If you have the necessary plumbing and electrical installation tools (we will talk about them in detail below), and you have the appropriate professional skills, then you will be able to make a welding transformer with your own hands.
You will, of course, have expenses, but they will be incomparably lower compared to the costs of purchasing a factory-made gadget. But how much pleasure you will get in the process of your favorite homemade work. And the delight at the moment of successful start of electric welding is, in general, incomparable!
In this article we will give you a lot of useful advice on choosing, calculating and manufacturing a welding transformer (hereinafter referred to as ST), which will help you optimize costs and save your budget.
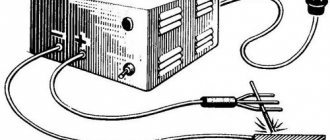
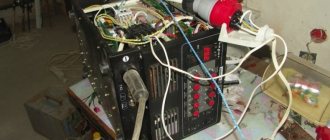
Appearance of a homemade welding transformer. East. https://autokuz.ru/kuzovnoy-remont/kak-sdelat-svarochnyj-apparat-svoimi-rukami.html.
The article will talk about two types of welding transformers. For welding:
- arc;
- contact
Assembly Features
Transformer
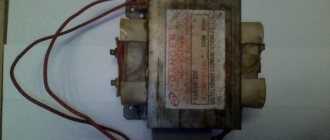
The topic of our article is spot welding from a transformer. We will use a transformer taken from an old microwave. It suits our purposes perfectly. When choosing a transformer, pay attention to its power. To manufacture a point device, you need a transformer with a power of 1 kW or more. A device built on the basis of this transformer will be able to weld metal up to 1 millimeter thick. If you need more power, you can use two transformers. But we'll talk about this later.
Take the transformer and disconnect the magnetic core with the primary winding from it. Often on such transformers the “primary” consists of several turns of thick wire. It is not necessary to remove these listed parts from the frame; it is enough to remove the secondary winding. This can be done using a hacksaw or chisel.
And if the “secondary” is glued, then you will have to use force and literally tear out the winding. Sometimes it is advisable to drill out the “secondary” if other methods do not help. Try not to damage the “primary” and the magnetic circuit itself when removing the secondary winding. If the transformer has shunts, then remove them along with the secondary.
Next you need to wind a new “secondary”. To do this, take a copper wire with a cross-section of 100 mm2 (or 1 cm in diameter). The wires are thick, but this is the cross section that is needed. In total you need to make about three turns. If you manage to make more turns, the device will be more powerful. But we still recommend increasing power using another method. We will talk about this further.
Power increase
As we wrote above, you can use not just one transformer for spot welding, but two. This is necessary in order to obtain more power, and therefore more welding current. Such a combination of two transformers will allow you to assemble a device capable of welding thick metals.
Of course, you can simply make more turns when winding the transformer, but often the core window does not allow this due to the thickness of the wire. In this case, it is better to connect the ends of the secondary windings of two transformers. The connection must be serial. This means that one wire must be pulled through both transformers. The number of turns must be the same.
Be sure to watch the direction of the turns. You should not have antiphase. If you need to make an even more powerful device, then you can connect more transformers. The connection is made using the same method as for two transformers. But take into account your electrical network and think in advance whether it can support such a device. Especially if you are going to cook at the dacha. The use of such powerful devices often leads to scandals with neighbors and broken traffic jams.
Control
The simplicity of a homemade spot welding machine is expressed not only in the internal design, but also in the controls. All you need is an on/off button and a homemade welding gun lever.
With a switch everything is simple. Choose the one you like best. Install it in the circuit with the primary. Do not install it on the secondary under any circumstances, because the current there is too high and the contacts at your button may melt.
With the lever everything is a little more complicated. You must remember that when spot welding, not only local heating of the metal is applied, but also clamping force. The thicker the metal being welded, the greater the force should be. If you weld thin-sheet workpieces, then your own silt will be enough to lower the lever and compress the metal between the electrodes. But if you are planning to assemble a more universal device, then it is better to attach it to a table and make the lever longer and heavier.
If desired, the lever can be modified by adding a screw tie to it. The tie must be installed between the base and the lever itself. Then you won't have to use your own force to compress.
If you have a lever with the simplest design, then the on/off button can be placed directly on it. You lower the lever and at the same time the current turns on. In this case, the second hand will be free, and you will be able to hold the workpiece.
Electrodes
Also, do not forget about the electrodes. Spot welding uses copper electrodes. The thicker the electrode, the better. You can buy electrodes or make them yourself on a machine. But buying is easier and faster. If you are assembling a small, low-power device, you can use a soldering iron tip as an electrode.
Electrodes are consumable materials. They need to be sharpened because they lose their shape. If the original shape is completely lost, the electrode must be discarded and a new one installed.
The electrodes are connected to the transformer using wires. Their length should be as minimal as possible. There should also be few connections, since each connection is always a loss of capacity. It is best if you put special copper tips on the wires, with the help of which the wire will be connected to the electrodes.
Copper lugs should not just be put on the wires, but soldered to them. This is necessary so that there is no resistance at the junction of the tip with the wire and the device can operate stably. In fact, this is a very difficult job and soldering the tip from the wires is quite difficult. But you can buy ready-made tinned tips designed for soldering. Then the task will be easier.
Some craftsmen do not solder the tips, but the electrodes themselves, to make their life easier. But in reality, they only complicate everything, since the electrodes need to be periodically replaced with new ones, which means they need to be soldered off. It's better to just solder the tips once and don't do any more extra work. Moreover, it is easy to clean the tip from traces of oxides.
Read also: Formula for spring stiffness coefficient over a period
Elements of a homemade device
Before making a resistance welding machine, you should first of all worry about a converter, the power of which should be sufficient for the electric pulse to weld the metal.
All these requirements are fully satisfied by the transformer devices included in most models of microwave ovens. To use them, simply remove the built-in secondary winding and replace it with a new one.
When disassembling an old device, you should act extremely carefully, trying not to damage the converter core. All additional elements on it (shunts, in particular) will also need to be removed.
In order to make a transformer for resistance welding (more precisely, its new secondary coil) you will need a thick copper busbar in reliable insulation.
Its thickness should be at least one centimeter, so to obtain the required low-voltage voltage (2 Volts) it will be enough to wind no more than three turns.
To independently assemble a device designed for high power, you will need to use two such transformers connected in series to the power circuit.
When using them, you should proceed from the capabilities of the existing household electrical network and not allow it to operate under significant overload.
The figure shows a circuit diagram for connecting such a complex transformer, consisting of two coils connected in series.
To manufacture a contact block, it will be possible to use the simplest design, which involves the use of standard-shaped welding electrodes.
It is recommended to use copper rods of suitable cross-section and shape as electrodes. Their thickness is selected so that it matches the power of the supply busbars.
In some cases, old soldering iron tips with a power of more than 100 watts can be used for these purposes. The general view of the contact block obtained from these spare parts can be seen in the photo.
Application nuances
Our homemade device has a very simple design and is unpretentious, but you still need to know some features in order for the device to work properly for many years.
First of all, the device must be turned on or off only when the electrodes are compressed. Otherwise, sparks may appear and the electrodes will simply burn. Also take care of forced cooling of the device. You can use a regular fan for this. If you do not take care of this in advance, you will have to constantly monitor the heating temperature of the device so that it does not overheat. Because of this, you will have to take frequent breaks.
The quality of the resulting weld points will depend not only on how correctly you assembled the machine, but also on how experienced a craftsman you are and how long you compress the workpiece between the electrodes. There are no clear recommendations here; you need to experiment with blanks of different thicknesses and check everything from your own experience.
The principle of operation of a spot welding machine from 220V
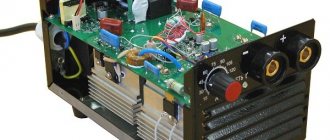
Look at the picture at the finished unit.
In order for the metal to melt, a very large amount of current must be applied to it. The degree of tension is not important here. 3 Volts or even less is enough. It is not advisable to carry out various experiments with indicators. Homemade welding machines made from a microwave oven transformer have long been tested. They have been tested numerous times and are therefore quite reliable.
The power of the transformer must be selected depending on the thickness of the workpieces. Eg:
- Up to one millimeter - power 1000 Volts.
- Two mm - 2000 volts.
- Three mm - 5000 Volts.
The primary winding must be selected based on the power of the device. Making a transformer yourself is very problematic, so it is advisable to use a ready-made one that fits in a microwave. This unit has its own characteristics:
- The radiating element will require a high voltage - several thousand volts. But the current level will not matter;
- The power on the windings will be the same. If a person wants to increase the number of turns on the secondary winding, then the voltage will increase, but the current will decrease;
- the transforming elements located in the microwave oven have a power of 3000 Volts or slightly less. To perform spot welding, this is quite enough.
The necessary components can be purchased at radio stores. They also use the insides of an old microwave oven. The result is a current power of 1 kA. This value is enough to melt the metal at the contact points. The result is a good connection between several parts. For this purpose, a 3 kW transformer is used.
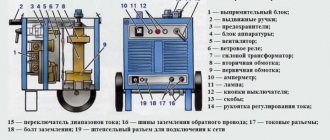
Operating principle of resistance welding machines for spot and seam joints
Spot welding involves clamping the parts to be joined between two copper electrodes. The degree of this clamping must be significant. For this purpose, in the factory, the devices are connected to high-pressure compressors. The electricity supplied to the electrodes through special transformers is characterized by a fairly low voltage, but a high current strength. In the current flow zone, the metal of the parts being connected is melted. In this way, a monolithic point connection is formed.
Devices equipped with a rotation drive produce long suture joints. Instead of point pressure conductive elements, roller electrodes are used here. But the basic principle of operation remains the same. The parts are tightly clamped between two rotating rollers. The seam is formed by melting the pressure points with uniform linear movement of the parts being welded.
The main elements of resistance welding machines are:
- Copper electrodes for spot welding and rollers for seam joints.
- Compression devices or rotation drives.
- Transformers.
- Regulators of the operating current of the secondary winding of the transformer.
- Primary circuit breakers.
- Pneumatic and hydraulic pumping devices or levers for manual pressing.
Copper electrodes can have a relief surface that follows the complex shape of the parts being welded. Some devices are designed for welding elements along their end edges.
How to assemble a transformer - 6 nuances
A magnetron is installed in any microwave oven. He needs significant tension. The transformer has fewer turns in the primary winding, and much more in the secondary. It is on this that the voltage will be 2000 volts. If there is a doubler, the value will increase several times. It is this property that needs to be used.
The transformer must be removed very carefully. To avoid damaging anything, it is not advisable to use various rough tools. First you need to get rid of the body and also remove all fasteners. The transformer is removed from the fixation point. From this device, a magnetic core will be used, as well as a primary winding that has a powerful wire and a small number of turns.
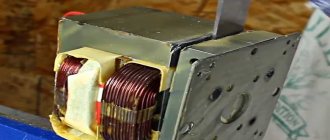
Secondary winding
Look at the picture of the secondary winding. There is no need to use it when assembling the weld, so it is advisable to get rid of it. A chisel and hammer are used for this purpose. It is important to carry out all work very carefully so that the required winding does not deteriorate. During work, a person may find a shunt device used in various microwave ovens. You also need to get rid of them.
Magnetic core for welding
Look at the picture of the magnetic circuit attached by welding. If there is a microwire in the microwave oven that is not glued, but welded, then you will have to remove this part using a hacksaw or chisel. The winding will sit firmly in the magnetic circuit, so you need to put in a lot of effort. In this option, you will have to use more crude methods to remove the structure using any available means. But it is worth considering that the operation is carried out very carefully.
After carrying out all the operations described above, we come to the creation of a secondary winding - a solid wire is used, with a diameter of 100 mm square or a little more. This corresponds to one centimeter. A bundle of wires is also used to provide the required diameter.
The winding is created - the transformer will be able to create a current equal to 1 kA. This is exactly what is needed for spot welding.
Read also: Etizhi pliers what is it
If there is a need to make the device more powerful, then a single transformer will not be enough. For this purpose, it is necessary to combine several elements from different microwave ovens. It will take two or three turns.
If the insulation is very thick, it will need to be removed and replaced with a thinner one - preferably fabric. If several transformers are used, then the secondary winding is made according to a common connection diagram. But then you will need to connect the outputs correctly.
Making your own resistance welding from a microwave
Many craftsmen wonder how to make a welding machine from a microwave. In fact, the most difficult part of this process is disassembling and preparing the transformer.
Options for a homemade spot welding machine from a microwave:
What tools are needed for the job?
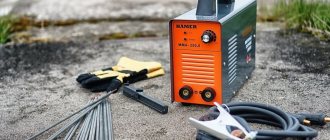
For work we will need the following tools and components:
- The transformer that we remove from the microwave. Depending on the power of the tool, you can use two or three.
- Thick copper wire.
- Electrodes (copper or coated with a copper alloy) that we will use in the future instead of clamps.
- Lever for manual clamping.
- Base for welding machine.
- Cables and winding materials.
- A set of screwdrivers and a grinder for opening the transformer.
Important! Electrolytic copper and its mixtures labeled EV are suitable for household use.
How to prepare the power part of the installation - transformer - for operation
The transformer is the heart of the device. The easiest way to get it is to remove it from an old, but still working, microwave. The minimum output power of the device must be 1 kW. This power will be sufficient to contact weld sheets up to 1 mm.
If you need to create a device of greater power, then several transformers will have to be connected into one circuit. We will show you how to do this later.
For us, it is not the transformer itself that is valuable, but its magnetic circuit and primary winding. The secondary winding must be carefully removed.
Removing from the microwave and creating a resistance welding transformer
In order to remake it to our needs, we need to use a grinder to carefully open the housing along the weld seam and get to the magnetic circuit.
This is what the transformer looks like just taken out of the microwave.
Next, we begin the procedure for winding the secondary winding. Most often, stranded wire with a cross-section of at least 100 mm2 is used for these purposes. It is enough to make 2-3 turns, since the voltage in this type of welding is not high. It is important that the insulation of this wire is heat resistant.
Manipulations must be carried out carefully so as not to bend or scratch the primary winding.
Combining transformers to obtain a device of greater power
However, there are times when the power of one transformer is not enough and several devices have to be connected in series. In this case, the wire is wound in turn through each coil, and the number of turns on each of them must be the same, otherwise you risk getting zero voltage due to antiphase.
Important! The more powerful the transformer, the stronger the voltage surge in the electrical network may be when the device is tested.
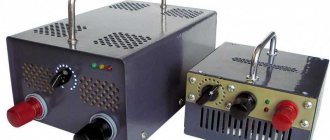
Transformer rewound and ready for use for spot welding.
Determining the correctness of the terminals connected in series
For ease of use, identical wire terminals are usually marked. But if this is not the case, then they can be determined by connecting the primary windings of two transformers in series. Next, we check the voltage with a voltmeter.
If pairs of windings are mistakenly connected to each other, the voltmeter will show a zero value.
If the voltmeter shows readings equal in value but opposite in sign, then it is necessary to change the sequence of connecting the secondary windings of the transformer. When the transformers are correctly assembled into a circuit, the device gives twice the voltage reading obtained from the two secondary windings.
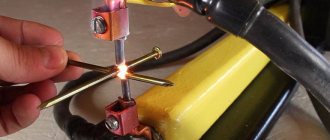
How and from what to make electrodes for contact welding
Electrodes for spot welding have different shapes and configurations. The smaller the workpiece, the sharper the electrode tip.
Electrodes are most often made of copper and its alloys. In some cases, it is possible to use copper-plated metal.
The shape of the electrodes can be straight, curved, flat or sharp. But most often in practice, electrodes with cone-shaped tips are used. To prevent the device from oxidizing, the electrodes are connected to the working wires by soldering. However, they can still wear out during work, so they need to be sharpened (by analogy with a pencil).
The electrode performs several functions at once:
- Presses the workpieces.
- Conducts a current discharge.
- Removes excess heat.
For the correct manufacture of electrodes, we turn to GOST (14111-90), which already specifies all possible diameters of these elements (10, 13, 16, 20, 25, 32, 40 mm). These are acceptable and working indicators, and it is not recommended to deviate from them.
Important! The diameter of the electrode must be greater than or equal to the diameter of the working wire.
What does the resistance spot welding control circuit consist of and how does it work?
In a welding machine, a very important parameter is the exposure time to the metal. To adjust this indicator, the following elements are used:
- Electrolytic capacitors C1-C6, with a charge voltage of at least 50 volts. The capacitance of the capacitors is: for C1 and C2 - 47 μF, C3 and C4 - 100 μF, C5 and C6 - 470 μF.
- P2K switches with independent fixation.
- Buttons (in the diagram KH1) and resistors (R1 and R2). The contacts of the KN1 button should be: one – normally closed, the other – normally open.
To install the switch, you should select the primary winding, or more precisely, its circuit. The fact is that the secondary winding circuit has too much current, which can cause additional resistance and welding of contacts.
The electrical circuit diagram of resistance spot welding shows the main parts of the device: the power part, the control circuit and the circuit breaker, which turns on the power and provides protection in emergency situations.
It is also necessary to create sufficient compression force, which is provided by the lever. The longer the handle, the greater the pressure between the electrodes. Do not forget that it is necessary to turn on the equipment with the contacts brought together, otherwise sparking and burning will occur.
Advice! The clamping lever can be equipped with a durable rubber ring. It will lighten the load force, and the elastic band will fix it.
Make sure that the microwave resistance welding equipment is securely fixed to the table, as force may cause it to fall and fail. For a homemade welding machine made with your own hands from a microwave oven, it is necessary to provide a cooling system. A PC fan can be used for these purposes.
Related article:
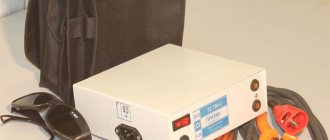
Do-it-yourself spotter from a microwave, an inverter welding machine and a battery: detailed step-by-step instructions with photos are in our publication.
How to test a DIY microwave welder
The device is also checked with a voltmeter, as well as by visual inspection of the quality of the wire connections and the integrity of the structure. After this you can do a test run. It is done twice: the first time at minimum power, and the second at maximum.
In addition, it is necessary to study the quality of the weld. There are several indicators that indicate problems with the resistance welding device, or violation of the rules for working with it:
- Lack of penetration. Occurs due to insufficient heating of the welding site. This reduces the strength of the product. Lack of penetration occurs due to a drop in voltage in the network, too little force during the cooking process, as well as poor cleaning of the surfaces of the parts being welded.
- Melting. Burnout of parts occurs due to an incorrectly selected electrode shape, their displacement, as well as misalignment of parts during their installation, and the presence of small debris in the welding zone.
- Cracks. They arise due to too rapid cooling of the welding core, as well as incorrectly selected electrode diameters.
To consolidate the information received, we suggest watching a video on how to assemble a spot welding machine with your own hands from a microwave:
It’s also important to know: 2 nuances about creating a homemade device from two microwave transformers
Look at the picture for a diagram of connecting several devices. If you use several transformers from microwave ovens, then the power of the device will increase. The voltage will increase by 2 times, and the same proportions will apply to the increase in welding current. But with this assembly method, certain losses may also be observed, since the circuit resistance will also increase greatly. The ends of the created winding will need to be connected to the electrodes.
If there are two transformers available, but their voltage is not enough to create a high-quality welding machine, then a series connection of their output windings is used. You should make sure that each element has the same number of turns. This must be done in those cases when it is not possible to wind the required number of turns on the magnetic circuit. When assembling such a device at home, you also need to monitor the direction of the turns.
DIY spot welding from a microwave transformer
How to avoid 4 mistakes when creating electrodes
Look at the picture for the electrodes used on the homemade device. When assembling welding, you need to make the right electrodes. Their diameter must match the wires that are attached to the weld. Copper rods are usually used. But if the power of the equipment is very high, then it is advisable to use a tip from a professional soldering iron.
To connect devices with electrodes, very strong wires are used. If you ignore this rule, then power loss cannot be avoided. Power can also be lost if a large number of different connections are used.
To increase the efficiency of the collecting apparatus, copper tips are used. Then it is possible to avoid power loss in contact areas.
To ensure that soldering occurs without problems, it is advisable to use tinned tips. Since the electrodes are removable, soldering should not be used in the places where they are fixed to the tip. Oxidation forms in these places - the power will decrease. Removable electrodes ensure easy cleaning. It is very comfortable.
The tips will be fixed with the electrodes on the bolts. It is important to ensure that the connection is more reliable. If you do not take care of this, then an increased transition resistance will occur, and therefore the power of the spotter will drop. It is advisable to create a hole of the same diameter for two parts. It is advisable to select the connected elements from copper. The choice of material is not unreasonable - it has low electrical resistance.
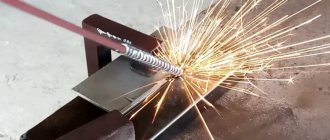
How to make your own resistance welding pliers
Manufacturing and selecting pliers for spot welding is the last stage of work on the welding machine. Their choice depends on the nature of the work, the drive system, and the planned size of the parts to be welded.
Sometimes pliers are made from pieces of copper pipes, simply held together with screws.
For the manufacture of clamp electrodes, copper rods or beryllium bronze are used. Some craftsmen use tips from powerful soldering irons as electrodes. One way or another, the diameter of the electrodes should not be less than that of the wires supplying the current. And the pliers themselves must be carefully welded and insulated.
Spot welding machine from a welder
The main difficulty in making a spot welding machine with your own hands is assembling the power source. It must produce short pulses of low voltage and high current, exceeding 1000A. The pulse duration is controlled by a thyristor circuit or manually by a conventional switch on the primary winding. For low-alloy steels, a longer pulse is required; stainless steel is welded with short pulses so that the upper part does not have time to warm up and oxidize, which significantly reduces the anti-corrosion properties.
In the second case, welding with such a machine requires a certain skill - it is very difficult to guess the required pulse duration the first time, especially on different metals. But by trial and error, using scraps of sheet steel or non-ferrous alloys, it is quite possible to achieve welding quality no worse than on industrial machines.
Spot welding, assembled with your own hands from an old welding machine, works quite effectively and is quite capable of solving a number of problems with joining sheet metal with a thickness from a few tenths to 2-3 mm. For thicker sheets, it is difficult to create the required force using homemade pliers or a lever device.
Why is an old transformer chosen? A do-it-yourself spot welding machine involves its complete re-equipment, which, however, only concerns the secondary winding. After the alteration, ordinary MMA welding with such a device becomes impossible, so an old, but still working device is selected; at least the primary winding should be, if not in ideal, then in acceptable condition.
The secondary winding is completely removed and another one is installed in its place, made from an insulated copper strand or busbar. The wire must be insulated very carefully, in several layers of non-flammable insulation. Fabric insulating tape is convenient for these purposes, which alternates with wrapping with ordinary automotive tape, which is used when painting the body.
The cross-section of the secondary winding wire must be at least 1.8 cm 2. If you can find a suitable factory-made insulated cable, it is better to use it. Both cables with a monolithic core and multi-core cables made from copper wires twisted into a bundle give good results. Several turns of cable or bus are applied to the secondary winding in such a way that when 220V is supplied to the primary circuit, a current of 6-8 V appears in the secondary. In this case, the current strength will reach 800-1000 A. This is quite enough for welding individual parts in a home workshop.
Inverter based
Resistance welding from an inverter is one of the alternative options for using an electronic device at home, the choice of which is determined by the special properties of the manufactured industrial samples of this equipment.
The operating principle of a contact point device based on an inverter is based on the same pulsed heating of the metal in the contact zone, followed by its melting and cooling. That is why its assembly in this case is completely identical to the manufacture of a microwave-based welding machine.
If you don’t have an old microwave device on your household, you can use any transformer suitable for these purposes with a power of at least 1 kilowatt.
The only difference between this option and the previously discussed one is the possibility of using non-rectified pulse current in the inverter circuit.
To securely fix the parts to be welded and prevent them from moving apart and forming a gap, the inverter device uses a special compression mechanism.
How to choose electrodes
For resistance spot welding, it is best to use industrial electrodes made in accordance with GOST 14111-69. These can be purchased on Internet sites or in welding equipment stores. When used on homemade equipment, they will last almost forever. But they are quite expensive, especially with press-fit tips made of tungsten or other refractory material.
In most cases, craftsmen make electrodes themselves. Depending on the welding power, copper rods with a diameter of 5 to 15 mm are suitable. On one side, they are inserted into a metal sleeve with clamping bolts, fixed to the cable from the transformer. Like the cable, the electrodes are firmly clamped with bolts.
The second option for attaching the electrode is soldering. This is also a fairly reliable and effective method, ensuring reliable electrical contact, but changing the electrode in this case is more difficult. This does not affect work productivity too much - the electrodes wear out very slowly, especially during amateur welding.
Reliable contact is much more important. If the connection is loose, the wire and electrode will oxidize and overheat, and the current will be less than required. It is also necessary to make all connecting cables as short as possible - the diameter of the electrode and cable must be the same, otherwise there may be surprises in the form of burning insulation or burning of the rods.
It would be useful to recall that the same copper wires are chosen for copper electrodes. Aluminum/copper combinations are unreliable and result in unreliable welding.
The working ends of the electrodes can be pointed (conical), oval or flat. In homemade household devices, it is most convenient to use flat bottom and conical top electrodes. This combination will provide both a high current density at the welding point and reliable support for pressing the parts.
Features of making your own spot welding for lithium batteries
Everyone knows that lithium batteries are very susceptible to overheating and a resistance spot welding device will help you weld the necessary thin elements to them without any problems. The design feature is that the welding machine is controlled automatically. Let's look at how a device for resistance welding of batteries works with your own hands.
| Illustration | Description of action |
| The device consists of a powerful transformer and a control system. | |
| To automatically turn the pulse on and off, an Arduino controller is used, which controls the triac. In addition, our circuit contains: a power supply for the controller and an input filter. | |
| The required time interval for the pulse is preset, each division is 10 milliseconds. We'll choose 30 milliseconds. | |
| Let's prepare a nickel-cadmium battery for work. | |
| We take the plate and place it under the electrodes. | |
| We press the button and welding occurs. | |
| As a result, we managed to weld “ears” onto the element. |
Battery spot welding
There is information on the Internet about how to do spot welding with your own hands using a regular 12 V car battery. You can use it to connect small parts that are usually connected by soldering. But in many cases, welding gives better results in terms of strength and is more convenient for joining dissimilar metals.
Do-it-yourself spot welding from a battery is a simple design and can be done in the garage within a few hours, if you have all the parts and tools, of course. Its installation does not require any special devices or complex equipment.
There are three types of battery welding. The first, the simplest, one might say primitive, requires only a battery and two copper wires, the bare ends of which act as electrodes. As a rule, this method is used most often, but only for welding non-ferrous metals. It is precisely this that can rightfully be called a point one.
The other two methods - with carbon electrodes and using an inverter - require a battery of several batteries and additional equipment. They are also used in household and camping conditions, but buying several batteries of the same type to make a welding machine out of them is quite expensive. Any battery that can be removed from the car can be suitable for spot welding.
A simple device for performing welding work consists of two copper wires with a cross-section of at least 1.5 mm 2, fixed in a terminal block. The distance between the stripped ends of the electrodes is 2-3 mm. Of course, as with any homemade design, there can be many options, but as a base it is best to use this type of design. How this mini installation works is shown in the video:
Battery welding is intended for joining small parts made of thin sheet metal, but even then the battery discharges quite intensively. If you removed it from the car, it is advisable to have a charger in the garage to return the batteries to their previous charge.
The examples given are the simplest homemade designs of spot welding machines. If you have your own developments, write to us on the website. We and our readers are very interested in the real developments of amateur designers. We will certainly publish the most interesting schemes.
Types of resistance welding
Spot welding is one of the most popular types of resistance welding at home. However, there are two more types of welding in this category, which are used most often in factories and in specialized metalworking shops.
- Seam resistance welding.The operating principle of seam resistance welding is no different from spot welding. The tongs we are used to are replaced by special copper rollers. In this case, welding occurs spotwise, but at a certain distance, and the welding seam resembles a path of individual welded sections.
Seam resistance welding is used for welding seams, both on circles and on elongated large sheets. - Butt contact welding. This type of welding is characterized by a larger area of simultaneous welding. An alternating pulse electric current is supplied to the welded products in contact at the joints. Thus, during the application of a pulse, heating occurs over the entire contact area, also called the cross-sectional area. This process is completely mechanized, so it is not suitable for self-assembly at home.
Diagram of a resistance butt welding machine - Capacitor welding. Capacitor welding works on the same principle. It is used in those areas of industry where miniature parts with a thickness of 0.5 to 1.5 mm are fused. This type of welding is used in the field of electronics and instrument making. The advantage is that it leaves virtually no marks and does not burn through the metal.
Homemade capacitor welding machine