Anyone familiar with the rules of electrical installation can easily make a simple welding machine on their own. But before getting down to business, it is necessary to calculate all the components of the device. The efficiency of the device when operating from a regular household single-phase network will depend on this.
Therefore, the main task in the design and assembly of welding machines is to provide the required current while reducing power consumption. This is only possible when performing welding work with reduced voltage on the electrodes.
The simplest welding machine has the following design:
- A step-down transformer that reduces the voltage to the limits of 55 - 70 V and at the same time increases the current strength to the required parameters. Thanks to this, it is possible to reduce energy consumption to reasonable limits.
- Current is supplied from the transformer to the electrode and the workpiece using special welding cables. They are distinguished by a larger cross-section and reinforced insulation, allowing them to work with high currents.
- For welding, you will need electrodes installed in the holder. Thanks to the coating used, they simplify the ignition and maintenance of the electric arc, which becomes the source of thermal energy necessary for melting the metal.
There are no complex devices in the design of such welding machines. But during design, it is necessary to calculate the basic parameters, otherwise connecting inappropriate equipment to the network will lead to its failure, short circuits on the line, or it will simply be impossible for them to cook.
Expert opinion
It-Technology, Electrical power and electronics specialist
Ask questions to the “Specialist for modernization of energy generation systems”
Capacitor welding: do-it-yourself diagram and description, contact welding for batteries, spot welding - Contact welding on There is information on the Internet about how to do spot welding with your own hands using a regular 12 V car battery. Ask, I’m in touch!
Types of Welding Machines
The modern market is filled with a fairly wide variety of welding machines, but not everything is advisable to assemble with your own hands.
Depending on the operating parameters of the devices, the following types of devices are distinguished:
- on alternating current - delivering alternating voltage from the power transformer directly to the welding electrodes;
- on direct current - producing constant voltage at the output of the welding transformer;
- three-phase – connected to a three-phase network;
- inverter devices - delivering pulsed current to the work area.
The first version of the welding unit is the simplest; for the second, you will need to modify the classic transformer device with a rectifier unit and a smoothing filter. Three-phase welding machines are used in industry, so we will not consider the manufacture of such devices for domestic needs. An inverter or pulse transformer is a rather complex device, so to assemble a homemade inverter you must be able to read schematics and have basic skills in assembling electronic boards. Since the basis for creating welding equipment is a step-down transformer, we will consider the manufacturing order from the simplest to the more complex.
AC
Classic welding machines operate on this principle: the voltage from the primary winding of 220 V is reduced to 50 - 60 V on the secondary winding and is supplied to the welding electrode with the workpiece.
Before you start making, select all the necessary elements:
- Magnetic core - stacked cores with a sheet thickness of 0.35 - 0.5 mm are considered more profitable, since they provide the least losses in the iron of the welding machine. It is better to use a ready-made core made of transformer steel, since the tightness of the plates plays a fundamental role in the operation of the magnetic circuit.
- Wire for winding coils - the cross-section of the wires is selected depending on the magnitude of the currents flowing in them.
- Insulating materials - the main requirement for both sheet dielectrics and the native coating of wires is resistance to high temperatures. Otherwise, the insulation of the semi-automatic welding machine or transformer will melt and a short circuit will occur, which will lead to breakdown of the device.
The most profitable option is to assemble the unit from a factory transformer, in which both the magnetic core and the primary winding are suitable for you. But, if a suitable device is not at hand, you will have to make it yourself. You can familiarize yourself with the manufacturing principle, determination of the cross-section and other parameters of a homemade transformer in the corresponding article: https://www.asutpp.ru/transformator-svoimi-rukami.html.
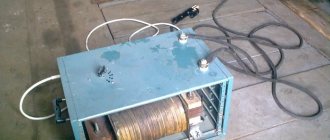
In this example, we will consider the option of making a welding machine from a microwave power supply. It should be noted that transformer welding must have sufficient power; for our purposes, a welding machine with at least 4 - 5 kW is suitable. And since one transformer for a microwave oven has only 1 - 1.2 kW, we will use two transformers to create the device.
To do this you will need to perform the following sequence of actions:
- Take two transformers and check the integrity of the windings powered from a 220V electrical network.
- Saw the magnetic core and remove the high-voltage winding,
Rice. 1: saw the core
Rice.
2: remove the high-voltage winding, leaving only the low-voltage winding, in this case there is no need to wind the primary coil, since you are using the factory one.
- Remove current shunts from the coil circuit on each transformer, this will increase the power of each winding.
Rice. 3: Remove current shunts - For the secondary coil, take a copper busbar with a cross-section of 10mm 2 and wind it on a pre-made frame from any available materials. The main thing is that the shape of the frame follows the dimensions of the core.
Rice. 4: Wind the secondary winding onto the frame - Make a dielectric gasket for the primary winding; any non-flammable material will do. Its length should be enough for both halves after connecting the magnetic circuit.
Rice. 5: Make a dielectric pad - Place the power coil in the magnetic circuit. To fix both halves of the core, you can use glue or tighten them together with any dielectric material.
Rice. 6: Place the coil in the magnetic circuit - Connect the primary terminals to the power cord, and the secondary terminals to the welding cables.
Rice. 7: Connect the power cord and cables
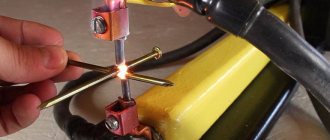
Install a holder and an electrode with a diameter of 4 - 5 mm on the cable. The diameter of the electrodes is selected depending on the strength of the electric current in the secondary winding of the welding machine; in our example, it is 140 - 200A. With other operating parameters, the characteristics of the electrodes change accordingly.
Welding technique
The DIY welding process requires preliminary setup of the machine. To do this, the welder needs to perform a number of actions:
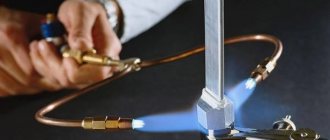
- When using non-consumable tungsten electrodes, they must be prepared in advance. The working rod must be sharpened using a needle file.
- After sharpening the electrode, it must be installed on the burner. A collet clamp is used for this.
- Open the valve on the argon cylinder. Using the reducer, set the operating gas flow rate. The optimal rate is 13 l/min.
- Fix the mass on the workpiece or metal work table.
- Turn on the oscillator. Bring the burner to the metal surface.
- After pressing the power button, a spark will appear. Open the gas supply to the burner.
The distance between the end of the electrode and the working surface must be at least 3 mm. You can guide the pointed part in different ways. If you increase the distance between the tungsten tip and the metal, the seam will become wide and the welding depth will decrease. When connecting thin workpieces, you need to move the torch from right to left. To make a root seam, you need to guide the electrode evenly. Corner joints are connected at an angle of 45 degrees.
TIG welding is used to join metals and metal-based alloys. The shielding gas used during the work prevents an oxide film from appearing. It is important to set up the equipment correctly, sharpen the non-consumable electrode before work, and keep the arc at the same distance from the workpiece.
Where is resistance spot welding used?
The technology involves connecting workpieces or welding individual parts to metal structures without creating an electric arc.
The method is applied under the following conditions:
- At manufacturing plants. Spot welding is used in the manufacture and repair of cars, aircraft, and complex technical equipment. The method helps to create strong, durable connections that have no signs of deformation or other defects.
- At home. A self-made machine is suitable for performing simple welding operations. It will help you weld elements of a fence or pipeline, or repair a car or motorcycle.
Roller welding
Disadvantages of roller welding
Rationality in application
It is most rational to use cold metal welding in the mass production of identical parts and in electrical engineering, where it can be used to connect copper parts with aluminum ones, ensuring reliable electrical contact in detachable joints.
Argon, nitrogen, hydrogen, helium and carbon dioxide can be used to weld metals in shielding gases. Welding non-ferrous metals is very different from welding steel. You can read more in this article.
Learning to cook is not difficult at all. You will find interesting literature at https://elsvarkin.ru/prakticheskoe-primenenie/literatura-po-svarke/ link.
DIY welding machine: calculation and assembly sequence
The technology received its rapid development primarily in crucible welding - now connecting two parts of a railway rail is not difficult.
Expert opinion
It-Technology, Electrical power and electronics specialist
Ask questions to the “Specialist for modernization of energy generation systems”
Power sources for pulsed-arc welding with a consumable electrode. The choke in such designs is made in the form of a separate remote inductor, which is connected as needed. Ask, I'm in touch!
Device design and necessary parts
Any contact type welding unit consists of 2 units:
- power supply (transformer);
- clamping pliers.
The correct ratio of windings allows you to generate a current that is strong enough to melt the metal. The design of the pliers includes graphite or copper contacts installed on different levers that fix the mechanism.
The following types of clamps exist:
- Mechanical. Includes a powerful spring and lever. The welder's muscle force is used to compress metals. Clamps of this type are installed in household devices used for simple operations.
- Pneumatic. Installed in portable hand-held devices. Adjustable by changing the pressure in the air channel. The disadvantage is considered to be low productivity and the inability to adjust operating parameters during welding.
- Hydraulic. The clamps also have a low operating speed, but their range of settings is wider than the previous type.
- Electromagnetic. They are distinguished by the highest productivity and are installed in both manual and stationary units. Electromagnetic clamps allow you to adjust the compression force of parts during welding. This reduces the likelihood of lack of fusion and metal leaks.
Sometimes the design is complicated by adding liquid cooling systems, control of current parameters, and automatic movement of electrodes.
When assembling a homemade spot welding machine, the master will need the following parts and materials:
- a modified transformer from an old microwave oven or car battery;
- thick copper wire or cable harness of small cross-section;
- levers used to assemble clamps;
- base for installing unit blocks;
- clamps;
- wires;
- insulating materials;
- copper electrodes necessary for welding;
- control key.
How to use cold dry welding for metal: principle of operation and method of application
We offer instructions that contain standard steps. Please note that depending on the individual characteristics of the product being glued, additional factors may arise. Classic stages:
- Identifying the object and then the exact location of the damage. If a water pipe leaks due to wear and tear, as well as when the car body rusts, several spots may appear. You need to detect them immediately, otherwise it will take two to three times longer, since the procedure can be repeated only after complete drying.
- If there is liquid or other contents in the container, it must be disposed of. Wires – de-energize.
- Cleaning the surface to be treated, removing dirt, and then degreasing.
- If you purchased a product that comes in two different flasks, squeeze out a small amount of paste from both and then mix them until smooth. When packaging in a flask with two connecting vessels, this point can be skipped.
- If you have two different parts, place the mixture on the joint, and then quickly and firmly press the two parts.
- In the case of a small hole, take and knead a small piece with your fingers, and then apply it to the outside.
- To apply a metal patch, you need to do the same as in the fifth stage, and then attach the plate on top.
The technical characteristics of any cold welding for metal are written on the packaging. It's worth looking at the drying time there, as it varies among manufacturers. But we recommend waiting an hour. During this time, all processes will take place. After this, you can begin sanding and finishing, especially if decorative work is required, such as painting.
General operating principles
The algorithm for assembling the welding unit includes the following steps:
- Removing the transformer. The part is taken from an old microwave oven. It is not completely needed; to manufacture the device, a primary winding and a magnetic circuit will be required. The remaining parts are carefully removed as unnecessary.
- Formation of a new secondary winding. To do this, use a copper cable with a cross-section of at least 100 mm². Durable rubber insulation is replaced with textile insulation. To create a powerful welding machine, 2 transformers with a common winding are used.
- Installation of a control unit that ensures uninterrupted flow of the contact welding process.
- Manufacturing and connection of electrodes, the type and diameter of which are selected taking into account the properties of the metals being welded.
- Housing assembly. The main units of the device must be reliably protected from external influences. At this stage, you can use the housing from an old microwave oven or assemble the structure yourself from sheets of metal.
Tips and tricks
- buy the product in strict accordance with the intended use, that is, for its intended purpose;
- check on the packaging what temperatures the seam can withstand;
- for emergency repairs, you can first use instantly drying, but less stable adhesives, and then, on top, more durable ones;
- If you need to remove the hardened composition, use a solvent or acetone.
In the article, we described universal instructions on how to properly use, work with cold dry welding and use it for metal, and paid attention to strength and scope of application.
How to make electrodes
When manufacturing these elements, the following points are taken into account:
- The diameter of the electrode must correspond to the cross-section of the wire to which it is connected. Copper rods can be used as rods. Electrodes for low-power welding units are made from soldering iron tips.
- During the welding process, the electrodes wear out quickly. To restore their operating parameters, the ends are sharpened. Over time, the electrodes are replaced with new ones.
- The wire for connecting the welding rod should be short. Otherwise, part of the device's power will be lost. The current strength also decreases if there are a large number of connections in the electrode-transformer circuit.
- It is recommended to solder copper tips onto the wires to which the rods are connected. This increases the efficiency of the equipment. Since the electrodes are removable, the connection points with the tips are not soldered.
Advantages of epoxy resin adhesive
- Sufficient adhesive strength.
- Visually consistent with a neat weld seam.
- Affordability, much less expensive than the device.
- No need for electricity or massive equipment.
- You don't need to have a lot of special skills or education, just a little practice.
- Great for household repairs and small temporary problems such as leaking pipes.
- Can be used for parts with holes and for solid surfaces.
- Even if the element being glued is subject to small forces, internal or external pressure, the work can still be carried out.
- Does not require preliminary dismantling of the system element. If you plan to weld parts of the water supply, the pipes do not have to be removed; they can be patched on site.
- Since the product will not heat up during the process, it will not be deformed, and nearby parts of the system will not be damaged in any way.
Assembling a device from a microwave oven
The device manufactured in this way allows welding with alternating current with unregulated force.
List of required tools
To create a homemade device from a microwave oven, you will need the following equipment:
- Screwdriver Set;
- sandpaper;
- copper rods;
- hammer;
- chisel;
- knife.
Conversion of microwave parts
After removing the transformer from the furnace, perform the following steps:
- Remove the secondary winding using a hacksaw or chisel. Dismantling is carried out carefully, trying not to damage the underlying layer. It is advisable to fill the space between the windings with corrugated cardboard.
- Remove the metal shunts that limit the current.
- A secondary winding is formed. At this stage, you will need a KG 1x35 wire. It can withstand prolonged exposure to high voltage and current up to 1200 A. The outer rubber insulation is removed from the cable.
- The core is covered with tape, which facilitates the sliding of the wire during winding. The cable is laid in 3 tight turns. For winding, the use of stranded soft wire is allowed. The total diameter of the cores must be at least 1 cm.
After the alteration, the transformer must have an open circuit voltage of no more than 3V and a current of at least 800 A.
Homemade device diagram
Creating an electrical circuit for a welding machine is not difficult. The electrode is connected with a soft cable to the secondary winding of the transformer. The circuit includes thyristors and rectifier bridges. One end of the pressure gun is connected to the secondary winding, the other is securely fixed to the device.
Other types of glue
Let's talk in more detail about special products designed for gluing other materials.
For different plastics
Most often it has a household purpose; it is excellent for repairing basins and buckets, cracks in plastic windows, balcony and interior doors, as well as interior cladding parts and outdoor furniture.
For linoleum
It is also suitable for rubber. It is very popular in construction and renovation because it solves the issue of laying flooring. This material is more durable than standard double-sided adhesive tape.
Contactor from a welding transformer
Such equipment can be turned into a full-fledged resistance welding tool. The only drawback is the inability to control the current strength.
Drawing development
The correct choice of circuit helps to produce a working welding machine. Preference is given to simple drawings that include a minimum number of parts and blocks. Such options do not allow you to create an overly powerful device, but the device is sufficient to perform minor repairs on a car, garden equipment, and fences.
List of parts and consumables
To convert a welding transformer into resistance welding equipment, you will need the following elements and materials:
- a transformer that converts electrical energy;
- thick cable;
- copper electrodes;
- bolts;
- tips;
- breaker;
- wooden blocks, plywood to create the body.
The process of creating a device
The homemade device is assembled as follows:
- The welding transformer is installed in a housing made of metal sheets. The electrical board is assembled on a textolite sheet more than 1 cm thick. The part is fixed in the body of the welding machine.
- A welding wire is bolted to the busbar and secondary winding. The remaining end of the cable is connected to the electrode.
- The power wire is connected to the contact block located on the electrical board.
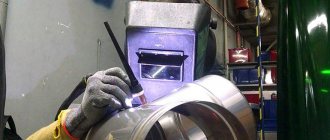
Spot Welding Operation
A master using a contact transformer apparatus must stand on a rubber mat and use protective gloves and goggles. The grounding cable is connected to the part to which another workpiece will be welded. After this, press the power key, compare the elements to be connected, and clamp with the electrode of the welding gun.
5 seconds after the start of the impact, the rod is transferred to the next point.
High temperature adhesive composition
This type of connection can withstand extremely high temperatures (above 1000 degrees Celsius). This type of glue is used to repair or join parts that are exposed to high temperatures. It is very often used to repair exhaust manifolds, exhaust pipes and other parts of the car. The high-temperature composition has many advantages:
- Easy to use.
- The seams are not destroyed by corrosion. They are also not affected by various aggressive substances.
- Sets quickly.
- Can be used in moving mechanisms.
- Environmentally friendly
Adhesive for plastic
Adhesive for plastic
Glue for fastening plastic products is used quite often. It is used to repair plastic products, such as plumbing pipes, or housings made of plastic.
DIY resistance welding pliers
To make such a device yourself, follow these steps:
- Form the basis. For this purpose, available materials are used - steel sheets up to 5 mm thick. Strips 2 cm wide are cut from them. The length depends on the design of the welding tongs. The strips can be replaced with metal rods. The ends of the two blanks are bent in the form of tongs.
- Place the parts on top of each other and join them together. A hole is drilled in the central part where the adjusting screw will be located. A dielectric layer is placed between the plates.
- A hole is drilled at one end of the rod or strip to secure the copper cable. The same actions are performed for the second workpiece. The holes should be opposite each other.
- The metal elements of the pliers are covered with a rubber pad and electrical tape. The materials will protect the welder from electric shock during work.
- Install the spring between the handles of the pliers. The part is necessary for fixing the elements to be welded.
Composition and properties
To understand what you have to work with, you need to know the characteristics and composition of cold welding. Compound:
- Epoxy resin is the main element of the adhesive mass. Only thanks to it, it is possible to combine different materials.
- Metal chips (powder). Thanks to this filler, after hardening the mass becomes durable. In addition to this, the protective properties in terms of temperature changes are increased.
- Additional elements. There are different types of cold welding that have different characteristics. These indicators are influenced by chemical elements and substances added to the composition.
The product is available in finished form or together with a hardener. Ready-made cold welding is a plasticine-shaped bar or cylinder, which must be kneaded in your hands before application. Epoxy resin with hardener is sold in liquid form. As for the hardened seam, the strength of the bond directly depends on the components included in the epoxy resin.
Regarding the strength of the seam, we can say that this indicator will depend not only on the components included in the epoxy resin, but also on the work carried out to apply the adhesive. The hardened weld is stronger than metal, but weaker than conventional welding.
When carrying out quick repairs, it is important to know how long it takes for the glue to dry and when further work can begin. Most types of cold welding require 2-3 hours to cure. However, complete hardening occurs within 24 hours.
Regarding the temperature that the finished seam can withstand, it all depends on the additional components. Classic epoxy resins, after hardening, retain their binding properties at temperatures up to 260 degrees. Specialized compounds can withstand heating up to 1316 degrees.
Using spot welding on lithium batteries
Using a battery to weld a nickel plate to the battery is the easiest way. To assemble the mini-unit you will need a battery, a charging cable, a piece of single-core wire, and electrical tape. 2 electrodes are created from the core, the ends of which are stripped and secured. The distance between elements should be 3 mm.
A charging cable connected to the terminals of the lithium-ion battery is connected to the other ends of the electrodes. Place the nickel plate on the battery and press the energized electrodes against it. As a result of a short circuit, the metal melts.
Source
Method of performing welding work without welding equipment
The third method is very exotic, and it involves the use of high-capacity car batteries. Some welders resort to this method. For example, they take 2-3 batteries with a capacity of 60-70 A/H and connect them in series to each other. In this case, the negative from the battery goes to the metal, and the positive from the battery is connected to the electrode. More details about this can be found on the website
In field conditions, when there is no electricity at hand (meaning 220-380 Volts), battery-powered welding comes to the rescue. But there is one small problem here too. Despite its apparent simplicity, such welding seriously damages the car battery, and given the small capacity of the battery, it only lasts for a very short period of time.
The best cold welding manufacturers
Most metal welding compounds are imported products. The import sector is represented by such models as: Hi-Gear, Abro, Poxipol. However, domestic products are also available for sale. These are mainly the Polymet or Henkel brands.
The most popular are the following compositions:
Abro Steel
Abro Steel
Two-component gel made in America.
Resistant to aggressive environmental influences and can withstand temperatures up to +250 degrees.
HiGeer
HiGeer
Hi-Geer products are widely used for many materials.
The products provide a connection between stone, wood and plastic products. The products have a low price and are resistant to many negative factors.
Glue moment
Glue Moment
Used for fixing metal products. Withstands quite high temperatures of 140 degrees. An excellent product suitable for household needs.
Wurth Liuguid Metal Fe 1
Wurth Liuguid Metal Fe 1
Cold welding produced in Germany.
Made for working with metal and ceramic products. The material is non-toxic, can withstand temperatures of 120 degrees and is excellent for sealing cracks in dishes or plumbing equipment.
Summary
Article Name
Cold metal welding
Description
Cold welding of metal - how to use - the most complete instructions for use. ✅Advantages and disadvantages ➜— ✅Instructions for use ➜— ✅Best manufacturers
Author
Sarychev Alexander Viktorovich - forensic construction and technical expert, candidate of technical sciences
Publisher Name
Wikipedia of construction tools
Publisher Logo
- Related Posts
- Welding equipment - what it is, types of welding equipment, where it is used
- Choosing a welding inverter for home and garden - Rating of welding inverters 2022
- Which electrodes are best to use for welding
« Previous entry