Lining is a material used for interior and exterior decoration. Due to its excellent performance properties and attractive appearance, the demand for it is steadily growing. Experts also highlight the following qualities of the material:
- availability. Suitable for people with different income levels. It is important to select the type of wood in accordance with the type of finishing and the room to be improved;
- ease of installation. Even a novice master can assemble the structure simply by following the instructions;
- environmental friendliness. By using wood in construction or renovation, you are making a choice in favor of your own health. Natural material heals the respiratory system and helps strengthen the immune system. The thick, resinous aroma is direct evidence of natural origin.
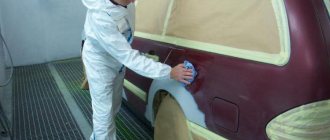
Despite the abundance of other finishing materials, lining is becoming increasingly popular. With proper processing and polishing, you can realize many design ideas in the interior or exterior of your home. How to prepare the lining for repair work will be discussed in our article.
Which is better for sanding wood - a grinder or a sander?
Carrying out repair work is often accompanied by the need to sand the wood. There are many options for this procedure. Each method has certain pros and cons. Many people are interested in what is better to sand wood: an angle grinder or a sander? Below is a detailed answer to this question.
Sanding wood has a number of features
Varnished surface
Wood varnishes have a wide range of possible options. This is a dense and thick material that is applied to the coating in two layers after previous drying. The advantage of painting is that the varnish also acts as a protective layer for the facing coating against moisture, dampness and fungus.
Varnish coating of lining
Using varnish allows you to slightly change the shade of wood without disturbing its individual pattern. Also, in this way you can make the surface matte or add a glossy shine to it. Varnish is an inexpensive material and requires one to two days to dry. Also, the coloring does not have an unpleasant odor and will last the room for about ten years.
Pros and cons of wood sanding tools
When sanding wooden surfaces at home, you can use different tools.
Bulgarian
This tool is an angle grinder. It is used in construction - for processing wood and metal.
How to grind with a grinder? To do this, abrasive wheels of different thicknesses are used, which are fixed on the shaft. In most cases, angle machines cut metal, ceramics, and concrete. Flap end discs help polish surfaces.
A grinder is often used to carry out the procedure.
Drill
A regular drill can be used to polish the surface to the desired condition. However, this requires the use of special attachments:
Belt sander
This is one of the most effective devices for influencing wood. Interskol company makes high-quality equipment.
The structure has a sanding belt with different levels of grit. Work is carried out in the direction of wood fibers. However, the tool does not allow cutting corners.
For reference! The equipment should be used to influence walls, floors, and furniture.
Vibrating sander
The vibrating tool helps to polish surfaces successfully. Also, such devices allow you to get good results when removing old paint or varnish. For work, use sheets or wheels with an abrasive surface. To fix them on the sole, soles or Velcro are used.
Orbital sander
This type of sander is also called an eccentric sander. The tool has a round base on which an abrasive disc is fixed. Paper that differs in grain size can also be used.
Sanding the lining with your own hands, analyzing the price per m2
Lining can safely be called one of the most popular materials used for interior and exterior decoration of houses. Thanks to its beautiful appearance and numerous positive properties inherent in natural wood, it is ideal for creating any interior and elegantly adapts to any design concept.
Using special power tools
In order to efficiently and quickly polish the surface of the lining before painting, you cannot do without the use of a special electric tool, of which there are four types:
- angle grinder or grinder (angle grinder);
- belt sanding machine;
- vibration grinding machine;
- orbital (eccentric) sander.
Each type of machine needs to be considered in more detail.
An angle grinder or grinder is one of the types of grinders widely used for cutting, cleaning and sanding wooden surfaces, stone or metal.
How to sand the lining with a grinder? Everything is very simple! For this purpose, it is necessary to use a special grinding wheel, on which you can easily attach sandpaper wheels of various grain sizes.
As a rule, the grinder is used for rough processing of lining used in finishing the facades of houses or baths.
It is rational to use a belt sander for both rough and fine processing before painting surfaces of a large area. The mechanism of the machine is quite simple - a belt of sandpaper is put on a pair of rollers, which moves along with the rotation of the rollers, while grinding the surface of the lining.
The operation of a vibration grinding machine is based on the reciprocating movement of the sole, which makes about two thousand vibrations per minute. A sandpaper is attached to the sole, with which the surface is polished. The sandpaper on the sole can be secured in two ways - with Velcro or with special rivets.
Vibrating sanders are usually used for fine finishing, when the surface of the lining has already been roughly processed, for example, with a belt machine. For fine sanding, it is most convenient to use sandpaper with a grit rating of 120 and above.
In an orbital or eccentric sander, the sandpaper is secured to the sole using Velcro.
Sanding before painting is carried out by rotating the working part around its axis and in orbit at the same time.
An orbital machine, as well as a vibration machine, is used primarily for the final, fine finishing of the surface of a lining board before creating a primer layer on it or applying varnish.
What is the best way to sand lining?
Using a power tool, without any doubt, sanding lining is much more convenient and faster. But even the use of the highest quality equipment does not exclude manual labor - there are places on the surface of walls or ceilings that can only be processed manually - for example, in corners, under a window sill, carved platbands.
In order to perform the processing correctly and quickly, sanding must be carried out strictly along the grain of the wood, otherwise, transverse stripes that do not decorate it will remain on the surface.
If you cannot sand the lining yourself - time does not allow or the necessary tools are not available, you can order this work from construction companies. For a reasonable price, they will not only treat the surface, but also perform other required work efficiently.
The cost of sanding, especially exterior sanding, depends on the time of year and region. In winter, when construction work is not so in demand, the price can be significantly lower than in summer, when it is extremely in demand.
The average cost of performing work is presented in the table.
| City | Price per m2 |
| Moscow | 200-210 rubles |
| Saint Petersburg | 210-230 rubles |
| Novosibirsk | 240-250 rubles |
| Krasnodar | 220-240 rubles |
| Ekaterinburg | 210-240 rubles |
Having analyzed the table data, you can see that the lowest prices are in Moscow and the Moscow region, but in general the difference between the regions is small and does not exceed 20-50 rubles.
The cost of grinding depends on a number of factors:
- scope of work
- type of wood from which the lining is made
- at what height should sanding be done?
- material quality
- how many times will sanding be required?
- region of Russia
An equally important factor in determining the cost of grinding is who exactly will do it. It’s no secret that good specialists are extremely valued and are always in demand, and therefore when choosing a team or company you need to pay attention to:
- cost, which cannot be too low, but often remains at the average level;
- the presence of photographs of work already completed, and if there is such an opportunity, then see it live;
- inquire about the team’s experience in providing such services;
- find out which tools and brand will be used to do the work;
- availability of reviews from real clients.
And the best thing is to ask your friends or neighbors who exactly did the work for them and how well they did it.
Dry and wet sanding
How to properly sand wood with a sander or other tool? First, it is important to choose the type of procedure. It can be dry or wet. The first type increases the effectiveness of the abrasive and ensures its accurate removal. The downside of this technology is that the skin easily becomes clogged with dirt.
When carrying out wet sanding, you need to apply the liquid to the grainy surface of the sandpaper. Mineral oil or soap solution can be used for this. White spirit will also work.
Note! During the wet procedure, the abrasive becomes much less clogged, which helps to increase its service life. This creates an unpleasant mass of foam and shavings.
Abrasive-jet grinding of a bathhouse frame
Recently, the abrasive-jet processing method has gained popularity. Its essence lies in the use of a special apparatus from which sand comes out under pressure. This is a non-contact grinding method. Thus, you can clean the surface of the wood from dirt, paint, burning and give it impeccable smoothness.
Sanding with this tool is easy and quick, and the quality is the highest. Due to the created brushing effect on wood, an original pattern is obtained, emphasizing the naturalness and sophistication of the material. This treatment looks exclusive and expensive. Such grinding is usually carried out by specialists with special equipment.
And finally, we present to your attention a video about polishing a bathhouse frame:
Source
Rules for sanding wood
How to properly sand wood with a grinder or other tools? This question interests many.
Sanding planed logs from the outside
To polish a log house made of planed logs, you should use angle grinders. It is recommended to use devices of the mid-price category.
A special grinder will be an effective device.
Sanding rounded logs
Such a log house already has a flat surface. Therefore, using a grinder with a lack of experience will lead to the appearance of furrows and holes. In such a situation, eccentric machines are more suitable. They are less productive, but if the pressure is too strong, the disc becomes blocked.
Sanding the log in grooves and corners
Regardless of the logs used, the grooves must be sanded with a grinder. It is recommended to use a smaller attachment than the disc. If they coincide, the tool may jam.
Important! The corners of the log house are considered the most problematic areas. They are best processed with chisels.
Log end processing
For these areas, it is worth using a grinder, which has an abrasive wheel with 40 grains. Adjusting the speed allows you to choose the optimal speed mode. In this case, cleaning with fine grains is not required.
Processing of logs inside the house
This procedure is no different from the external one. If you do not plan to sheathe the walls, you need to make an additional finishing pass. To do this, use a 120 abrasive disc.
Sanding of a log house must be performed according to the rules
How to sand timber walls
In this case, the same tools as when processing logs are suitable. In this case, you need to evaluate how large a layer of wood needs to be removed. If the bathhouse is made of glued or profiled timber, nothing needs to be leveled. In such a situation, it is enough to use an angle grinder. If you have little experience, it is better to take an eccentric machine.
Important! Walls made of ordinary timber need to be well leveled. In this case, you need to use a grinder.
When is the best time to sand?
It is necessary to grind the frame after the main shrinkage. During this period, the log dries, which makes working with it easier. It can be difficult to remove even a thin layer from damp wood. If the log house is made of dried wood, it can be processed immediately.
Procedure and organization of work
Since little time should pass between grinding and processing, the procedures must be carried out along the crown. It is permissible to start work from the top or bottom. In this case, you need to sand one wall and then move on to the second. The structure can be covered with primer or impregnation after finishing one wall. In this case, you first need to clean the surface from dust.
Sometimes there are dark spots on the surface of the wood. They appear due to fungal activity. Such defects do not affect the safety of the material, but seriously deteriorate the appearance of the structure.
If you plan to paint the structure with light or transparent dyes, you need to deal with the shades. To do this, it is recommended to use special substances for bleaching wood. It is worth applying a fire retardant, a primer layer and finishing agents on top.
Sanding wood has a number of features. For the procedure to be successful, it is important to choose the right tool and strictly follow the rules for its use.
Source
Decorative coatings
Compositions from this group are supplemented with antiseptics, antipyretics, water-repellent, sunscreen and shockproof components. Information about this is always indicated on the packaging.
stain
The sealants are water-based, oil-based, wax-based, acrylic and alcohol-based. For treating lining inside the house, products based on acrylic, wax or oil are better suited, since the former take a long time to dry, and the latter have a strong smell. After stain treatment, the slats must be provided with a finishing coating, such as varnish.
Azure
This substance, like a stain, gently tints the lining, preserving and emphasizing the natural pattern, and gives budget wood like pine a resemblance to noble varieties (beech, hornbeam, wenge). The differences between glaze and stain are the composition (only water, oil or solvent based), thickness of the coating (there are thin-layer, medium-layer and thick-layer), glossy shine and independence.
Dye
If you need to radically change the color of the lining, and the wood pattern can be neglected, use oil-based, water-based or acrylic paint. The latter option is preferable for interior work, since it does not require the use of protective equipment, is not bothered by a pungent odor, and dries quickly. Apply paint with a wide brush or roller.
Varnish
Such compositions are divided into acrylic, alkyd and polyurethane. For processing lining in a residential heated room with a comfortable environment, affordable and safe acrylic varnish is suitable. If you need to protect the coating from photoaging, choose alkyds based on phthalic resins and solvent, and polyurethane will provide maximum strength.
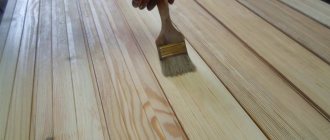
Wood sanding methods
Wooden products almost always require leveling and sanding at some stage. During such work, all traces of glue, protruding pile, unevenness, chips and other defects must be removed from the wood. Typically, wood is sanded before applying an adhesive, protective or decorative material (primer, paint, varnish, etc.) to it.
The grinding process has many subtleties and pitfalls , which it doesn’t hurt to know about in advance when doing the work at home.
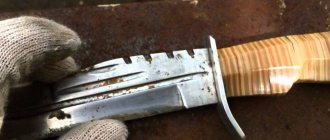
The task is to sand the old lining
Which sander is more effective for doing this? I am using an EShM Metabo 450Sx Duo (or something like that). Everything is fine, but the edges of the grinding wheels quickly get knocked against the edges of the neighboring linings. What tool would be more effective than an ESM for such work?
Renat 2607 wrote: Which tool would be more effective than an ESM for such work?
Arbitration manager, bankruptcy and everything connected with it.
Renat 2607 wrote: but the edges of the grinding wheels quickly get knocked against the edges of the neighboring linings. What tool would be more effective than an ESM for such work?
. The second topic is about the same..
..It is almost impossible to fit either Eshm or LShm into the seams between the panels. Normally they sand everything before nailing it in place. both individually and with sheets of different grain sizes, only then will there be a result. And now, if you don’t want to disassemble, use a grinder (although it’s hard on the vertical), and the grooves can be polished either by hand (there are special blocks) or (expensively) the FYain multimaster has a special platform for chamfers of all kinds and crevices. Also, in these grooves, of course, you can make fun of them with a drill with an appropriate attachment. But it will be long and annoying.
I came across a lot of statements that they were grinding angle grinders with flap wheels.
helmutivan wrote: the FYain multimaster has a special platform for all kinds of chamfers and crevices. Also, in these grooves, of course, you can make fun of them with a drill with an appropriate attachment. But it will be long and annoying.
Well, for a very long time.
Serg wrote: I have come across a lot of statements that they were grinding angle grinders with flap wheels.
..and expensive. You can buy linings for a new half-machine.
I encountered the same problem; in two years, has there been a breakthrough in technology in the field of joint processing? I grind the board itself with a vibrating makita, it turns out just fine and quickly, but I can’t get anything into the joint except for a “specially trained” profile block with sandpaper, maybe someone has a working solution, answer, but without these same ones. Well, you understand. ironic theorizing is also familiar to me
.
Uncle_James wrote: I encountered the same problem; in two years, has there been a breakthrough in technologies in the field of joint processing? I grind the board itself with a vibrating makita, it turns out just fine and quickly, but I can’t get anything into the joint except for a “specially trained” profile block with sandpaper, maybe someone has a working solution, answer, but without these same ones. Well, you understand. ironic theorizing is also familiar to me
.
Source
What and how to grind
The purpose of sanding wood is to remove defects as quickly and efficiently , without leaving noticeable deep scratches. To do this, you can use special tools - now their price is not too high.
There are several types of grinding machines available for sale:
You can install not only abrasive wheels on the grinder, but also brushes. Thus, nylon brushes are actively used for sanding wood. They allow you to make the surface not only smooth, but also highlight the texture of the wood by choosing softer fibers. This process is called brushing.
For large surfaces made of wood and wood-based materials (veneer, chipboard, fiberboard, plywood), belt and surface grinders are best suited.
Many people still prefer to sand decorative items, furniture, toys, and frames by hand, and this is not such a bad method - it allows you to achieve a perfectly smooth surface effectively and without unnecessary expense. At least, when working with your own hands, you won’t have to think about where to get a sander (ask a neighbor, buy it in a store, rent it, leaving a deposit).
Belt type machine
Belt machines are so called because the sandpaper here is made in the format of a belt and it continuously moves thanks to rollers. This machine is designed for intermediate and rough sanding. But in order to achieve perfect smoothness and perfect finishing (this is especially true for those who make furniture), you will have to additionally use other sanding equipment.
There are different types of sandpaper you can install on your belt sander. And, for example, when inserting fine-grain sandpaper, it is quite possible to achieve a normal result for carpentry that is to be painted. And, say, to eliminate long scratches you will have to carry out step grinding, changing the grain size several times.
The belt sander has excellent performance. But it should be recognized that the tape is placed on it in such a way that not all points and grooves on the surface of the board can be properly processed.
Even with a considerable width of the belt, it grinds mainly at its center. The parts of the tape behind and in front are not used for this. They are in a slightly raised position, and their main function is to feed the driving roller mechanisms.
Another obvious drawback of belt equipment is its solid mass; it is quite difficult to perform any operations with such machines in weight when processing vertical products.
Belt machines for sanding wood also have a disadvantage, such as high noise - working without earplugs or headphones will not be very comfortable. And one more important point: if you leave the machine in one place for a long time while working, a fairly noticeable hole will appear.
Surface grinder
Even sanding large pieces of wood with a surface sander is quite fast. The key organ of the device is a flat, rather large plate (sole), to which the required abrasive is attached. This design is famous for the almost complete absence of dead zones (that is, areas that cannot be reached with a machine and processed tolerably) - any corners can be sanded relatively easily.
The demand for flat sanders among woodworkers is due to their reasonable price and availability of equipment. When choosing such a machine, you should pay attention to such parameters as motor power (usually we are talking about indicators in the range from 150 to 300 Watts), weight, amplitude and frequency of the sole stroke.
Manually
Sanding wood by hand, of course, requires a lot of labor and physical effort. But this method of grinding is a priori less aggressive and allows you to completely control the process. Even in hard-to-reach places - in corners and on complex curved bends - you can get decent quality grinding by choosing the manual method.
With the so-called interlayer sanding of finishing coatings, manual work has no alternative at all - only it eliminates the risk of damage to the already applied finish. Manual processing (compared to sanding machines) allows you to get the most even and smooth surface, although it takes many times more time.
Does the carriage need to be sanded before painting?
Kremlev Andrey Aleksandrovich
production manager
It just so happens that more and more often, when choosing building materials for finishing, we give preference to natural products. Wooden lumber is especially in great demand. This is understandable, a tree is a living organism, capable of sharing its energy with us, bringing elements of comfort, an atmosphere of warmth and harmony into the house.
This is an environmentally friendly product that does not harm either humans or the environment; the presence of essential oils saturates the air around us; among other things, wood is a high-quality material and has excellent heat and sound insulation properties.
Why is wood sanding needed?
Often when finishing walls and ceilings, we choose lining. Specialists
, give a unanimous answer to the question whether it is necessary to additionally sand the lining - of course YES.
If you are interested in the paint not only laying down perfectly evenly, but also serving for a long enough period of use so that the funds spent on purchasing the compositions are not thrown away, then such a procedure as sanding the surface of the lining before painting should be included in your plans .
Photo 1. Grinding calibration machine for grinding
The composition of wood in no way depends on the type of wood. Cellulose is the main constituent of cells, and the free space between cells is filled with lignin. Then the natural question arises, what is the difference between tree species. It's simple - differences in porosity are observed.
Photo 2. Sanding the lining before painting
Smaller cells can increase density, while larger ones create light, porous wood. For example, Siberian larch has a high density and is difficult to process, unlike tree species such as cedar or Scots pine.
Photo 3. Sanded larch under ground
To enhance the depth of penetration of the composition, to unclog pores, to create reliable adhesion to paintwork materials and more economical paint consumption, grinding is simply necessary. On any board surface, even if it has been planed using good equipment, there are always small processing imperfections, which after painting can quite spoil the appearance of the coating.
Photo 4. Board without preliminary sanding
As you know, lining is one of the varieties of tongue-and-groove boards for cladding work indoors and outdoors, for building facades. To produce the material, edged boards from larch, pine, spruce, alder, linden and so on are used.
Photo 5. Painted pine lining
First, the raw materials are dried in thermal modules so that the humidity does not exceed 12 - 15%. Then the product is planed (folding and tongue-and-groove) using special equipment. After which direct distribution by grade, depending on the quality of the board.
Photo 6. Raised pile on an unsanded board
How to sand lining correctly?
There are two available ways to sand a board: manually or using special equipment:
- Anyone who has done this work at least once will agree with us that the activity does not bring joy, but only calluses and, in addition, the sandpaper either falls off or is difficult to hold in your hands.
Photo 7. Abrasive stone
For manual sanding, for convenience, you will have to sand the lining using improvised means. For these purposes, you need to stock up on sanding blocks, special plastic attachments for attaching abrasives of different sizes, and sandpaper to them.
- Use a special eccentric sander, with an excellent additional function for collecting dust and microparticles, or use a vacuum cleaner when working. Collection of dust and debris is necessary so that the open pores of the wood on the sanded side of the panel do not become clogged with dust again.
Photo 8. Eccentric machine
Pads and jaws
A block is an extremely useful device for manual grinding; its presence and proper use can speed up the process. The block, as a rule, is a regular wooden block wrapped in sandpaper. Its abrasive side should be on the outside, and the non-abrasive side should be attached to the block with a large stapler or PVA glue. Some hardware stores sell ready-made pads with sandpaper, that is, you don’t have to make it yourself, but just buy it.
Foamed polyurethane sponges are also used for sanding wood. They are more convenient to use than sandpaper, since you can wash them under water after work. Sponges and abrasive cloths are great for careful hand sanding of wood, allowing you to process the smallest details. They can also be used to sand primed or varnished wood.
Selection of sandpaper
What is the best way to sand wood? Which sandpapers should you choose for your work? In reality, these are not such simple questions. Sandpaper today is made from different materials:
Garnet is characterized by the fact that it wears down faster than all other materials, but carefully sands wood. And silicon carbide, according to experts, is perfect for sanding the varnish coating and removing particles of debris and dust stuck to it.
Ceramic sandpaper is usually used when sanding wood with sanders. Skins with a ceramic working surface are one of the hardest and most expensive abrasives. Much the same can be said about corundum.
But the most important classification of sandpaper is the classification by grain size. At the moment, there are coarse-grained, medium-grained and fine-grained sandpapers.
In the Russian Federation, the marking of sanding products complies with the ISO-6344 standard - the grain size is indicated by the letter “P” and a number. The larger this number (it shows the exact number of sieve wires in one inch), the smaller the grain size. And, accordingly, the smoother the product becomes after sanding with such sandpaper. Typically this marking is indicated on the packaging.
It is advisable to buy several types of papers at once for sanding wood. Coarse-grain paper is considered to be paper that is marked with a number from 40 to 80; it is suitable for rough processing. The markings for medium-grain sandpaper contain numbers from 100 to 150, and the markings for fine-grained sandpaper contain numbers in the range from 180 to 220.
Note! You can find GOST markings with the letter M. It means fine-grained sandpaper.
In addition, sandpapers come in closed or open-grain types. The first ones are very densely covered with grain - that is, their abrasive is more effective and efficient. And on the basis of open-fill sandpaper there are significantly fewer grains (usually their share is no more than 60% of the entire surface of the canvas), so it is not so effective. But the presence of empty space between the grains prevents the sandpaper from quickly clogging - this extends its service life.
Thus, closed sandpaper is suitable for hard surfaces, while open sandpaper is suitable for more pliable and soft surfaces .
Ideas
In a modern interior it is very difficult to find a place for classic lining with a light fiber texture. Most often it will look like a tree trunk torn out of the forest and brought straight into the house. You need to choose a finishing method and create the desired decorative effect so that the interior looks as harmonious as possible (read more about where lining is used and how to sheathe walls inside and outside with it, and find out how to beautifully sheathe walls and ceilings with wooden boards in a separate material).
There are several interesting ideas for painting wooden panels:
- Alternate combination of different tones of coloring compositions, panels of various thicknesses and widths.
- Multi-profile panels can be combined into an interesting relief.
- The placement of spotlights in different areas of the cladding creates incredible lighting effects that significantly transform the appearance of the lining.
- The use of several colors of paints or varnishes in the same color range, but different in saturation and tone. This will allow you to emphasize some areas and zoning the space.
- Painting on a wooden surface looks very original and natural.
- Bleached canvases create a feeling of spaciousness and a more noble interior.
Important It is important not to overdo it, not to turn the room into a color blot. It is necessary to adhere to a harmonious combination of colors and their saturation.
Dry and wet sanding
To sand wood before and after applying finishing coatings, two current techniques are used - dry and wet.
Dry grinding increases the effectiveness of the abrasive and makes it possible to use it more accurately. At the stages of intermediate sanding of delicate finishing materials, this is what you need. The disadvantage of this technique is that the skin quickly becomes clogged with debris. To eliminate this problem, experts advise using an emery cloth with anti-clogging properties.
Wet sanding involves applying liquid to the grainy surface of the sandpaper. Such a working fluid can be ordinary soap solution, white spirit and mineral oil.
During wet grinding, the abrasive becomes clogged much more slowly and, accordingly, its service life increases. But the wet method also involves the formation of an unpleasant mess of chips and foam. In this case, the home craftsman will have to periodically wipe the wooden product.
Rules for manual grinding
You should start your DIY sanding with the coarsest-grained sandpaper available to remove obvious defects from the surface of the wood. But here we must still take into account the nature of the damage that needs to be eliminated.
Note! If defects on the surface are minimal, then there is no point in starting with P40 abrasive (this abrasive is only suitable for very large bumps and depressions).
You need to act on the surface correctly: it is best to move the block or just sandpaper in a straight line along the fibers in a back and forth direction. And sanding, for example, in a circular motion can lead to unnecessary scratches.
Having reached the edge of the surface to be treated, be sure to grind off the sharp corners. Soon, as a result of exposure to coarse abrasives, dust mounds will begin to appear on the wood. They should be carefully removed with a vacuum cleaner. Then you can proceed to processing with the next medium-grit sandpaper.
This processing is carried out according to the same principles as described above. The final stage is grinding with an abrasive with the finest grain. After this, the wooden product should become completely smooth, there should be no flaws left on it.
Source
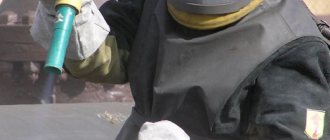
External polishing of the bathhouse frame
When starting work, be sure to protect your eyes and respiratory tract from dust. To do this, you need to stock up on goggles and a respirator. If you have no grinding experience, it is recommended to initially “get your hands on” in inconspicuous areas.
The procedure for polishing a bathhouse outside
It is best to start sanding from the bottom up. We perform the procedure in the following sequence:
Finishing the outside of the bath
To give an aesthetic appearance and protection from the negative effects of precipitation and fungus, it is necessary to pay attention to additional processing of the logs. Each wall must be coated with compounds immediately after sanding. Otherwise, it will darken within a day, and all the work will be in vain.
When finishing, follow the following instructions:
What you need to know about painting lining
When painting exterior wooden walls, you need to consider the type of finishing material. Lining, imitation timber, wooden siding are the same material. These finishing boards differ only in thickness and profile. The same paints are suitable for all these types of cladding, and any acceptable technique can be used when applying them.
Facade finishing with clapboard
Cladding the outside of the house with clapboard
If the wall is built from timber or rounded logs, a different approach to the choice of paint and the method of its application is required. You need to know about this before deciding how and with what to paint the walls of a wooden house.
You should not be afraid that in 2-3 years you will need to renew or repaint the facade. If you know all the rules and secrets of the painting process, the facing layer will not lose its properties even after 10 years. Many manufacturers of paints and varnishes provide a guarantee for a longer period.
Photo: painted imitation timber
Important points to know
Most homeowners who are not familiar with the nuances of choosing and applying paint complain that the very next year after painting, the facade loses its attractiveness. The finishing layer begins to peel and crack. All these troubles can be prevented.
But even among experts, few people know that to get an excellent result, you need to change the approach to painting wood. This job requires as much attention as painting a car. To obtain a durable cladding coating, you need to perform several steps:
Careful observance of all nuances has a positive effect on the result of painting the lining
Let us consider each of these processes in as much detail as possible.
How to clean the material?
Most often, special boards are used to cover the walls in a home bath or sauna, in the hallway, summer kitchen or in an attic extension (how to cover a bathhouse with clapboard?). In addition, they also cover floors and are used to insulate and improve the ceiling (how to insulate a house with clapboard?).
Lining:
- environmentally friendly;
- has an aesthetic and solid appearance;
- has good heat and sound insulation properties;
- resistant to mechanical damage;
- quite easy to install;
- affordable.
Attention
Lining is a unique building material that can adapt to almost any interior design style. Cozy “country”, modern loft or eco-style will only benefit from the “neighborhood” with such panels.
To ensure that the lining does not lose its original appearance, does not become moldy, or rot, it must be properly processed and promptly cleaned of soot, soot, and other types of contaminants.
From the dirt
You can remove dirt from a cladding board using:
- soft cloth soaked in soapy water;
- wipes soaked in solvent;
- brushes with medium-hard bristles.
At the same time, it is important to ensure that the lining does not get too wet during such “cleaning”. Otherwise, after drying, it may become deformed and change color.
From soot
Soot is a common occurrence in home baths. This unpleasant black coating usually “decorates” walls, floors and even ceilings. At the same time, there are only two ways to effectively get rid of soot:
- manual cleaning;
- grinding.
Both methods of removing black, unpleasant stains from wood involve a dry version of the work, in which the contaminated surfaces are cleaned either with a spatula or a sander.
From old paint
Before you start removing paint from a wooden board, you should decide its future “fate”. If the cladding material is simply repainted in a new color, then it will be enough to sand the old paint with sandpaper.
If the previous tinted protective layer is blistered or cracked, a chisel (metal spatula) and a hair dryer will come to the rescue. They will need:
- warm up old paint;
- carefully remove it from the surface of the lining.
Important
It is dangerous to remove a layer of old paint from a finishing board with an open flame. Drying out of the building material and changing its structure are only a small part of the problems that will appear almost immediately after such “barbaric” cleaning.
How to update the lining, including repainting, is described in detail in another article.
How to properly prepare wood for staining
Drying the lining
Careful preparation of wood includes several stages. The first of them is high-quality drying of the finishing material. If the lining is damp, the paint will not last on it for more than 1-2 years. Already next season, its peeling and fading will become noticeable. The owner may decide that the quality of the paint or the inept hands of the workers are to blame for this, but in fact the reason is improper preparation of the wood or ignoring this important stage.
Chamber drying of lining
The board must be dry before painting. The permissible degree of humidity is 15-20%. But it is not always possible to achieve such indicators, especially for those facades that are already lined. Craftsmen recommend using this method: build a canopy over the walls to protect them from rain, and dismantle it after 3-4 weeks. During this time, the wood will lose a sufficient amount of moisture and it will be possible to begin finishing work.
There is an opinion that the process of drying wood speeds up the application of a high-quality deep-penetrating antiseptic to it. These include Neomid 46 Bio.
Antiseptic for intermediate protection Neomid-46 BIO concentrate
Penetrating into the pores, the composition replaces moisture and the process of its evaporation accelerates. For these purposes, you can use any preservative that protects wood during the construction of a house. On average, these compounds act for 6-7 months, after which they spontaneously decompose into biologically safe substances.
How to check the moisture level of the lining
If the surface of the polyethylene is wet to the touch, it means the lining has not dried. Such wood cannot be painted.
Processing of lining
An important point in preparing for painting is sanding the boards. All materials of medium quality (grade B and lower) require this procedure. Often on such wood you can notice “fleecy” areas, uneven profiles, and height differences in the area of knots. All of the above are problem areas, without eliminating which it is impossible to obtain a high-quality painted surface.
The easiest way is to process the facing material before it is laid on the walls. In this case, you can use various tools: a milling cutter with a cutter of the appropriate profile, an angle grinder with an abrasive disc, a thickness planer. However, the use of a mechanical processing method does not eliminate the need for manual labor. All recesses and protrusions of the profile will have to be sanded using sandpaper.
Tool for sanding lining
If the lining is already fixed to the facade, a nylon abrasive brush and a sander are used to process the wood. The grinding process is not fast, but it will allow you not to think about finishing the facade for 8-10 years.
Prices for popular models of sanders
Wood priming
After the lining has a flat and smooth surface, the wood must be primed. You should not postpone this process for long. Therefore, it is recommended to decide in advance on the type of primer and purchase the required quantity. There is an important point in this matter: it is not recommended to choose the most inexpensive composition. It will not be able to provide high-quality adhesion and will not adequately protect the wood from moisture.
High-quality primer often costs more than paint. This situation is observed in different product lines. A competent manufacturer knows that the most important part of the painting job is priming. It is its quality that determines the durability of the paintwork.
Tikkurila Valtti Akvabase
The following types of primers are suitable for external work:
Regardless of the chemical composition of the primer, you need to choose those products whose containers indicate that they are intended for facade work. Another important property that you need to pay attention to is the degree of penetration of the solution deep into the wood. The primer should say so: “deep penetration”.
Valtti Pohjuste
It is not recommended to use alkyd compounds for facade work. They form a thin film on the surface of materials. It simultaneously protects the lining from pests and mold, and prevents moisture from escaping from the deep layers of wood. Therefore, the best choice is water-soluble primers, which include acrylic and (or) silicone.
You can often find acrylic penetrating primers with antiseptic additives on sale.
When priming and painting the facade, special attention is paid to the south side of the house. It is more exposed to the negative effects of ultraviolet radiation. Therefore, on the north side of the house, the paint fades less and cracks less often.
Prices for wood preservatives
How lining is sanded
The modern construction market offers a large number of finishing materials, for example, plasterboard or plastic. But wood is considered the most popular. After all, what can we say about artificial materials, they are of course more accessible, but the effect on human health, alas, is detrimental.
If you still have not decided on a building material for finishing, for example, a balcony or loggia, then we recommend that you read this article, which talks about high-quality and durable building material for interior and exterior finishing work, and also find out how sanding occurs linings.
How to sand lining?
Characteristic
Lining is a cladding board that can be easily fastened with your own hands, thanks to special shunt connections. Construction companies offer three types of building materials: wood, plastic and MDF.
Plastic sheeting is the most durable, can withstand sudden temperature fluctuations, and is resistant to rotting and corrosion. But for external finishing work, it is better to choose sidin, since the plastic sheet loses its appearance when exposed to direct sunlight.
The average service life is about 15 years. To extend the life of the wooden panel, it is necessary to treat it with special varnishes against insects and fungus.
Process
Depending on the type of finishing work, wooden panels can be made of oak, larch, spruce, pine, etc.
It is believed that wood has a beneficial effect on a person’s well-being, especially if the room has a facing layer made of coniferous lining. Traditionally, their needles are used to make finishing lumber, flooring boards, blockhouses, etc.
But it is important to carefully familiarize yourself with the quality of the sanding of the canvas; if it does not suit you, then you can do it yourself.
What to choose
Artificial polymer or wood, which material is better to choose? The answer seems to be known in advance, of course, natural building material. After all, the tree, even after several decades, will not emit a pungent odor harmful to human health. In addition, wood is non-toxic and can even be used for finishing work in a children's room.
With the help of wood, a facing layer is created, which has a number of advantages: it perfectly regulates the temperature in the room, retaining excess moisture. The use of wood also has an aesthetic meaning. After all, people have long used everything natural in everyday life. That is why lining is in considerable demand in the building materials market.
Manufacturing stages
At first glance, it seems that making a wooden canvas with your own hands is quite difficult, but this is not true. You will need to go through a number of simple steps:
- choice of wood type. At this stage, it is necessary to choose the right canvas, because each type of lining has its own nuances, for example, appearance, presence of resin, etc.;
- direct production. You will need to cut the canvas into boards of the length you need. Or you can stick to standard sizes. Wooden panels with a length of 1.5 m., 3 m. are presented in the customization markets. and 6m. However, at this stage it is important not to forget to sand the construction canvas with sandpaper size 120-150. Next, you need to clean off all the chips with a vacuum cleaner; it is best to use powerful professional models, not household ones;
- drying. If the canvas is not dried beforehand, installation time may be delayed. For drying, special equipment with a 12% humidity level is used;
- grinding. At this stage it is recommended to use a grinder, since manually this process can take a long time. Final sanding must be carried out after installation and coating with a special construction varnish and antiseptic. Once you've coated the blade, you can confidently grab the 320-grit sandpaper or sander and do the final sanding. Before buying a wooden panel, you need to ask the seller which antiseptic varnish is best to apply to the paneling, otherwise you may get into trouble.
If you want to change the natural color of the wood, you will need to purchase a stain, with which you can manually give the canvas the color that will highlight your interior, as shown in the video.
Let's sum it up
Lining is a universal material that is widely used for interior and exterior finishing work. At the same time, the cost of the canvas is affordable for everyone.
Choosing paint for a wooden facade
One mistake many homeowners make is not reading carefully, or not reading at all, what is written on the paint can. This information contains instructions and recommendations from the manufacturer, following which you can achieve the desired result. But before it comes to them, you need to decide on the type of paint. After this, you can begin to familiarize yourself with the nuances of its application.
It has been noticed that oil paints lose their color saturation the fastest. They become covered with cracks faster than others. The reason is the composition of these coatings and their viscosity. The latter property provides high covering ability, but does not guarantee the quality of the coating. Therefore, oil compositions are not often used for finishing facades.
Oil paint MA-15 “Economy”
The best choice for exterior work is quick-drying water-soluble acrylate paints. You can pay attention to the products. This manufacturer has a wide range of paints and varnishes for facade work. Excellent reviews of Ultra and Pika Techo paints.
"Pica-Techo" acrylate paint
Paint for wooden facades Tikkurila Pika-Techo
For regions with unstable climatic conditions, characterized by temperature changes and cold winters, silicone-based façade paints are suitable. These compositions successfully withstand low and high temperatures, have a high degree of moisture resistance, and at the same time remain vapor permeable. Silicone facade paint combines the best properties of acrylate and silicate compounds and forms a durable, uniform coating.
Facade silicone paint
Prices for different types of construction paints
Characteristics of facade coatings
| Type of paintwork | Working temperature | Drying time | Consumption |
| Acrylic | +5°С – +20°С | 12-24 hours | 115-120 g/m2 |
| Oily | +5°С – +20°С | At least 72 hours | 110-130 g/m2 |
| Alkyd | +5°С – +20°С | 24 hours | 140-150 g/m2 |
| Silicone | +5°С – +20°С | 24-48 hours | 150-180 g/m2 |
The lining can be painted with stains, tinting impregnations and oils. Wax or varnish is used as a finishing coat.
Samples of shades of applied stains
Wood stain, shades
Color palette
The choice of color when painting lining is determined by the style of the interior, its color scheme, as well as the taste of the owners of the house.
Not everyone likes a light and smooth surface. Some people will want to add brightness to the interior, while others, on the contrary, will want to shade it with dark splashes. Some will emphasize the structure of natural wood, while others will decide to hide it completely. All this is a matter of taste.
Often when painting lining, white is used. Whitewashed wood, especially oak, creates a special atmosphere in the house. Light shades visually expand the space, “lift” it, add air and spaciousness. Therefore, rooms with a small area are most often decorated in light colors.
Combined with the structure of the wood, the effect is truly magnificent. Such a surface will fit into any style; it will harmonize with almost any environment and color. Translucent paint that does not hide, but emphasizes the wooden texture and gives a white tint to the material itself is a good option for slightly refreshing and updating the interior without drastic changes.
To create a bright color accent, you can use acrylic or oil paints. They offer a fairly wide selection of shades - from discreet muted to flashy bright ones.
Another option for adding color to the lining is the use of tints. They can be added to water-based paint, glaze, and obtain a variety of shades of any degree of saturation. By properly mixing several tones, you can get a rather interesting complex shade that will fit perfectly into a given interior. But in order not to spoil all the base paint (to which the colors will be added), it is better to pour a little into a separate container and try there.
In general, painted lining itself creates an interesting effect in the interior, especially when the structure of the wood remains clearly visible. It is not for nothing that such a solution is increasingly found in a variety of designs, in different colors and in different styles.
Methods for painting lining
Before choosing a painting method, you need to learn about the rules for performing work, without which it will not be possible to achieve high quality surface finishing. The main point is the timing of the work. The lining is painted no earlier than 3 days after the last rain. During this time, the wood will be able to dry completely.
The air temperature must be positive. The limits recommended by paint manufacturers are +5°С – +20°С. It is also important to consider the time of day. It is best to start coloring at 10-11 am. By this time, the lining will be completely dry from the morning dew.
Lining painting techniques
The easiest way is to paint the lining before installing it on the facade. In this case, you can get a uniform layer without smudges. The paint is applied with a brush, roller or spray gun. Since the boards are quite long, the work is carried out in a spacious room or outdoors. In any case, you will need to do a little preparation.
If you decide to work indoors, you need to provide the possibility of high-quality ventilation. The floor, furniture and household items are covered with plastic film. This is especially important if you plan to use a spray gun. Don't forget about your protection. First of all, you will need cotton gloves. If the paint will be applied by spraying, wear safety glasses.
Painting lining with a paint brush
The process of applying paint is easiest if you use a quality paint brush. The best choice is semi-hard bristles, with a fairly soft and even edge. The choice of tool also depends on the amount of work. Synthetic bristle brushes are more wear-resistant.
The coloring technique consists of several simple steps.
Step 1. Open the container with paint and thoroughly mix the composition using any convenient device. You can use a wooden strip of sufficient length.
Step 2. Dip the brush into the paint to 1/3 of the length of the bristles.
Step 4. Lightly press the bristles onto the edge of the jar.
Step 5. Apply paint to the wood using light strokes.
Painting lining with a brush
Step 6. Repeat the process until all the boards are painted.
Do not put a lot of paint on the brush, otherwise there will be streaks
Painting the lining with your own hands
Processing lining with paint
Painting lining with a roller
Choose a narrow roller equipped with a fur coat with medium-length pile. You will need a paint tray, which is otherwise called a “paint bath” or “construction ditch.”
Paint tray, roller
Step 1 . Open the container and mix the paint.
Step 2. Pour paint into a special tray.
Step 3. Immerse the roller in the paint to ½ the height of the roller.
Step 4. Roll the roller along the corrugated beveled part of the cuvette. Thus, the paint is evenly distributed over the coat and the excess is squeezed out. One set of paint should be enough to paint 1-1.5 m2 of lining.
Putting paint on a roller
step 5. Apply paint by pressing the roller against the wood with even force.
Painting lining with a roller
Step 6. Distribute the paint so that the surface is well painted and there are no smudges on it.
Step 7: Repeat the process.
Applying paint with a roller
The lining has a rather complex profile, so the edges of the boards will have to be painted with a brush.
Gray painted paneling
Painting lining with a spray gun
An airless sprayer can be used to apply paint. This is the most successful way to carry out finishing work with an already installed facade. The spraying method allows you to paint all hard-to-reach places. But areas near window and door openings need to be refined using a paint brush.
To apply paint, you can also use devices such as low-pressure paint sprayers. When working with these tools, you need to take into account that some of the drops will settle on objects located close to the workplace. This happens because the paint exits the device’s nozzle in a fan-shaped manner. Therefore, not all particles reach the surface of the facade.
Working with a spray gun is more convenient than using a brush and roller. In addition, the dyeing process will be much faster.
Prices for paint sprayers
Carrying out the procedure
To paint wooden panels, paint or varnish with colors and dyes of different types and compositions is used (how to properly varnish a panel for a long time?). Application techniques and finishing methods depend on the composition of the paintwork material.
Varnish
To paint wooden panels with varnish you will need:
- check all existing lining, sort it by color and quality, exclude panels that contain falling knots or other obvious defects;
- thorough sanding is carried out until absolutely smooth to the touch is achieved;
- if necessary, cover with a special primer or apply the first base layer of varnish, leave each canvas to dry without touching the treated surface;
- if an opaque varnish is used, then repeated sanding over the painted layer is necessary;
- A second layer of varnish is applied until the color is uniform over the entire area of the canvas, and then dried.
Tip Rejected panels can be used as test panels. On them you can see the type of coating with different numbers of layers, etc.
You can watch how to properly varnish the lining, what tools and techniques to use for this, in the following video:
Dyeing white
To create the desired decorative effect, several coloring techniques are available:
- Acrylic pigment primer diluted to 80-100% is applied like a regular varnish. It creates a coating with a long service life, but its price is high.
- Polyurethane pigment primer labeled “bleached” or “white” with a dilution of up to 80-100% also provides the desired decorative effect, but over time the color becomes yellow.
- Oil with wax - with a single-layer coating requires rubbing with a rag to preserve the wood texture; with a two-layer finish the surface is opaque.
- Tinting or staining - often found with the markings “bleached oak”, “frost” and the like. The peculiarity of the finishing is a multi-layer coating with very thin and uniform films. Otherwise, a peeling effect will form on the surface.
These methods provide different shades of white, depending most on the type of wood.
You can learn how to quickly and correctly paint the lining white from this video: