Greetings to car enthusiasts and simply visitors to my blog. Today I want to talk about which battery for the chameleon welding helmet is necessary when replacing it, and I will also make a small upgrade of the mask.
Not long ago it happened that it became necessary to weld one part to another.
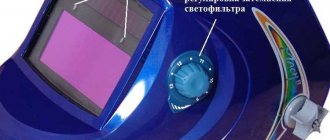
I had at my disposal a Resanta MS 2 welding mask, which contained a chameleon filter.
Everything was ready for welding, but as soon as I started welding the part, the “Bunny” was caught.
I stopped working and decided to check the filter.
When I brought the lighter to the filter glass and lit it, the filter did not darken, but only some faint flickering appeared.
It became clear that the filter was faulty.
But they didn’t want to wait for the parts that needed to be welded to each other and had to be welded into the faulty mask.
The chameleon welding mask is not a cheap pleasure, and therefore it was certainly a shame, since the mask was only 1 year old.
Types of faults
Very often a situation occurs when the chameleon welding helmet does not work. In this case, most likely the problem lies in the batteries. If everything is powered by solar panels, then the mask can simply be completely seated and need to be recharged. To do this, you need to put it in a sunny place and then check for functionality. If work is carried out on lithium batteries, then they also need to be replaced or charged, depending on the design. The strangest thing here will be damage to the battery pack itself, since then it will need to be replaced, and this is more expensive and complicated.
Batteries in the Chameleon mask
Glass damage may also be an issue. In this case, it is quite easy to identify the breakdown, since cracks or other mechanical damage are usually observed on the glass. Naturally, the welding helmet is not darkened in this case. This also requires replacing the liquid crystal glass, and its parameters must exactly match the previous one. This is one of the most expensive elements.
Replacing the battery in a chameleon welding helmet
One day the mask did not want to work: the most that could be achieved from it was a slight flicker of the screen.
In such cases, manufacturers sometimes advise keeping the mask in the sun to charge the internal batteries, but “recharging” did not help. The amount of work was small, it did not require much responsibility, and I decided to cook “blind” for a while, covering my face with a mask, but without looking at the arc, since the “chameleon” filter itself is already quite dark.
It was not possible to “pump up” the built-in batteries using the welding arc (there was a secret hope for this). In general, one job was done, but a new task immediately arose: change the mask or try to fix it. Of course, to begin with, the second choice was chosen: throwing it away would always be possible. It was decided to repair the chameleon mask with our own hands. It turned out to be a whole master class!
PROCEEDINGS
The easiest part of the job is to remove the chameleon element from the mask. Since on this model the dimming control is located outside, we first remove it. To do this, use a flat object (knife) to pry up the rotating handle of the regulator (1) and unscrew the plastic nut (2). There is nothing difficult in removing the filter element - it is installed on a latch (3). We don’t need the mask body with the outer replaceable glass (more precisely, a sheet of transparent plastic) for now, let’s see how to disassemble the filter.
The preliminary task is to determine the size of the built-in batteries. Everything would be simple if the filter housing had some kind of compartment or slot for them, but such masks are quite rare. And our case is the most typical: the case is non-separable. Using the same knife, pry up the dimming and sensitivity delay time regulators (4). In principle, you can remove the transparent plastic inserted into the body “from the eye side”, but this will not give us anything - we leave it as is.
“Non-separable case” in our case means that both halves of it are connected to each other, but there are no screws or at least stickers under which they can be hidden. The preliminary conclusion is that the halves are either glued together or secured with some kind of internal latches; this will become clear upon opening. To do this, we take the knife again and carefully try to separate the halves. The body should be held firmly during this operation.
The knife, by the way, is an ordinary table knife, with a rounded tip so as not to cut yourself if it accidentally slips. Having disconnected one of the corners, slowly, using the knife as a lever, we move along the perimeter (5). If the connection were made using latches, they would break or come out of engagement (depending on your luck) with a characteristic crunch, and after the first such click, you could try to somehow press on them in order to save at least part of it. But we don’t have any latches - it’s just gluing. So, continuing to be careful, we “unstick” the halves from one another, trying not to break them. If it breaks, it’s okay, but there’s no need to complicate the task by also fixing the body. When a sufficient gap is formed, we look into it from time to time. Very often, individual elements of the “filling” of electronic equipment are attached or “stuck” in different halves of the case, and they can be connected, for example, by thin soldered wires. If you “opened” the case in the wrong direction, you will have to solder these wires. And it’s not a fact that this will be possible without a “thin” soldering iron or soldering station. No such problem arose here: all electronic elements remained in the lower (outer) half of the case. By removing the cover, you can admire the inside of the device (6).
The first thing that catches your eye is what looks like two round batteries. Although it’s unlikely - quite ordinary batteries. Of course, it is possible to recharge the batteries a little, but they are still not batteries. However, if you consider that the mask has worked reliably for four seasons, there is not much difference: the battery will also at least lose a fair amount of capacity during this time. Apparently, in most cases, manufacturers call batteries “built-in batteries”. On simple masks of a low price level, at least. Finding similar batteries on sale would be quite simple, if not for one “but”. To this variety, the “positive” and “negative” terminals are welded at two points each - the connection can also be considered permanent. Exactly such elements are unlikely to be sold “on every corner”, and going specifically to a radio electronics store to buy them is not interesting. In the end, such batteries are convenient for assembly at a factory, but it’s difficult to unsolder the contacts from the board, and then find and solder back new “batteries with contacts” at home. There is one more reason that does not motivate such a “feat” at all: the board is multilayer.
All elements and conductive paths are visible only on one side; on the other, except for a glued photocell (“solar battery”) and a pair of sensors that respond to changes in illumination, nothing is visible.
To clear our conscience, we inspect other electronic components located on the board - there are no external defects. The first part of the task is completed: for the repair we need two round batteries “number 2330” with a voltage of 3 V (this data is indicated on them), ordinary ones, without any additional legs. In principle, any batteries are suitable, but for now we will focus on buying these.
The first attempt to buy exactly these batteries was unsuccessful. That is, others, similar, but of a different diameter or thickness, were on sale, but “2330” was only one. In general, the “market hand” showed a combination of three fingers. Since repairing the mask was not a priority, I did not specifically search for batteries.
And, as usually happens, a mask, or rather welding, was needed almost immediately. The resonator (part of the exhaust system on a car) needed to be replaced, and the new one required “adjustment”. The work is also small: move the hook for attaching to the body and slightly change the bend of the pipe. Welding is a matter of literally a few minutes, but without a mask you can’t do it, and you won’t be able to weld “with your eyes closed” - the metal is not thick, you need to constantly monitor the work. And somehow there’s nothing to go for batteries with. The easiest way out is to go to the place of sale “in the neighborhood” and buy batteries or a whole mask there; a more difficult one is to try to repair the mask based on what is available (a tool, 3 V round batteries, albeit of a completely different size, twice as thin and smaller in diameter, and had already been working for some time). In general, at least it was quite possible to practice.
PREPARATION
There are two (or even three) options for installing batteries. The first requires certain qualifications: inserting batteries into place is quite difficult. It is much easier to make some kind of “remote power supply”. And these are the second and third options that were used later.
But the beginning is the same in all cases. It is necessary to remove the old elements by disconnecting them from the “legs”. Let us remind you: they are attached by spot welding, two points for each terminal. I didn’t want to put in a lot of effort so as not to break the board, but with little effort it didn’t work: although the welding points were small, they “held” tightly and could not be torn off. The most convenient tool for this work turned out to be an engraver (sometimes called a drill). The “positive” contacts were easily disconnected using a cutting disc - it was enough to “saw” them right through at the weld points (7). It turned out to be more difficult with the “negative” contacts - the cutting disc did not fit there, there was no small (ground) disc included in the engraver’s equipment, but there was a grinding attachment - a “pebble” of a suitable size (. Here it is enough to “saw off” only one weld point, and then , twisting the battery in different directions, disconnect the second one.
An engraver is a useful tool (rarely, but accurately), but not everyone has it. It is possible to disconnect the batteries without it. You can still try to carefully, one by one, “break off” the welding points, or you can, for example, take some kind of needle file and saw the “legs” across, next to the welding points.
As a result, we have four contacts (“positive” - on top), to which we need to attach either wires or batteries directly. There are also several options here, but since the existing batteries were clearly “too small”, “too old” and would not last long, it was decided to use a “temporary scheme” so as not to waste time during subsequent replacement. The first solution is to simply solder the batteries to the existing contacts.
A FEW WORDS ABOUT CHECKING THE “CHAMELEON” AND ABOUT SOLDERING
Checking the functionality of the chameleon mask is easy and without welding. You can strike a lighter in front of the arc sensors, or you can point the mask at the light source (lamp or sun) so that it is not yet darkened, and quickly pass your hand in front of it. A working mask should go into darkening mode and after a while (usually less than a second, depending on its settings) “lighten up”. It was already possible to check the functionality of the experimental mask; when the elements were clamped between the contacts, it was regularly darkened. All that remains is to secure them, but without a soldering iron this would be difficult to do. (Afterwards I thought that conductive “glue for rear window heating filaments” (sold in car dealerships) could help in such a situation, but I did not check this option.)
To ensure high-quality soldering, you need three things: a soldering iron, solder and some kind of flux. We will have to dwell on this in more detail, because, from experience, not everyone knows how to “solder with a flywheel.” The soldering iron must be well heated; the solder, since we are talking about electronics, should preferably be low-melting; completely different substances are used as flux. Most often this is rosin; good results can be achieved using regular crushed aspirin (acetylsalicylic acid). For example, I prefer phosphoric, or more precisely orthophosphoric, acid (H3PO4).
Almost pure acid is also sold in car dealerships, called “rust reducer”, usually domestically produced. Disadvantage: after soldering with acid, it is advisable to neutralize its residues (if the soldered parts cannot be washed with water, then a brush or cotton wool slightly moistened with soda solution is quite suitable for cleaning). And the advantage is that the soldering holds tightly.
Before soldering, you should prepare a soldering iron. When working, carbon deposits form on its tip. The tip (usually it is copper) must be sharpened to metal and tinned - apply flux to the working surface and cover it with a thin layer of solder. The soldering iron we had was not quite suitable for working with electronics - the tip was too thick. But there is a way out here too. In such cases, I clean the carbon deposits from the tip only in a small area and service only that area.
As a result, even on a fairly large tip you can only hold a small drop of solder. That's what is required.
The parts to be soldered must also be tinned first. In the same way: dip the part and the soldering iron in flux, “pick up” a drop of solder on the soldering iron, and press it to the part.
A thin film should form, “flowing around” the heated area. We do the same with the second part, then once again apply flux to the tinned areas, press them together, and apply a soldering iron to them (sometimes even an additional portion of solder on the soldering iron is not needed, but this must be looked at locally). There should be no “snot” on properly soldered parts - the tinned areas of the connected parts should have a smooth transition of solder “to each other”.
REPLACEMENT OF ELEMENTS. OPTION ONE
To secure the batteries by soldering, you will first also have to tin small areas on both sides of them (not quite in the center, so as not to interfere with the pressing of the contacts). There are some peculiarities here. Batteries should not be heated too much as they may deteriorate. Therefore, the heating from the soldering iron should be minimal: if you touch it, you immediately move it away; if it doesn’t work the first time, you need to wait until the battery cools down. It is worth repeating that the soldering iron should be well heated (this requires less time), and the contact area of the tip with the battery should be small (less heat will be transferred in the end). If in doubt, you can try to practice on the removed elements.
Next, we prepare two small pieces of wire, remove the insulation from their ends and also service them. These will be jumpers from the “negative” contacts on the board to the “negative” contacts of the batteries. This is more convenient because there is little space for direct soldering. We also service the contacts in diagram (9). We solder jumpers to the “negative” contacts of the batteries (also with minimal heating of the latter, but this is easier), then solder each jumper to the “negative” contacts in the diagram (10). First, just in case, we close the sections of the circuit under the terminals. Small pieces of adhesive tape are enough. We will not remove them in the future. We attach the batteries to the lower contacts and solder the “positive” terminals (11). We check the functionality - everything is in order. You can put it back together.
There is no point in gluing the body tightly together. Tightness is not required, and inside the mask it will be pressed anyway. It’s easier to wrap it with thin strips of electrical tape from the edges without covering the sensors, photocell and “window” (12). To be on the safe side, you can apply a thin layer of hot melt adhesive (13) or, for example, sealant around the perimeter. It will hold, it won’t interfere with the installation of the body into the mask, and it’s not difficult to disassemble it in the future, if anything happens.
At this point the repair could be considered complete. The mask works, everything that needed to be done with welding was done. But I wanted to replace the temporary circuit with a permanent one - install new batteries of the required size. The search for them in the nearest large populated area ended in the same way as the first time: in a good dozen retail outlets, only one element 2330 was available.
So we had to take almost the same elements 2430, with a slightly larger diameter, but the same thickness (the first two numbers are the diameter of the element in millimeters, the second are the thickness in tenths of a millimeter). Actually, the size of the elements no longer mattered: the idea arose to make “remote power supply” by taking the batteries outside
SECOND AND THIRD REPLACEMENT OPTIONS
We disassemble the filter again, solder out the batteries, and instead of them solder pieces of wire, 20–30 cm long, with a margin to all four contacts. I pulled them out from some old power cord, and there were three suitable wires with different colors of insulation. Why three and not four?
Because at first there was an idea to get by with two. On almost all equipment with several batteries, they are assembled in series, one after the other, i.e., it is enough to have only two terminals for connection. This option did not work on the mask: with this connection, it darkens, but does not work correctly, and some conductive paths were visible between the two middle pins of the contacts on the board. In our case, we could get by with three conclusions: the “diagnosis” showed that the middle contacts were connected. It is not a fact that other masks use the same circuit diagram; often the batteries are “spaced” to different edges of the board; whether in such cases there is some kind of common bus connecting them is unknown. In general, the easiest way to do repairs is to solder all four wires, insulate them (15), drill two holes in the housing cover, group the wires in pairs, bring them out and seal the housing. To do this, we again use hot melt glue. We also apply a little glue to the places where the wires come out of the housing (16), “so that they don’t dangle.”
The further task is to attach the batteries to the terminals. The easiest option is to press the wires to the poles of the batteries, for example with the same electrical tape. Let's consider this the second option - photo (17) shows what it might look like assembled with a mask. The batteries are light, the wires are quite rigid, if you clamp them with a wire frame on the mask, you don’t have to do anything else. It will work, but you shouldn't expect reliable contact.
Although it is not difficult to restore contact if it disappears. If you want to make a truly reliable connection, you need to assemble some kind of “battery block”. And this is the third possible option.
Further actions depend on what is available. It is best, of course, to use ready-made blocks. 3V coin cell batteries of various sizes are used in many types of electronic equipment. Each of them can be easily replaced with a pair of “finger” or “little finger” (AA or AAA) batteries or accumulators. Any unnecessary or broken electronics can become a “donor”: remote controls, some car alarm key fobs, toys, household appliances... even computer motherboards. If you cut out a section with a battery slot from a damaged board or case, the problem is almost solved (of course, you will need two such slots). Well, if nothing suitable is found, you can assemble the block yourself from scrap materials.
In our case, everything we needed (18) was found after a short search. Of course, there is no need to assemble exactly the same set - there is room for imagination. The body is an old packaging from cutting discs for an engraver. The same engraver, using another grinding stone, “rubbed” a narrow slot in the housing cover for inserting wires with contacts. The spring was once part of a bicycle bell, the plastic rings are gaskets of unknown origin (you can cut an analogue from cardboard). The third battery was “cut out” from the mask filter and was also useful as a gasket. Three rings “for curtains” were also needed; they were soldered to three terminals from the filter housing (19). There is no need to use the fourth pin in this configuration. Plastic spacers are needed to ensure the centering of the contacts - those rings that touch the “negative” sides of the batteries: the gap between the poles of such batteries is a fraction of a millimeter, and, of course, it is impossible to bridge the poles.
Next is the assembly. Into the housing we alternately insert the gasket with the “negative” (blue) terminal, the battery with the “negative” side down (20), the second gasket that covers the “intermediate” terminal with the yellow-green wire, and another battery (21). These two wires were intentionally made a little longer than the second pair - it’s easier to assemble.
We tie them in a knot, put on the “positive” contact - brown wire (22). It does not need an insulating gasket, instead we press the contact on top with a third gasket (an old battery), install a spring, close the lid (23). Actually, that’s all.
The assembly just seems complicated; replacing the batteries in such a unit in the future is not a problem at all. We insert the resulting structure into the mask (24).
The battery pack, of course, needs to be attached to the mask - again glue or sealant will do.
The price of the most popular “chameleon” masks in the budget price range is 1000–4000 rubles (as of November 2013). The time spent on repairs, if all the tools are selected and the procedure is clear, is literally an hour or two. The batteries, judging by statistics, last at least three years; I had to change them in the fifth season. The cost of a new pair of elements is 60–70 rubles (as of November 2013). In general, the benefits of replacement are quite obvious.
Author: Maxim Griboyedov
Maintenance
If you find a chameleon of malfunction on the welding helmet, then first of all you should stop all welding work that was being carried out and you need to turn off the equipment. Then it is advisable to conduct an external inspection to identify possible malfunctions and their causes. Next, if all else fails, then you need to disassemble the product to inspect it from the inside.
To reduce the likelihood of failure, periodic maintenance should be performed. It should be carried out at least once a month. This helps remove dirt and dust that accumulates in the filter cartridge. To clean the cartridge, use a clean cotton cloth, which is moistened with a non-aggressive liquid. Do not use abrasives, solvents or substances that contain oil. During cleaning, you do not need to bend the electronic cable and do not press hard on the material so as not to damage it.
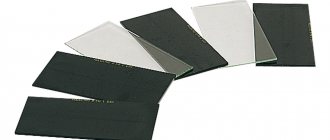
It may be necessary to remove the filter plates. This is necessary for replacement, removing excess particles from it, servicing the element, or for removing the protective film if a new mask is used. During maintenance or when repairing a chameleon welding helmet with two batteries, it may be necessary to replace the batteries. To do this you need:
- Rotate the power compartment cover so that it is aligned with the open lock sign on the case;
- Open the lid;
- Remove the batteries;
- Install new ones, observing the polarity of the elements.
Safety precautions
During work, you should act carefully, since the likelihood of damage to a person is minimal, but it is quite possible to damage the equipment itself. To do this, all procedures when wiping and when working with microcircuits should be done extremely delicately, as you can damage the filter or break small parts. There is also no need to use oils or other aggressive substances for maintenance. After all procedures, the equipment should be wiped with a dry cloth.
How does a chameleon mask work?
The chameleon mask can instantly darken when bright light appears. As a result, the welder does not have serious vision problems.
It is worth noting that during the production of the chameleon mask, the darkening filter is made in layers, where a special film and liquid crystals are alternated. When sparks appear, the crystals are positioned in such a way that only an acceptable portion of the light passes through the filter.