Working with various materials requires the use of high-quality cutting tools. Most of the required types have standard parameters and are freely sold in stores, but some samples have specific sizes or shapes. They are not produced or are extremely rare. To a greater extent, the question concerns cutters that have many profile options, varieties or types of design.
Finding the right type can take too much time, so sometimes there are no other options other than making a cutter at home.
DIY cutter: making homemade wood cutters
The question of how a wood cutter can be made with your own hands worries not only home craftsmen who do their own carpentry and modeling, but also professional finishers. And the main thing here is not only the desire to save money, but the fact that serial tools for woodworking, which today are easy to purchase in specialized stores or on construction markets, often do not have the required configuration of the working part. That is why specialists and home craftsmen who use such a tool have to modify its serial models or make it from scratch, using cylindrical steel blanks.
Homemade wood cutters
Types of homemade cutters for wood processing
Cone cutters, processed at medium and high speeds, are used to remove excess wood from the end elements of the workpiece. The best option for making a tool of this type on your own is a cutter from a drill. This cutter from a drill is made at home as follows: the tool is cut closer to its shank (from half to a quarter of its length), then each cutting edge of the cut drill is ground down by 1/2 – 1/3 of its diameter. If the cutting edges are ground down to a large amount, then not only will its body be exposed, but it will also lose its cutting properties. It is difficult to restore the cutting edges of homemade wood cutters, which have a spiral shape, with your own hands.
From a drill you can make cutters with different working heads
An end-type wood cutter can also be made from a thin-walled tube. How to make a cutter from such a blank? The following recommendations should be followed.
- A piece of pipe is taken as a workpiece, the length of which is 15–20 cm.
- From the side of the future cutting edge (at a distance of 2–3 cm from it), oval-shaped grooves are made on both sides of the pipe.
- The future cutting part of the wood cutter is given a conical shape, and it is ground at an angle of 2–3°.
- Having clamped the workpiece in a vice, a cross-shaped cut is made on its end part, for which an angle grinder is used.
- From the side of the cutting part, grooves are cut on the workpiece - up to oval holes.
Homemade tubular cutters
Using a homemade end mill made from a thin-walled tube, you can create blind or through holes in wood products. In this case, the inner surface of the blind holes must be refined using a chisel.
Many home craftsmen are interested in the question of how to make a large-diameter cone cutter with their own hands. It should be borne in mind that it is not easy to make such a tool for woodworking; for this you need to use special blanks and complex metal-cutting equipment.
Source: https://met-all.org/oborudovanie/prochee/freza-po-derevu-svoimi-rukami-samodelnaya.html
How to make a cutter
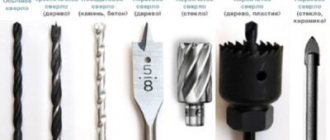
Milling cutter is a general name for a wide group of cutting tools. There are two main types:
- on wood;
- on metal.
There are many types of cutter designs used to perform different technological operations:
- Whole.
- Composite (prefabricated).
- End.
- End face.
- Shaped.
- With replaceable plates and others.
The production of cutting tools is a high-tech process that is demanding on the quality of the material. For example, the production of end mills consists of several stages:
- Turning of a workpiece (shaping).
- Milling teeth.
- Processing of cutting edges (sharpening and backfilling).
- Heat treatment of the material (hardening, tempering, other operations resulting in a high-quality metal structure).
To manufacture other varieties, similar or other operations are performed, determined by the type and design of the tool. Homemade cutters are only modifications of ready-made samples.
The need to use one type or another, to obtain a certain profile or size of the cutting organ, forces you to decide the issue yourself. Let's look at how to make a cutter with your own hands at home.
Homemade wood cutters
Making a wood cutter with your own hands is possible if you have the appropriate workpiece and a machine where it will be installed. At home, an electric drill or a hand-held milling machine is usually used. The most affordable option is to change the shape of a regular metal drill, but other methods can also be used.
Let's look at how to make a wood cutter from a drill. Depending on the purpose of the tool, you will need a workpiece (metal drill) of a certain size. If you plan to manufacture a shaped cutter, then the diameter of the workpiece must be equal to the maximum diameter of the final product. Manufacturing consists of two stages:
- Giving a profile.
- Creating a shank.
Both operations require the use of industrial equipment. In any case, a lathe will be required to make the shank. The hand router collet is designed for a diameter of 8 mm (there are options for 6 and 7 mm). Therefore, for large drill diameters, the shank should be prepared before creating the profile. This will eliminate beating, which is dangerous when processing wood. The easiest way to create a profile is by grinding. First you need to make a template, according to which you need to constantly check the status of the profile. To work, you will need a grinding machine (emery), a grinder or a cutting wheel mounted in the chuck of an electric drill.
To create replacement plates for the milling head, either ready-made samples are used, which are given the desired shape, or blanks made of high-quality metal. The profile is created by grinding on a machine at hand.
The final operation is backing. This is the process of setting a specific cutting edge angle to ensure that the back of the edge does not contact the workpiece.
Important! Backing is a rather labor-intensive process, but necessary; it is the only thing that gives the cutter the ability to work normally.
DIY metal cutter
Making cutters for metal at home is limited to regrinding existing tools, changing the profile or diameter of the cutting part. More active intervention will require the use of industrial equipment, as it will be necessary to perform complex procedures:
- Tempering of metal (a procedure reverse to hardening).
- Machining, including shaping, sharpening, backing).
- Hardening the cutter.
It is almost impossible to carry out these actions efficiently at home. In addition, work of this kind requires considerable professional training and experience, which not everyone has. Therefore, they are limited to only available procedures that involve minor intervention in the original state of the workpiece.
Making cutting tools at home requires the necessary equipment and suitable workpieces. In addition, you must have skills and experience, otherwise you can end up with a very dangerous product that can ruin the surface being processed and harm the craftsman himself. It is not recommended for an untrained person to carry out such work; it is better to seek help from a specialist.
How to make a milling cutter from a drill
In this article we will talk about how to make a cutter from a twist drill, and also look at the structure of these cutting tools.
Sharpening a cutter in this way is not at all difficult, but the product you receive will not have very good qualities and high abilities. Undoubtedly, a spiral cutter made of carbide is much superior to its homemade counterpart. But in terms of price, the drill is, of course, almost a hundred times cheaper than a figure-eight cutter. So, if you are not satisfied with the high quality of your products, experts have already figured out how to resharpen a drill simply and quickly.
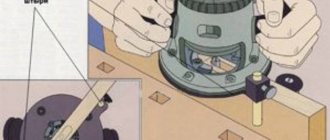
First, we must understand what we will do and what we can get in the end. Therefore, we will study the section of the drill in a cut. The cutting part of the drill is a cylinder-shaped rod with two spiral grooves. During the drilling process, chips fall along them from the hole being machined. Each groove on the protrusion has a cutting edge. The cutting part of the drill consists of the front and back surfaces, two cutting edges, sharpened along two surfaces in the shape of a cone, with a jumper at an angle of 55 degrees between them. During operation, all cutting tools, including drills, behave depending on the material from which they are made, heat treatment and the angles at which the cutting edges are sharpened.
Twist drills are widely used in industry. These drills have a diameter ranging from one tenth to eighty millimeters. The main parts of the drill are the working part, a conical or cylindrical shank (with its help the drill is secured in the spindle or in the chuck) and the legs, which act as a stop for removing the drill from the spindle.
Drills have different spiral angles. The less the drill spiral is twisted, the better the cutter will be. And sharpening such a drill is much easier. Plus, such cutters vibrate much less.
When examining the cross-section of the cutter, you will notice that the largest diameter is only at one point through which the cutting edge passes. At any other point in the section, its diameter is less than the original one.
Air flows passing through the backing grooves prevent the cutter from heating up. Looking at the cylindrical hole being processed, in which milling takes place, we notice the movement of air, which cools the cutting tool well. The cutting edge of the cutter touches the surface being processed at only one point, nothing interferes with the process. Air currents also help remove cut chips.
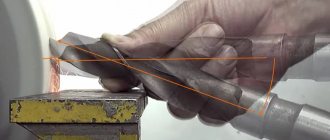
To begin work, we will need a marker for marking. Since we will be processing two identical spirals, we will paint over one of these spirals with a marker so as not to miss when sharpening.
Take a drill and grind it along a spiral turn, passing once. We cut off part of the metal until we finally get the profile we need. We grind with small ribbons, making backing. This operation must be carried out without fail on both one spiral and the second. A cutter with a back that is too flat will not show good cutting properties.
We will carry out the work on a household machine, which is perfect for turning our drill into a milling cutter. In the process of sharpening the drill, we will need to hold it at a certain angle. On this machine we can do this very easily, unlike other machines in which the jaw is located far from the circle. It will not be possible to place the drill on them at the desired angle to the disk.
Cone cutters
Wood cutters, the working part of which has a conical configuration, are used for processing surfaces of complex terrain. In particular, with the help of such cutters, finishing of grooves in elements of furniture structures is performed. To manufacture such wood cutters in production conditions, complex-shaped workpieces are used, which are problematic to process at home. Such a cutter can be made with your own hands from a drill, the working part of which is given the required configuration.
Due to the fact that a homemade wood cutter is used to process fairly soft material in several passes, there is no need to further strengthen the structure of the material from which such a tool is made.
Manufacturing options for cone cutters
Manufacturing technology and recommendations
A homemade cutter has limitations on the materials that can be processed with its help. Making cutters for your own needs, as a rule, involves working with soft grade steel. That is why such a homemade tool is capable of cutting wood quite effectively, but when processing harder materials it quickly becomes dull.
In order to make their own milling tools, craftsmen use scraps of steel rods or reinforcement. If reinforcement is used as a workpiece, its ribbed surface is leveled using a lathe.
Scheme of a homemade cutter
The technology for making a homemade wood cutter from such a blank is as follows:
- On the part of the cylindrical workpiece where the cutting part of the homemade tool will be formed, half the diameter is cut off.
- A smooth transition is formed between parts of the workpiece with different diameters.
- Another quarter of the diameter is removed from the treated section of the workpiece; such a section of the workpiece is also connected with a smooth transition to the untreated part of the rod.
- The processed part of the workpiece is given a rectangular shape, for which its lower part is cut off. The thickness of the part of the workpiece on which the working part of the woodworking tool will be formed should be 2–5 mm.
To trim the rod, you can use a grinder and a drill, and the formation of the working part can be done on a sharpening machine
A homemade cutter can be used to process wood, but its internal angle must coincide with the center of rotation.
In order for a home-made wood cutter to be used for effective processing, the following recommendations must be followed when making it.
- The cutting edge must be sharpened at an angle of 7–10°. If you make it sharper, it will hold an edge poorly and have low cutting properties.
- To give the cutting part of the tool the required configuration, diamond-coated needle files or angle grinders with discs specially designed for metal work are used.
- If a homemade wood cutter must have a complex configuration, then it can be bent or flattened.
The cutting edge is polished with a diamond disc, then the surface is polished with sandpaper
With a small thickness of the cutting part, a hand-made milling tool has a fairly short working life. To slightly increase the service life of such a wood cutter, the corner on the bottom of the tool, located opposite its cutting edge, can be slightly rounded.
A homemade cutter cannot immediately cope with a large volume of wood removed from the surface of the workpiece, so processing is carried out in several passes.
How to make a wood cutter with your own hands?
Every craftsman at least once in his life had to work with wood, and in the process of this work it was impossible not to use such a mechanism as cutters. And even more so, with repeated use, their ineffectiveness during long-term use immediately catches the eye.
- Preparing the template
- Manufacturing of the product
Constant sharpening and maintenance of the cut takes a lot of time, and in the end, production materials do not last very long, but they cost a decent amount.
In order to always be able to work with wood, it is useful to have the skill to make cutters and materials accompanying these parts, such as knives, for example.
This article will tell you exactly how to make woodworking cutters with your own hands.
How to make a homemade wood cutter from a drill
Working with various materials requires the use of high-quality cutting tools.
Most of the required types have standard parameters and are freely sold in stores, but some samples have specific sizes or shapes. They are not produced or are extremely rare.
To a greater extent, the question concerns cutters that have many profile options, varieties or types of design.
Finding the right type can take too much time, so sometimes there are no other options other than making a cutter at home.
How to make a cutter
Milling cutter is a general name for a wide group of cutting tools. There are two main types:
There are many types of cutter designs used to perform different technological operations:
- Whole.
- Composite (prefabricated).
- End.
- End face.
- Shaped.
- With replaceable plates and others.
The production of cutting tools is a high-tech process that is demanding on the quality of the material. For example, the production of end mills consists of several stages:
- Turning of a workpiece (shaping).
- Milling teeth.
- Processing of cutting edges (sharpening and backfilling).
- Heat treatment of the material (hardening, tempering, other operations resulting in a high-quality metal structure).
To manufacture other varieties, similar or other operations are performed, determined by the type and design of the tool. Homemade cutters are only modifications of ready-made samples.
Attention! The manufacturing technology of cutting tools is complex and requires the use of precise equipment. At home, production “from scratch” is impossible; only processing of the finished tool, changing its shape or size is available.
The need to use one type or another, to obtain a certain profile or size of the cutting organ, forces you to decide the issue yourself. Let's look at how to make a cutter with your own hands at home.
Homemade wood cutters
Making a wood cutter with your own hands is possible if you have the appropriate workpiece and a machine where it will be installed. At home, an electric drill or a hand-held milling machine is usually used. The most affordable option is to change the shape of a regular metal drill, but other methods can also be used.
Let's look at how to make a wood cutter from a drill. Depending on the purpose of the tool, you will need a workpiece (metal drill) of a certain size. If you plan to manufacture a shaped cutter, then the diameter of the workpiece must be equal to the maximum diameter of the final product. Manufacturing consists of two stages:
- Giving a profile.
- Creating a shank.
Both operations require the use of industrial equipment. In any case, a lathe will be required to make the shank. The hand router collet is designed for a diameter of 8 mm (there are options for 6 and 7 mm). Therefore, for large drill diameters, the shank should be prepared before creating the profile.
This will eliminate beating, which is dangerous when processing wood. The easiest way to create a profile is by grinding. First you need to make a template, according to which you need to constantly check the status of the profile.
To work, you will need a grinding machine (emery), a grinder or a cutting wheel mounted in the chuck of an electric drill.
To create replacement plates for the milling head, either ready-made samples are used, which are given the desired shape, or blanks made of high-quality metal. The profile is created by grinding on a machine at hand.
The final operation is backing. This is the process of setting a specific cutting edge angle to ensure that the back of the edge does not contact the workpiece.
Important! Backing is a rather labor-intensive process, but necessary; it is the only thing that gives the cutter the ability to work normally.
DIY metal cutter
Making cutters for metal at home is limited to regrinding existing tools, changing the profile or diameter of the cutting part. More active intervention will require the use of industrial equipment, as it will be necessary to perform complex procedures:
- Tempering of metal (a procedure reverse to hardening).
- Machining, including shaping, sharpening, backing).
- Hardening the cutter.
It is almost impossible to carry out these actions efficiently at home. In addition, work of this kind requires considerable professional training and experience, which not everyone has. Therefore, they are limited to only available procedures that involve minor intervention in the original state of the workpiece.
Making cutting tools at home requires the necessary equipment and suitable workpieces. In addition, you must have skills and experience, otherwise you can end up with a very dangerous product that can ruin the surface being processed and harm the craftsman himself. It is not recommended for an untrained person to carry out such work; it is better to seek help from a specialist.
Copy rings and templates
Devices for a hand router, such as copying rings, are a round plate with a protruding shoulder that can slide along the surface along the template, thereby ensuring the exact trajectory of the cutter. Often this element is attached to the base of the workbench. There are several ways to install it:
- Screwing the ring into a threaded hole.
- Installation of special antennae of the device into the holes on the sole.
If you have such a device for a manual router as a template, you can also achieve more accurate and efficient work. The said element is fixed directly to the workpiece itself with double-sided tape, after which both parts of the device are pressed to the machine using clamps. Upon completion of the work, experts recommend checking the condition of the ring - see whether it is securely pressed against the edge of the template or not.
Another feature of the tool in question is the ability to process not the entire edge, but only its corners. At the same time, some devices for a hand router allow you to make curves of four different radii at once. Thus, the process of cutting material using a template is an excellent way to cut grooves for a part.
Preparing the template
Stage 1. Sketching.
The materials that may be needed at this stage look like this. Using a ruler and pencil, it is worth sketching the knives, since they are a direct reflection of the future cutter. If they are not available, it is not a problem to find an example on the Internet, and then redraw its profile and follow further instructions.
Stage 2. Cut out the shape.
Depending on how many knives we ultimately need, we count out the required number with a leaf and, grabbing them, carefully cut out the shape of the future product, without catching either the “edge” or the two load-bearing sides of the knife.
Stage 3. Making the mold.
Using glue, glue the template to the workpiece and carefully saw off the excess length with a grinder. Remember: it is important to preserve not only the edge, but also the sides! So, when working with an angle grinder, you should be somewhat careful and take into account the dimensions of the product.
Device, types and characteristics
Structurally, a milling drill consists of a shank, a milling part and a drilling part. Products with two working surfaces are usually classified according to the following criteria:
- material (high-alloy tool high-speed steel, hard alloys);
- tail section designs (cylindrical, hexagonal);
- length of the shank (short, extended, long);
- the material being processed (for metal, wood, universal);
- manufacturing method (solid, composite);
- diameter (from 3 to 12 mm);
- overall length;
- length of working parts;
- hardness (61÷68 HRC).
A drill-cutter working on metal is a universal cutting tool. They perform operations to make shaped holes in any thin-walled material. The advantages of the product, firstly, include the fact that with the help of one tool it is possible to perform two operations, which reduces the time for making a hole of the required configuration. This fact increases labor productivity, which is a decisive factor in production. Secondly, to rotate the milling drill, you can use any tool that has an appropriate clamping device
This is important for home craftsmen and small workshops. They can use a hammer drill, drill, or tabletop drilling or milling machines
Thirdly, the product can be resharpened, i.e. the sharpening angle of the drill can be restored if it becomes dull.
Adviсe
Let's talk a little about tips that should be taken into account when creating homemade cutter models.
- To give the cutting area the correct configuration, you will need to use diamond-coated needle files or angle grinders with discs that are used specifically for working with metal.
- The edge for cutting should be sharpened at a 7-10 degree angle. If you make it sharper, then it will hold an edge poorly, which is why its cutting properties will significantly decrease.
- If a wood cutter made by yourself must have some kind of complex device, you can flatten it or bend it.
- When using an edge router, take into account that the guide ring or bearing is already installed.
- The cutter must be secured in the collet before starting work.
- The presence of additional accessories will help increase the power of the electric tool.
- The part to be processed must have some kind of support.
- When carrying out work, the correct insertion depth level should be set.
- To prevent too much dust from being generated when working, you can use a vacuum cleaner.
In general, it should be said that creating a wood cutter yourself is not difficult. True, it should be understood that in this way you can quickly solve some simple problem, because for hardware such as bolts, ordinary steel is used, not tool steel. This means that such a homemade cutter will quickly wear out. But its life can be significantly extended in a number of ways. Therefore, this solution has a place and should be used in cases where you really need to quickly acquire a pretty good wood cutter in order to get the desired result.
For more information on how to make a wood cutter with your own hands, see the following video.
Required materials and tools
If you need a wood cutter, but you can’t go and buy it in a store, but you have a metal drill at home, you can easily and simply sharpen it into a tool of the desired diameter. A steel drill is intended for metalworking, which means it will withstand drilling wood just fine.
To make a cutter, in addition to the metal drill itself, you will need the following materials and tools:
- Bulgarian;
- file;
- drilling machine (preferably vertical);
- router or drill.
Also, for the convenience of the work process, it is necessary to prepare a marker or tape, a piece of wood for testing the resulting attachment.
In some cases, additional tools and materials may be required to make work more convenient.
Cutting disc for drill
If it is necessary to use an angle grinder, but it is not available, it is permissible to use a cutting wheel for a screwdriver or drill. To be able to use this device, you need to purchase or manufacture a special attachment that ensures reliable fastening of the cutting disc.
PHOTO: img.staticbg.com The cutting disc must be attached using a special adapter
Using a drill attachment for a cutting wheel has several advantages, including:
- the ability to process metal in places where it is difficult to reach with a regular grinder;
- versatility since the user only needs to change the attachment without having to change the tool.
PHOTO: Lower drill speed reduces metal cutting efficiency
The disadvantages of this method is the need to fully comply with safety rules when operating a cutting tool. Also among the negative aspects are:
- decreased operating efficiency due to fewer revolutions;
- limited thickness of the processed metal to 5 mm.
It must be taken into account that the shaft of the power tool can rotate in both directions. When cutting, you must ensure that its rotation is carried out exclusively clockwise.
PHOTO: ae01.alicdn.com A variety of cutting discs allows you to turn your drill into a universal tool
Active use of drill attachments allows you to significantly expand the range of applications of this tool, including use as equipment for plucking poultry or mixing a solution. Therefore, when carrying out construction or repair work, you need to think about the need to purchase such a device. You can once again learn about the features of nozzles for cutting metal from the presented video.
Watch this video on YouTube
PHOTO: beton-house.com The corresponding attachment turns the drill into a concrete mixer PHOTO: One movement, and you can pluck a bird with the drill PHOTO: A set of brushes will turn the drill into a device for cleaning and grinding metal
Previous DIY HomiusSpa at Home with Helpful Bath Bombs Next STORIESReinventing an Old Chair: 5 Creative and Easy Ideas
Types of cutters for metal
An electric drill with an inserted cutter can replace a manual metal milling cutter. Milling with a drill is not as convenient as with a special tool, but you can do many jobs. Types of metal cutters for a manual router:
- End This is the most commonly used type of metal tool. The axis of rotation of the end mill is located vertically. Flat surfaces are milled, from which a layer of metal is removed.
- Disk. This is a tool for forming various grooves and grooves. The teeth can be located both on the side and on the end surface of the tool.
- Cylindrical. The axis of rotation of such a tool is located horizontally. The teeth are on the side surface. They can be straight or screw. Helical teeth ensure more precise and smooth operation of the tool.
- End mills machine grooves, recesses, and ledges. They have teeth both on the side surface and at the end.
- Shaped and corner cutters are used for processing shaped and corner surfaces. These are the least commonly used types of tools.
When working with a drill on concrete, carbide bits with adapters are used. Simple types of cutters that work in conjunction with electric drills are a countersink and a cutter. They are used for boring holes in metal and roughing.
Guide rail
When it comes to straight lines, a guide rail is a good alternative to the rip fence. It is fixed at an arbitrary distance from the edge and at any angle to it. Instead of a stop, a special shoe is installed on the rods - it slides along the tire and sets the position of the router. Due to the support on the guide, a height difference may occur as the machine is raised above the workpiece. To avoid holding it suspended, extend the support leg (if provided).
In a special configuration, such guides also serve for precise milling of holes, which is especially important when making furniture (the ruler has holes with a standard pitch, the machine has a stopper; all you have to do is select the desired positions and drill).
Important note: a set of parts for working along the guide is not purchased in all cases; it must be included in the manufacturer's list of accessories and be suitable for the specific router. The tire is fixed relative to the workpiece
The router is positioned along it using a “shoe” similar to a side stop, and can be placed at different distances from it. Since only part of the platform rests on the tire, an additional “leg” is extended
The tire is fixed relative to the workpiece. The router is positioned along it using a “shoe” similar to a side stop, and can be placed at different distances from it. Since only part of the platform rests on the tire, an additional “leg” is extended.
Do-it-yourself wood cutter from a drill Metalworker's Guide
The drill has long been used not only for drilling holes in various materials. This tool has found its application not only in the field of construction, but also in the field of designing and assembling furniture.
To do this, special types of attachments are installed on the tool, which are called wood cutters. Wood cutters for drills allow you to carry out different types of processing of wood materials.
To do the job correctly, you will need to choose the right nozzle.
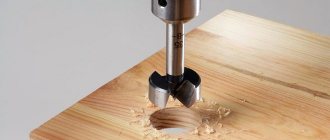
A wood cutter for a drill is somewhat reminiscent of a drill, however, instead of a cutting edge there are teeth of various designs. The ability to perform certain technological operations depends on the shape of the teeth. To secure the attachment in the tool chuck, the cutter has a cylindrical shank.
Set of wood cutters
The working part of the nozzles is sharpened using high-precision equipment, and specialized grades of steel are used for their manufacture. Their service life depends on the quality of the steel used for the production of nozzles. Milling attachments for drills come in the following types:
- Mounted, the dimensions of the mounting holes of such products are 32 mm, and they are intended to perform relevant tasks on stationary milling machines
- End mills are also called finger cutters, and their seating area can range in size from 8 to 12 mm. Such products are suitable not only for stationary milling machines, but also for hand drills
Types of wood cutters
! For hand tools, it is important to use exclusively end mills. Using these products you can process not only wood materials, but also drywall.
Milling cutters are produced according to their intended purpose, depending on the types of wood materials that are planned to be processed with them. Some of the most reliable and wear-resistant products are those designed for processing plywood.
Their main advantage is plates made of hard alloys, which has a positive effect on the service life of the products.
Depending on what operation is planned to be performed on the wood material, cutters are divided into appropriate types (moulding, disk, seam, fillet, etc.).
How to use a drill with a cutter correctly
Before you pick up the tool and attach the attachment to its chuck, you should understand that this can only be done for rough work. To achieve perfect finishing of the material, you will need to use a milling machine.
To use a wood cutter on a drill, you need to understand the peculiarities of performing these actions.
The principle of operation of the nozzles is similar to drilling, only in this case the material is processed, obtaining various types of holes and shapes in it.
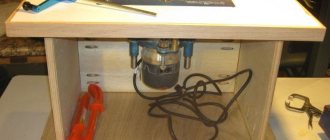
To process wood with such an attachment at home, you need to resort to building a milling machine with your own hands from a drill.
! Special brackets are produced in the form of a frame for securing the drill, which allow the use of hand tools for working with cutters.
Drill with a special bracket for working with a milling cutter
Not many home craftsmen know which drill is suitable for milling.
To obtain high accuracy of cut shapes in wood, the tool must have a speed control function and a large power reserve.
A drill as a milling tool is not the best solution, as the following negative factors contribute to this:
- Negative impact on the tool gearbox
- Rapid heating of the tool, which shortens its service life
- Probability of misalignment in relation to the workpiece being processed
- Unreliable fixation in the tool chuck
Despite all these disadvantages, hand tools continue to be used to cut wood. When performing work, you must comply with the following rules:
- Don't rush to do the work
- Act carefully
- Securely fix the workpiece
- Pause periodically to allow the instrument to cool down.
! If you plan to work with a wood cutter for a long time, then for such purposes it would be a good idea to purchase a special attachment made of carbide materials. As soon as the nozzle is securely fixed in the key chuck of the tool, you can begin to perform the appropriate actions.
Choosing wood cutters for a drill
When choosing nozzles, their parameters are important. Nozzles come not only of different types, but also differ in the types of materials that they plan to process. Some of the main criteria for choosing milling attachments include:
- Product size, which depends on the technological task
- The shape of the cutting knives, on which the final result depends
- Sharpening angle
- Production material, which affects not only the capabilities of the nozzle, but also their service life
- Purpose. The attachments can be used to process not only wood materials, but also metals, plastics and various types of natural stone.
Processing wood with a milling cutter on a drill
https://www.youtube.com/watch?v=q5uGFd7yfK8
When choosing a product, you need to pay attention to the manufacturer, but if you plan to use the attachments in question on drills, then it is advisable to buy cutters from inexpensive products.
Do-it-yourself vertical milling cutter
It is quite difficult to operate a drill with such an attachment installed in its chuck, and it is almost impossible to obtain a clean result.
If you don’t have a milling machine at hand, but you need to use a milling attachment to do rough work, then a regular drill will do.
To do this, it is recommended to fix it in a vertical position and securely fasten it.
! To be able to regulate the rotation speed of the tool chuck, it is recommended to use a voltage regulator.
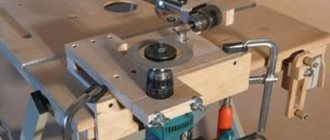
Homemade milling machine
In order to rough-process wood, you will need an appropriate set of wood cutters, as well as a homemade machine from a drill, which you can make with your own hands.
Manufacturing the installation does not require any skills or knowledge, and in each individual case the design may differ.
The main rule of such an installation is to securely secure the tool.
To make a homemade milling machine from a drill with your own hands, you will need to perform the following steps:
- A table is being made, which requires wood. The amount of wood required to make a table depends on the size of the future device
- Creating a platform with a limiter. The drill will be fixed in this area and moved using the appropriate guides. To make the platform, you can use chipboard and steel tubes
- Installing the tool on the platform. To secure the tool, you need to use steel plates and threaded connectors in the form of bolts and nuts
- Making a handle that moves the tool vertically up and down
Homemade machine for milling wood
The drill milling machine is ready for work. You can install the appropriate cutters in the chuck and begin testing it. Do not forget that the work must be carried out with extreme caution, since the slightest wrong movement can cause the tool to be torn out from the installation structure.
If the device you built yourself passes the first test, then you can make a control panel for it to make it easier to operate.
Such a tool has one significant advantage - it can be used for both milling and drilling. The drill can be removed at any time and used outside the structure.
Do not forget about the negative impact on the drill when working with attachments, which greatly reduces the service life of the tool.
[Total: 6 Average: 2.2/5]
DIY cutter: making homemade wood cutters
The question of how a wood cutter can be made with your own hands worries not only home craftsmen who do their own carpentry and modeling, but also professional finishers.
And the main thing here is not only the desire to save money, but the fact that serial tools for woodworking, which today are easy to purchase in specialized stores or on construction markets, often do not have the required configuration of the working part. That is why specialists and home craftsmen who use such a tool have to modify its serial models or make it from scratch, using cylindrical steel blanks.
Homemade wood cutters
DIY drill cutter
This video tutorial shows how to make a cutter from a drill, analyzes the differences between the two tools, and the advantages and disadvantages of each of them. The repeatability result of this DIY method is very good, but don’t expect any supernatural abilities from the resulting product; a carbide spiral cutter is still much better. Although, on the other hand, a drill costs 20 rubles. Eight milling cutter about one and a half thousand. So it's up to you. It’s up to the master to show how to do it easier.
You need to start with a marker. First of all, we will sharpen two identical spirals, and in order not to make a mistake, you need to mark one spiral with a marker. You need to understand what actions need to be performed and what result is needed. Let's consider what section is in the cut. They are made from a cylinder, they have identical recesses, which are provided by the presence of a cutting edge. The drill has a shelf next to it. This is the cylindrical part that is present in any such tool. Next comes the step and the cylindrical part.
By the way, watch the video about this master’s milling table.
What is the backing for?
The air currents that pass through cool the cutter better. If we take a cylindrical hole in which rotation occurs, then air movement occurs here, the working surface is better cooled. Secondly, the cutting edge. Here nothing prevents cutting; we have only one point of contact. Vortex flows promote chip removal.
If we take a drill and grind along a spiral, in one pass we remove layers until we reach the desired profile. We remove in small strips and do the backing. It must necessarily be on one side and on the other.
Let's look at the machine. It is a household tool, but is very suitable for sharpening cutters. Here the drill has to be held at a certain angle and in this case nothing interferes with it. In other machines, this cheek is further away from the stone; there it is not possible to position it completely flat to the stone.
How spiral grooves are cut for backing
If we apply a drill, we will place it so that it touches this edge with two points. We can see at what point in the cut the stone touches. If we change the angle to a flatter one, the point of contact moves towards the cutting edge. You shouldn't approach her right away. You need to set the position of the drill as gently as possible. Also depending on the inclination. When positioned horizontally, the rear part is backed up.
We will sharpen it as follows. We will press the drill with our finger and drag, press and drag. But as the edge is sharpened and pressed with a finger, it cuts the finger. Apply adhesive tape or duct tape to protect your fingers.
Why is one groove black and one white? First we make a white groove, then a black one at the same angle. This will ensure that the edges are removed evenly. Then we set the angle and grind the white groove again. Next - black.
When rotating the drill as far as the length of your fingers is sufficient, you should not strive to sharpen the entire cutting edge. You still won’t be able to work at the working length. In addition, it will weaken and the resulting cutter will be very soft, it will sing and vibrate. At the same time, due to rattling, it begins to snatch the material. Continued on the video channel from 8 minutes.
Source: https://izobreteniya.net/freza-iz-sverla-svoimi-rukami/
A little about cutters
Structurally, there are a huge number of cutters depending on the tasks performed, the milling tool used, the material being processed and the format of the parts being processed. The largest division of cutters is based on the type of installation on the milling tool. This type distinguishes between end and attachment cutters.
Mounted cutters are also called disk cutters, since they are really disks with holes in the center that are mounted on the axis of horizontal and universal milling machines.
An example of a disk cutter.
End mills use cutting surfaces located on the end of the cutter, which is clamped into the spindle of a milling machine, similar to the drill bits in a drill press chuck. Moreover, many of the cutters even resemble drills in appearance.
Example of an end mill.
However, there is a fundamental difference between drills and end mills, no matter how similar they may be. The fact is that drills are designed for workload only in the axial direction. Any displacement or deviation from the axial load is fraught with destruction of the drill. Milling cutters, in the most general sense, are used for spatial non-axial displacements and processing of material in various directions. The cutting edges of such cutters can be either along the axial part or at the end of the cutter.
The presence of several cutting surfaces and the ability to use this for spatial processing of material is also characteristic of disk cutters, which distinguishes them from cutting wheels.
It is this ability - the use of several cutting surfaces for spatial rather than axial or flat processing of material - that makes cutters a universal tool that can be used for almost any purpose and task. And the combination of a CNC milling machine allows you to create real works of art and even miracles.
Examples of work on a milling machine.
Attack end mills are represented by a large range of cutters that can be used both in home devices and hand-held milling machines, and for production purposes. Grooving cutters, edge cutters - molding, fillet, etc., as well as sets specially selected for performing the most common milling work. In addition to a wide range, Attack cutters are distinguished by precision and accuracy of surface processing and a long service life.
A drill-mill is a type of cutting tool that is used to make holes, including shaped ones, in materials of different purposes. Combines the functions of a drill and a cutter. The drilling part is used to make a hole, and its expansion to the required shape and size is carried out with a milling cutter, which is the side face of the tool. Manufacturers from different countries produce such drill-cutters of a universal type or for performing operations on a specific material - wooden blanks or metal. This is indicated in the passport data that the manufacturer puts on the product packaging. Due to the presence of two working surfaces, the tool is called a milling drill.
Using drill-cutters, holes are made not only in metal and wooden blanks, but also in plywood, plasterboard, fiberboard, chipboard, MDF, and plastic. To rotate the tool, use a hammer drill, drill or drilling and milling machines.
How to make it yourself
Having prepared everything necessary for work, you can proceed directly to the remodeling process:
- Use tape or a marker to mark the part of the drill bit that you want to keep. It is usually about half the size of the entire instrument. Don't forget to leave a small reserve for sharpening.
- Saw off the remaining part in a convenient way.
- Using a machine, use a rough wheel to form an approximate drill profile. If you look closely at the cutter cut, you can see that the clearance angle is quite large, about 40 degrees. Shape the back surfaces.
- Place a diamond wheel and gradually bring the cutter profile to the desired one. You also need to form a spout (centering). Then carefully process the shank.
- If there is a thin circle, use it to trim the edges. This way you can achieve maximum resemblance to the factory tool.
- Check the alignment, making sure that the resulting spout is exactly in the center. To do this, draw 1 line on one side of a piece of wood, and then turn the drill 180 degrees and draw a second line. If they coincide, it means the alignment was done correctly.
After sharpening is completed, you can begin testing your homemade cutter. We place the resulting attachment on the router and make several holes in the wood. If everything was done correctly, the holes will be of high quality, perfectly rounded, even. The wood is perfectly milled, without any effort. To compare the result, do the same with a branded drill. As a result, you can see that there is almost no difference.
This homemade product will save a lot of money, since factory cutters are very expensive. It turns out to be of high quality and reliable. But for an excellent result, you will need to practice on old drills, comparing them with wood cutters, and turning out the desired shape. With a little practice, forming the correct angle and edge will be quick and easy.