No one remembers that the drill once became dull. But only until it suddenly became necessary. Without a sharp drill, the work will not move. Therefore, you will have to buy a new one or try to sharpen it. Sharpening a drill for metal is not an easy process. But it's worth a try.
How to sharpen a drill correctly Source tehnomuza.ru
Signs that the drill is dull
Before sharpening the drills, you need to make sure that they are actually dull. What signs does this show:
- the cutting tool gets very hot;
- metal shavings flying out from under the edge have a fine fraction;
- the noise of operations increases.
We especially note the last sign, because the friction force between the dull edge of the drill and the plane of the workpiece increases. Therefore, as soon as there is an increase in noise during drilling, work must be stopped immediately. If work is not stopped, the cutting tool will overheat greatly, the structure of the metal will change, which will lead to the complete loss of the tool. After which there is no point in sharpening it.
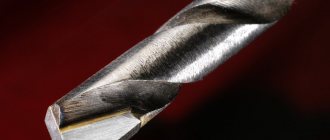
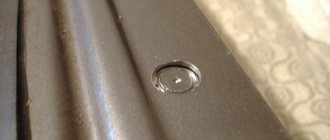
Edges and rear planes of an overheated drill Source podshipnik-servis.ru
How to choose a drill
Before deciding how to sharpen a drill correctly, I would like to dwell a little on the cutting tool itself.
Let's start with the fact that drills on the construction tools market are presented in a fairly wide range. Since we are only interested in metal equipment, it should be noted that there is a choice here too.
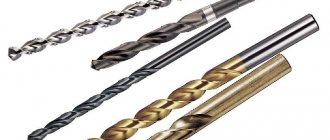
First, you can select by tool color:
- Black is an oxide film, the function of which is to protect the base of the drill from corrosion and high temperatures. Therefore, this variety has high strength and wear resistance.
- Gray – this tool can easily be classified as low quality equipment.
- Bright golden. This color indicates only one thing – the steel from which the tool is made contains titanium.
- Dark golden. The same as the previous option, only there are no internal stresses inside the steel rod. Hence its high qualities.
Types of metal drills Source rozetka.com.ua
It should be noted that most metal drills are rods made of tool steel. But to increase their cutting performance, you need to strengthen the cutting edge. Therefore, today you can buy four types of equipment with different coatings:
- Still the same black oxide film.
- TiCN is titanium carbonitride.
- TiAIN is titanium aluminum nitride.
- Titanium nitride itself.
- Ceramics.
Attention! The last two coatings cannot be re-sharpened.
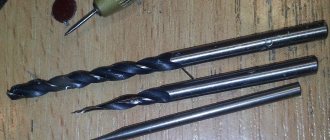
Mainly in everyday life, and many craftsmen use twist drills to drill holes in metal. This is a steel cylindrical rod in which grooves are cut in the form of a spiral. Hence, in principle, the name.
The smaller part of this tool is occupied by the shank, which is clamped in the chuck of drilling equipment or in a drill or hammer drill. The main part is occupied by a cylinder with grooves. Grooves are cut for one purpose - to create a space through which metal shavings will leave the drilling site without interfering with the main process.
Twist drill: its parts and elements Source studfile.net
Spiral equipment also has a small classification, where there are three positions:
- Classic drill.
- Left-handed. It is used when it is necessary to drill out a broken fastening element from a hole: a bolt, a screw, etc.
- High precision. If the task is to drill a hole with minimal errors, then use it.
So, having sorted out the assortment of equipment, we move directly to the main question - how to sharpen a drill for metal.
Rules for sharpening drills
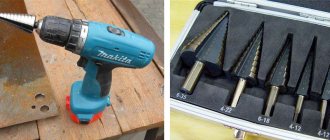
Firstly, to carry out this process you will need either special equipment or special devices in the form of attachments for drills or hammer drills. The first group includes a sharpening machine on which a sharpening stone is mounted. A thrifty owner will always have such a small machine in his garage or shed.
It should be noted right away that the sharpening technology depends on the type of drill. It can be conical, helical, cylindrical, or one- or two-plane. But you need to understand that in any case only the rear edges of the tool need to be sharpened. In this case, each edge must be sharpened equally. It is clear that it is almost impossible to do this manually. But craftsmen sharpen small-sized drills by hand, which requires some experience in carrying out this type of work.
Screw drill for metal Source besplatka.ua
See also: Catalog of companies that specialize in the installation of metal structures and utility networks
There are some differences in sharpening different types of drills. For example, a single-plane drill differs from others in that its back wall of the pen has only one plane. And the angle of inclination of this plane varies in the range of 28-30°. It is this plane that needs to be sharpened. Here it is important to bring the drill to the rotating sharpening stone parallel to this back plane. In this case, the tool cannot be rotated; even a slight deviation will lead to an incorrect operation.
Double-plane drills are sharpened in the same way. You just have to sharpen two planes separately. The same requirements apply here.
As for conical models, the main task is not to disturb the taper of the structure of the edge being sharpened. Therefore, the tool is brought to a rotating grindstone, the drill is pressed and oscillating movements are made along the cone. The important thing here is not to tear the rig away from the stone. That is, the process is carried out in one touch.
And one more wish - to strictly adhere to the shape of the edge. It is clear that this is not always possible, especially if the drill is up to 10 mm in diameter. But for this variety you can only maintain the back angle. And that's enough. As for large-diameter drills, experts recommend, in addition to sharpening the edges along planes and accurately maintaining the angle, sharpening the front plane, thereby improving the design. These drills are more efficient when drilling.
Sharpening should be done with one touch Source novate.ru
Why is it necessary to sharpen the front plane? The thing is that by decreasing the angle of inclination of the front plane, the angle of the cutting edge increases. And this increases the resistance of the tool to chipping of metal from the plane of the cutting edge. In addition, it should be added that the length of the transverse edge decreases sharply. That is, it turns out that the edge of the cross member does not cut, but scrapes the metal workpiece. Or rather, the central part of the drilled area.
After sharpening the drill, it is also recommended to carry out fine-tuning. That is, the nicks left by the grindstone are removed. This is a mandatory procedure in factory conditions. This is what allows you to increase the wear resistance of the tool. If it is possible to carry out fine-tuning at home, then it must be done.
Usually other stones are used for finishing:
- made of silicon carbide, it is green, grade 63C, and it is better to use a wheel with a grain size of 5-6 and a hardness of M3-SM1;
- from CBN, a grit size of 6-8 is required here.
Please note that these stones must be made in a Bakelite bond.
Stone for sharpening drills Source i.ytimg.com
Stages of work
According to the rules, sharpening should be done in a utility room, in a garage or, in extreme cases, on a balcony. Under no circumstances should you perform work in the kitchen. Metal shavings and dust will fly around the workplace. It must not get into the eyes, digestive organs, or respiratory tract. You should wear glasses, and after finishing sharpening, vacuum the room and do wet cleaning.
Sharpening a drill consists of several stages:
- Preparing the sharpening tool.
- Determining the exact angle and method of sharpening.
- Sharpening. First, the back surface of the drill is ground off, then the cutting edge is straightened and the jumper is reduced (if necessary).
- Finishing until smooth.
- Cleaning.
When sharpening, you must ensure that the drill does not overheat. Otherwise, the risk of deformation increases. Place a container with machine oil (or, in extreme cases, water) nearby. After drilling each point, lower the drill bit into the liquid for 2-3 minutes.
Nut based
A specific homemade device for sharpening drills with your own hands, which is still suitable for beginners. Here you will need a welding machine, since the monolithic body is more durable.
To make a sharpening tool, follow the plan:
- You will need a large diameter nut, for example, M 16. You need to cut a triangular hole in it. You need to try to get to 120 degrees. To check this, just apply the drill .
- Another nut with a smaller diameter is welded on top. You will need it to screw in the clamping bolt.
- All you have to do is screw in the bolt and you're done. The nut will serve as a guide and sharpening the drills with your own hands will be much easier.
READ Is it possible to cut rubber with a grinder?
Anyone can assemble such a machine for sharpening drills with their own hands, but its effectiveness is questionable. You shouldn’t have high hopes, since the nut will also gradually wear off.
In fact, these DIY drill sharpening devices are disposable and will not last long. Therefore, they can be collected for training.
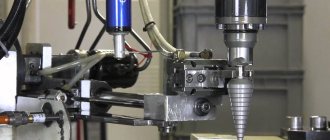
Devices for turning drills on a machine
It is difficult to hold a drill in your hands and sharpen it on a machine on which the stone is spinning at high speed. You need to have a lot of experience so as not to screw up the instrument. Therefore, there are special devices on sale that make this operation easier.
Simple devices can be purchased on the market. There are also quite complex ones with electric motors that not only hold the drill in the required position, but also feed the tool to the grindstone automatically. The latter are more often used for sharpening twist drills. But such devices cost a lot of money, so they are purchased by professional sharpeners.
Assistive devices
Now it's time to make a device for sharpening drills. It is suitable for 2 types of masters:
Beginners who are unable to maintain a suitable inclination evenly. This results in an uneven edge and reduced drilling efficiency. Sometimes the drill starts to work even worse than before, and this reduces the speed of work. The devices will be useful for craftsmen who have to constantly sit behind the emery. In these cases, homemade tools for sharpening drills are a necessity.
Video description
The video shows how the master made a device that helps to properly sharpen a drill for metal:
How to sharpen a drill using a drill
If a sharpening machine is not available, you can adapt a drill with a grinding wheel mounted on the shaft. There are two options for the process:
- hold the drill in a vice and bring the drill to the stone with your hands;
- Clamp the cutting tool in a vice and bring the stone with the drill manually.
Both options are not easy, but the second is easier than the first.
How to sharpen a drill correctly in this case:
- the cutting tool must be installed in a vice in a vertical position;
- using a circle mounted on a drill, the trailing edge is removed, the goal is to remove signs of wear;
- then sharpening is carried out at the required angle - usually 120°.
Attention! To prevent the edge from overheating, the sharpening process should be carried out for no more than two seconds. That is, the metal is removed in layers.
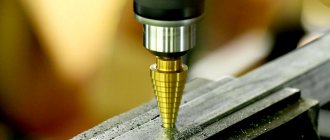
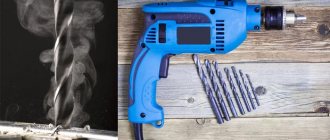
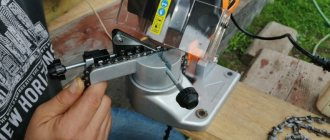
But there is an easier way. To do this, you need to purchase a special nozzle. It is installed on a drill and a drill is inserted into a special groove. The latter, relative to the rotating sharpening tool, is located at a certain angle equal to the sharpening angle. This can be clearly seen in the photo below.
Sharpening a drill using a drill and a special attachment Source yandex.net
Sharpening accessories
It is difficult for beginners to carry out the sharpening procedure efficiently. Therefore, manufacturers of construction tools have been producing special attachments for drills for a long time. This is actually a nozzle. It must be installed on a drill, insert a drill into the hole from the end and turn on the power tool.
Then the drill is pulled out, rotated 180°, reinserted into the drill sharpener, and the drill is turned on again. That is, the second plane of the cutting edge is sharpened.
Device for sharpening a drill mounted on a drill Source yandex.net
Sharpening small drills
Unfortunately, it is impossible to sharpen a tool with a diameter of less than 4 mm using an attachment or on a machine. Therefore, such drills are sharpened by hand using a file or needle file. As for the latter, it is better to choose one with diamond coating. Even if a file was used, the edges must be finished with a file.
The complexity of the operation lies in the fact that the cutting tool has a small plane and edge. Therefore, it is recommended to purchase glasses with four times magnification for this, and also use a lamp with a good luminous flux.
The principle of sharpening is exactly the same. But there are some recommendations:
- grinding off a layer of more than 1 mm is not recommended;
- The sharpening angle of the metal drill is standard, but is maintained by eye;
- As practice shows, you will definitely ruin the first drill, don’t despair, skill comes with experience.
Important Rules
Turning drills for metal does not cause any difficulties for experienced home craftsmen. But there are still several important rules:
- The main requirement that should be adhered to when developing the design of a turning machine: the product must remain stationary and not rotate around its axis. If it turns even a degree, the alignment will have to be repeated again.
- The surface of the wheel or sharpening disk must be perfectly flat. Therefore, it must be adjusted periodically with CBN nozzles.
- At the end of the work, the restored tool for drilling metal should be allowed to cool in natural conditions and only then check the geometric parameters using a template.
The lengths of the cutting edges should differ from one another by no more than 0.1–0.3 mm. This rule is especially important for small diameter tools.
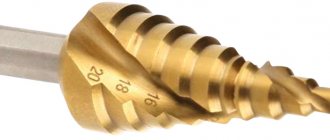
Types of sharpening
Some types of sharpening have already been mentioned above, but we will repeat it again. So, there are five types of sharpening, which are selected based on the type of material and the specifics of the work associated with drilling.
The first of them is normal under the title “N”. This variety is universal, but is used only if it is necessary to sharpen a drill with a diameter of no more than 12 mm. Essentially, two cutting edges and one transverse edge are formed on the tool. To do this, you have to maintain an angle within 118-120°.
And the rest:
- NP – sharpening is done with a short crossbar to reduce the load on it;
- NPL - in addition to the transverse edge, the width of the ribbon is also reduced, the goal is to reduce the friction force that is created between the drill and the workpiece;
- DP is the so-called double sharpening, where in addition to the transverse edge, four more edges are formed, which are broken lines;
- DPL is the same previous version, only the ribbon is additionally sharpened.
Attention! Why are four edges needed? This is an opportunity to reduce the angle between sections of the peripheral planes of the edges. Thus, an increase in heat removal from the drilling site is achieved. And this increases the service life of the tool itself.
Correctly carried out sharpening of a drill Source tehnomuza.ru
How to sharpen drills for metal using sandpaper. A little theory
First, you need to understand the design of the instrument and understand which of its characteristics will need to be restored and which to preserve without spoiling it. In the process, you will need a tool to check the angles and lengths of the cutting edges.
Drill design
A metal drill consists of: a shank and a working part. These two parts are made of different metals, which are joined into one piece by welding. The shank is made of unhardened steel.
The working part is made of high-speed hardened tool steel. It can be divided into several parts: calibrating and cutting. The working part contains the following structural elements:
- two cutting edges;
- two rear surfaces (back of the head), extending backwards at an angle from the cutting edges;
- two front surfaces located under the cutting edge and turning into a groove for chip removal;
- bridge at the top between the cutting edges and the rear surfaces;
- two grooves for chip removal;
- two backs forming the outer surface of the drill;
- two ribbons located on the backs.
Main parts of a twist drill for metal
The cutting edge is formed at the intersection of the surfaces of the front part (groove) and the back part (receiver). To restore the sharpness of the cutting edge, it is the rear surface that is processed using a sharpener or other tool.
During operation, it is the cutting edges that become dull. When sharpening, you need to restore their sharpness, geometry, as well as the angle at the apex between the back and front.
Settings to restore
When sharpening a metal drill correctly, you need to restore its following parameters:
Apex angle. It is formed by the cutting edges at the intersection with the jumper. The angle value should be within 116° - 118°. But this value is not strict; for working with materials of different hardness and viscosity, it can be in the range from 60° to 150°. There are also special cases in which it reaches 180°. The angle between the cutting edge and the axis. It is half the value of the apex angle, i.e., approximately 58° - 59°, if the value of the apex angle is 116° - 118°. It must be the same for each of the two cutting edges
This is very important because... if it is asymmetrical, only one edge will work, the drill will quickly wear out unevenly, heat up more, and cut into the material worse. Shape and length of cutting edges
The lengths of the cutting edges must be equal on both sides. Edge length is measured from the center of the bridge to the edge (side apex). If the lengths of the cutting edges are different, then runout will appear when drilling, and the diameter of the hole will be greater than the nominal value indicated on the drill. In rare cases, the cutting edges are deliberately made of different lengths to produce a hole slightly larger than the nominal diameter. Rear cutting angle. One of the most important parameters during restoration, if it is not observed, drilling performance can decrease several times, up to complete loss of performance. Depending on the material being processed, it can vary from 7° to 17°.
Sharpening angle
As mentioned above, before properly sharpening a drill for metal, you need to choose the right sharpening angle. Firstly, this parameter is tabular. Secondly, it depends on what kind of metal needs to be drilled. If this:
- cast iron or steel workpiece, then the angle should vary from 116° to 118°;
- if it is brass or bronze, then from 120° to 130°;
- if the workpiece is made of copper, then 125°;
- aluminum – 140°.
An incorrectly sharpened drill leads to overheating of the tool itself. But, as practice shows, it is the incorrectly chosen sharpening angle that leads to a decrease in the quality of the process.
How to extend the life of a cutter
To avoid having to edit it for as long as possible, you should:
- avoid overheating, which leads to rapid softening of the metal, and therefore dulling of the edge;
- lubricate with machine oil - this will help reduce such a dangerous friction force and prevent a sharp increase in temperature in the contact zone;
- control the rotation speed - limit it, focusing on the hardness of the material and the desired hole diameter, but do not chase speed, remember that operating conditions should be gentle;
- remove chips in a timely manner so that they do not clog the recess, otherwise the tool may get stuck and even break;
- also process the jumper with a ribbon - this way you will improve the durability and quality of the plunge, which will allow you to weaken the feed while maintaining proper performance;
- make several passes, giving pauses between each of them - so that the device has time to cool down.
We told you how to properly sharpen a drill for metal, we also provided a video of this process, now you can safely start processing damaged rods. And if you need to purchase a machine for this, you will find it in the plant’s catalogue, contact us and order high-quality and modern equipment.
Briefly about the main thing
You can sharpen a dull drill using different devices: a sharpening machine, a drill on which a whetstone is installed, or a drill attachment.
Small drills are sharpened by hand with a file or needle file.
The main sharpening parameter is the angle that forms the edges. The sharpening angle is selected taking into account the metal that is to be drilled. This parameter is tabular.
To increase the wear resistance of the drill, the sharpening configuration is changed, using five options for edge formation as a basis.