Making homemade cutters for handmade woodworking
A wood carver is a hand tool that is used for artistic wood carving, so many people want to make it themselves.
The product consists of a metal cutting element and a wooden handle. The main carving is done with the sharp part, thus creating figures or paintings.
To make a knife for artistic carving you will need a minimum set of garage tools.
► Tools and equipment:
- grinder;
- grinder for slicing knives;
- jigsaw;
- circular cutter;
- sandpaper.
Additionally, you will need the material itself, in particular tool steel.
►Materials for production:
- wooden round block - section 25 mm;
- steel strip – thickness 0.6-0.8 mm;
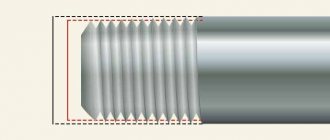
- drills (for thread);
- circles for a circular cutter.
The consumable material also includes a grinding wheel, which will be used to grind the cutter for work. Old wheels will be needed as the main raw material for making sharp knives.
Step-by-step instructions for making a wood cutter
1. Making blanks for the cutter knife
Blanks for a knife for a hand cutter are made from an old circular wheel. To do this, the metal is cut using a grinder into several rectangular strips measuring about 20x80 mm. Each individual strip is a future cutter for a hand tool.
2. Shaping the main incisor
Each cutter must be ground to the desired shape. The procedure can be carried out in two ways: by sharpening on a machine and by forging. Forging is needed to create the bend, and turning is needed to make the overall shape of the knife for the cutter.
3. Sharpening a knife for hand tools
To sharpen a knife, you need a grinding machine with a small grit wheel. Sharpening is carried out at an angle of approximately 45 degrees, and the length of the sharp part is about 20-35 mm, depending on the total length of the cutter. The knife itself can be sharpened either manually or using equipment.
4. Making a handle for easy carving
To make wood carving as convenient as possible, you will need to make a wooden handle. The handle is made on a machine or manually by planing and further grinding using sandpaper.
5. Docking the knife with the handle
A metal knife is inserted inside a wooden handle. To do this, you need to drill a hole up to 20-30 mm deep inside the handle. The blade of the cutter will be located outside, and the base itself is driven into the handle. It is worth noting that for reliable fixation, the end of the metal workpiece must have a needle-like point. When hammering, you should use a thick cloth insert so as not to dull the knife blade during the procedure.
6. Installing a crown for reliable threading
A metal retaining ring is installed to secure the knife. A special contour is cut out on a wooden handle exactly along the diameter of the ring. Next, the thread is made and the crown itself is attached to the finished thread. Ultimately, the wooden handle should be crimped and the knife should be securely fixed inside the product.
7. Grinding the knife
In order for wood carving to be of the highest quality, the blade must be fine-tuned. To do this, use a small sharpening stone or simple ceramics. A little oil is poured onto the surface of the sharpening part (you can use motor oil), and then the cutter is sharpened perpendicularly.
The end result will be a sharp, polished tool; if sharpened successfully, the wood carving will be very light and of high quality. If necessary, the cutter can be upgraded.
Video: thicknesser for handmade woodworking – part 1.
Wood cutters, their differences in blade shape and size, independent production and sharpening
Wood carving is one of the oldest types of applied art, which has not lost its popularity today. Artistic carving is a very labor-intensive and complex, but very exciting activity, which requires special tools - wood cutters.
There are a large number of types and shapes of these tools, designed for different cutting methods, depending on the specific areas of the relief of the wooden workpiece. The cleanliness of the carving depends on their quality no less than on the skill of the carver.
Types of incisors
All wood cutters necessary for manual work have the same design and consist of a metal blade with a shank on which a wooden handle is attached.
To cut simple geometric patterns on a flat surface, you can get by with a couple of simple cutters, but to create complex volumetric and openwork works from wood, you will need to use a large number of special cutters.
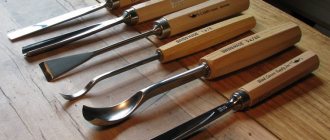
The most widely used types of these instruments are:
- jamb knife - a tool like a shoe knife with a short triangular blade, the bevel angle of which can be different, which makes it universal and suitable for a wide range of jobs;
- The chisel is the most common type of wood cutter. It performs the bulk of the work when creating most carved products; it has a smooth blade with a cutting edge at the end, which can be straight, oblique, semicircular or angled in the shape of the letter V;
- cranberry - a tool similar to a chisel, with a blade that has two bends of one hundred and twenty degrees (so that the handle does not catch the plane being processed when working). With a variety of cutting parts - semicircular, bracket, straight and others;
- spoon cutter - a cutter for cutting spoons and other utensils, made in the shape of a ring or half ring with a sharpened side edge;
- a hatchet is a knife that looks like a slightly beveled ax blade, which is a fairly universal tool, the corners of which can make cuts both towards you and away from you, and with the middle of the blade you can cut off bulges.
For those who are just starting to master the technique of wood carving, at first it will be enough to buy 5-6 cutters - a jamb knife, a flat chisel and two semicircular and corner ones with different radii and bending angles.
But you need to take high-quality, professional tools, despite their rather high price. Cheap kits for beginners are made of poor steel, they become dull very quickly and working with them will not bring pleasure to the carver.
Experienced craftsmen prefer to make wood cutters for themselves. Making them is not very difficult and can be done by anyone, even at home.
DIY making
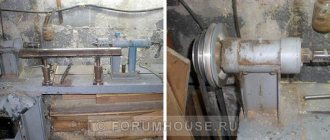
When making these tools, you cannot do without an electric sharpening machine (electric sharpener) with a set of abrasive wheels of different grain sizes. In most operations, it can be successfully replaced by a grinder with cutting and grinding discs.
Wood cutter blade
To make a tool blade, any used high-quality steel products are suitable - springs, drills, scalpels, rasps and even bearing rings.
For knives, the easiest choice is a hacksaw blade. Manufacturing consists of cutting it into pieces of the required length, forming the desired blade shape and sharpening.
The best option for chisels is a circular saw blade, the thickness of which is very suitable for this purpose. The carbon steel from which it is made holds an edge for a long time, even when processing hard wood. Cutting strips of the required size and grinding them to obtain the required blade shape is done using a grinder or an abrasive disc of an electric sharpener.
An old punch is perfect for a semicircular chisel - it already has the desired shape. It is enough just to cut off the excess metal from it and sharpen it.
During intensive grinding, the metal heats up, which causes a tempering, making it softer and unable to maintain an edge for a long time. Therefore, after giving the blade the desired shape and sharpening, hardening is required. To do this, you need to heat the cutting part using a gas or kerosene burner until it turns crimson and lower it into a container with machine oil.
Sharpening wood cutters
The final stage in the manufacture of wood cutters is the formation of the cutting part and sharpening. The main part of the metal from the cutting edge can be removed on the abrasive wheel of an electric sharpener or with the sharpening disc of an angle grinder.
The sharpening angles of the chamfers of all types of cutters are approximately the same and lie in the range of 18-25°, and the length of the sharp part is about 20-35 mm, depending on the total length of the cutter. During the processing process, it is necessary to constantly cool the blade in a container with water.
Further work is performed manually in the following sequence:
- sharpening on an emery block, which is recommended to be periodically moistened with water;
- sharpening on a thinner block or on sandpaper placed on a hard, even substrate;
- final editing and polishing of the cutting edge on a leather belt rubbed with GOI paste.
During the operation of a cutting tool, its blade inevitably loses its sharpness. Regular thorough sharpening of wood cutters is a necessary condition for comfortable work of the carver and high quality of the carved product.
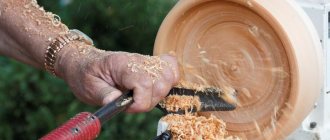
Wood turning tools
A turning cutter is a tool designed for manual processing of a workpiece rotating in a machine. Such tools, unlike handmade wood cutters, have a long handle. It is necessary so that the turner can hold the tool comfortably. The presence of such a handle allows you to control the blade without putting much effort into holding the cutter.
The blade of all types of turning tools is also longer than that of hand tools, since the turner needs to clasp it with his left hand when working.
Most types of wood turning on a lathe require only two types of cutters: reuter and meisel.
Reuter is a tool with a cutting part in the shape of a semicircle, which is used for roughing, initial processing of the workpiece. With the help of a rater, the workpiece is ground to give it the approximate shape of the future product.
Meisel is a cutter designed for finishing a piece of wood to obtain a finished product. The blade of this tool is a plate with a beveled cutting part, similar to a jamb knife.
For making the blades of these cutters yourself, old files are most suitable, and the process itself is no different from that described above.
In the process of gaining experience, the beginning carver will determine for himself the most convenient types of cutters, their shapes and sizes. He will learn to create excellent tools and beautiful wood carvings, and this activity may become a lifelong hobby for him.
Article rating:
(2 5,00 of 5) Loading...
Purpose of turning cutters and their types
Wood turning tools are intended for manual processing of a part rotating in a machine.
They consist of two main parts: a working part (metal) and a handle (usually wooden).
In turn, the working part can be divided into:
- cutting (blade) - this is the part that is sharpened and interacts with the workpiece;
- body - the main part by which the turner holds the cutter with his “non-working” hand on the armrest of the machine;
- shank - a narrowed part into which the body smoothly passes. The shank is designed for attaching a handle to it.
The handle can be divided into two parts:
- the base is the large part that the turner holds in his “working” hand;
- neck - a small cylindrical part with a metal fastening ring that prevents the handle from cracking when it is pressed onto the shank of the working part.
Types of turning tools
Depending on the type of work performed, wood turning tools have different configurations; the more complex the product, the more sophisticated their design will be, which will determine the specific sharpening of the blade. Each master can have his own special, exclusive, highly specialized turning tools designed to perform some special work. Therefore, there is no need to study the design of each individual cutter.
For the successful work of a novice turner, two types will be enough: reyer and meisel.
Reyer - designed for rough, roughing, initial processing of the workpiece. A design feature of this type is a blade shaped like a semicircle. It is made from a thick plate or from a semicircular groove. With the help of a reyer, the wooden blank is given the approximate outline of the future product.
Meisel - for finishing the workpiece, giving it its final shape. Also, it can be used to cut off the product from the remains of the workpiece. The shape of a meisel resembles a jamb knife (a plate with an oblique blade, sharpened on both sides at the same angle).
Types of thread
There are many techniques for processing wood, with the help of which craftsmen create real works of art from it.
As such, a strict classification has not yet been created, but conditionally all techniques can be divided into several types.
Flat socket carving: a flat wooden surface acts as a background. The pattern is formed using notches of various shapes.
Flat grooved threads are:
- Geometric has a pattern in the form of a bizarre combination of various geometric shapes.
- Contour forms a pattern in the form of a rigidly drawn outline, as if pressed into the surface.
Flat-relief carving highlights a convex pattern on a background deepened with the help of a tool.
Flat relief carving can be:
- Oval - the pattern on it is located in the shape of an oval, often filling the entire space of the canvas with small recesses.
- With a selected background, a large ornament appears against the background of the space scraped out by the tool.
Relief carving: three-dimensional paintings, practically devoid of a flat background.
Relief carving can be:
- The bas-relief has protruding figures of medium height (about half of their volume).
- High relief - the background is deeply recessed, the figures are very voluminous and protrude greatly.
- “Tatyanka” - a convex pattern fills the entire space of the product, the elements merge, turning into each other (usually the theme is botanical).
The slotted thread can have the appearance of flat-relief or relief. The pattern is made by completely removing wood fragments and leaving through voids between the elements of the pattern.
The slotted thread is:
- Openwork: has protruding parts combined with cut holes, widely used for decorating furniture sets in the Baroque and Rococo styles.
- Overlay: made up of figures cut through and with protruding elements, processed only on the front side.
Sculptural carving - the depicted objects are separated from the background and represent a full-fledged sculpture.
House carving is the creation of elements used to decorate wooden buildings.
How to make wood turning tools yourself
Homemade wood turning tools are something of a talisman for craftsmen. Therefore, they prefer to make working tools with their own hands rather than purchase them in a regular store. Although the purchased ones fully meet their requirements, technical characteristics and safe work practices.
Making reyer and meisel yourself is not difficult. To make them with your own hands, the most suitable material would be files and rasps that have already “outlived” their usefulness. This decommissioned tool has the required dimensions, strength, material quality, and steel grade. Using a sharpening machine, the file is given the required shape in terms of the blade and shank. Then a machined handle with a fastening ring is stuffed. And that’s it, the tool for making wood turning products is ready.
To make wood turning tools, you can use, in addition to files and rasps, car springs or reinforcement bars as materials. They have the necessary hardness. But after making the tool with your own hands, you need to be extremely careful. Its tests must be carried out on soft wood (linden, poplar), after which the blade must be inspected for chips and cracks. And only after such a check can turning tools made by yourself be used when working with harder wood (birch, oak, beech).
Video about homemade cutters
When making cutting tools yourself, you need to remember:
- The shorter the working part, the more difficult and inconvenient it is to hold it while turning. The length of the body should provide full grip with the hand, plus support on the armrest, plus the distance from the armrest to the workpiece, plus margin for wear and sharpening. Therefore, the initial length of the working part should be at least 20 cm, but a size exceeding 40 cm will cause inconvenience in work. The optimal length should be 20 – 30 cm;
- The shorter the shank, the greater the possibility that it can be torn out of the handle. Therefore, when a cutting tool is made from files or rasps, the shanks are lengthened by 1.5 - 2 times;
- The thinner and narrower the working part of the tool, the greater the likelihood of it being damaged by the workpiece during the turning process. Therefore, at the initial stages of processing, when the workpiece does not yet have an absolute cylindrical shape and runout on the blade occurs, as well as at large diameters, when the cutting force is of great importance, it is necessary to use cutters with sufficient thickness.
- wood turning tools must have a handle no shorter than 25 cm. If it is much smaller, then during the turning process it will be difficult to hold the tool in your hands, not to mention the quality of the work performed.
Wood cutters: types, DIY manufacturing process
[hide]
- Wood carving technique
- Kinds
- Let's make it ourselves
- Blade
- Lever
- Sharpening
Knives for wood carving are a must-have accessory in the arsenal of a craftsman who makes decorative objects from natural wood.
Such tools can have different types and shapes, which directly affects the specific processing of individual parts. The most famous cutter, which is very popular among our craftsmen, is the Bogorodsk knife.
Wood carving technique
Wood carving is a complex but very interesting technique for decorating products, known since ancient times. Getting started, as a rule, consists of creating a blank, or, more simply, a deck or blank. Next, a rough surface treatment is performed, during which it is leveled and all sorts of defects are removed.
Then comes the turn of artistic work, which the master carries out using wood carving cutters. Technically, this process looks like removing a piece of wood, which allows you to give the workpiece relief and volume. This stage can be called the main one, because it determines what the final appearance of the product will be.
The finishing treatment of a decorative item consists of sanding the wood and impregnating it with antiseptics and paints and varnishes.
To perform manual work of this type, cutting devices with different blade configurations can be used. The purity of the ornament on the wood depends on their quality no less than on the skill of the carpenter, so it is necessary to ensure that the chisel blade is strong, sharp and free of jagged edges.
If experienced craftsmen can determine the type and quality of carpenter's knives with their eyes closed, then choosing wood cutters for beginners can be a difficult task . For those who are not yet fully familiar with the features of choosing and manufacturing cutters, we suggest that you familiarize yourself in more detail with their main varieties and method of application.
You can also learn how to make wood cutters yourself by giving them the required sizes and shapes.
Kinds
It is believed that virtuoso craftsmen can get by with one or two chisels, however, as practice shows, a good set of special carpentry tools, which includes chisels with blades of various shapes, will help to achieve the best result and make work easier. Experts in this industry recommend adding the following items to your arsenal:
- Jamb knives are a type of wood cutters with short triangular blades. They can have different bevel angles of the cutting part, making them suitable for forming complex relief patterns. Such universal wood knives include three functional sections: blade, toe and heel;
- chisels are the main and most common carpentry tool for figure cutting with an elongated rod and a cutting edge at its end. The chisel, depending on the configuration of the edge, can be flat, angular, semicircular, bracketed and reverse. With such a varied set, you can cut grooves and recesses of various depths, as well as give the surface the desired texture and volume;
- cranberries are devices for manual finishing cutting, characterized by a significantly curved working part, which makes it possible to achieve a clear relief of parts. Like the previous version with a straight handle, the cranberry blade varies in blade shape (bracketed, straight, semicircular, dovetail, goat’s leg, etc.);
- spoon cutters - made in the form of a ring or half ring, as the name suggests, intended for cutting spoons. Very often, cabinetmakers prefer to make such a semicircular wood cutter with their own hands and adapt it to their needs.
Along with devices for cutting openwork elements, there are also additional items that no carpenter can do without. Such tools include hacksaws, jigsaws, drills, wood hacksaws can be intended for roughing or finishing work (reciprocating saws, bow saws).
Those craftsmen who work with large-sized structures acquire not only hacksaw tools, but also include hatchet cutters, or, as they are also called, figured adzes, in their arsenal.
Their operating principle is similar to that of smaller cutting tools, with the only difference being the scale and purity of the process.
Beginners who are just starting to learn the craft do not understand the types of instruments as thoroughly as experienced craftsmen, so the main thing here is to follow the golden rule - quality above all.
Since buying high-quality knives can be expensive, many people make cutters on their own, especially since today it’s easy to find suitable video and photo tutorials on the Internet. Next, we will tell you how to make knives for figured carving with your own hands from scrap materials.
Let's make it ourselves
Let’s say right away that a high price does not always force a carpenter to take radical measures.
Often, a good experienced craftsman cannot choose a tool for himself that would meet his requirements, and this also becomes the reason for working on the cutter independently.
In principle, this problem can be solved quite successfully; the main thing is to know what to make the cutters from and what technology to use in this case.
Blade
In most cases, ordinary wood or metal cloth is suitable as a raw material for self-harvesting. You can make an excellent jamb knife from this material - just break it off by hand or cut a segment of the blade on a lathe, and then form a cutting edge.
The wood saw blade also has decent characteristics suitable for our product, because it is very important what steel the knife is made from, and here we are dealing with a carbon metal that is easy to sharpen and remains sharp for a long time even when working with hard rocks tree.
If your future homemade cutter is intended for cutting wood, it should have a semicircular blade shape, and in this case it is better to make it from a punch, which can be found in almost every home workshop. In private carpentry workshops you can find homemade bearing cutters, which have also proven themselves to work well.
Lever
When the cutting part of the chisel is ready, you can begin making an equally important part of the tool - the handle.
Here we will need a wooden block, and it is better if it is hardwood, from which we will need to cut a holder with a hole in the end.
Please note that the shape of the hole must correspond to a similar parameter of the metal shank of a knife for wood carving, made with your own hands from a canvas or disk.
Next, you need to glue the cutting segment into the handle and further strengthen the structure with a metal ring.
If a handle consisting of two parts is used to make a wood cutter, it is recommended to additionally fix the blade with fasteners and carry out the gluing process using a vice or clamps.
Sharpening
A carver can achieve a decent result in his artistic craft only if the tool he makes is sharp. When carving wood, knives tend to become dull, so a properly sharpened joint can work for a long time without re-processing.
Do-it-yourself sharpening of cutters
The quality of the treated surface largely depends on the correct sharpening of the working tool.
To do this, you will need an electric sharpening machine with a set of wheels of different grain sizes and a velvet bar for manually editing the blade.
Video of sharpening cutters
Each craftsman chooses the sharpening angle independently, focusing on his skill as a turner, the hardness of the wood, the quality of the working tool and the final desired appearance of the surface being processed.
For a novice turner, the optimal sharpening angle options will be:
- for meisel - the bevel itself should be 40° relative to the axis of the working surface and 40° for each side of the blade;
- for reyer – 50° – 60°.
Over time, as the turner's skill level increases, sharpening angles can be reduced to 20° - 35°.
Ideally, in addition to a set of different styles, it is desirable to have cutters of the same type, the same size, but with different sharpening angles. This will make the turner’s work much faster and easier, and will also extend their service life, because there will be no need to constantly resharpen the blades depending on the type of wood being processed.
Blunt sharpening angles are intended for: hard wood, initial (rough) processing.
Sharper corners of the cutting tool allow for better surface treatment and speed up the turning process, but at the same time there is a high probability of chipping the workpiece and damaging the blade. And such a tool has to be sharpened and adjusted much more often than with more obtuse angles.
The approximate sharpening angle of the blade is formed at the stage of making cutters with your own hands, before the start of heat treatment - hardening.
Then, when they are completely ready, the sharpening process is carried out using an abrasive wheel and is completed by hand finishing on a velvet block.
If you find an error, please select a piece of text and press Ctrl+Enter.
Tools for work
Truly high demands are placed on specialized carver tools. The skill of the performer plays an important role. But only with correctly selected and carefully sharpened tools will a master be able to demonstrate his skills in full force.
And if a professional easily and at first glance determines the quality of devices for work, then a beginner is invariably lost and can make a mistake.
First of all, you should purchase:
- quality knives;
- chisels (several pieces);
- needle files;
- hacksaws cutting metal;
- clamping device;
- sandpaper of different grain sizes;
- drill and several types of drills;
- wooden bars.
Knives
It is best to buy knives in a specialized store of goods for creativity and hand-made goods. They must be made from high quality steel. If funds are limited, you can temporarily buy simpler knives, but sharpen them well.
Experts speak positively about tools from the Tatyana, Narex and Kogatana brands.
Chisels
At first, instead of chisels, you can use a sharpened screwdriver and file.
When purchasing chisels, pay attention to the following types:
- Flat - a chisel in the shape of an elongated rod with a cutting edge at the end; it is needed during the initial processing of wood.
- Semicircular is one of the most popular types; it can be of varying degrees of roundness: medium, round or sloping.
- V-shaped - necessary when making geometric threads.
Machine
Carving on a machine has enormous potential, simplifying this work and turning it into pleasure. Modern models are not cheap at all, but professionals characterize them from the best side.
The machines can simplify many labor-intensive operations familiar to carvers:
- surface treatment at different angles;
- drilling recesses, grooves and grooves;
- milling;
- the actual carving.
There are huge differences in the sizes of machine models and in the technology of their operation:
- manual;
- milling and engraving;
- laser;
- CNC machines.
To simplify many operations of artistic carving, professionals advise purchasing a CNC machine. But if a novice craftsman just wants to try himself and see if this hobby is suitable for him, a manual machine is quite enough.
How to make a cutter for artistic wood cutting
A tool called a cutter, or carver, is designed to perform artistic cutting of wood. Professional sets of such devices are quite expensive, so let’s talk about how to make wood cutters for handmade work with your own hands. Each of the products has a working blade (in fact, this is the carver’s blade) and a wooden handle. We will look at everything in more detail regarding the manufacture of such tools in this article.
What do you need for work?
Drawings of wood cutters (sizes and types) are available in large quantities on the Internet. To make your own DIY kit, you will need:
- Grinder for cutting knives.
- Grinder.
- Circular cutter.
- Jigsaw.
- Sandpaper.
Important! The optimal material for making the tool is tool steel.
In addition to the tool, you will need materials:
- 25mm wooden block.
- Circles for cutter.
- Drills for thread.
- Steel strip with a thickness of 0.6-0.8 mm.
The category of consumables also includes grinding wheels.
Making wood cutters with your own hands at home can be divided into the following stages.
Blanks
For knife blanks for hand carvers, old circular wheels are used. Using a grinder, the metal is cut into 2x8 cm rectangles. Each of the metal strips is the future working part of the device.
Product design
All blades need to be sharpened to give them the appropriate shape. To do this, use 2 methods:
Important! Forging is used to create curves, and turning is used for general design.
Sharpening
A grinding machine is well suited for sharpening a knife. It is advisable to use a wheel with a small grain size. The sharpening angle is approximately 45 degrees. The sharp part of the tool, depending on its size, has a length of 2 to 3.5 cm. You can sharpen it by hand.
Making the handle
The handle is necessary to make working with wood as comfortable as possible. A special machine is used to make the handle.
Important! You can plan it by hand, sanding it using sandpaper.
Docking handle and knife
A metal blade is inserted into the handle. To do this, drill a hole in it with a depth of 2-3 cm.
Important! To make the joining as efficient as possible, a needle-like point is made at the end of the metal workpiece.
Retaining ring
Its purpose is to secure the knife in the handle. The procedure for installing the retaining ring is as follows:
- A contour is cut out on the handle, completely matching the diameter of the retaining ring.
- The next stage is making the thread and attaching the crown to the thread.
At the end of these manipulations, the handle is crimped, and the working part is securely fixed inside the handle.
Sanding the finished product
This is the final point. To sharpen the blade, use ordinary ceramics or a small whetstone used for sharpening. The cutter is sharpened perpendicularly, using a small amount of motor oil.
Lerych for the production of wood cutters
Home comfort October 26, 2016
Wood cutters are a necessary tool for any carver. However, the quality of store-bought cutters often leaves much to be desired, so if you plan to seriously engage in wood carving, then you should make your own wood cutters.
Band saw wood cutters
How to make a wood cutter with your own hands from a band saw? In fact, this is not so difficult, despite the fact that such cutters hold sharpening very well. To work you will need:
- Oak scraps for handles.
- Electric sharpener.
- Hacksaw.
- Belt sander.
- Sanding cloths of different grain sizes.
- The actual blade is from a band saw.
- A respirator to protect your respiratory system.
- Wood glue.
Blade making
If you plan to make wood cutters with your own hands, then you will need a piece of saw blade approximately 8 centimeters long. Of this, 4.5-5 centimeters should be left for the shank, which will be attached to the handle. Using an electric sharpener, the shape of the future knife is cut out of the canvas.
The master determines the form himself depending on the requirements. Then you need to grind the shape using a belt sander, making a large chamfer with an angle of 10-15 degrees. This narrowing from the butt to the cutting edge is necessary so that the cutter can be worked with.
A cutting edge with an angle of 25-30 degrees, which will participate in the cutting process, is created later.
This work must be done slowly, otherwise the metal will heat up, become soft and no longer hold an edge. You can sometimes cool the workpiece in water.
Making the handle
To make handles for objects such as machine tools, you need to give the wood a special shape with your own hands. For the handles, oak bars about 12 centimeters long and 12x22 millimeters in cross section are suitable.
Next you need to do the following:
- Sand the tail of the metal workpiece along the edges to remove burrs.
- Place the tail on the block and trace the shape with a pen.
- Use chisels to select wood to a depth identical to the thickness of the workpiece. Periodically, the workpiece must be tried on, placing a second block on top. The hole should not be too deep or too shallow - in the first case, the blade will wobble, and in the second, the handle will simply crack or not stick together.
- Once you are sure that all the parts fit together perfectly, you can glue them together. Glue must be applied to the socket and to the surface of the bar. You can apply less glue to the second part.
- Then connect the parts as accurately as possible and tighten them with clamps. You need to do this forcefully, but so as not to split the bars.
- Remove excess glue with a damp cloth and leave everything to dry for about 12 hours.
After this, the tightness of the structure must be checked - grab the handle with one hand, and try to loosen the blade with the other. If you hear characteristic creaks, the work will have to be redone. Don’t be lazy - if hand wood cutters are poorly made, the blade will quickly become loose and can ultimately lead to injury.
Handle adjustment
The good thing about DIY wood cutters is that you can shape the handle yourself, as you see fit. Although some general rules must be followed:
- Leave the back round and wide, much wider than the one closer to the blade. Therefore, it is better to make handle blanks in advance in the form of an elongated truncated pyramid.
- Be sure to make a notch on the handle for your index finger.
The edges of the handle can be sharpened with a grinding machine. This must be done in a respirator and safety glasses so as not to damage the organs of vision and breathing. Roughly grind the handle and then sand it down by hand with fine sandpaper. Afterwards, if desired, paint the handle and be sure to varnish it.
Creating a tool from a metal cutter
The cutter can also be made from a metal cutter - it is extremely durable and made of carbon steel, so your cutter will remain sharp for a long time and will not become dull very soon.
To make wood cutters with your own hands, you need to carry out the work in the following order:
- Apply the design of the cutter you want to obtain onto the cutter. The jamb knife is especially popular among carvers. The shank must be made longer than the blade.
- Using a metal cutter, cut the cutter exactly according to the design. This will give you a knife blank.
- Sand the blade by occasionally dipping it in cold water.
- Make a hardwood handle using two halves. Cut a recess in one half for the workpiece. Glue everything together with PVA glue and sand the handle.
As you can see, the answer to the question: “How to make a wood cutter with your own hands?” - quite simple and practically does not require any special skills from you.
Sharpening wood cutters by hand after manufacturing
After you make a blade blank, you will need to make a small chamfer - the direct cutting edge of the blade with a sharpening angle of about 25-30 degrees. A sharpening angle of 10-15 degrees will not be enough for you because the blade, when cutting even soft wood, will eventually chip and crumple.
A small chamfer can be formed with sandpaper or a block. You need to go from smaller to larger - first take a sandpaper with a grit value of about 240, and when the chamfer is formed, bring it with sandpapers to 800, and then 1000 grit. Afterwards, you can polish the blade on a leather belt with GOI paste.
Checking the sharpness
The sharpness of the cutter should be checked. If it is sharpened correctly, then even the hardest wood will be easily cut not only along, but also across the grain. Also, the sharpness should be checked on soft wood, making sure that the cut is shiny and smooth, as if “oily”. For this test, for example, pine, which is very easy to obtain, is suitable.
Sharpening if the knife is dull
Over time, your knife will, of course, become dull. Then it can be sharpened with sandpaper, and then also polished on the back of the leather belt with GOI paste.
How to make a wood carving tool
The process of wood carving is an exciting hobby. The possibilities for creativity are almost endless, there are many techniques and styles of carving. In order to take the first steps towards this art, you will need a professional tool, and it costs a lot of money. You can make a wood carving tool with your own hands.
For the entry level, a few devices that can be used to apply a design to a wooden surface will suffice. This article will talk about how to make your first wood carving kits. First, you need to decide what woodworking tools for beginners you will need.
Mistakes and how to avoid them
It takes a lot of time to master carving. And it goes not only to learning how to work with a tool, but also to coping with the consequences of failures and mistakes that are made due to inexperience.
Professionals advise paying attention to these “little things” that can ruin the final result:
- Only well-dried wood should be used.
- You should not hastily delve into the surface of the workpiece; all movements should be made smoothly and with minimal pressure on the tool.
- It is necessary to take into account the specifics of different types of wood, having studied it additionally, with different types of wood and you need to work differently.
- You can’t start working without a sketch; a beginner should give up improvising.
- You can’t grab onto everything at once and try to complete complex tasks; you need to gradually move from the simplest tasks to more complex ones.
Chisels
You can make chisels for wood carving with your own hands if you have a metal blank and a grinder with a sharpening stone. The final sharpening of chisels is done manually, without the use of power tools; after giving the desired shape to the tip, it is necessary to harden it.
The cutting part of the chisel must be hardened after shaping and sharpening the tip. To do this, heat the sharp part of the tool to a crimson color using a gas or kerosene burner and lower it into a container with machine oil or waste.
Advice! Immediately after placing the working part of the chisel in the liquid, move it into the sand, this will save you from the procedure of cleaning the chisel from fuel oil.
The point of a chisel can be straight or shaped; the easiest to make is a straight point; in order to make the right shaped chisel you need to know the proportions.
The handle can be turned on a home lathe, assembled from an engine from an old refrigerator and a corner of different sizes.
Types of chisels for wood carving have different sizes and shapes of the working part; it is expressed in numerical values from 1 to 12.
The curvature of a chisel is determined by the number assigned to it; the smoother it is, the lower the numerical value is used to designate it. Smooth chisels for wood carving are used mainly at the initial stage of processing the workpiece. More V and U shaped curves, numbered 12 and 11 respectively, are used to give the final appearance of the product.
Advice! When making a handle for a chisel, try to make it flatter, this will prevent the tool from involuntarily rolling off the table. When dropped on the working part, it becomes dull and requires frequent sharpening.
Wood carving is done with small chisels, the size of an adult's palm. There are smaller tools available that are used when working with small parts.
Incisors
One of the most commonly used wood carving tools is the cutter. Wood carving cutters should be of various shapes; the set includes a total of six varieties. The types of wood cutters depend on the factors described below.
The difference is the shape of the blade and its angle of inclination; depending on them, the cutter is selected for each specific case. Of the six devices, one is usually considered the main one; most operations are performed using it. Here are some requirements applicable to all types of cutters:
- Convenience - the handle should fit well in the palm of your hand and not have sharp edges so as not to damage your hand during operation;
- Sharpness – the blade should always be well sharpened. To ensure sharpening lasts longer, the blade is made of alloy tool steel.
Sharpening cutters is a responsible and complex process, since sometimes they have a bizarre blade shape.
When buying a cutter on the market or in a specialized store, do not hesitate to pick it up and check whether it will be convenient for you to work with it in the future.
When working with wood, you cannot do without a good knife; when choosing this tool, you should give preference to the one that will be most convenient for processing wood. It is also important to find out what grade of steel was used in its manufacture.
When choosing a knife from a foreign manufacturer, you need to compare the specified steel grade with a domestic analogue, and check what properties it has according to the steel grade.
A good knife is characterized by a high carbon content with the addition of alloying elements.
Knives for working with wood are divided into three types: folding, with a replaceable and fixed blade. A blade with a length of 40 to 50 mm and a thickness of 4 mm is considered optimal.
Wood cutters: main types. Manufacturing and service
All photos from the article
In the arsenal of any craftsman engaged in the manufacture of decorative objects, there will definitely be wood cutters for handmade work. These devices can be very different, and therefore it is advisable for beginners to become familiar with their main types, as well as study the features of choosing and caring for such an instrument.
A variety of knives and chisels are used for processing wood.
General principles
Wood carving is a fairly popular technique for decorating various products.
As a rule, the process itself follows this scheme:
- First, a blank is made from wood, be it a flat board, a block or a figured blank.
Note! Sometimes undisturbed parts of trees are decorated with carvings. In this case, a fragment is selected whose shape has maximum decorative potential.
- Then a rough leveling of the surface of the workpiece is performed, during which all defects are removed from it.
A variety of tools are used for figured carving
- After this, the surface is processed with special cutters, with the help of which a part of the wood is selected. Due to this, a decorative relief is formed.
- After the actual carving is completed, finishing is carried out - grinding the cut areas, impregnation with protective compounds, full or partial painting, varnishing, etc.
The most important tools in this process are the wood carving cutters. In addition to the skill of the carver himself, it is the quality and correct selection of the cutter that determines how clean the ornament or plot image on the wood will be.
That is why below we will look at the main types of such tools and describe where and how they are used.
Chisel profiles
To create three-dimensional images, craftsmen use a variety of types of wood cutters. In principle, if you have the skill, you can do without some of the products listed below, but to achieve the best result, it is better to collect as extensive a set as possible and use each device for its intended purpose.
Cranberries with blades of different shapes
The main types of cutters are presented in the table below:
| Variety | Application at work |
| Blunt knives |
|
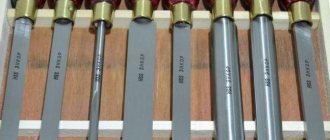
| Chisels | The most common type of incisors. A typical chisel is a long rod with a cutting edge formed at the end. Depending on the shape of the chisel edge, there are:
Wood chisels of most varieties can be produced with both straight and curved shafts. In the first case, the design of the tool allows it to be used together with a mallet, in the second, the carving is carried out solely by muscular force. |
| Klukarzy | Clukars are special chisels that are characterized by a strong bend in the working part. Clukarza is usually used for finishing carvings with strong penetration, which allows the formation of a clear relief. Generally, these tools are classified by blade shape:
|
| "Goat's legs" | This variety is a chisel, the blade of which is curved in the shape of a step. This design allows for deep cutting without affecting the surface layers of the wood. |
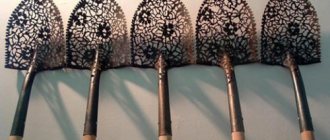
| Spoon cutters | As the name suggests, these devices are used in the manufacture of wooden spoons. The working part of the spoon cutter is a ring or half-ring, the sharpening of which is applied to one of the side faces. The main function of this device is to remove wood cleanly and in large volumes. |
Spoon cutters of different shapes
Additional accessories
However, a master carver, in addition to chisels and knives of various shapes and sizes, also requires other tools.
The required minimum additional equipment includes:
- Wood saws (hacksaw or reciprocating saw for rough work, bow saw for finishing work).
- Jigsaws.
- Drills and rotators.
- Planers for leveling planes.
- Set of wood files (rasps).
- Mallet for processing hard wood with cutters.
- Devices for sanding wood.
Teslas of different sizes
If the master works with fairly large structures, then in addition to simple cutters he may also need figured hatchets - the so-called adzes. According to the principle of operation, they are similar to cutters (naturally, adjusted for the scale and purity of the work).
Tips for choosing
If you are planning to master the technique of wood carving with your own hands, then you need to start by selecting the appropriate tool.
And here we are faced with a dilemma: really high-quality cutters are quite expensive, but if you buy a set for beginners “on the cheap,” then working with inconvenient and constantly losing sharpness devices will discourage you from engaging in this type of creativity for a long time.
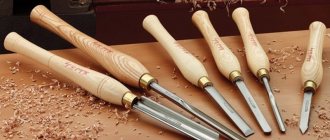
Ready set of tools
The optimal solution would be to buy several good cutters, and then, if necessary, expand your toolkit. To begin with, we will need at least one medium-sized blunt knife, as well as four to five chisels: one flat, several corner and semicircular ones with different blade curves.
High-quality products from a foreign manufacturer
As for specific instances, you need to pay attention to the following features:
- The blade must be durable and well-hardened, free from rust and other defects.
- The cutting part must be securely, without play, fixed in the handle.
Note! This does not apply to knives with replaceable blades - in any case, they will have minimal play that you will have to put up with.
- Handle material: wood or durable plastic. However, the second option is still somewhat worse, since the wooden handle fits much more comfortably in a sweaty hand.
- Naturally, the handle should be even and smooth, without burrs or cracks.
Products with mushroom-shaped handles
- If we talk about the shape of the handle, the most common are cylindrical options (suitable for impact carving with a mallet), conical and mushroom-shaped models.
- Some manufacturers produce chisels and jambs with anatomically shaped handles equipped with finger grips, but many novice craftsmen have complaints about their convenience.
- The manufacturing company also plays an important role: today on the market you can find both domestic and foreign forms that produce products of quite decent quality. But what you should refuse are the frankly cheap Chinese and some domestic cutters: yes, you will save on the purchase, but even if you cut these products, they won’t last long.
Making the cutter yourself
Many craftsmen, either wanting to save money or not trusting third-party manufacturers, prefer to use homemade carving tools. In principle, making a knife or chisel is quite simple, the main thing is to choose the right material.
The photo shows a hacksaw blade and a simple jamb knife made from it
The raw materials for our design can be used:
- A saw blade for wood or metal is an almost ideal blank for a jamb knife. During the manufacturing process, we cut off a piece of blade on a machine or simply break it off at the angle we need, and then form a cutting edge.
- The wood saw blade also has acceptable characteristics. The carbon steel used to produce such saws holds an edge well, which means that the cutter will not become dull even when working with hard wood.
- Before making a semicircular chisel, you can look “in the bins” for an unnecessary punch. To make a tool, we will only need to cut off part of the wall diagonally - and we will get a very convenient device for sampling wood.
An important part of any cutter is the handle.
The instructions for its manufacture are also not complicated:
- We take a block of hardwood and cut a handle out of it.
- We make a hole at the end of the handle, the shape of which corresponds to the shape of the shank of the metal part.
Gluing the blade into the handle
- We glue the cutting part into the handle, and then clamp the structure with a metal ring.
Note! Sometimes the handle is made of two halves. In this case, the blade can be additionally secured with screws or rivets, and gluing should be done in a vice or clamps.
Sharpening cutters
You can only get a decent result if you work with a perfectly sharp tool. And since even the softest wood dulls the blade quite quickly, sharpening wood cutters is definitely included in the “minimum program” of training for a novice carver.
To perform this operation we will need:
- Bars of different grain sizes - from coarse to fine.
- Old leather belt for straightening.
- GOI paste (or similar composition).
Rough sharpening
We do the work like this:
- First, we moisten a coarse-grained block, place the cutter on it at the selected angle and sharpen it using pressure from ourselves.
- We switch to a block with medium abrasive grain and repeat the operations until a clearly defined sharpened edge appears.
- We carry out the finishing on a diamond stone, removing the metal chamfer that appears on the tip of the cutter.
- Then we apply a layer of GOI paste (a composition based on chromium oxide) to the belt and polish the working part to a mirror shine.
Editing on the belt
Advice! Finishing on the belt can be done more often than the main sharpening - this way we can correct a slightly dull blade.
It’s easy to check the quality of our work: if the cutter cuts the newspaper without effort, it means we’ve done everything correctly, and we can start working on the workpiece.
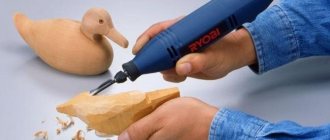
Power tools
Wood carving involves manual processing, but at the initial stage it is possible to use power tools for wood carving. These include:
- Electric jigsaw;
- Drill;
- Lathe;
- Electric planer.
Preparatory stages involving additional equipment are needed to give the workpiece the necessary proportions for further processing using hand tools.
A wood carving workshop should be equipped with a standard set of power tools.
Making a knife
There are a huge number of options for making knives yourself; let’s look at the most popular of them.
Blade knife from a hacksaw for metal
A broken or sharpened blade is suitable for such a knife. The process of processing it is quite complicated, this is explained by the high quality of the steel, but on the other hand, the better the tool will be.
Using a grinder, cut the blade into three parts at an angle of 45 degrees, this angle will be the working surface of the future knife.
The grinder accelerates to high speeds during operation, which will affect the quality of the metal; all alloying elements near the cut will simply burn out. Therefore, after sawing, you will need to clamp the desired part of the blade in a vice and use a file to remove two or three damaged millimeters.
If the blade is too thick, then it is recommended to remove excess metal with a small file or needle file. Sharpening a wood carving tool requires a thorough approach; this will require a needle file and sandpaper.
When the sharpened cutter is ready, you can think about the handle. The easiest thing would be to simply wrap it with electrical tape or raw rubber, but professionals prefer handles made of wood.