How to make a circular saw with your own hands?
Making a circular saw, like any other household appliance, requires patience and imagination.
Many craftsmen identify several options for the manufacturing process of this instrument, and each of them is correct. Some people buy an industrial unit and improve it depending on the purposes for further use. Others assemble a circular saw using the shafts, motor, frame and other parts themselves. In some cases, parts (except for the electric motor) are made by hand. We recommend: How to choose the best metal drill bit for drills and other tools
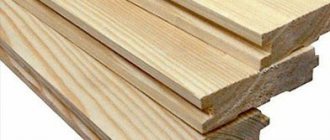
Table saw
The desktop version of the woodworking unit is an option for collecting tools for the amateur. To make it you will need wood for the body and iron corners or profile pipes. The table saw has a small base.
The grinder is most often used as a base. You should consider how to turn the tool on and off. The principle of creating a table saw is to manufacture the body, top plate, fasteners for wood, fixing parts and mounting points for the grinder.
As a result, during assembly you can get a small unit that can be easily moved or transported to another location.
Full-fledged stationary minicircular
A full-fledged circular saw is distinguished, first of all, by its large volumes, which means increased productivity. It allows you to process more wood, fixation improves, and it becomes possible to adjust the saw, but in its manufacture you should use more materials and do without a grinder. In the manufacture of a stationary saw, the emphasis is on the use of a metal base. This significantly increases the service life of the unit and its productivity. Only individual parts are made from wood that are not subject to heavy loads. Most often, a metal corner of 100x100 mm is chosen as a stop. Metal plates with a thickness of at least 5 mm, which have slots along their length, are welded to it. The length of the stop should ultimately be equal to the working surface of the circular. The length of the plates should be equal to the surface of the slab.
The next step is drilling holes in the work plate:
in the middle; on the edge of the frame.
As a result, the holes should form a rectangle with the vertices in the center of the holes. Nuts will be welded in place of the holes for further installation of the clamp bolts. When making holes, remember that the stop must be parallel to the plane of the saw.
Making a handle for a circular saw
The circular saw handle is needed to set the depth and height of the cut. This element is one of the most important. The lifting mechanism can be designed in two ways.
In the first case, the mechanism used works by raising and lowering the saw blade itself. Such a device can be made by installing a metal plate on the base of the machine using long bolts. Lifting will be done by tightening the fixing nuts. The saw blade will be lowered in a similar way, only by unscrewing the nuts.
The second type of adjustment mechanism is a little more difficult to manufacture, but the result is a reliable and easy-to-use raise and lower function.
The lifting mechanism includes:
handle on which the adjustment scale is located; adjusting rod with pre-installed fixing nuts; direction for the movement of shafts and motor.
If desired, the adjusting rod can be replaced with standard metal studs with new threads. This option is more profitable, more reliable and easier to manufacture the adjustment function.
The first step in creating the adjustment handle is to weld a metal plate to the stud. Next, holes are drilled at a distance of 4–5 mm from the center of the metal plate aligned with the pin. To rotate the entire structure, it is additionally recommended to weld the rod.
The scale is easy to make using multi-layer plywood or plastic. The part is put on a pin and fixed with self-tapping screws or other suitable means at hand. The main thing is that the adjustment scale is firmly fixed. After installing the scale, marks are placed on it, which will subsequently determine the lifting height of the working plate.
Homemade jointing machine: sketch, main manufacturing stages
For any work to be successful, you must have good equipment and tools.
The same statement applies to amateurs (or professionals) “tinkering” with wood. Craftsmen who make furniture or other wooden products always try to acquire various tools and devices that can help them in their work. For example, a jointer. This device significantly increases the productivity and quality of woodworking. But not all fans can purchase it, because its price is quite high. How to get out of such a difficult situation? There is a solution, and it’s quite simple - it’s to make a tabletop jointer with your own hands. And the manufacturing process itself will be discussed in the article.
Manufacturing process
So, a person has all the necessary tools, a shaft with a certain diameter, as well as a drawing. First you need to fix the part in the lathe. Regardless of its type, double-sided fastening is used. Any lathe has a spindle. The shaft is secured here using special clamps. On the other side is the tailstock. She presses the material from behind. Now you can proceed to rough processing.
For these purposes, a flow cutter is used. For roughing, rough removal is used, so there are no specific requirements for the tool. The most important thing is that it is sharpened. Otherwise, burrs may form on the workpiece, and this is unacceptable. The machine is simply started and processing is carried out according to the largest diameter.
It will be needed for finishing with a cutter.
Now you can move on to processing other surfaces. Since there are quite a lot of seats, each of them will be processed in accordance with the drawing. It is worth working at high speeds so that the surface is as high quality and smooth as possible.
Once roughing is completed, you can move on to finishing turning. An appropriate cutter is also used for these purposes. All allowances that remained previously will have to be removed. Here you should definitely focus on the drawing dimensions. They are processed. It is advisable to check the size after each finishing pass to ensure that the final product is truly correct.
Next comes the groove cutter. It is used for turning special grooves for keys. There will be several of them here. They will allow you to attach a wide variety of parts to the shaft. It is necessary to cut in accordance with the dimensions shown in the drawing. After the work is completed, you can once again check all available dimensions.
If necessary, you can remove the shaft and then try to fit the bearing and other parts that will be used onto it. If everything is fastened normally, then we can safely state the fact that the work was carried out correctly, and, therefore, the circular shaft is ready for use. Of course, you can use additional sandpaper to get a cleaner surface.
To process the workpiece with its help, the latter is fixed again in its position. Now take a sheet of sandpaper and run it along the shaft. In this case, the clamped workpiece should rotate. You should use non-coarse sandpaper to get a mirror shine, after which the shaft can be removed from the machine. It is completely ready for installation on a circular machine. Of course, you will have to do a number of manipulations with other blanks so that they all fit perfectly on it.
In fact, the work is not difficult, but it is still better to turn to professionals, especially since not every person has a lathe at his disposal. It is better to carry out the work on a machine with numerical control, as this makes it much easier.
Thus, the work is completed, which means we can sum up some of its results. Now everyone knows how. In fact, everything that was described above consists of processing a simple shaft.
In some cases, it can be obtained from a rod of the appropriate diameter. All remnants of the workpiece are subsequently removed. They can simply be sawed off using a hacksaw. You can also use another tool. For example, a grinder with an appropriate circle that is capable of cutting metal is ideal for these purposes. It all depends on what a person has available in his workshop.
The household often lacks a circular saw, especially if major renovations or construction are underway. Not everyone can afford industrial products - they are too expensive. But you can make a circular saw yourself, using materials that are available in the household.
Drawing. The main stages of creating a jointer
Tabletop jointer - drawing
Tabletop jointing machine - drawing (part 2)
A jointing machine, its simplest version without additional functions, can be made quite easily with your own hands. The general progress of work in this case will look like this:
When fastening, glue and clamp are used. The recess should ideally fit the dimensions of the bearing;
After creating the system for turning the electric motor on and off, the machine is ready for use. But in order for your new tool to bring only benefit and joy to work, it is worth using it correctly and safely.
Manufacturing process: step-by-step instructions
Marking the place where the saw is attached to the table
Marking and fastening of stiffeners
Tabletop for a circular saw in finished form
To make a quality structure, you need to follow some tips. The process consists of several steps presented in the table.
| Steps | Description |
| 1 | The block should be leveled on all sides using a plane. Then the frame of the future table is assembled from it. Several 5 mm holes need to be drilled in each side of the tabletop. Additionally, one through one is made for the legs of the product. |
| 2 | The drawers have several holes of the same diameter. In the legs one through one is made. The diameter remains the same, 5 mm. |
| 3 | Proceed to install the dowels into the tabletop. Before this, they are coated with wood glue. The legs and drawers are placed on top. If there are clamps with ties, the product should be secured using them. When the glue has completely dried, you need to fasten the drawers and legs using special metal fasteners. Additionally, it should be tightened with self-tapping screws. You can add reliability and strength to the structure by using corners. They will become an element of additional fastening and give the product stability. For the short side, 2 pieces are enough, and for the long side, 3 are suitable. |
| 4 | The next step involves securing the saw to the product from the inside. There are several methods to accomplish the task. M4 bolts or bars with self-tapping screws are suitable for fastening. The first case is fast and reliable. The second method does not require additional holes, eliminating the need for drilling. You need to make a cut in bars, the width of which is equal to the dimensions of the saw platform. Next, self-tapping screws and bars on both sides fasten the equipment and the tabletop |
| 5 | After installing the saw, you will need another larger block. It is secured to the base of the structure using self-tapping screws. Screwing is carried out on the marks made when setting the platform in a level position. These manipulations will help, when removing the saw, to return it usually quickly without searching for markings |
| 6 | The saw blade is installed in its proper place. The base is sawed to obtain a longitudinal hole. Then the product must be turned over |
| 7 | Then the production of the rip fence begins. Two strips are sawn off from the plywood. Their length should match the width of the table. On average, these dimensions are 10 cm. The corners should be rounded |
| 8 | The resulting strips are polished. They need to be fastened at an angle with self-tapping screws. A metal corner should be screwed inside |
| 9 | If you need to attach a stop to the base and the structure will be used frequently, you should attach the guide so that it is perpendicular to the disk. Attach the roller to the bottom. This will allow him to move. |
Attaching the legs to the table
Attaching the saw to the tabletop
Fixing the start button
The design is completed and ready for use
When performing the described manipulations, it is important to remember to follow safety precautions. This also applies to any manipulations with a circular saw. Regularly check the position of the table and its strength
The structure must be stable, without loosening
Regularly check the position of the table and its strength. The structure must be stable, without loosening.
An example of a manufactured work table for a circular saw
Table version for hand-held circular saw with lifting mechanism
First make sure the saw is securely fastened, only then turn it on. Do not hold the cut material with your hands. This will help prevent wood from hitting your face when the knots start to bounce. Additionally, it is recommended to use special safety glasses when working.
For safety, be sure to wear safety glasses
These simple tips will help you avoid injuries in the workplace.
Drawing. The main stages of creating a jointer
Tabletop jointer - drawing
Tabletop jointing machine - drawing (part 2)
A jointing machine, its simplest version without additional functions, can be made quite easily with your own hands. The general progress of work in this case will look like this:
When fastening, glue and clamp are used. The recess should ideally fit the dimensions of the bearing;
After creating the system for turning the electric motor on and off, the machine is ready for use. But in order for your new tool to bring only benefit and joy to work, it is worth using it correctly and safely.
Making a circular saw
Before proceeding directly to the manufacture of a circular machine, it is necessary to think through its structure and design, and ideally, select a drawing diagram according to which all work will be carried out in the future. When planning the manufacture of the frame, it is necessary to remember that such a design must be stable and reliable. For industrial powerful saws, the base is made of reinforced welded metal structure. For household models, you can use wooden blocks with plywood for the frame or weld a base from a metal corner.
You can make a powerful and easy-to-use circular saw from a washing machine motor. This won't be too difficult. Such motors are compact in size, operate on a single-phase network with a voltage of 220 volts, are reliable and are capable of operating at high speeds.
One of the most important components of a power saw is the shaft on which the working saw is mounted. You can use a ready-made shaft from similar equipment or make it using a milling cutter from round timber. Turn the shaft on a lathe, checking for perfectly accurate centering. Even minimal shaft runout is not allowed, since in the future it will be impossible and unsafe to work on such an incorrectly centered circular machine. Seats for pulleys and a circular saw should be made on the shaft.
The saw blade should rise above the surface of the worktop by a maximum of one third of its diameter. Otherwise, with a higher saw height, it will be difficult to process wood, and working on such a machine will simply become dangerous. If it is necessary to work with timber, the diameter of the saw blade will be approximately 350 millimeters. To process boards, you should choose small disks with a diameter of 250-300 millimeters
The quality of the saw blades used must be given due attention, since in the future the mini-circular saw will bear a significant load, low-quality blades will quickly become dull and require replacement
Nuances of work and safety precautions
Sleds are used to solve special problems. For example, for precise cutting of sheets, cutting many identical small workpieces to one size using a width stop, cutting at an angle. For the latter, the workpiece itself is placed at the desired angle on the movable table.
Processing of long workpieces is limited by the table stroke length. It will not be possible to cut a wane from an unedged board with a length of, for example, 6 m using such a device.
Safety precautions when working with a sled are the same as when working with a regular circular saw.
- the hand should not come close to the working saw blade;
- the workpiece must not be clamped;
- you cannot work tired, with reduced reaction;
- You should also remember about electrical safety. Exposed contacts and wires, unsuitable cables are not allowed.
In general, working with a carriage is safer, since the hand pushes the slide further from the saw blade than the workpiece on a simple circular saw.
Advantages of a portable saw
Hand circular saw
There are several very important technical characteristics that make this tool recommended for such purposes.
- The saw can be equipped with a blade with an outer diameter of 350 mm, which allows cutting lumber with a thickness of 70–85 mm. On the machine, this depth decreases slightly; boards with a thickness of 60–75 mm can be cut. This is quite enough for most household wood crafts - from complex furniture to simple toys.
- The engine power is at least 2 kW, it can withstand significant loads, and special effective forced ventilation quickly removes heat, which allows the mechanisms to operate for a long period of time under normal thermal conditions.
- The rotation speed of the saw shaft meets the existing requirements for woodworking cutting tools. This allows you to obtain excellent quality cuts and comply with safety regulations.
- The hand saw can be fixed to the table in such a way that, if necessary, it can be quickly removed and used as usual. At the same time, all initial technical characteristics are completely preserved.
Additional attachments to control cutting accuracy make working with the circular saw easier
Bosch PKS 16 Multi hand-held circular saw - lightweight and compact tool
Rockwell RK3440K corded mini circular saw with laser pointer
In connection with such advantages of portable saws, we will not consider dubious options for manufacturing stationary circular saws, but will only dwell on this.
From a drill
This is not the best option for a miniature circular saw in terms of durability and reliability. If you use a hand drill without making additional changes to the design, then you can offer two options for a circular saw from a drill. The first option will use a chuck, without any changes - the blade of the disk will need to be mounted on the bolt and clamped in the drill chuck. The second option would be to remove the drill chuck and use the spindle to mount the saw. But be that as it may, a hand drill is intended for short-term operation; manufacturers recommend using it continuously for only 2-3 minutes, after which you take a break of at least 5-7 minutes. This tool is designed to work with drills with a maximum diameter of 10-13 mm, so using a circular saw blade with a diameter of even 125 mm on such a saw would hardly be reasonable.
Making a circular saw with your own hands
The need to have a small circular saw on hand has probably occurred to everyone who has at least once tried to make an even cut on a small board or strip of laminate with a jigsaw or handsaw. It's another matter when such an operation is performed on a stable machine. Even though this circular saw was assembled with your own hands from metal and does not have a very presentable appearance, this woodworking machine allows you to do the work faster and with better quality. But how can you assemble a circular machine yourself at the lowest cost and use available parts, for example, a motor from a washing machine?
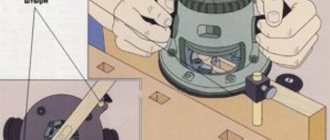
The device of guides for saws of different types
Scheme of the drawing of saw sharpening and routing - 1) Saw blade. 2) Sharpened tooth. 4) Sharpening device. 5) work table for sharpening saws. 6-7-8) File directions, relationship to the work table and saw teeth being sharpened. 9) – line bending the teeth when setting.
The crosscut stop is one of the simplest and most commonly used devices. It allows you to cut long workpieces at 90° and 45° angles quite quickly. The base of the stop is made of textolite, which has a thickness of 4-5 mm. You can also use 9-10 mm plywood. Support beams with a cross section of 2x2 cm are suitable for oak or beech. The beams are connected to the base with screws that have countersunk heads
It is important to maintain angles of 90° and 45° between the beams for support. If necessary, such stops can be made for other cutting angles
If you need to cut a large number of identical bars, you need to make a U-shaped structure. It presses against the trimmed beams like a “saddle”. This device consists of 3 parts: a back and two side parts. The back is made from a piece of board, which has a thickness of 23-25 mm and a width equal to the cross-section of the block. The side parts are made of textolite or plywood. The width of the sidewalls must be made such that the edge of the tool platform is supported before the saw blade enters the wood of the block.
It will be possible to accurately cut thick timber in two passes from different sides, without the need to remove the stop.
It is possible to make an edge stop, but you need to know that it takes quite a long time to make. Thanks to the longer support edge, the guide will be able to provide a more even cut than the designs that come with the saw. The base of the stop and the support strip are cut from plywood, which has a thickness of 13-15 mm. In the base, grooves are selected for the guide keys, after which holes are made for the saw blade and a through groove for the screw for clamping. In order to make the edges of the support strip, dowels, and saw mounting rails, you will need to use hard wood. It is recommended to strengthen the adhesive connections of the dowels, the edges with the support strip and the tool mounting rails with the base with small screws with countersunk heads.
It’s not difficult to make accessories for a circular saw yourself; you need a minimum set of materials. It is not recommended to use the structures that come with the saw.
Making a countertop
At the first stage of making a frame with a wooden tabletop with your own hands, the existing sheet of plywood is placed in accordance with the existing sketch or drawing.
In order to reduce the number of cuts, markings are carried out from the edges of the sheet. DIY accessories for circular saws.
The tool used is a fine-toothed hacksaw or a jigsaw.
Conclusion
It is best to make a planing machine multifunctional so that you can not only plane workpieces, but also cut them, drill, chisel, and also polish them. The main element - the main shaft - should be ordered by a professional turner. The power of the electric motor should be approximately 3 kW at 1500 rpm, and for better processing of parts, pulleys of different diameters should be installed on the motor and rotor.
The frame of the machine must be massive and reliable, for which use channel No. 5 with a wall thickness of 8-10 mm, although it can be wood. All rotating elements must be covered with a casing. The video in this article will give you the opportunity to find additional information on the above topic.
Source
Manual version from an angle grinder
A hand-held circular saw is easiest to achieve if you already have a grinder on the farm. All you need to do is make two simple improvements: a sliding stop and an axial handle.
A sliding stop is two pieces of small metal corner located on both sides of the working element: a disk with teeth installed instead of an abrasive wheel. The gap is 3-4 mm on each side. The horizontal edges of the corners must be rounded at the bottom so that they do not cling to the workpiece. The corners must be connected with cross braces at the front and back. Bolts and nuts are suitable for this, and a pack of washers will provide the required clearance.
We put a clamp made of metal tape on the body of the angle grinder; The screw tie of the clamp is located at the bottom. A double-folded strip of sheet metal or galvanized steel with a hole for the rear bolt of the sliding stop is rigidly attached to it. This way the stop is secured at the back. You can make the clamp with the rear support post as one piece, but the thickness of the metal strip must be at least 1 - 1.5 mm. By shifting the washers that provide clearance, equal gaps are achieved between the working body and the sides of the stop.
In the gearbox housing of the angle grinder we make two to four threaded holes for small bolts (M3 - M5). The gearbox must first be disassembled and identified in a place where it can be drilled. These holes are needed to attach a homemade axial handle. When using the standard side handle of an angle grinder, making an even cut will be difficult even for a physically strong man with strong work skills.
The axial handle is made of a metal tube or rod in the form of a horn directed upward and forward, or a transverse bracket the width of a palm with some margin. Do NOT spill the ends with which it will be attached to the gearbox and drill holes in them for the mounting bolts. If the fastening ends are spilled, the handle will bend from effort during operation.
If the handle is in the form of a horn, we splash its far end in a horizontal plane and drill a hole in it for an axle of 4-6 mm with a margin, i.e. 6-10 mm. If the handle is a bracket, under it, in the same holes in the gearbox, we attach a piece of rod or tube protruding forward, and we spill its end and drill a hole in it, as indicated above. Of course, between the rod and the bracket there should be a distance sufficient for ease of work - 100-150 mm.
Now we take a piece of steel bar 4-6 mm. This will be the adjustment rod. We bend one end of it in the form of a loop, slightly splash it, and drill a hole for the front bolt of the stop. By selecting washers at the front end of the stop, we achieve a uniform gap width along its entire length. With a 6 mm rod, you will most likely only need two thin washers, one on each side.
We cut a thread on the “tail” of the rod. The threaded tail will fit into the hole in the handle described in the previous paragraph. One nut is screwed onto it in advance, and a second one after assembly. By loosening and tightening the nuts alternately, you can adjust the depth of the cut. That's it, the hand-held circular saw is ready for work.
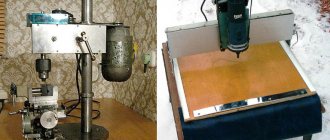
Do-it-yourself shaft for a circular saw without a lathe
And I also ask you all for one piece of advice: on a jointer, one half of the table is blank, and the other is adjustable, the blank half in relation to the knives should be set at what level?
There are many ways, many from the Internet I use myself, but everything is individual to the machine: 1. Level the tables and place a magnet on top; the knife will rise evenly along the plane; all that remains is to tighten the screws; I tried it; there is a drawback when tightening the screws; the key sticks to the screws and interferes with tightening.
A similar option to the first one, but at the bottom of the shaft, 2 holes are drilled at the edges and a spring is inserted into them. knife on top. glass on top, tighten the screws.
3 I have a notebook, here’s a quote from it that might be useful: beer:
Everything is very simple. We take any block (you can use a bead of 30.40 centimes). We make a vertical mark on the side of something and place it on the table. Now we mark this mark on the table and begin to rotate the shaft. The knife approaches the block, touches it, lifts it, drags it some distance, lowers it and moves away. We mark the new position of the mark on the table. And now we do the same with other knives, ensuring that the marks match. Then use the same method to set the other end of the knives. ALL. The method can be modified by introducing different rulers, etc. The good thing about this principle is that it turns fractions of a millimeter into centimeters (as if multiplying them), allowing you to achieve the highest accuracy without any micrometers. Suitable for all planes and very simple. One grandfather showed it to me about 30 years ago, I’ve been using it ever since, thanks to him! Yes, I forgot to add, first we set the maximum planing depth, and then reduce the depth if necessary.
scromniy I also use the same method, and for about 25 years now. Suitable for any machines from industrial jointers to hand planes. Only on the block two notes are initially made with a distance of 5mm. Place the block on the front table so that the first mark is on the edge of the table. We set the table to zero and adjust it so that the knives advance the block to the second mark, i.e. by 5mm. With this adjustment at zero, the knives will “lick” the material. The ruler adjustment works fine. You set it to 2 mm. 2 mm and removes. This method was taught to me by my grandfather, who worked as a carpenter all his life.
In my stationary machine, the knives rest on springs. A sheet of 8 mm glass the width of the knives with ground ends is placed on the back table and pressed by hand, after which the shaft is rotated by the pulley. (The risks of glass laying and maximum blade extension are marked with a marker). The knives rise flush with the table automatically and are then secured with chipbreakers. 2. In a manual jointer (Rebir), the knives are adjusted with screws, which is less convenient; you have to lay flat aluminum. the bar on the back sole and use screws to catch the zero rise of the bar with knives when turning the drum. There is a desire to also seal (caulk?) the springs into the groove, but I still can’t get around to it.
I display my knives with the help of a large magnet, and it’s better if there are two of them, put the magnet on the back plate, loosen the screws of the knife, the knife automatically sticks to the magnet, all you have to do is carefully clamp the knives, that’s all.
Using 2 wooden blocks with magnets glued to them. Place on the table, the outermost magnet hangs over the shaft, loosen the screws and the knife will become magnetized. Tighten the screws. And do the rest. Preparation - 2 blocks, magnets (preferably 3 pieces each) put on a flat surface surface according to the size of the blocks (150-200 mm). It is better to glue with liquid nails, they will choose the gap on the magnets if they are different. Place the block on top. Let dry and use. Enough for a long time!
Preparing the jointer for operation
Before planing begins, the structural parts are adjusted and the installation of working elements is monitored.
Adjusting the jointer table
The difference between the surfaces of the rear and front plates is set in the range from 1.25 to 1.5 mm, this makes it possible to align the plane in two passes of the workpiece. To ensure that the installation parameters of the rear plate do not change during operation, locking devices are provided for fixation. Provide a distance of 5 mm between the knife shaft and the sponge
The material for the table slabs is gray cast iron. On the reverse side of the working plane there are rigid ribs to reduce vibration movement. To prevent wear of the slab ends under abrasive loads, steel linings are made; they also serve to reduce the distance from the edges of the blades and provide additional safety.
Installing the working blades
Knives are selected with straight blades, the deviation is checked with feeler gauges and a ruler, and the gap should not exceed 0.1 mm. Prepared and tested knives are installed in sequential order, with the edges of the blades protruding above the edge of the steel plates of the slot by 1-2 mm. The parallelism of the knives is checked with a control bar or a special indicator.
When using an indicator, the installation accuracy is greater than when using a control bar. Avoid distortions of the blades when fastening; they should be located on a common cylindrical rotation contour, with the axis of the cylinder coinciding with the axis of the knife shaft. It is prohibited to use any type of spacers when installing blades; knives that have become unusable due to grinding or changing the width of the blade must be replaced.
Control block
Used to adjust the jointer when installing the cutting blades. The device is made from hard dried wood, the control edges are processed with high precision. The bars are made with the following cross-section:
During the use of the bar, its edges are checked and additionally aligned and planed to remove teeth and depressions. When installing knives, the measuring device is placed on the back plate of the work table. By turning the shaft by hand, ensure that the blades touch the underside of the block. The position is controlled at three points of the shaft, in the middle and at the ends at a distance of 70-100 mm from the edge. The adjustment is carried out until the knives are evenly protruded at all intervals and touch the same.
What types of equipment are there?
Currently, there are several main options for machines on the equipment market that use spindle shafts:
- CNC machines are high-tech mechanisms with a computerized processor, suitable for processing both metals and wood, as well as some types of plastics. Allows you to perform work via a computer - the program contains the progress of work, types of processing, the operator can only place the workpiece and wait for the end of the process.
- Horizontal woodworking machines have a wide working surface and perform work only in a horizontal position of the workpiece.
- Vertical machine - the working unit is located vertically, which allows you to perform work in an up-down plane, which greatly simplifies the processing of some elements.
- A hand router is, of course, not a machine, but if you attach it to a desktop, you get an excellent portable device. In some cases, a copier can be made from a cutter to produce products according to a given sample.
Important!
Tabletop options are most often used by carpenters at home; machines of this type are good options for reasonable money. It is also worth remembering that each cutter has its own configuration and you will need several options to work (they are not sold with the machine).
What is a milling shaft for a wood lathe?
The shaft is the main and important piece of equipment in a woodworking machine. Its purpose is to rotate and start movement from the engine of the mechanism to other parts of the machine.
The wad performs the following main functions:
- transmission of force from the power mechanism to the working elements;
- clearly fixes the elements of the machine, especially the cutter;
- regulates the position of the working elements relative to the working surface (table) and depending on the characteristics of the work performed.
REFERENCE. Most often, the shaft is a household name; in the drawings it can be designated as a spindle; its location can be found in the support of the cutter mounts.
Necessary materials
A homemade table can be made from wood
For such a table, wood, plywood or chipboard can be used. MDF and chipboard are also suitable. Some people prefer to choose steel or aluminum.
Steel plate table saw
It is not recommended to use plastic; it is completely unsuitable for a table of this purpose. If wood is chosen, then after completing the assembly the product should be treated with a special antiseptic composition. This will provide reliable protection from moisture and help avoid rotting.
To make a saw table yourself, you need to prepare the materials.
Selected raw materials for the base. The thickness should be 21 mm. The timber required for the frame. An edged board 3 meters long with dimensions 50 by 150 mm is suitable. A total of 5 pieces are needed. Dowels made of wood with dimensions of 10 cm. At least 12 pieces. Wood glue. Metal fasteners in the amount of 4 pieces. Metal corners. 10 pieces are enough. Self-tapping screws.
These elements must be prepared in advance and placed near the workplace.
Recommendations for use
A rotary machine, like any mechanism, needs proper operation. If you do not follow certain rules, the device can quickly fail. And in the worst case, you yourself will get injured. Therefore, when using, you should follow the recommendations from specialists:
Of course, it is worth keeping your desktop clean. After finishing work, with the machine turned off and de-energized, clean the device from chips. The same must be done periodically to perform large volumes. Turn off the machine and remove any accumulated chips from all mechanisms and surfaces. Cleanliness will make your work easier and help keep the unit operating for a longer period of time.
The video will discuss in detail one of the options for a homemade jointing machine.
Source
What is required and how much will production cost?
You will need a marking tool: a carpenter's angle, a tape measure, a level, possibly a caliper.
Tools for cutting workpieces to size may vary. For metal: a monkey bar with a cutting wheel or a hand saw for metal, a gas cutter or electric welding. For soft materials: hand saw or bow saw, circular saw, jigsaw, reciprocating saw.
It is impossible to name the manufacturing price. If the craftsman already has the material and fasteners and does everything himself, production may not cost anything in money. Only time and work. If you have to buy material, the amount depends on what material, how much, at what price, whether you have to pay, for example, the welder or not.
Therefore, the manufacturing price can be from 0.0 rub. up to 3-7 thousand rubles. and even 20 thousand or more, if a complex machine with a slide, screw adjustments, etc. is being made.
The cost of the manual circular saw itself is not taken into account. It is considered as a self-sufficient tool that can be used effectively even without a stationary option.
Stationary machine with your own hands
To perform everyday or one-time tasks, a hand-made circular saw is quite suitable. Small-volume sawing work does not imply heavy loads on the disk drive. The compact tool has small dimensions, which makes it possible to put it away after finishing work in a certain place. An experienced carpenter will need to make a large stationary type circular saw.
Circulation table
The main condition for making a table is the selected material. It is recommended to use a solid steel sheet, duralumin or silumin alloy. Materials such as moisture-resistant plywood, plexiglass and textolite require processing and installation on top of a galvanized sheet. The use of any material in manufacturing must meet the main conditions:
- increased vibration resistance;
- sagging with a load exceeding 50-60 kg is unacceptable;
- the presence of a perfectly flat surface.
In cases where the conditions are not met, a DIY circular saw may stop due to a jammed disk or a broken drive. The consequences can be different, from a damaged part to injury to a person.
There are several options for making a circular table. Stationary tables can be sawed or made from two parts. The circular saw blade should protrude no more than a third of its diameter.
Saw blade
Saw blade
The design of a DIY circular saw must contain a saw blade. The working surface of the disk is set to one third of the total diameter. For example, with a diameter of 210 mm, the disk should protrude 70 mm from the table. Parts with greater thickness will require a powerful motor, from 1 kW. A miniature circular saw will not cope with such tasks.
The splitting knife installed on some models serves to prevent short circuits and jamming during operation. It is located at the back a few millimeters from the teeth of the saw blade. The device may also be needed when making a circular saw with your own hands.
Adjustable side support
Any type of work will require a stop. The side support is made of a block of dense wood. In other cases, it is possible to make it from a metal corner. The arrangement should be slightly longer than the table structure. The stop is installed using bolts. The template is installed between the table and the cutter for precise installation and better settings.
Shaft
Homemade shaft
The most important part of the design is the shaft mounted on the circular saw. A self-made shaft for a circular saw can damage the structure and cause injury. The reason for this is runout, which cannot be avoided when making a shaft using artisanal methods. The manufacture of the shaft should be entrusted to a specialist with good turning equipment. You should remember that there is a cutter that needs a seat. The holes must be symmetrically machined and machined.
Finished shafts are sold in specialized markets. Preference should be given to parts with a self-aligning bearing. Otherwise, the conventional mechanism may soon render the circular machine unusable.
Broadcast
There are several types of gears that can be used in the design of a DIY circular saw:
- V-belt transmission;
- mechanism consisting of gears.
The preferred option is to use a belt drive. Using a mechanism with gears can lead to jamming if a foreign body enters and injury to the worker. When choosing the pulley diameter, the maximum number of revolutions of the saw blade is taken into account.
Motor
Electric motor for circular saw
In most cases, homemade machines are equipped with an engine from an old washing machine. The main features are increased service life and efficiency. The speed of such engines is not high, which makes working on a circular saw assembled with your own hands safer, longer, and has a positive effect on the result. The use of a special three-phase motor implies the presence of a 380 Volt network. If one is not available, you will have to use a starting and running capacitor, which leads to additional costs.
Rules for safe operation of equipment
If used incorrectly, gas cylinder equipment can become a source of a strong explosion or fire.
When performing welding work, you should definitely use personal protective equipment: glasses, gloves, special shoes.
Before starting work, you need to thoroughly inspect the equipment for damage. If the equipment gets dirty, be sure to remove the dirt
You can work with propane cylinders only in well-ventilated areas, and the air temperature should not be below 0 °C.
Absolutely forbidden:
- Work near open flames.
- Keep the cylinder tilted when working.
- Place the vessels in the sun.
- Carry out work without a gearbox.
- Heat the gearbox over an open fire.
In addition, if you smell gas, you must immediately stop working and turn off the valve on the cylinder. We also recommend that you familiarize yourself with the main reasons for the explosion of gas cylinders.
When working without personal protective equipment, you can get burned, not only from an open flame, but also from accidentally touching hot parts.
If the considered homemade burners are not suitable for you, we recommend that you familiarize yourself with other options for making useful homemade products discussed in our articles - a burner made from a blowtorch and a burner for a sauna stove.