In what areas is the equipment used?
This is an important point for those who are just about to purchase machines.
- Creation of souvenir products.
In the production of souvenirs, laser machines have shown high efficiency. It has already been said that non-contact processing makes it possible to create patterns on parts with any parameters. Which makes the entire work process easier. Even pens and USB keys are processed using this technology.
- Information, award products.
Laser machines are convenient to use for making signs with any information. Diplomas made of two-layer plastic, award certificates - and in this area laser machines have practically no equal. The main thing is to choose the right drawings.
- Promotional Products.
The equipment is especially relevant when creating interior and exterior elements. After using the machines, surfaces made of acrylic and plexiglass look good - they have a glossy end, and there are no radii left from the cutter. The smaller the element, the easier it will be to cut it when plasma cutters are used.
- Cutting plywood and veneer.
Laser cutting technology has become widely used in interior design. We are talking about the manufacture of overhead elements, decorating furniture, creating radiator and ventilation grilles. Usually we are talking about elements with a small thickness, fragile.
It is almost impossible to produce such parts using milling machines, because it is difficult to avoid the appearance of chips and cracks and other similar defects. Children's toys, construction sets and individual interior elements can also be made using this cutting technology.
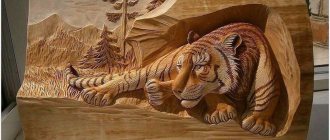
This area is also characterized by the active use of laser cutting of veneer. Especially when it comes to the production of marquetry and inlay. In the Hermitage, many objects were created using this technology.
- Packaging work, changing the structure of foam rubber and plastic products.
Few people will be surprised by packaging made using laser machines. The equipment is convenient because it can be easily and quickly programmed at any time. There is no need to be tied to a specific circulation or set up complex lines for supplying materials. The surface is free of creases during non-contact processing. The surface of the pattern looks beautiful.
Cutting plywood: how to cut at home and how to cut without chipping
- Engraver;
- Grinding attachment;
- Prepared wooden products;
- A simple black pencil;
- Sandpaper;
- Stain;
- Varnish;
- Application brushes;
- An eraser.
- First-grade plywood is considered a high-quality raw material without any flaws or deformations. The cost of this material is quite high.
- In second-grade plywood, minor microcracks and a small number of knots are allowed.
- Third-grade plywood assumes the presence of numerous flaws and various types of defects, such as glue leakage, various wood inserts, numerous cracks, knots and gaps.
- The fourth grade is the worst and is characterized by a large number of various defects. Such raw materials find their use only as reliable and durable packaging for all kinds of industrial goods. The cost of such plywood is significantly less than the cost of higher quality materials.
By its nature, plywood has the amazing ability to take on a variety of geometrically irregular configurations. These properties can be explained by the fact that this material differs from others in its high bending resistance.
It is easier to bend plywood along the grain than across it. Knowing this nuance allows you to significantly increase the bending angle.
Expert opinion
Strebizh Viktor Fedorovich, leading construction foreman
Much wider possibilities for cutting plywood open up when using milling and laser cutting of plywood on CNC machines. If you want to clarify something, please contact me!
Video lessons on modeling from plasticine, salt dough and clay!
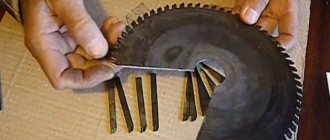
The best wood saw blades for a circular saw
Modeling for children and adults. Here are the best video tutorials and modeling classes
from plasticine, salt dough, polymer clay, mastic, plastic, cold porcelain, sand, mass and even snow.
Everything about how to make cool crafts, for example, making animals (cat, dog, monkey, bear and other animals), food (fruits, vegetables, buns, pies, pies, buns, dumplings, dumplings, ice cream and other products), and also flowers, a person, a girl, a doll, Freddy, a dinosaur, a snowman, Smeshariki, figurines and other toys made of plasticine, dough, clay and other materials for modeling. Detailed video reviews about tools and materials for modeling: plasticine, salt dough, polymer clay, mastic, plastic, cold porcelain, sand, mass, snow and so on. Support our project!
Tell your friends and acquaintances about the site, share it on social networks.
Review of the most popular attachments for working on wood and metal
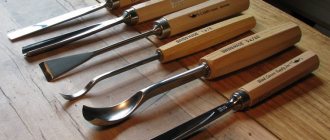
Wood carving tools
Wood is one of the most commonly processed materials for engraving, along with glass, metal, and stone. Dremels are often used for carving wood, drilling miniature holes in it, applying images to the surface of a given material, sanding, and creating small grooves or tongues. Therefore, popular types of attachments for woodworking are:
- wood cutters;
- drill;
- cutting circles;
- polishing, grinding wheels and cylinders;
- spherical and cone-shaped burs;
- diamond and carbide bits of various shapes;
- felt balls.
There are also specific types of wood cutters, but they are used very rarely even by specialists. It is recommended to purchase consumables for processing wood of different species using a straight grinder as a set. Thus, everything that may be needed when performing work manipulations will be collected immediately in one case.
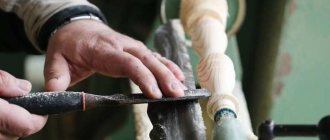
Working with an engraver: “easy and simple”
To ensure that the product, on which the craftsman has to work painstakingly, is not spoiled by an accidental mistake, it is necessary to know the intricacies of using an engraver, be able to accurately copy drawings and follow safety rules. Difficult? Not at all! We will tell you in more detail about all the secrets of working with the tool later in the article.
Stage No. 1. Workplace organization
First of all, you need to properly prepare everything you will need for engraving.
For working with tools, a table with a high-power lamp is best suited - this way all the smallest details will be clearly visible. To avoid damaging the furniture, it must be covered with paper or cloth.
Thanks to this, chips and dust generated during cutting and grinding will remain on the material and not on the surface of the table.
For rough drawing, you should stock up on a pencil or felt-tip pen and adhesive tape - it will come in handy if the pattern has already been drawn on paper.
In this case, the tape will help firmly secure the “draft” to the surface so that it does not move and the pattern is even.
If you intend to depict something directly on glass, plastic or wood, the surface should be “degreased”, that is, wiped with alcohol. This way the felt-tip pen will not wash off, and the drawing will be better visible.
Stage No. 2. Tool preparation
In order not to be distracted by searching for the necessary attachments during the engraving process, it is better to immediately lay them out in the order in which they will be needed during work. At the same time, it is worth understanding the purpose of each part.
For example, a cone-shaped bur bit is designed for cutting outlines and is not suitable for making fine strokes, while a cylindrical bur bit will do the job perfectly.
The engraver always comes with instructions, so you can quickly find out in what case to use the attachments.
Sometimes a special suspension is sold along with the instrument. It is needed not only to give the engraver the correct position during storage.
Thanks to it, it is possible to avoid vibrations that occur during operation, and, consequently, some errors when applying the pattern.
Before you start using the tool, you must install the suspension so that the flexible shaft cord does not get in the way and does not create interference.
Stage No. 3. Drawing
To ensure better hand glide over the surface, you should wear gloves. Thanks to them, the brush will not remain in the same place for a long time. In addition, this will help avoid the appearance of stains on degreased wood or plastic.
For those who are just starting to work with an engraver, experts advise choosing the minimum speed. This way you can simultaneously solve 3 problems: cut the pattern evenly, make strokes of the same depth and not damage the material.
You need to start by drawing the outline itself and only then move on to “drawing” the details - small lines, dots, etc. In order to give the image a finished look, you should use the roller with a soft felt surface included with the engraver. Using this part, you can remove all roughness and “burrs” left by the carver.
When working with an engraver, you should always remember that every 10-15 minutes you will have to stop and turn off the tool (if its design does not include a cooling system). This way you can avoid engine overheating and premature breakdown. More precise times for each model can be found separately in the attached instructions.
Stage No. 4. Equipment care
In order for the engraver to serve properly for many years, you need to constantly monitor the condition of the working elements.
If, upon inspection of diamond wheels, brushes or attachments, cracks, roughness or other damage are found on them, these parts must be replaced with others.
It is worth remembering that new consumables must be of the same brand as the tool itself. Only in this case the manufacturer guarantees the efficiency of the engraver and its long service life.
The second thing you need to do every time you finish painting is to clean the ventilation holes. They serve for additional cooling of the engine, but over time they become clogged with dust generated when cutting wood, plastic or glass. Contamination reduces the productivity of the engraver and often causes its failure.
To prevent this from happening, you need to carefully remove the abrasive using a piece of cloth soaked in warm water or soapy water. It is not recommended to use alcohol-containing products, solvents and gasoline, as they can damage the body of the instrument.
It is typically made from ABS plastic or polystyrene, which are susceptible to chemical attack.
Based on this information, you can organize your work with the engraver step by step so that it is effective, reliable and enjoyable. However, this only applies to those cases when the tool is used to apply patterns. Otherwise, when cutting various materials, grinding surfaces, or drilling holes, you should follow the safety rules:
- before turning on the engraver, you must make sure that the power cord is in good condition and check the operating parts for damage;
- To protect your eyes from dust and random sparks, you must use glasses;
- during heavy work (drilling, milling), the engraver must be held firmly with the fingers of the entire hand - this eliminates the risk of arbitrary movements that can lead to failure of the equipment;
- If the cutting disc suddenly jams, do not try to immediately remove it from the hole. In such cases, you need to turn off the power supply, wait until the nozzle stops rotating, and carefully pull the engraver out of the cut;
- After completion of work, all used nozzles must be cleaned of accumulated dust. By servicing the engraver on time, you can not only extend its service life, but also improve the quality of work with it;
- consumables purchased separately (wire brushes, diamond discs, etc.) must exactly match the technical characteristics of the tool, have the appropriate shank dimensions, thickness and speed.
Apply these simple tips when completing orders and you will get excellent results. And if you don’t already have one, you can always choose a suitable engraver in the catalog on the website of our online store.
Additional work tips
Wood cutter for drill types and application features
The following factors must be taken into account during operation.
Laser engraving can be used without creating printing forms, cliches and matrices. Accordingly, there is no need to purchase additional equipment or involve more people in processing.
Most operations can be easily performed at home. Just like the preparation of the drawings itself. Cutting them won't be difficult.
This saves time spent on pre-press processing. The production process is accelerated, the productivity of any installation becomes better.
Laser technologies are known for not requiring the use of large quantities of materials.
Without the laser itself, engraving cannot be performed. The installation is powered by regular electricity. One laser should be enough for approximately 20 thousand hours of continuous operation. Intensive use of one device can last up to 7 years. Even if cutting is carried out constantly.
- One operator is quite capable of servicing the installation. The main requirement is the ability to work with graphics programs.
- Products can be manufactured in both small and single batches. For the design of drawings and their direct production, working files are created in a special program.
- The result of any work is obtaining durable images that are resistant to any external factors. The drawing can be saved for future use.
Caring for engraving equipment and tools
In order for an engraver or drill used at home or in a well-equipped workshop to last as long as possible, it is necessary to properly care for it. First of all, you need to monitor the condition of the tools that are used in conjunction with such equipment: there should be no cracks or other defects on their working surface. Defective instruments may only be replaced with burs of the same design and type. You should also make it a rule to clean the engraver's ventilation openings from dust accumulating in them after each working session.
Proper care of the engraver will not only keep such equipment in working condition for a long time, but also perform processing with its help as efficiently as possible.
Figure cutting of plywood (cutting out figures from a sheet of plywood using a machine) is popular among decorators and furniture makers. Using a sheet of plywood and special equipment, you can create not just a home decorating craft, but an entire work of art.
Read also: Homemade chassis for a homemade snowmobile
Laser cutting of decorations for home decoration
Sawing methods (basic techniques)
You can cut out a figure using:
- machine for figured cutting of plywood – laser equipment;
- a regular jigsaw (you will also need a set of files for it);
- CNC – milling equipment.
Before you start sawing using one technology or another, you should know some nuances that need to be taken into account when working with glued veneer:
- You should know that cutting a figure from plywood made from pine/spruce will be much more difficult than from other wood species. This is explained by the fact that coniferous varieties have a viscous structure due to their resins.
- Glued veneer should be cut in the direction of the grain. If you need to make a cross cut, then first make small cuts with a knife, and then start sawing with the main tool.
- Before driving a nail, you need to make holes for it.
Sawing with a jigsaw
- You only need to cut in one vertical plane. The saw should be moved “up and down”.
- If you need to make a turn according to the drawing, then turn the workpiece, not the base.
- They begin to cut in the inner contour. Then they move to the outer contour.
- The nail file should be cooled periodically (pause work for 10-15 minutes). Otherwise, it will become unusable.
Note.
From ancient times to the present day, sawing with a jigsaw has been considered an interesting and creative activity.
Creating a masterpiece with a hand jigsaw
Laser cutting of plywood sheet
Operating principle: beam burning along the contour. The main advantages of this technique include:
- there is no need to process/file the edges of the figure after cutting;
- high-quality cutting;
- the size of all laser-processed parts is the same;
- You can burn a pattern of any complexity.
Disadvantages and possible risks when working with laser equipment include:
- with excess power, plywood may char (despite the fact that the technology provides a special air supply, there is a risk of fire/charring, albeit small);
- When a craftsman sees plywood, he must be able to determine what species the veneer is made of and what kind of glue it is glued with (the burning mode depends on the type of wood and the type of glue);
- If a novice works with such equipment, and during the burning process the beam “accidentally” (due to the operator’s inexperience) hits a knot, the product will be damaged.
Before you start cutting plywood with a laser, you need to learn how to work with this type of equipment. How the figure will look depends on experience.
Classification of nozzles
There are a large number of varieties of equipment for working with a mini drill. The wide range on the market allows you to select attachments for wood and many other materials that engraving equipment can work with. Also, individual craftsmen make them themselves.
Structurally, the attachments (burs) consist of two parts;
- tail, clamped in the tool chuck (diameter from 0.8 to 8 mm);
- worker who processes materials.
Equipment is classified according to two main criteria:
- by the type of material from which they are made;
- by area of use (purpose).
By type of material processed
Based on the material, engraver cutters are of the following types.
- Made of hard alloys (carbide) with small and large working parts. There are different types of notches on them. Designed for initial or intermediate processing of workpieces of different hardness.
- Diamond-coated steel, used for basic work operations with various materials.
- Disc holders that can be equipped with felt, cutting, or rubber wheels, depending on the properties of the workpiece and the nature of the work performed.
- Rubber with the addition of corundum, used in processing metal workpieces.
- Abrasive, which are used to perform work on stone, metal, glass, and ceramics.
- Felt, intended for polishing wooden surfaces.
Carbide equipment is of high quality, durable and is one of the most expensive consumables for Dremels. The shape of the tips determines the features of its application. With the help of such peak burs, it is good to process bone, plastic, and make tracing (indicate the contours of the picture). Diamond attachments are also of high quality, even if the kit they are included in is classified as cheap consumables.
On the market you can find a set of burrs, all the elements of which are marked with some color - it indicates the level of sharpening. Those marked black are the most productive burs, while the sharpness of green or blue ones is worse. The yellow-marked attachments are the best choice when finishing workpieces.
By purpose
You can use an engraver with attachments not only for engraving, but also for performing other work operations. The breakdown of consumables used in the operation of straight grinders is presented in the table below.
| Work performed | Nozzles used |
| engraving | the varieties discussed above are suitable |
| drilling | performed using steel or carbide drills |
| polishing | circles made of felt, cotton, felt, sandpaper, leather, as well as special devices (holders) that you can wrap yourself (for example, with felt) |
| grinding | grinding stones (of various shapes and from different materials) and wheels (of sandpaper), diamond rings, rubber cylinders |
| tongue and groove | burs with a spherical working part |
| cutting | cutting discs |
| milling | cutters |
| cleaning surfaces (for example, from rust, scale) | wire (steel), thread, fabric brushes |
| finishing of holes or cavities | diamond cutters |
| creating grooves | cone burs |
Consumables from each group can be used when processing various materials. At the same time, milling equipment is used mainly by professionals.
Selecting a saw blade for cutting plywood | Magazine of the Fair of Masters
- plywood 8 mm thick
- pencil
- thick film
- stationery knife
- drill
- drill
- electric jigsaw
- jigsaw files
- sandpaper with grit P100
- glue
- varnish
- tassel
Bulgarian
It is strictly forbidden to use a grinder to cut wood; plywood is stiffer than solid wood, but it is also not recommended to use a grinder for cutting it; this type of work is extremely dangerous
To avoid such defects, it is advisable to consider the following recommendations:
- Based on the cutting drawing and the dimensions of the selected tool, the thrust rail is set. It will avoid vibrations of the cutting device, which will reduce the amount of damage.
- If the work is carried out with a hand-held circular saw, the tooth output is minimized. As a result of the adjustment, the sawing part should not protrude more than 5 mm.
- To make the edge without chipping, a special tape is glued along the line. This reduces delamination, but does not guarantee complete absence of defects. An alternative option is to wet the upper area, but due to the moisture resistance of the material, it will not be possible to achieve the desired effect.
- The cutting part is brought to the starting point of the process in the switched on state, since when started, the teeth tear the wood fibers directly at the edge.
- The movement of the tool should be uniform; pressing too intensely creates creases and burnt areas. If you move very slowly, tracks will appear as a result of constantly entering the surface.
Expert opinion
Strebizh Viktor Fedorovich, leading construction foreman
A hand jigsaw is a specific tool; it is used only for small decorative work and is designed for cutting plywood up to 7 mm thick. If you want to clarify something, please contact me!
Operating principle of the device
Currently, any laser equipment has an acceptable price level. That’s why it is gaining popularity and is used not only in large but also in small businesses. The drawings with templates presented in this section will also be indispensable assistants. At the same time, high-quality work and high productivity are characteristic of even the most budget models.
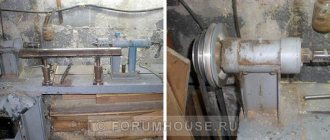
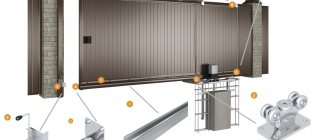
To correctly use drawings using cutting, you need to understand what the machine consists of:
- One-piece frame.
- A table located in a horizontal plane.
- Mobile portal. It is equipped with a special head that emits a laser beam.
A stepper motor allows you to set the equipment in motion. A numerical program circuit organizes the adjustment of all parameters. A Numerical Control device installs the laser at certain positions along with other devices that perform work operations.
The assembly optics unit also has several components.
- Laser tubes.
- Emitter in the form of a head.
- Reflective devices with the shape of mirrors.
- Focusing mechanism.
- Focus lens.
The best cordless engravers
The main feature of such models is the ability to operate autonomously. They are used in conditions where there is no power supply, hard-to-reach places or when the engraver needs to move frequently.
Battery engravers can work without interruption for a limited amount of time, have a low cost and are small in size.
Fein AGSZ 18-280 LBL Select
5.0
★★★★★
editorial assessment
100%
buyers recommend this product
The body of the device has a closed design, which protects it from solid waste particles entering the engine. Thanks to the presence of four shock absorbers, there is virtually no vibration of the elements during operation.
The rotation speed is adjustable in the range of 9000-28000 rpm according to the user's needs. Long-term operation under high load is guaranteed by a lithium battery with consistently high current output and a heat dissipation system.
Advantages:
- electronic tuning;
- long service life;
- capacious battery;
- illumination of the working area.
Flaws:
high price.
Fein AGSZ 18-280 LBL Select is a reliable and versatile device. Long operating time and large immersion depth allow it to be used for professional grinding and milling of metal.
Bosch GRO 12V-35
4.9
★★★★★
editorial assessment
95%
buyers recommend this product
See review
The main distinctive characteristics of the model include long-lasting operation and high spindle speed.
The device is equipped with an overheating prevention system and a rpm regulator for working with various materials.
The maximum collet diameter is 3.2 mm. The package includes 5 attachments and two batteries with a capacity of 2 Ah each. Comfort during operation is ensured by the soft pad on the body and the low weight of the device.
Advantages:
- electronic speed control;
- maximum rotation speed - 35,000 rpm;
- overheat protection;
- capacious battery;
- illumination of the working area.
Flaws:
noisy.
Bosch GRO 12V-35 is universal and can be used both for cutting stone or metal materials and for polishing surfaces.
Long-term operation and high rotation speed allow the tool to be used in professional activities.
Dremel 7750-10
4.9
★★★★★
editorial assessment
91%
buyers recommend this product
See review
A special feature of the model is the presence of three operating modes. Convenient switching between them and a system for quick replacement of attachments ensure high efficiency of work such as engraving, polishing and cleaning, sharpening, grinding.
The battery capacity is 1.5 Ah and will take about 1 hour to charge. Thanks to the soft circular grip on the handle and the ergonomic design of the body, it can be held from any side.
Advantages:
- collet lock;
- air ventilation;
- weight - 420 g;
- 10 nozzles included;
- fast battery charging.
Flaws:
position regulator of rotation speed.
The Dremel 7750-10 can be used for a variety of machining tasks on soft metals or plastics. The device is worth purchasing for fast and efficient operation in conditions of no power supply.
Metabo GA 18 LTX
4.8
★★★★★
editorial assessment
89%
buyers recommend this product
Thanks to its compact design, spindle locking and capacious storage, the model is characterized by high productivity and operating time. The device is equipped with fuses against restarting and engine overheating.
The battery is characterized by economical energy consumption and charge level indication. The maximum spindle speed is 25,000 rpm. The removable rubber cover provides easy storage and safety for the owner.
Advantages:
- fast battery charging;
- energy saving;
- overload protection;
- start fixation.
Flaws:
heavy.
Metabo GA 18 LTX will be an excellent assistant for long-term work without electricity. The safety and performance of the device allow it to be used both at home and in a professional workshop.
READ ALSO
12 Best Belt Sanders
Types and purpose of cutters and attachments
- The cutter consists of two parts: the shank and the actual working head. The shank is designed to secure the tool in the device clamp. As a rule, collet clamps are produced by the manufacturer under a specific brand, so you need to have a universal set of fastening tips. Depending on the type of technological operations, the most suitable and convenient tools are selected.
- Cutting discs are designed for initial rough processing of the source material in order to prepare the surface for the main work.
- The working surface of the head can be cylindrical, oval or wedge-shaped. The cutter itself is made of tool steel. To grind surfaces, appropriately shaped attachments with an abrasive coating are used. Rubber mixed with grinding powders is used as an abrasive. A more expensive and effective option is a bur coated with diamond chips. As a rule, burs are produced in sets of 6 pieces and have different configurations of the working surface.
Read also: How to replace a plug on headphones without a soldering iron
A wide variety of dental instruments allows them to be successfully used in artistic carving. High strength and wear resistance will ensure durable and high-quality use of products.
What can be engraved with laser engravers?
The list of materials suitable for engraving is extremely wide. It includes:
- steel, stainless steel, aluminum, copper, titanium, non-ferrous alloys (some metals may require special paste or spray);
- wood, cork;
- glass, fiberglass;
- marble, natural stone;
- fabric, leather, lavsan;
- ceramics (including ceramic tiles);
- acrylic, plastic, rubber.
At the same time, it is important not only what can be engraved on, but also on what specific objects the engraved image will look especially attractive. Here are some products that serve as an ideal basis for engraving:
- kitchen, hunting, tourist knives;
- cigarette cases, flasks, glasses;
- wallets, purses, cardholders, diaries;
- cases for smartphones;
- flash drives;
- pens, lighters;
- spoons and forks;
- animal identification medallions;
- watches, awards, key rings, tokens, bracelets, rings.
History of origin and development
Wood can rightfully be considered one of the oldest materials used by man. Since the dawn of time, people have realized how accessible and easy to process wood can be. They began to attract it everywhere for construction. The art of carving is closely intertwined with a separate type of architecture - wooden architecture. People have never suppressed their inner desires to surround themselves with beautiful things. This desire for beauty often became the impetus for the development of art in different directions. Carving was no exception. As usual, at first all the best was placed on the altars for the deities who were worshiped in those days. The Shigir idol is considered the oldest example of the art of wood carving. It was found during excavations near Yekaterinburg. The product is a figuratively cut pillar with thematic designs on the surface. According to scientists, this idol was created in the middle of the 8th century. They made a pillar from larch (contrary to the generally accepted misconception about oak). In addition to the Shigir idol, there are also later finds decorated with carved elements, but the technique of those masters was primitive and crude. Modern people would rather call them original than beautiful. This was influenced by the poor tools used by the masters of those times.
Now let’s take a big leap of almost ten centuries and fast forward to the 16th century, when the first artels of carvers began to appear. From the realm of rituals and paganism, wood carving gradually moved into everyday life. Bizarre patterns began to be used to decorate meager furnishings and wooden utensils. The technique became more elegant, thanks to an expanded set of special tools that masters began to use. In addition to ordinary wood, even tree roots and burls (a type of growth) were used. With their bizarre, irregular shapes, they evoked abstract associations and pushed carvers to create original asymmetrical household items. Artels en masse decorated temples, cathedrals, palaces and houses of wealthy citizens. Most household utensils (from chests to spoons) were covered with decorative patterns. Since even representatives of the middle class tried to decorate their houses, a separate direction appeared called house carving. Many examples have survived to this day. Most of them became official monuments of art. In parallel with house carving, a more complex technique appeared - volumetric. Relief decorations required great skill from the carvers, but the result was worth it. Carvings were used to decorate chests, chairs, toys, coasters, gingerbread boards (similar to trays), spoons, snuff boxes, caskets, headboards, frames and window shutters. Although a couple of decades ago this art form was in decline, the traditions of ancient Russian wood carving are gradually being revived. It’s not for nothing that they say that everything new was simply well forgotten.
Tips for beginners from professionals
- Before starting to carry out the simplest tasks regarding the artistic processing of wood products, it is recommended to take a master class in wood carving from professional carvers and engravers. These are invaluable and free lessons for those who want to engage in an exciting activity that gives wide scope to the creativity and imagination of a person who wants to acquire knowledge and skills in a previously unknown area.
- Drill carving lessons can be found in numerous good video clips on the YouTube Internet portal. You will become familiar with the most important techniques and methods for processing material in hard-to-reach and inconvenient cavities of the intended product using unique means to achieve the goal.
Wood engraving is one of the oldest folk crafts. Rus' has long been famous for its forests, so ancient artisans never lacked materials. Most often, soft, pliable wood species were chosen for work. However, real craftsmen did an excellent job with hardwoods (spruce, birch, oak). Engraving on various materials (glass, wood, metal) is an art popular among many peoples of the world. For example, in the Caucasus and Dagestan, the old traditions of engraving, or chasing, on metal are still alive.
Making intricately decorated wood products is an original Slavic tradition. Nowadays, engravers have many other materials, such as PVC and chipboard. Nevertheless, the tree also does not give up its positions. Wooden dishes and kitchen utensils , decorated with intricate engravings, can be found at folk craft fairs and thematic exhibitions in folk art centers. The younger generation is also actively learning the ancient craft in creative circles. Mostly boys are interested in wood engraving, but girls are also not uncommon in such circles and studios. Engraving can be an interesting hobby for a person of any gender and age.