In the repair industry, the ability to drill correctly is one of the basic skills. In addition to the general rules, it is important to take into account all the nuances when working with a specific material: concrete, tile, metal, etc. All issues related to drilling will be covered in this article.
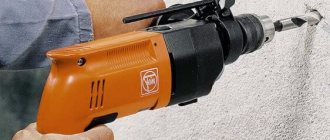
- Choosing an electric drill: which one is better?
- How to remove a drill from a hammer drill
General principles of drilling + (Video)
As already mentioned, drilling is the most common activity for a repairman, and therefore it is important to immediately learn a few basic rules associated with this activity.
- Use of suitable tools. There are many drills, each of which is designed for a specific type of material. Therefore, you should not try to drill concrete with a wood drill and vice versa. It is also important to consider the conditions in which the tool will be used. For example, industrial drills cannot be used for interior repairs (this is simply unsafe). It is also important to take into account resistance to moisture: for outdoor work you will need a tool of class IP34 if the climate in the area is humid and IP32 if you have to work in good weather. IPX2/ can be used indoors
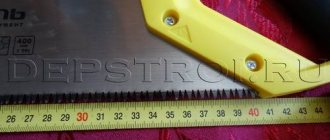
- Correct markup. Before starting any work, it is important to carefully and accurately mark the drilling locations with a marker. You can also put paper tape under the marker to prevent the drill from slipping on the material.
- Selecting the required drilling speed. Here everything depends equally on both the material and the diameter of the blade. If we are talking about very thin drills (with a diameter of less than 3 mm), then you need to work at low speeds, less than four hundred per minute. For other drills, the following rule applies: the thinner the drill, the higher the drilling speed required.
It is also important to ensure that the handle is securely attached to the shaft of the hand drill. The drill must also not be allowed to skew.
Preparing for work
Metal crown: types, sizes, methods of application
Proper preparation should be made before starting work. To determine whether a tool is ready to perform tasks, there are several conditions:
- When the drill is started using the power cord, it must be connected to the mains;
- If it operates using a battery, it must be connected and charged;
- A drill is inserted and fixed inside the drill.
To check the functionality of the drill, you need to click on the power button. If the chuck rotates fast enough, there is enough charge and you can start working. If it rotates very slowly, then the battery is discharged and needs to be recharged.
Subtleties of drilling for various materials
How to drill metal correctly + (Video)
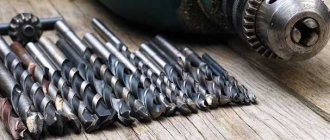
The first thing to start with is the selection of drills. They are distinguished by a sharp edge designed to allow the drill to easily penetrate the metal. Regular metal drills are good for not too hard metals like copper or aluminum, but for something harder (for example, stainless steel) you need to take products made of titanium carbide or chrome-vanadium alloy.
We should also talk about optimal speeds. A common mistake beginners make is using too many turns. In fact, for hard metals, medium speeds are used: for example, brass one centimeter thick will be optimally drilled at a speed of 2000-2500 rpm.
There are a few more points to cover. So:
- If a thin iron plate needs to be drilled, it must be secured between two pieces of wood. This is done so that the sheet of metal does not tear off.
- It is necessary to use lubricating oil from time to time to cool the drill and facilitate the drilling process.
- If you need to make a hole in the pipe, it must be securely fastened. To prevent the pipe from being flattened by the drill, a piece of hard wood should be placed inside.
If you follow these simple rules, then even a beginner will be able to perform high-quality drilling.
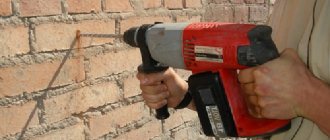
How to drill concrete walls + (Video)
In everyday life, you have to drill into walls most often, because without this it is impossible to hang a shelf, a cabinet, or install a cornice. Of course, it is better to use a hammer drill or impact drill for this purpose. These tools are powerful enough to handle hard materials like concrete or brick. However, if the wall thickness does not exceed 10-12 cm, then you can get by with a regular drill. But you shouldn’t take risks if you only have a low-power tool at your disposal - if it comes into contact with concrete, it can simply break. If the drill is selected correctly, then the following tips will be useful:
- Before starting work, you should make sure that there are no pipes or other communication systems in the drilling area.
- The drills used for such work must be made of hard metals or alloys. The best option would be diamond-coated drills.
- If during drilling you come across too dense areas of concrete, they need to be punched out using a small hammer and a pin (punch).
Although it is generally possible to drill through a concrete wall with a drill, it should still be done with caution. Otherwise, the damage can be quite serious. It is better to use specialized tools for this.
How to work with tiles using a drill + (Video)
Often people who do not have extensive experience in the field of repairs are afraid to drill into such a fragile material as tiles. However, this can become an urgent necessity, because you need something to attach various cabinets and shelves in the kitchen, bathroom or toilet. Alas, in many respects the condition of the tile after drilling is determined not by the master who takes up the drill, but by the one who laid the tile. A competent tiler lays the tiles so that no voids form between the tiles and the wall. In this case, careful drilling will not harm the tile in any way. If there are “air pockets” between the wall and the tile, then most likely the tile will crack.
In order to properly drill through the tiles, you need to take a drill, masking tape, or a hammer drill (or a powerful drill with drill bits for concrete). Next you will need to perform the following steps:
- The drilling location is marked with a piece of masking tape and a marker. The tape is here to prevent the nail from sliding on the surface of the tile.
- Drilling is carried out strictly perpendicular to the material. The number of revolutions should increase gradually: from the minimum possible to 150-200 revolutions per minute. This way you can avoid damage to both the material and the tool.
- It is important to ensure that the drill does not overheat. If smoke starts coming out, the drill needs to be cooled down immediately.
Once the holes are made, you can insert dowels into them. This is done with a hammer.
Drilling cast iron - how to do it correctly + (Video)
Cast iron is a fairly hard material, so drilling it is very, very difficult. In addition, cast iron products are fragile, so it is important not to crumble them. Like other materials, cast iron has its own subtleties when it comes to drilling.
- There's no rush. This is perhaps the most important rule when working with cast iron. Everything must be done slowly, with extreme care and attention.
- The drill must be made of a very hard and durable alloy, in addition, it must be perfectly sharpened. To prevent cast iron from crumbling, you need to take drills with an angle of 114-119 degrees.
- It is unacceptable for the drill to overheat. Sometimes they don’t pay attention to the fact that the instrument is overheated. And this can lead to poor quality work or even breakdown.
How to carefully drill through wood + (Video)
Wood is one of the “easiest” materials when working with a drill. However, there are some subtleties here too.
- The drilling speed directly depends on the type of wood. Loose, not too hard types of wood will be suitable even for a low-power device. Of course, the expected diameter of the hole also plays a role - the larger it is, the more powerful the drill is needed.
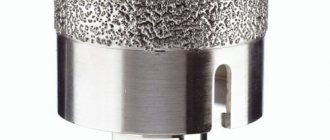
- In order to make large holes, you need to use special core drills. Their diameter can exceed 120 mm. As for depth, on average crowns are suitable for materials up to 20-22 mm thick, but there are also special models that can cope with thicknesses of more than 60 mm.
- If you need to make a blind hole rather than a through hole, then Forstner drills, which are available in diameters from 1 to 5 cm, are perfect for this.
We should also talk about drilling timber. Although it is convenient to fix it for further drilling, the large thickness of the material creates certain difficulties. Drilling timber for further fastening in the dowel holes. For a standard beam 18 cm thick, it would be best to take a drill with a diameter of 25 mm and a length of 36 cm. You will need to drill slowly, at low speeds. In terms of power, a 1300-1500 W drill is perfect. If the beam is not very long, then two holes on each side will be enough. If the length of the beam for the dowels is long enough, then it will be necessary to make an additional hole in the center. After the holes are made, you can drive the dowels into them using a hammer or small sledgehammer.
Safety precautions
How to make a hole in glass
Compliance with these rules ensures that the work will be successfully carried out without harm to human health
Before any work, it is important to inspect the surface. If a small element is being drilled, then most likely it will need to be secured in a special vice
For example, if we are talking about timber. Never place a work element in a poorly fixed spindle.
There should be no hanging ends on the worker's overalls. The shirt is usually tucked into the trousers. Under no circumstances should clothing be cleaned during work, as this can lead to serious consequences. Masters use protective glasses - masks to protect the skin of the face and eyes.
To prevent the tool from slipping out of your hands while working, you must wear gloves. If the drill is massive, then it is best to carry out work with rubber gloves. They not only help ensure that the instrument does not slip out of your hands, but also prevent various injuries to the skin of the hands.
Be sure to hold the tool with both hands. Do not work while standing on stairs or other poorly secured surfaces. Do not use blunt equipment, this leads to an increase in construction time. Do not insert or remove a drill using an adjustable wrench as this will damage the chuck and tool. Do not use the drill in snow or rain, even light rain - this can lead to a short circuit and electric shock.
Whatever work needs to be done with a drill, it is important to remember that the quality of the work performed directly depends on taking into account the features of drilling. The main thing is to believe in yourself and not stray from the planned work plan.
If you don’t have a drilling machine at home or at least a stand for a drill, then drilling an even perpendicular hole is quite a difficult task. To do this, you will need special devices, for example, a jig for drilling holes, but you can’t buy such a device everywhere, or you need to make a vertical hole at 90 degrees urgently. Let's find out how at home you can easily drill a perpendicular hole using a regular hand drill.
The first device for evenly drilling holes is quite simple - it’s a pair of pieces of wood fastened together with a tenon and an iron construction fastening angle glued to the inside, that’s all, I further refined it with stain and varnished it since this is a device I use quite often.
How to drill a straight perpendicular hole with a hand drill
How to drill a straight perpendicular hole with a hand drill
It’s easy to use, we put it on its side, put the drill in the intended place, lean the inner corner of our homemade corner tightly against the drill and drill like that, if the hole should be very deep, and this corner is already in the way, then you can safely remove it and drill further without it , since then the drill itself will go straight.
How to drill a straight perpendicular hole with a hand drill
How to drill a straight perpendicular hole with a hand drill
The second device is a conductor made of a wooden block; using a corner, we mark an even line at 90 degrees on it. Then on a circular saw we set the cutting depth to about 5-7 mm and make cuts with it. Using a utility knife, we make chamfers on the edges of the cut and the jig for drilling vertical holes is ready!
How to drill a straight perpendicular hole with a hand drill
How to drill a straight perpendicular hole with a hand drill
How to drill a straight perpendicular hole with a hand drill
How to drill a straight perpendicular hole with a hand drill
Now we place our jig on the surface that we will drill, bring the guide recess to the drill and drill, pressing the drill to this cut.
How to drill a straight perpendicular hole with a hand drill
If you don’t have time at all to make such devices, you can simply take two slats, move one slat slightly relative to the other to form an angle and tighten them with clamps, then placing the clamp in this corner, you can quickly drill an even perpendicular hole with a drill without using a stand or drilling machine.
How to drill a straight perpendicular hole with a hand drill
At what speed should you drill?
One of the important parameters when drilling is the number of revolutions per minute. The speed at which you need to drill depends on the type of material and the type of drill. There is a general rule: the harder the material and the thicker the joint, the lower the number of revolutions per minute should be. As for the specific numbers, they can be seen in the table below.
| drill diameter, mm | soft wood | solid wood | plastic (acrylic) | copper | aluminum | steel | Notes |
| 1.5-4.8 | 3000 | 3000 | 2500 | 3000 | 3000 | 3000 | When drilling metal thicker than 3 cm, lubricate the drill thoroughly with oil. |
| 6.4-9.5 | 3000 | 1500 | 2000 | 120 | 2500 | 1000 | |
| 11.1-15.9 | 1500 | 750 | 1500 | 750 | 1500 | 600 | |
| 17.4-25.4 | 750 | 500 | — | 400 | 1000 | 350 |
This table is for conventional twist drills. For specific options (Frostner drill, etc.), the drilling speeds for various materials are slightly different from those given above.
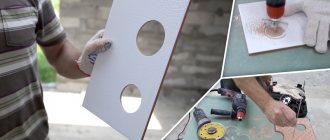
Drill attachments
To work with them, special attachments are provided (grinding, cutting and sharpening).
They should be secured in the chuck in the same way as regular drill bits.
Polishing attachment
It is used to polish the material using an abrasive layer. It is used as sandpaper or a felt base with GOI paste. The attachment looks like a circle with a rotating flat surface that is used to sand objects.
For rough cleaning of materials
To clean hard surfaces, wire tools (brush brushes) are used. They are made in the shape of a cylinder with stiff metal bristles. The stiffness of the bristles may vary. Both thin wire and pieces of thick cable are used.
"Cricket"
This accessory can turn a drill into a metal nibbler. When using it, you can cut metal sheets if their thickness is less than 1.6 mm. This attachment is useful for roofing work (fitting, cutting).
Nozzle - file
Equipment made using abrasive particles greatly facilitates the work when sharpening parts, as well as adjusting grooves and holes. Most often, a whole set of stones with different shapes and sizes are sold. They are made in the shape of a cone, cylinder or sphere, and there are also flat attachments.
Milling
Such attachments are most often called roller cones. In the process of working with them, grooves, grooves and recesses of the required shape and size are obtained. They are disc, cylindrical, shaped, end and end. The specific type is selected depending on the power of the device and the thickness of the material.
Others
There are attachments for other tasks as well. All of them can be divided into several groups according to their purpose:
- For sawing. The method of operation is similar to using a jigsaw. Wood, plastic or metal up to 20 mm thick can be used as blanks.
- For drilling large areas. The equipment used is crowns, beam and feather drills, as well as Forstner drills. Materials for drilling can be wood, plywood, beams.
- For tightening fasteners. The attachments are designed for installing screws, nuts and bolts. If the device has a low-speed mode, then it can be used as a screwdriver.
- Drill mixer. The nozzle is designed for mixing paints, plaster and other substances. A special whisk helps you get the paint of the desired shade or stir wallpaper glue.
- Drilling machine. For ease of use, you can buy a special clamp for the device with a lever and a vice. It will help you make holes in workpieces of non-standard shapes and at different angles.
https://youtube.com/watch?v=NEYsyawQsFE
You can also find various exotic drill attachments on sale. These may include a pump attachment (helps pump liquids) or equipment for plucking feathers from birds. In ordinary life, such things are required much less often than the usual carpentry and plumbing tools.
An electric drill is one of the most useful tools in the house. It will help you save significantly on the purchase of many devices. Using a drill, it is easy to drill holes, cut surfaces, mix compounds, chisel walls, as well as grind materials and sharpen tools. It is recommended to purchase individual attachments for each task. To avoid injury while performing work, you must follow safety rules.
How to drill a hole straight + (Video)
A fairly common problem is that the drill slips off the mark and the hole is not made in the right place. Paper tape glued to the top of the tree can help combat this. Also, sometimes similar difficulties arise if you have to work with an overly thick drill. Then you should first make a recess in the material with a thinner drill, and then drill, resting against the mark you made.
It is important to pay attention to the quality of sharpening. If the edges are not sharp enough or sharpened unevenly, problems with drilling accuracy may occur.
Drill fixation mechanism
It may fly out or break, then the hole in the surface will turn out crooked.
The drill is equipped with a jaw chuck.
This means that the adjusting ring moves along the surface of the hollow cylinder. The chuck is attached to the drill shaft using a base with a threaded or tapered hole.
How to insert a drill correctly
To properly secure the equipment, you need to know some nuances. The hole, which acts as a clamping device, has a depth of 2 cm. The deeper you can push the drill inside, the more securely and firmly it will be fixed.
Standard drills have one of two types of clamping mechanisms:
- Manual - it must be tightened by hand;
- Key - fastening occurs using a key.
Modern drills are equipped with a quick-release (manual) chuck. It has a simpler device and quickly fixes the drill.
To secure the equipment in the chuck, they work according to the following scheme:
- In a stationary position, the chuck jaws are connected. The adjusting ring is turned counterclockwise by hand. This is done until the cams are completely separated. The distance will be slightly larger than the size of a standard drill;
- The drill is then inserted as deep as possible. For precise fastening, its diameter should be in the range from 2 to 13 mm;
- To tighten the drill, the adjusting ring is turned in the opposite direction;
- Now a special key should be inserted into the hole on the cartridge. The teeth on it should close with those located on the instrument;
- The key is turned clockwise with little effort until it stops. If the chuck has several holes for the key, you should gradually turn it in all of them so that the clamp is uniform.
Less common is a quick-release mechanism that should be locked without using a key. It can be with one or two sleeves for adjustment and anti-slip notches. If one sleeve is used, the device must be kept stationary. If there are two sleeves, then only the part fixed to the spindle does not move. The moving part should be turned clockwise by hand.
How to remove a drill from a chuck
Before removing the attachment, make sure that the drill is not plugged into an outlet. If the tool is powered by a battery, you need to eliminate the possibility of accidentally pressing the start button.
If the device of the tool requires a chuck with a key, proceed as follows:
- The drill turns off, the chuck stops completely;
- The key is placed in the chuck hole;
- The key is turned counterclockwise to move the chuck;
- The cartridge is unscrewed by hand, at which time the jaws move apart;
- The drill is removed;
- The key is placed in a pocket or other convenient place. Often, craftsmen glue a piece of electrical tape to the drill wire to hold the key.
Please be aware that the attachment and chuck become hot when rotated. Therefore, you should not grab them with bare hands, it is better to use gloves when you want to change the drill.
How to remove a drill from a drill without a key
Some drills use a keyless chuck. If removing the attachments does not involve using a wrench, proceed as follows:
- Release the power button;
- Wait until the rotating chuck comes to a complete stop;
- Take the drill chuck with one hand and turn it counterclockwise with the other;
- Pull out the nozzle with your hands after the chuck jaws move apart;
- Place the nozzle in a visible place so as not to accidentally lose it or step on, for example, a table.
You cannot start pulling out the equipment until the chuck has completely stopped after turning off. It is also prohibited to stop the cartridge with your hands, as this may cause serious injury.
How to drill a perpendicular and vertical hole
Although it is sometimes necessary to drill at an angle, it is most common to make vertical holes (that is, perpendicular to the surface). In order for drilling to take place strictly at an angle of 90 degrees, it is necessary to use special guides. They will allow you to drill perpendicularly without deviating in any direction.
The simplest guides allow you to make only vertical holes, but there are also more complex designs that allow drilling at certain angles.
Types of drill guides
Conductor
The device is a plastic housing in which guide bushings for different drill diameters are rigidly fixed. By limiting deflection, drilling can be performed with acceptable accuracy on a variety of materials.
The conductor is held with one hand, and the other holds the drill. There is no need to constantly monitor the slip angle. In addition, the device allows you to accurately start drilling at a given point. No punching is required.
Almost all guides with an angle of 90° allow you to work on rounded surfaces (pipes). For this purpose, a special groove is provided on the lower support heel.
There are also simpler designs (if a clip of several diameters is inconvenient to use). For example, a mandrel into which bushings of various sizes can be inserted.
In addition to standard guides with an “attack” angle of 90°, there are specialized jigs in which the bushings are located at a different angle.
- low accuracy (there is a slight play in the guide sleeve);
- wear effect on the drill.
Guides with sliding carriage (household version)
They represent a support frame on which vertical posts are fixed. The carriage moves freely (but without distortions) along the guides, in which the drill body is secured. The simplest designs cannot change the angle of the racks.
As a rule, fixtures are equipped with a 45° cutout for fixing cylindrical workpieces (for example, pipes). The support is equipped with a handle for holding and has a non-slip coating. With its help, you can start drilling with high precision and under visual control and maintain a given angle.
Application can be limited only by the area of the workpiece: if it is smaller than the size of the support area, use is impossible.
Due to the fact that the support is fixed by the hands of the master, the placement of the guide can be anything: even on the ceiling.
- affordable price;
- high positioning accuracy.
Works only with certain drill diameters, and with the only possible shank.
Semi-professional drill guides
Semi-professional guides can be equipped with various fastening devices for the frame, drilling depth regulators, the angle can be set both along and across the plane of the tool’s swing. Due to this, the equipment turns out to be more bulky.
Professional drill guides
As a rule, guide posts for professional use are equipped with their own drill chuck. Why is this being done?
Even the most accurate drill clamp has a serious error. In addition, the drill gradually wears out, the bearings on the shaft give a slight play. All this affects the drilling accuracy.
The stock guide chuck mount is less susceptible to wear because it is used less frequently
Plus, it doesn't matter to you which drill is connected to the chuck. It's just a source of rotation
- high accuracy;
- thoughtful fastening on the workpiece;
- ability to perform work with high intensity and load.
- high price;
- narrow specialization.
Before you go to the store for a guide, decide what tasks you face. You should not buy expensive and bulky equipment unnecessarily. For most household tasks, the following device is suitable:
Practical recommendations from experts
Drilling diagram for a concrete wall.
In order for the drill to stand exclusively vertically when drilling openings, use a square. It is placed strictly at a right angle, in parallel with the drill.
Regular carpentry work involves purchasing a special stand that will hold the power tool perpendicular. The stand allows you to control the depth of the grooves.
To firmly fix the wooden block, you should use a vice or a workbench. Holding the material in your hand is not at all safe: at the moment of processing, the dry base can crack and split, injuring the master.
To ensure a smooth entry groove, it is recommended that any remaining board be placed under the base of the groove so that it can be discarded later. The product can be drilled. This technique works well for flat surfaces.