Choosing the right grid
The mesh differs in cell sizes, as well as in the material used. The cheapest is considered to be a mesh with large cells, woven from black wire. It is not suitable for a permanent fence, but is suitable for temporary fencing. Black wire corrodes easily, so it will only last three to four years.
Sometimes its service life is extended by painting or treating it with bitumen.
Galvanized wire makes the mesh strong, durable, and more attractive in appearance. This kind of chain-link is more expensive, but it can be used to build permanent fences - light but durable. Nowadays, manufacturers additionally coat galvanization with protective polymers, which give the mesh a different color.
In order to choose correctly and not overpay, you must first decide on the purpose of the mesh. If you need to temporarily fence or demarcate an area, you should not take an expensive chain link; the most ordinary one will do. If you plan to install a permanent fence, be sure to choose high-quality galvanized mesh.
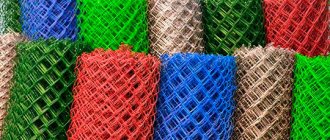
To make the fence decorative, you can purchase colored mesh.
Fine mesh netting is usually purchased for fencing poultry to prevent chickens from crawling into other areas, such as the garden. If the fence is needed for demarcation, a chain-link with large or medium cells is suitable. Everyone chooses the height of the fence separately; The mesh width is from a meter to 1.8 m, the standard length is 10 m.
Chain-link mesh - what kind of material is it? Advantages and disadvantages of using it for a fence
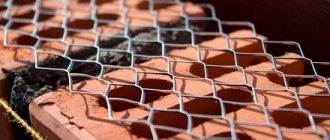
The history of the creation of this material takes us to the end of the 19th century. In 1878, Czech engineer Karl Rabitz patented his invention. He used this mesh as a reinforcing agent when plastering walls.
This material is a metal wire woven using a machine by twisting flat spirals. Currently, chain-link mesh is widely used:
- in the construction of fences and barriers for country houses, houses, garden plots, sports and children's playgrounds;
- in the manufacture of animal enclosures and cages for poultry;
- for the manufacture of fences and protective sections in industrial premises;
- as a reinforcing material when laying a slab foundation;
- for the manufacture of a protective layer of walls when working in mines.
Reliable and easy to install fencing
The use of chain-link mesh in the construction of a fence has both positive and negative criteria. The advantages of using it for these purposes include:
- One person is enough to install this material on the poles. This does not require any special knowledge or skills. It is enough to secure the structure by simply twisting the wire.
- The material does not require large financial costs, so the constructed fence will have a minor impact on the construction budget.
- The design of the material is such that it will not interfere with air circulation and the formation of a continuous shadow. This quality of chain-link mesh is especially valuable when used in fencing for gardens, vegetable gardens and summer cottages.
- In winter, a fence made of such material will not create snow drifts.
- Chain-link mesh fits perfectly into any environment. Thanks to its visual transparency, this fence does not disturb the landscape, which indicates its versatility.
- With appropriate processing and proper use, the metal mesh will not lose its original appearance for several decades.
The disadvantages of chain-link mesh as a fence include:
- It must be properly secured to the posts, using not just pieces of wire, but also bolts and nuts or a welding machine. Otherwise, there may be people who want to kidnap her.
- Not everyone will like visibility through the mesh, so you will need to additionally cover this space.
- Since the material is made of metal, it is susceptible to corrosion.
Types of fence mesh
To make chain-link mesh, various materials or combinations thereof are used. This significantly affects its service life, technical characteristics and, naturally, the price. Therefore, this material is divided into types:
- Non-galvanized mesh has the lowest cost due to its short service life. When wet, this mesh will rust, so it must be treated with a special solution or painted. After several months, these procedures should be repeated, the cost of which will ultimately exceed the purchase price of the mesh itself.
- Galvanized mesh. If you purchase this option, the price is quite high, which not everyone can afford. However, such a mesh does not require additional processing and will last a long time.
- Plasticized mesh is distinguished by the fact that its entire fabric has a polymer coating. This innovation appeared not so long ago, but has already become popular. Prices for mesh with this coating are significantly higher than for previous types. Having installed a fence with it, you can forget about the service life, since with high-quality plastic the wire is well protected from moisture and other weather influences.
- Plastic or polymer mesh differs from the previous ones in that it does not contain metal wire. In the manufacture of this material, special additives are used that make it resistant to ultraviolet exposure. This type of mesh is made with cells of various shapes, sizes and shades. Unlike the first three types, it is much softer, so it is not advisable to use it to fence the perimeter of a household.
Galvanized, on the contrary, does not require additional processing
Non-galvanized mesh requires protection from moisture
The polymer coating of the plasticized mesh will reliably protect against natural precipitation and temperature changes
The plastic is UV resistant, which is its undeniable advantage.
How to choose support pillars
High-quality installation of a chain-link fence with your own hands implies not only technology, but also a competent choice of load-bearing supports.
- metal;
- wooden;
- reinforced concrete;
- asbestos.
The light weight of the fence allows the use of a metal profile with a cross-section of 60x40 mm, thin pipes and channels. Such supports have a relatively high price, but they look neat and last a long time. Iron fence elements need to be treated with anti-corrosion mixtures and also require painting periodically.
If hollow posts are used, they must be covered with canopies or special covers on top.
Which is better: heated floors or radiators?
Warm floorBatteries
Columns from profile
Wooden posts are not as strong, but are much cheaper. The processing of wooden stakes for mesh is simple: they are cleared of bark, thoroughly sanded, the lower part is coated with bitumen, the rest is painted or primed with an antifungal compound. This allows you to significantly extend the service life of the columns.
Reinforced concrete pillars, like asbestos pipes, are the most convenient supports for such a fence. They are cheaper than metal ones, more durable, do not require processing, and they also do not need to be repainted annually. In any weather conditions, concrete supports are consistently reliable.
Installation of fencing support elements
Before filling the perimeter of the fence with mesh, support posts are initially installed. There are several types of supports for fastening the chain-link:
- wooden;
- plastic;
- concrete;
- asbestos-cement;
- metal.
Support installation diagram
The easiest and cheapest way is to use wooden posts, but the strength of such posts is low. The mesh material is attached to them with nails or staples. Supporting structures made of wood have an increased degree of susceptibility to rotting.
The most acceptable option is metal racks in the form of profile pipes of rectangular or square cross-section. A metal profile with a cross-section from 40x40 to 50x50 mm with a wall thickness of 3 mm is used for the mesh fence.
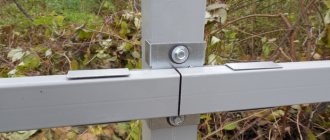
A photo of a mesh fence mounted on supports made of profile pipes is presented below.
Attaching the mesh cloth
Having decided on the choice of products for covering the perimeter of the fence and its load-bearing elements, an estimate of the monetary costs for the purchase of the required volume of mesh material and profile pipes is drawn up. After purchasing all the components, you can begin installing the supporting structures.
Making the markings
You need to determine the location of the corner posts by marking them with pegs. Then connect them with a stretched cord, fishing line or rope. If the fence has turns, measure the required distance from the post, drive in a peg and pull the cord again.
This is how the perimeter of the future fence is marked. Next, you need to outline the locations of the remaining supports. To avoid unnecessary sagging, the posts are placed every 2 m, maximum 2.5 m. This means that 2 meters are measured from the corner and a mark is placed, and so on until the end of the fence.
Manufacturing of tension fence
This is the simplest design of mesh fencing. It will require minimal financial and labor costs. Next, each stage of construction is discussed in detail.
Site marking
Preliminarily mark the location of the supports on the site:
- in the area where the fence is installed, large plants and debris are removed, depressions and mounds are leveled;
- markers (stakes) are driven into the ground at the corners of the site boundaries;
- a cord is pulled between them;
- along the towline from the entrance to the site, mark with pegs the position of the wicket and gate posts;
- measure the distance between the corner markers, and from the corners to the installation site of the goal posts.
Then, for each side, the span length is selected from the range of 2-2.5 m, so that a whole number of them fit in the space between the markers, and they themselves are approximately equal along the entire perimeter of the fence. It remains to place markers along the string in increments equal to the accepted span length, thus indicating the location of the supports.
Preparing holes for pillars
It is more convenient to make holes for posts using a garden drill. Depth - 10-15 cm more than the buried part of the column. At the bottom of the excavation, a sand or sand-crushed stone cushion 10-15 cm thick is arranged. The material is compacted in layers of 5 cm, after watering it with water. This is a drainage cushion: it does not retain moisture, so the base of the column remains dry.
Installation of load-bearing pillars
The supports are installed in the following sequence:
- a “heel” (a square plate for support) and hooks are welded to the posts, then they are primed and painted, and the buried part is also covered with bitumen or polymer-bitumen mastic;
- randomly choose one of the sides of the future fence and install the outer supports. Each column is brought into a strictly vertical position using a plumb line and temporarily fixed with wooden wedges or fragments of brick;
- Using a water level, determine which rack has the lower top. Sand is added under it until both posts are the same in height;
- Having removed the wedges, concrete is poured into the holes with installed racks or a mixture of soil and sand is filled with a layer-by-layer tamper. The rack cavity is filled with the same material;
- The cord is pulled strictly horizontally between the supports, for which equal distances are removed from the tops. A thick wire is laid between the cord and each stand. Without this, when installing other racks, they would have to touch the cord, which could lead to its unnoticeable bending.
Then the intermediate posts are installed one after another, observing the following conditions:
- strictly vertical position (controlled by a plumb line);
- the distance from the top to the cord is the same as that of the outer supports;
- the gap between the post and the twine is equal to the thickness of the wire laid under it on the corner posts.
Methods for installing fence posts
All vertical parts are welded on top with plugs. They also practice driving a post into the ground. They drill a small hole, install a support, put a glass on top to protect the head from flattening, and hammer it in with a sledgehammer. This option is suitable for dense soil.
Fastening the mesh
The easiest way is to unfold the mesh and hook it onto the hooks of the supports, having first tensioned it properly. You can do without hooks - just tie the fabric with wire or clamps. But such a fence will soon sag.
It is more correct to use guy wires with a diameter of 4-6 mm; there are two installation methods:
- the panel is “stitched” with wire, passing it through each cell, then the fabric is mounted, tensioning the stretch with tensioners or ties. This is an ideal option, but it is labor-intensive, especially since at least two strings are required, and preferably three;
- First, tension wires are stretched between the posts, and then a web is screwed to them with wire every 20-30 cm. This is a simpler installation method.
Stretch marks put a significant load on the corner posts, which is why it is recommended to make them from a larger diameter pipe.
But the installation step of the supports can be increased to 3 m. The strongest fences are on logs - crossbars made of profiled pipes welded to the supports. It is allowed to use steel bars or reinforcing bars with a diameter of 10 mm.
Do this:
- roll out and secure the mesh on the posts using hooks or clamps;
- thread a rod through the cells;
- weld the rod to the vertical structural elements.
To evenly stretch the mesh, a rod is threaded through the cells and the panel is stretched by two people from above and below.
How to dig holes correctly
For such a light fence, it is not necessary to dig the posts very deeply. Sometimes they are simply driven in if the soil is dense enough and there is no risk of flooding of the area. This method is justifiable to use temporarily, but for a permanent fence it is better to dig the posts and concrete them. How to properly tension a chain-link mesh video? The easiest way to dig holes is with a garden drill; it is convenient, quick and saves energy.
You won't be able to dig a narrow hole with a shovel; then you'll have to fill it up a lot and compact it. The depth of the holes is approximately 1 m, on loose soil - 1.2 m. How to stretch a chain-link mesh with your own hands? Often, the installation of mesh fences is carried out this way: holes are dug only to half the required depth, after which the supports are driven in.
Tension fastening
There should be no difficulties when installing using this method. We select any pillar located in the corner of the site and attach the beginning of the mesh fabric to it. The mesh must be attached to the pole in at least four places. A commonly used method is tying with clamps or wires passing through the cages. But many summer residents choose a more reliable method.
Pass a steel rod with a diameter of at least 4 mm through the meshes of the chain-link and attach it to the support by welding every 400-500 mm. Prepare 3-4 guides, each up to 6 mm in size. Weld them to each post, stretch the lattice over them, and bend the ends of the rods.
Drill 2 through holes in the supports, insert a piece of rod into them and bend it in half so that it passes through the cells of the canvas. The ends of such a clamp are aligned, then twisted or welded.
To prevent this from happening, you need to do the following: insert a rod vertically into the mesh, pull the canvas as tightly as possible and hold it in this position. At this time, another person straightens the chain links so that the mesh is optimally tensioned. To perfectly tension the mesh, an assistant is essential.
The tension method is attractive due to its simplicity, but such a fence has one drawback - sagging of the top edge. This could be caused by a person or a large dog. To eliminate this drawback, it is necessary to thread a steel or plastic-protected wire through the top row of cells.
To do this, you need to wrap the posts with wire loops. They start with the outer element, and then move on to arranging the entire perimeter: wire loops are reshaped for every 2-3 brackets, trying to stretch the material as much as possible. Then, on the “loop” supports, twist the wire with a thick metal rod. The last step is to attach the fabric to the wire.
Some other "wired" methods.
- Attachment to ear straps welded to the top of the post, however, installation may be significantly slower in this case.
- Using factory wire tensioners. Once mounted on the first bracket on the second wire, it passes through the device. It is secured in a clamp, the cable is wound on a drum.
- Installation with cables and rigging - pullers, hooks with clamps and ties. In this case, the cable passes through the cells.
Installation of pillars
To prevent the supports from sagging or warping, a sand cushion is placed at the bottom, on which a little gravel is poured. You can also sprinkle crushed stone or broken bricks.
- level;
- scrap;
- concrete solution;
- spacers
The pillars are lowered and leveled, in addition, they are leveled in height. Crushed stone and earth are poured into the hole and compacted with a crowbar. If the column is hollow inside, it is filled with solution; then they are leveled again, strengthened with spacers and concrete is poured.
Mesh fence diagram
Which pillars to use
There are several options:
Wooden pillars - made of timber or logs. The cheapest, but also the most “perishable” option. Antibacterial treatment is required before installation. The best option is a special protective impregnation. To save money, you can paint the above-ground part, and it is better to impregnate the part that will be buried with mining: immerse the pillars in a container for several hours. Before installation in the hole, you can additionally wrap this part with roofing felt. Chain-link fence on wooden posts Metal posts. They can be made from a round or square pipe or a metal corner. The wall thickness is 2-3 mm, the pipe diameter is on average 50 mm, the profile section is 40-50 mm, the angle flange is 50-60 mm. Concrete pillars. The most inconvenient installation option: it is too difficult to attach the mesh to them, and it is difficult to install. In addition, the strength resource of reinforced concrete will not be in demand: too small loads are created by a chain-link fence.
The most convenient option of all those mentioned is a profile pipe, and preferably a rectangular one. It is easy to attach the mesh to it, and you can weld hooks or wire if necessary. If possible, install these. The optimal cross-section for a pillar is 25*40 mm or so. There is no need to take a larger cross-section - the fence is light.
The order of installation of pillars
First, the pillars are placed in the corners of the site. If you need to fence only one side, place one post at the beginning, the second at the end. Their verticality in all planes is strictly checked, and the height is adjusted. At the very top and 10 cm above ground level, two cords are pulled. The rest of the pillars are placed on them. The height is leveled along the upper cord, the lower one serves to facilitate orientation: by applying a plumb line to a point on the upper thread, you can find the place where the hole will be drilled.
Installing posts under a mesh fence
The installation step of the pillars is 2-3 meters. Less is too expensive, more is no point, the mesh will sag. When installing a grid without a guide wire, it makes sense to place posts every 2 or 2.5 meters. This makes it easier to tighten the mesh without sagging. For other models - with wire, slugs (guides) or sections - the step can be 3 m.
Example of corner post reinforcement
If the mesh is pulled between the pillars, the outer ones will bear a considerable load. To prevent them from being led away, they put up jibs. They are placed, dug in, and welded to the installed pole.
5
Sectional fence - assembly instructions
All preliminary work is similar to the installation of a tension fence. You need to make a frame inside which the mesh is mounted. The material is a corner with shelves 30–40 mm and a thickness of 4–5 mm. Its length parameters are 10–20 cm less than the distance between the supports, and its width differs from their height by 10–15 cm. The metal is cut to size using a grinder and welded into a rectangle.
Unwind the roll, separate the piece, removing the wire. Sometimes the mesh is wider than the section, then the excess is removed with a cutting wheel. But it is advisable to foresee this and calculate everything so as not to create additional worries for yourself - buying a chain-link according to the size of the frame.
It is more difficult to tighten the mesh inside the section than without it. To do the work with your own hands efficiently, do everything step by step:
rods 4–5 mm thick are threaded into the outermost cells; they are welded on one side inside the corner; reinforcement is installed at the bottom and top in the same way; they are grabbed by welding from the side where the mesh is already fixed; the fencing element is pulled and finally fixed inside the frame .
Another method involves welding pieces of wire with a diameter of 4–5 mm as often as possible on the inner sides of the corners. They put a mesh on them, then bend them
Here it is important to calculate where to install the hooks. To prevent the fence from sagging, they are welded at the top of each cell
When the sections are ready, strips of metal 4-5 mm thick are attached to the posts (by welding, on clamps, nailed - depending on the material). On both sides of the supports they should protrude enough to allow the frame to be attached. Two pieces are required on each side, installed at a distance of 20–30 cm from the edges.
A sectional fence is more difficult and more expensive to make than a simple tension fence, but its appearance is much more attractive.
Chain link fastening
The better the preparation, the easier it is to install chain-link fences. The first roll of mesh is placed vertically near the corner post. Using a knitting wire, the edge of the fabric is attached to the support in three places along the height. Unwinding the mesh, the roll is moved to another post and pulled tightly.
Again they fix it with wire and move on. Another way: the roll is unwound completely along the line of the pillars, then with a sharp movement the mesh is lifted vertically and one end is screwed to the support. From the other end of the roll, a section of profile is threaded vertically into the cells - this will help to properly tension the mesh and not damage the shape of the cells.
Attaching the mesh to the stand
The second option requires the presence of an assistant, otherwise the chain-link will get tangled. It is very important to tension the canvas evenly, or some spans will be level, others will sag. You should not attach the mesh close to the ground - you need to leave a distance of 15 cm from the ground. When the canvas is completely secured, a thick wire must be threaded along the top of the mesh to prevent possible sagging.
If you need to connect two pieces of mesh, unscrew the wire spiral and tie both pieces together with it.
Following these recommendations, installing a chain-link fence is easy. Its further operation will not require special care or costs. If necessary, it can be tinted.
How to connect a chain-link mesh together. How to connect a chain-link mesh together in height - video
Considering that the standard length of a chain-link roll is 10 meters, this is clearly not enough to fence even a small area. Therefore, it is necessary to connect the rolls together. Let's consider what options and methods of connection there are.
How to connect a chain-link mesh together
3 ways:
Connecting a chain-link mesh with the same mesh size
Everything is simple here. You need to pull out the last turn in one of the rolls; it will act as a connecting wire, having exactly the same parameters as the wire in the connected rolls. Due to the specifics of production, the wire has different lengths, i.e. turns of different sizes are wound in pairs. Therefore, before you start tying, you need to determine the top and bottom of the connecting wire. Then lay the two sheets on a flat surface and screw the connecting wire between the turns of the connected rolls.
Screwing in a coil of wire to connect the chain-link
You can connect two rolls of chain-link by weight, but this is only possible with help and some skill. Material prepared for the website www.moydomik.net
If you incorrectly determine the top of the connecting wire, then the canvases will not fit together as expected and will have different heights.
Incorrectly connected rolls of chain link - different heights
To avoid this, you need to check how the roll ends. If it is a pair, then you need to unscrew one wire, if it is an unpaired turn, you need to unscrew two wires. One will serve as a connecting one, and the other will be used for the next connection.
How to connect a chain-link mesh -
Connection of mesh netting with cells of different sizes
In this case, the function of the connector is performed by a piece of reinforcement or a long strong wire (in extreme cases, a wooden batten) to which all the turns of the panels being connected are attached.
How to connect two rolls of chain-link with different mesh sizes
Connecting a chain-link mesh along a post
This is the simplest, but not very aesthetic way of connecting. In this case, the mesh sheets are selected in such a way that the connection falls on the support post for the fence, and fastening is done by screwing both mesh sheets directly to the post.
Based on the three existing ways to connect two rolls of chain-link, you can choose the appropriate one, taking into account the situation.
What types of chain-link mesh are there for a fence?
The Ograda-DV company installs turnkey chain-link fences in Khabarovsk. We use three types of mesh:
- Wicker mesh netting. How to properly tension a chain-link mesh video? The round wire is pre-set to a specific profile shape in the form of spirals. Their sequential weaving ensures the formation of a mesh of the desired shape.
- Woven mesh. Cross weaving of horizontal and vertical wires.
- Welded mesh. Made from reinforcing steel by spot welding longitudinal and transverse rods. Divided into:
- Galvanized welded mesh
- Non-galvanized welded mesh
If something went wrong
In the process of connecting a galvanized chain-link mesh, you may end up with a connection that is not entirely correct if you initially incorrectly prepared one of the sides of the fabric to be connected:
A correctly connected mesh netting has the same height and ideal appearance:
Installation of a chain-link fence in Khabarovsk
Easy installation and speed of construction of a chain-link fence is one of the main advantages of this fence. Like any fence, it basically consists of pillars installed at a distance of 2-3 meters from each other. When installing poles in the ground, one basic requirement must be observed - they must be fixed below the freezing level of the ground. When concreting pillars, sand is poured into a prepared hole dug in the ground, thereby providing a sand cushion.
The pillar is pre-aligned on a vertical and horizontal plane and filled with concrete.
An excellent alternative to concreting is a chain-link fence on screw piles. In this case, the installation of fence posts does not require excavation and concrete work - the support is screwed to the mating part of the pile using a flange connection. You can install the mesh immediately without waiting for the concrete to harden.
Thus, a chain-link fence on poles can be installed in one working day, without the use of special equipment.
As a rule, before installing the chain-link mesh on the poles, the rolls must be connected to each other to achieve the required length. This is done by unscrewing the outer wire of one of the rolls. Then the ends of both rolls are applied to each other and fixed using the same wire, screwing.
A simpler way to connect two rolls of chain-link mesh for a fence is to simply pass a larger wire between the two ends of the mesh. Thus, both rolls are connected into a single span, ensuring the integrity of the structure. Since the height of the rolls is 1.5-2 meters, if necessary, increase the height of the chain-link fence on posts - the bottom is filled with brickwork or decorative rubble stone.
How to attach chain-link mesh to metal posts. How to attach chain-link mesh to metal posts
The most common type of support posts for a fence is made of metal (profile pipe, corner). Consequently, there are several approaches to how to attach a chain-link mesh to an iron support by welding and without it.
- fastening with hooks. This is a welding method. The easiest and most reliable way to fix the mesh on the supports is to hook it onto holders welded to the metal.
How to attach chain-link mesh to metal posts using hooks.
The method of attaching to hooks is indispensable when installing sectional fences. A plate is welded onto the frame from the angle, to which the fence section is then welded. Instead of welding, a bolted connection can be used in the fastening unit.
Among the ways to attach a chain-link to posts without welding are:
- with fixing pad. This approach involves making a metal lining. Holes for hardware are drilled in the cover. The same holes are made in the support pillar. After the chain-link mesh is tensioned, the workpiece is applied to the support post, the hardware is screwed into the prepared holes, and their caps are riveted. This is the most reliable method, which significantly complicates the dismantling process.
- mounting on pipe clamps. Due to the fact that the clamp matches the dimensions of the pipe, it rests more securely on the support and holds the mesh well.
- wire fastening. In this case, the mesh is stretched around the post and secured with wire. This is a simple method, but a significant drawback is that due to the even and smooth surface of the support, the wire moves out over time. And if it still bears the load in the form of the weight of weaving plants, the deformation process occurs even faster. Fastening to a wire through a plate does not improve the situation much.
- on special clamps - pipe spans, which are attached to the profile or to the corner with a self-tapping screw or using a special latch with a hook.
- through holes. In this case, the mesh is stretched over a support post and fixed to it by inserting long pins into the holes. It is important to tighten the nuts correctly here.
Sectional chain-link fence
In addition to directly tensioning and fixing the chain-link onto the posts, there is another way to install the mesh - on a pre-welded frame. As a rule, this is a metal corner or a profiled pipe. A sectional type chain-link fence looks more beautiful, its strength, due to a more reliable frame, is much higher
compared to a conventional chain-link fence.
In addition to the chain-link itself, a welded mesh is installed in the metal frame.
Since the sections (frames) are made of the same size, when installing a chain-link fence and installing posts, it is necessary to strictly maintain the distance between them. It is also worth considering the elevation difference in the area. Based on these factors, the length of the spans is calculated - in areas with large differences, their width can reach the minimum calculated values.
Regardless of what kind of fence you use (sectional or regular), it is a good idea to cover the fence with anti-corrosion and decorative compounds. Thus, you will extend its service life without neglecting the aesthetic component of your garden plot.
Project Definition
At the initial stage, you should determine the installation location of the country fence, the surrounding landscape, terrain features, the length of the fence and the possibility of attaching posts. Additionally, you need to decide what type of fastening and frame will be used. The following options are available to you:
- Tensile structure. Requires the installation of supports on which the chain-link is pulled. The cost of construction is minimal, but the material will sag over time.
- Tension fencing with a wire broach. It eliminates sagging.
- The sectional option is more expensive and reliable, requiring the installation of a special corner for the frame.
Turnkey installation of a chain-link fence in Khabarovsk
Are you thinking of fencing a plot of land quickly and inexpensively? Buying a chain-link fence is the only right decision. The Ograda-DV company specializes in the construction of fences for personal and summer cottages of various types and configurations.
Competent specialists, extensive installation experience and the availability of the necessary equipment allow us to erect a turnkey chain-link fence in one day!
In addition, we have our own production of building materials in Khabarovsk and a store-warehouse of finished products.
Fencing installation
Installation of the fence is carried out in the following order:
Installation of support pillars
A cord is stretched between the corner pegs, and holes with a depth of at least 70 cm are dug every 2.5 m. Posts are installed in these holes with your own hands, and then the holes are concreted or filled with crushed stone. It is recommended to concrete the metal supports. This way they will stand more stable and thieves will not be able to steal them.
Concrete and wooden pillars can be concreted, but you can fill the holes with crushed stone or construction waste. In this case, the holes must be thoroughly watered and compacted. Since the chain-link does not have significant weight and windage, such supports will fully support the weight of the fence.
Tensioning the mesh
After installing the pillars, the mesh is tensioned. To do this, a roll of mesh is installed near the outermost post, and the chain-link is securely fixed to the support. Next, the roll is unwound with your own hands, and the mesh is attached to each support. It is recommended not to lower the mesh all the way to the ground, but to leave a gap of about 5 cm. Later, this gap can be closed with any solid material. This way you will protect the chain-link from contact with wet soil.
Attaching the mesh to the posts
The method of attaching the chain-link to the supports depends on the material of the supports themselves. The fact is that the chain-link is attached to different materials in different ways.
Metal poles
As a rule, metal supports already have special brackets, hooks or plates, which are fastenings. The mesh is attached to the metal posts using clamps or wire. Moreover, it is advisable to use stainless steel wire. If the mesh is put on hooks, then use a hammer to bend the hooks. You can also attach the mesh to metal posts using plates with holes drilled in them. Threaded pins are threaded into the holes, which must be secured with nuts through the holes in the supports.
Attaching a chain-link mesh to a metal post
Concrete posts
Since concrete supports do not have any fastening, the chain-link is secured to them using large clamps or simply tied. For this purpose, strong steel wire is used.
Wooden supports
The mesh is attached to wooden posts using nails or staples. If they are unavailable, you can use strong wire. Using it you need to secure the chain-link to the support in several places.
Where to buy chain-link in Khabarovsk?
Are you planning to buy a chain-link mesh for installation yourself? And in this matter, the Ograda-DV company will be able to help you. We keep up with the modern spirit of the times - our online store is , on the pages of which you can easily select and buy a chain-link of the desired type and size.
How to treat the surface → Room decoration → How to choose the right paint → Surface treatment technologies → Leveling and finishing the walls → Selecting and applying a primer → Removal from the surface → Stretch ceilings and technologies → Reviews and testimonials
How to connect rolls with different cells?
To do this, you can use a regular steel bar, pierced (stretched) simultaneously through the spiral of one and the other mesh web (but the bar will rust).
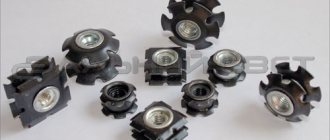
To connect galvanized chain-link, you can also buy stainless galvanized threaded rods (so-called PE-ER-ki), which are sold in hardware stores.
We offer
Pros of mesh fences
Chain-link mesh is popular in the building materials market and has established itself as an affordable and easy-to-install material.
Fence on a summer cottage
Advantages of metal mesh fencing:
- Every person who is not involved in construction will be able to install this iron fence;
- can be purchased at a relatively low price, and in the Leroy Merlin chain of stores delivery is made free of charge to the site, taking into account the order estimate;
- air circulation throughout the entire territory;
- mesh fences are characterized by good quality and long service life, taking more than 30 years;
- the fence fits perfectly into any landscape design;
- this fence does not shade the garden area;
- if the homeowner has dogs, they can guard the area as effectively as possible so that thieves cannot steal something;
- This is a really reliable fence on which you can install barbed wire if required, this ensures inaccessibility.
Gate in the fence
The product is an excellent material intended for fastening in internal areas of a certain territory, for example, in playgrounds, places where animals are kept and other types of fences. In addition, the list of disadvantages is not as long as the advantages.
Disadvantages of attaching mesh fencing to corrugated sheets:
- There is an opinion that a fence made of a profile pipe and chain-link is not prestigious and unpopular. But such a statement is controversial.
- The mesh has high transparency. This can be corrected by organizing hedges. In addition, you can fill the base with decorative plastic or wooden panels.
In the evening
Types of chain link
Types of chain-link
The mesh is made from black and galvanized wire, so the quality of the chain-link varies. Black wire mesh is the cheapest and most short-lived. It becomes covered with rust after the first fog or rain, and after 3-4 years it becomes completely unusable. You can extend the service life of non-galvanized chain-link by using paint or liquid rubber, which should be applied to the mesh before its installation, and then periodically renew the protective layer.
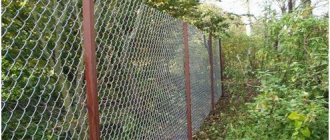
Chainlink made of plain black wire
A mesh made of galvanized wire is not afraid of corrosion, and therefore lasts longer. It costs a little more than black, but does not require any protective treatment at all. Fences made of galvanized chain-link look neat and attractive.
Galvanized mesh
Plasticized chain-link is becoming increasingly popular. This metal mesh is coated with a dense layer of anti-corrosion polymer, due to which it has increased resistance to atmospheric influences. In addition, the polymer is colored, the mesh looks very attractive and aesthetically pleasing. And although such chain-link is quite expensive, the demand for it is constantly growing.
Chainlink mesh with polymer coating
In addition to quality, chain-link mesh differs in mesh size, wire thickness and roll height. Cells can have sizes from 10 to 65 mm, wire diameter 1-5 mm. The roll height is from 0.8 to 2 m, but the most popular is 1.5 m. The standard mesh length in a roll is 10 m; rolls of 20 m are made to order. The smaller the cells, the more expensive the cost of the mesh, because this increases material consumption .
| Type of mesh | Wire diameter, mm | Mesh width, mm | Live mesh cross-section, % | Estimated weight of 1m2 mesh, kg |
| woven mesh with rhombic mesh | 1,20 | 1000 | 55,0 | 4,52 |
| woven mesh with rhombic mesh | 1,20 | 1000 | 61,0 | 33,73 |
| woven mesh with rhombic mesh | 1,20 | 1000 | 69,8 | 2,78 |
| woven mesh with rhombic mesh | 1,40 | 1000 | 65,5 | 3,8 |
| woven mesh with rhombic or square mesh | 1,20 | 1000,1500 | 75,3 (78,9) | 2,20 (1,94) |
| woven mesh with rhombic or square mesh | 1,40 | 1000,1500 | 71,5 (76,2) | 3,00 (2,57) |
| woven mesh with rhombic or square mesh | 1,40 | 1000,1500 | 76,3 (77,0) | 3,24 (2,74) |
| woven mesh with rhombic or square mesh | 1,60 | 1000,1500 | 73,3 (77,0) | 3,24 (2,74) |
| woven mesh with rhombic or square mesh | 1,80 | 1000,1500 | 76,0 (78,9) | 3,25 (2,75) |
| woven mesh with rhombic or square mesh | 1,60 | 1000,1500 | 77,5 (80,9) | 2,57 (2,17) |
| woven mesh for fencing | 1,4 | 1000-2000 | 83,6 | 1,77 |
| woven mesh for fencing | 1,4 | 1000-2000 | 87,0 | 1,33 |
| woven mesh for fencing | 1,6 | 1000-2000 | 85,7 | 1,74 |
| woven mesh for fencing | 1,6 | 1000-2000 | 88,0 | 1,39 |
| woven mesh for fencing | 1,8 | 1000-2000 | 87,0 | 1,76 |
| woven mesh for fencing | 1,8 | 1000-2000 | 89 | 1,46 |
| woven mesh for fencing | 2,0 | 1000-2000 | 87,9 | 1,81 |
| woven mesh for fencing | 1,8 | 1000-2000 | 91 | 1,1 |
| woven mesh for fencing | 2,0 | 1000-2000 | 90,7 | 1,36 |
| woven mesh for fencing | 2,0 | 1000-2000 | 91,7 | 1,23 |
| woven mesh for fencing | 2,5 | 1000-2000 | 90,7 | 1,70 |
| woven mesh for fencing | 3,0 | 1000-2000 | 89 | 2,44 |
| woven mesh for fencing | 2,5 | 1000-2000 | 92 | 1,41 |
| woven mesh for fencing | 3,0 | 1000-2000 | 92 | 1,74 |
| woven mesh for fencing | 2,5 | 1000-2000 | 94 | 1,10 |
| woven mesh for fencing | 3,0 | 1000-2000 | 93 | 1,53 |
Prices for mesh netting
Rabitz