When renovating a bathroom or other areas of the home, it is often necessary to make a hole for an outlet or switch. Some materials can be easily cut with the most common tools, while others require a special approach.
It is quite difficult to drill a hard but fragile tile without damage, and making a hole with a large diameter is even more difficult. In this article we will talk about popular and simple methods by which you can quickly cut tiles to install an outlet.
How to make a hole in a tile for a socket: 6 ways
Ceramic tiles are a complex but attractive material for finishing. To make a hole in it for a socket and not spoil it, you need to have a lot of patience and experience. This article discusses several simple methods for high-quality processing of ceramic tiles. The described methods will help you make holes of any shape. But first, prepare the tool and familiarize yourself with the features of the work.
Hole without chips: recommendations
To avoid chips that spoil the appearance of the tiles, you must adhere to the following rules:
- Careful selection of the tool, namely its cutting part. It is necessary that the glazed layer gradually deteriorates, and only then the ceramics.
- Failure to comply with work standards. The tiles are placed on a hard surface, horizontal or vertical.
- Excessive pressure on the tool. The selected drilling option should be focused on cutting the ceramic sheet without additional pressure.
Depending on the purpose of the hole and the available tools at hand, the drilling method is selected. However, when performing work, it is necessary to observe safety precautions and adhere to recommendations to reduce the risk of chipping.
What to consider
Before drilling into tiles, it is important to consider the characteristics of the material. It is fragile and slippery. Inaccuracy in this work will cause cracks to appear on the tiles.
It is especially difficult to make holes if the tiles are already laid on the wall. It is better to think through these details in advance when arranging the premises and carry out the necessary preparatory work. You will need to wet the tile with water. This will make it more pliable for carrying out the necessary work, and it will be completed easily and without defects. Thus, you can drill not only small holes, but also openings for sockets, switches or for a pipe.
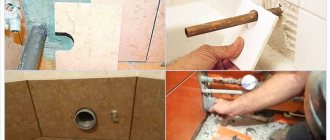
Instructions for cutting out places for sockets
When working with a hammer drill, you need to protect all surrounding objects from dust. It is advisable for the master to wear protective elements. Further work proceeds in this order:
- The outline of the future hole where the crown is applied is marked on the wall;
- The hammer drill must operate in the impact-drilling mode;
- The crown will mark and cut out the desired cup holder, and if this does not happen, you can knock out a hole using a chisel.
Working with a drill also involves marking, and then several holes are knocked out at a distance of 2 mm from each other. If work is already carried out on tiles fixed to the wall, the remaining material will be removed with nippers, and concrete with a chisel or hammer.
When using a grinder, you only need to work with a diamond blade. Drill a hole carefully, moving the tool away from you and gradually going deeper into the contour.
When working with a hand jigsaw, proceed as follows:
- The outline of the future outlet is indicated on the tile, and in its center you need to make a hole with a drill;
- You need to attach a tungsten thread to the jigsaw and start sawing from the inside, using smooth movements;
- When the hole is ready, the edges need to be sanded.
When working on already fixed tiles, it is better to cover the hole markings on the outside with masking tape. This will maintain the integrity of the entire slab and keep the outline in check.
Cutting with a crown
The quickest way to make a hole in a tile is to use a special drill attachment called a drill bit. Bits for drills and hammer drills are sold in hardware stores; they have different diameters, which must be selected for the socket being mounted. However, experienced craftsmen do not recommend making holes in the tiles using a hammer drill, since vibration causes cracks and chips to form along the edges of the cut. To work with tiles, use the following type of crowns:
- Diamond crown. Diamond-coated crowns for making holes for rosettes in tiles from different manufacturers have a diameter of 65-68 mm. A high-quality nozzle can cost 4-6 thousand rubles, so it is usually used by professional finishers. But it drills tiles quickly and accurately.
Diamond crown - Crown with pobedite teeth. This device for cutting holes for a socket in a tile costs 500-700 rubles, it is enough for 20 cuts. Drilling tiles with this attachment takes much longer than with a diamond-coated crown, however, it is in no way inferior in quality.
Crown with pobedit teeth - Crown with carbide tips. Hole saws with carbide tips are half the price of diamond-coated hole saws, but are not inferior in quality or speed of cutting tiles.
Carbide tipped bit
Features of working with tiles
It is quite difficult to make an even and neat round cutout on a tile for a rosette, since it is highly hard and durable. In addition, the slippery glazed surface complicates the cutting process, since there is no adhesion between it and the cutting tool, which is why the drill constantly slips . The main danger when making holes in tiles is splitting and damage to the expensive material. To make the cut look neat, you need to perform a number of preparatory measures:
- Markings are applied to the surface of the tile on the outside where the drilling will be done using a pencil or marker.
- To prevent the drill from slipping off the glazed surface of the tile, the cutting area is covered with construction tape or adhesive tape. Before cutting, you can scratch the outline of the hole for the socket with a regular nail.
- Before starting work, you should wet the tiles to speed up the cutting process and reduce the formation of dust.
Important! The hole for the socket on the wall surface must be made before installing the tiled covering. You need to be prepared that the tiles may break during the making of the cutout, and have a safety stock of material, which is 10-15% of the total quantity.
What is required for processing?
The best option for working with ceramic tiles would be a corded or cordless screwdriver. Its high rotation speed (800-1000 rpm) allows you to easily handle tile processing. An alternative to a screwdriver is an electric drill, or a manual modification if you have to drill a small hole.
Selecting a drill and auger
When the unit is prepared, all that remains is to choose the type of nozzle aimed at solving certain problems:
- Diamond coated drills. They give the best results for drilling even very hard tiles, but due to their high cost, it makes sense to use them only for a large volume of work.
- Drills with a tip made of pobedit. They work well with soft tiles and medium-hard tiles. It is recommended to drill ceramic tiles on the wall using so-called feather drills - they have a small sharpening angle that does not allow damage to the tile glaze.
- Spear drills. Suitable for laying dowels, they have a low price and an enviable service life.
- Single-sided sharpened carbide drills. These attachments reduce the risk of overheating and make working with very fragile and thin tiles easier.
- Core drills with tungsten carbide coating. Universal components that can easily cope not only with the most durable tiles, but also with marble, brick and porcelain stoneware.
Diamond core drills require periodic cooling with water, and work with them at low speeds - no higher than 500 per minute.
What else can I drill?
If you need to get a hole of a large diameter, a drill with adjustable teeth - the so-called ballerina - will come to the rescue.
The device can drill holes up to 9 cm in diameter, including non-standard shapes for which there are no suitable crowns. But due to the manually moving bracket, the edges of the hole are uneven. Therefore, it is advisable to use a ballerina in cases where the perforation will be covered with something.
Another option for work is a Pobedit concrete drill. Since the tip is not intended for working with tiles, its cutting part is sharpened as sharply as possible, and during the drilling process maximum care is taken so as not to damage the coating.
Tungsten wire cutting
To make a neat hole in the tile without the risk of splitting and damaging the material, it is better to use a hand tool rather than a power tool. To do this, you need to buy a tungsten string from a hardware store, which is inserted into the saw instead of the cutting blade. The cutting process is performed in the following order:
- Markings of the future outlet are applied to the outer or inner surface of the tile.
- If the hole is located inside the tile, then inside the marked circle you need to make a hole of small diameter using a Pobedit drill and a drill.
- A tungsten cutting wire is inserted into the hole made by a drill in the tile.
- With the help of a string, a hole is cut along the markings using forward-returning movements.
Tungsten wire cutting
Note! When cutting tiles with a tungsten wire, cracks, chips or other defects never occur. However, it takes up to 30 minutes to make each hole manually, so this method is not suitable for industrial scale.
Tips for carrying out work
The process of drilling holes has certain nuances and requires caution. Knowing some tricks will help make the job easier and do it as efficiently as possible. It is best to make a hole at the edges of the tiles, at the intersection of four tiles or at the junction of two adjacent ones. In this case, the likelihood of damage is minimal. If you wet the drill with water from time to time, you can avoid overheating.
It is worth remembering that the drill must be turned off before doing this. A metal drill is also suitable for making a hole at low speeds, but it will only be enough for one time.
Cutting with a thin pobedit drill
It happens that the master does not have special tools for cutting tiles in his arsenal, but the work needs to be done urgently. Then a drill with a regular Pobedit drill with a diameter of 6-8 mm comes to the rescue. The process of making holes using this method is as follows:
- The socket box is placed on the outside of the tile and then outlined using a marker or pencil.
- About 20 holes with a diameter of 8-8 mm are made along the marked circle in increments of 1-2 mm.
- The isthmuses between the holes are carefully removed using pliers or wire cutters.
Cutting with a pobedite drill bit
Important! Marking and drilling of tiles should be done only from the outside of the material, otherwise the cut location will look sloppy.
Bulgarian
Unfortunately, it is almost impossible to cut round holes in ceramic tiles with a grinder. Especially if they are small in diameter. The diamond cutting blade is too large for such operations. But you can cut a rectangular section without any problems. It's done like this.
- If possible, the cuts are made through along the applied contour. If this is not possible (the rectangle is small), simply make notches with a disk along the entire perimeter of the figure.
- Through cuts are made in the middle of the rectangle (along or across, preferably diagonally).
- Next, the cut piece is broken in any way, you can even hit it with a hammer. The main thing is not to break the outer edges.
- Now use wire cutters or pliers to straighten the edges.
- After which you can use a file to remove sharp pieces protruding beyond the contour.
Drilling
You can drill small holes (up to 15-20 mm) using a drill by inserting a conical or spiral drill bit of the appropriate diameter into it.
Drilling is convenient if the tiles are already glued. But usually a hole must be drilled before the tile is glued in order to route the wire through it or put it on the pipe. Therefore, the tiles must be well fixed on a flat surface. Drywall or chipboard sheet is used as a substrate. To reduce the risk of the ceramic breaking during drilling, it needs to be wetted. It is recommended to fill the slats onto the chipboard to form a box. The slats are glued with silicone. The tiles are placed in the box and filled with water. They drill ceramics right in this box. The water will soften the tile, there will be no internal tension in it, and the drill will be constantly cooled.
The technology for performing drilling work in tiles is as follows:
- The first problem is that during the first revolutions of the drill, the drill slides along the smooth surface of the tile. Adhesive tape, which is glued to the drilling site, will come to the rescue.
- Mark the drilling point. It should be on tape.
- Drilling begins with slow rotations of the drill, so that the jerk does not cause the drill to float across the glaze and make a scratch.
- After the drill has caught on the tile, the drilling site is moistened with water. As you operate the drill, you must ensure that the work area always remains moist.
Using a drill, you can make a large diameter hole for a sewer pipe. But this method can be used when you need to make one or two holes, since the process is labor-intensive and the quality leaves much to be desired.
To do this, many holes are drilled along the contour of the cutout with a thin drill. Thus, a perforated contour is obtained. After completion, the inside of the hole is knocked out, the remaining teeth are cleaned with pliers and smoothed with sandpaper.