by Alexey | Crafts Decor Workshop Furniture Accessories | Saturday, April 30, 2016
| Follow Make-Self.net on Facebook and be the first to read our articles. |
Dear readers and random guests of the Make-Self blog, today we want to show you the simplest way to drill wood at an angle. If you read our blog, you have already seen 70 Ways to Join Wooden Parts, but this time we will show you how to join two wooden parts using just a drill and two screws. Every home craftsman, when creating a photo frame or a simple cabinet, was faced with a dilemma - how to connect two wooden parts so that it was simple and reliable? Friends, there is a solution. Without using special tools.
Drilling at an angle
When manufacturing various parts and products, sometimes it becomes necessary to drill holes at angles. In this case, the accuracy must be maximum. It is difficult to achieve this without the use of special devices for the following reasons.
- Axial rotation of the tool is accompanied by increased friction on the cutting edges. It tends to move the drill to the side. This is especially noticeable when starting to drill holes at right or other angles. The situation is aggravated by the curvature of the workpiece or workpiece. Naking does not always help.
- It is very difficult to maintain the exact direction. When drilling holes at angles other than 90°, this is almost impossible.
- While drilling holes, the drill bit may move to the side. This occurs under the influence of a force arising from uneven friction on the surface.
- The difficulty increases to the maximum level when it is necessary to drill a large diameter hole at an angle.
The use of various devices helps reduce the influence of the above negative factors. To drill holes at angles, attachments and jigs are used (depending on the design features, they can be called overlays and templates), as well as improvised means.
With a regular mirror
The mirror method is suitable for any drill. It should only be placed on the material being processed with the reflective part up, and when the drill rests, achieve a perfectly straight line between the reflection and the cutting attachment itself. If there is a deviation during operation, the line at the convergence point will bend.
The method is really very good. The only drawback is that a perfectly even angle is obtained from only one plane. This can be changed by using two mirrors.
There is a combined way to use a corner and mirrors. Mirrors are attached to the two inner walls of the corner, and lines are drawn at an equal distance from the convergence point. This method can be considered the best among the others, since the accuracy of the work done will be very high.
Tools for drilling holes at angles
Let's start with a description of the consoles.
Guide attachments for drilling holes at angles
Attachments for drilling holes at angles are structures consisting of:
- stanine;
- guides;
- carriages moving along them, serving to fix drills;
- handles
Photo No. 1: drill attachment
The frame has a cutout at an angle of 45°. It is designed for fixing pipes and cylindrical workpieces.
Photo No. 2: drilling a cylindrical workpiece using an attachment
These devices are available for household, semi-professional and professional use.
- Devices of the first type only have the function of adjusting the tilt of the guides to set the desired drilling angle. The structures are held in place using handles.
- Semi-professional attachments for drilling holes at an angle can be equipped with additional devices such as frame fixation systems and drilling depth regulators. Some models have the ability to change the drilling angle both along and across the plane of the workpiece. Due to the presence of additional devices, such attachments are more cumbersome.
- Professional models. Additional accessories may also vary. The main difference between professional attachments is the presence in the designs of their own chucks for fixing drills. This solution increases the accuracy of the resulting holes and also extends the service life of drills and drill bits.
Image #1: Professional attachment for drilling holes at an angle
Jigs for drilling holes at angles
Conductors (or templates) are auxiliary devices of various designs that are used when it is necessary to drill precise holes of various diameters in metal and other materials at various angles.
Devices are divided into 2 main types.
- Jigs designed for drilling holes at right angles.
- Devices for drilling holes at acute and obtuse angles.
Photo No. 3: overhead jig for drilling holes at right angles
In addition, jigs for drilling holes at angles are divided into different types according to two criteria.
1. Scope of application.
- Universal. Standard models made of steel. Suitable for solving most problems.
- Furniture. Designed for drilling holes for furniture assembly, mounting, fittings, etc.
- Conductors for crowns. These are special models designed for drilling holes at angles not with ordinary drills and drills, but with large-diameter diamond core bits.
- Devices for drilling tiles and tiles. Equipped with water supply systems for cooling diamond drills.
- Pipe models. Designed for drilling cylindrical workpieces.
2. Method of application.
- Invoices. Such jigs for drilling holes at angles are used when processing workpieces with flat surfaces. The devices are held by hand or securely fixed.
- Sliding. Such devices are not fixed. They are held by hand when used.
- Rotary. They are used when drilling holes in cylindrical parts. The drilling direction is set using bushings. It can be vertical, horizontal and inclined.
- Tiltable. Such jigs for drilling at angles are used when it is necessary to work in different planes.
- Pinned. They are securely attached to the surfaces being treated. This is convenient, but limits freedom of action.
Image No. 2: drilling metal using a jig
How to drill a hole at a right angle with a drill? Testing 4 methods
Greetings to all subscribers and guests of the Podelkin
!
In this article we will talk about how to drill a hole at a right angle (90 degrees) with a drill or screwdriver using available tools. This is quite a relevant topic, because not every home workshop has a drilling machine or other special devices that can easily cope with this task, and drilling by eye, trying to maintain a right angle, is practically impossible. Today you will learn 4 ways to drill at right angles,
with which I conducted my own experiment and at the end of the article you can watch
a video with the results of their testing.
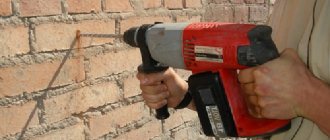
Metal corner
The most common and easiest way to drill a hole at a right angle is to use a metal corner. We firmly place the corner on the drill so that it comes into contact with the drill on both sides at once and drill a hole. The result is very good, almost without errors. In addition to a metal corner, a wooden one is also suitable, which can be easily glued together from two bars. The only drawback of this method is that it will not be possible to drill a hole with a small-diameter drill, since due to the height of the corner, the drill will rest against it.
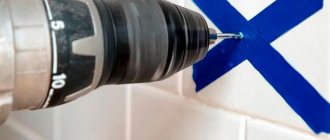
Mirror
You can make a hole at right angles with a drill of any diameter using an ordinary mirror. To do this, you need to make sure that the drill lines up with its mirror image in one straight line.
The slightest deviations will be noticeable, but after testing this method, I was convinced that an angle of 90 degrees would be obtained only on one side, on the other there would be a noticeable error. You can increase the accuracy of the angle if you use 2 mirrors.
Two mirrors with notches
A more accurate result is obtained if you use two mirrors with notches, which are fixed on a wooden corner.
The essence of this method is that thanks to the mirror reflections of the drill, guided by the lines, you can set an angle of 90 degrees along two axes at once. But this method also has disadvantages. Firstly, the design with two mirrors is quite cumbersome, and secondly, drilling a hole is not very convenient, since you need to look from the side and simultaneously navigate on both sides. For more information about the testing results of this method, see my video.
screw
The last way to drill a hole at a 90 degree angle is to use a union nut (or two nuts wrapped with electrical tape). The result is almost perfect, the same as when using a furniture jig. However, there is one “But”. This method is suitable if you use a drill of non-standard diameter. For example, you can only drill a hole with an M8 nut with a drill with a diameter of 7 mm. To use a drill with a diameter of 8 mm, you will first have to drill the threads of the nut itself.
Conclusion
In principle, all of these methods are working, and it’s up to you to decide which one you use. If we evaluate the accuracy of the angle, I liked the metal corner and nut the most.
Be sure to write your opinion in the comments and don’t forget to subscribe to the
Podelkin .
Source
What can you use at home?
At home, you usually have to drill holes at right angles. To increase accuracy, you can use two effective means at hand.
Metal corner
This is the most common device for drilling holes at an angle of 90°. It is used like this.
- Make markings using a core.
- Take a drill and place the drill in the center of the future hole.
- Attach the angle to the drill so that it is in contact with the tool on both sides.
- Drill a hole to the required depth.
Extended nut
Holes made by drilling metal at right angles using an extended nut are also highly accurate. The operation only involves holding a device of the required diameter while drilling and centering the drill at the intended point.
With connecting nut
Precise drilling results can be achieved by using a coupling nut or several regular nuts wrapped with electrical tape. The process of use is very simple: the lotion is placed on the surface of the material being processed and held firmly by hand; Next you need to insert the drill into the hole and start working.
The accuracy of the result is amazing, but there is also a drawback. Unfortunately, with such gadgets it is possible to drill perpendicularly only rarely used diameters: with an M5 nut, you will have to use a 4 mm cutting attachment, and with an M10 - 9 mm. You can get out of this situation by drilling out the threads of the nuts, then the holes will have more common diameters.
All three methods are good in their own way. It all depends on the required angle accuracy, as well as the characteristics of the diameter used. In any case, it is not necessary to purchase an expensive drilling machine for one-time use. It is quite possible to make do with the means at hand that will allow you to get an impressive result.
How to drill a 45 degree hole with an electric drill
In this review, the author will share a simple way to drill a large diameter hole at an angle of 45 degrees. In principle, this method is also suitable for small diameter holes.
Why drill at an angle? The author needs this to secure coat hooks in the board (this will be a wall hanger).
The hooks in this case are the simplest ones, made from a shovel handle.
To drill holes at an angle of 45 degrees, the author uses a drill and a spade drill. Moreover, the drill should be slightly larger than the handle - if the diameter of the handle is 19 mm, then you will need to take a drill with a diameter of 20 mm.
If you have a good eye, you can drill a hole without additional tools. Well, it’s more convenient for beginners to use a homemade conductor. Below we will tell you how to do it.
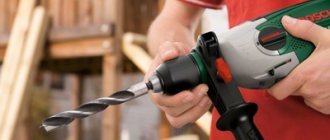
Using a metal corner
The most popular and simplest method of drilling at right angles is to use a metal corner. To do this, you need to place a corner at the drilling site so that the fold is located exactly in the location of the future hole. Next, a drill fixed in a drill or screwdriver is applied to the inner fold of the lotion along its entire length. You need to drill slowly, avoiding deviation from the corner.
This method is very good. Holes are obtained with minimal error. The only downside is that the height of the angle limits the use of the drills used. For example, for a small diameter hole, drill bits are usually short. But when using such a lotion, the tool cartridge will rest against it and not allow it to move further into the depth of the material.