The plastic recycling process begins with thorough washing and drying. To do this, you can use a bucket, basin, or do it in the bath. You can wash with warm water, but it is recommended to use a soap solution.
Important! If the plastic is not washed well, there may be a lot of smoke when melting.
Then you need to sort. To melt a house without harm to health, it is best to use only plastic marked “2”, “02” in a triangle, or simply the inscription HDPE.
Before grinding, you must remove the lid and the protective ring attached to the neck. They are made from a different type of plastic and are recycled separately.
Plastic injection molding at home
This video lesson from the OchumeletsTV channel is about how to cast plastic at home.
Molten plastic is not completely liquid. This is a thick mass, so it is poured under pressure. To create it, the master made a metal syringe. I used a plumbing squeegee. Piston. Guide. Solid mold. Made from epoxy resin. Make a screw lamb. Polypropylene was used as a raw material. From an old box. At home, it is better to cast polypropylene and polyethylene, since these plastics are non-toxic.
When heated, they do not emit harmful products. Fill small pieces into a syringe. We put it in the oven at 220-240 degrees. The part is simple, so the plastic should not be overheated. While the plastic is heating up we will assemble the mold.
First, secure the bolt to the required distance. Just pull by hand, no wrench needed. The pressure is not so high. To prevent the bolts from moving back and forth, we use a cap. Chipboard material. Install the cover and tighten it with nuts. We will pour plastic into the hole.
30 minutes have passed. We put on special gloves and take out the syringe. Let's quickly wind it up. Apply pressure to squeeze out the plastic. Installed on top of the mold. Let's press. We wait a certain time. It must be kept under pressure to minimize shrinkage. Let's analyze the form and see what the product turned out to be.
It's obvious that everything has spilled. Let's extract it. The detail worked. The bolt is well filled and sits firmly. The protrusions can be trimmed. This way you can do polypropylene casting, etc. at home. This is the most primitive artisanal method. So that the product can be cast quickly and easily.
Mold making
Next, watch a video on how to make a mold for pouring plastic.
Polypropylene casting machine
The author of the OumeletsTV channel showed a self-made machine for home plastic molding. It's electric. The piston is manual. Thermostat for precise temperature control. The video shows his tests. For these purposes he will cast nylon or polyamide. There is another name - nylon. Chair crosspieces are usually made from nylon. The master found just such a thing, he crushed it. Before use, the mug must be dried at a temperature of up to 100 degrees. This must be done within 2-4 hours.
Load the granules into the machine. Let's set it to 250 degrees. This is the optimal temperature for polyamide casting. Let's wait until the required degrees are reached. Then we will install the piston. The machine has reached optimal mode, the indicator light is on. Now you need to wait 5 minutes for the plastic to completely warm up from the inside.
The polyamide has warmed up. We put it on the mold. We press in. We do pressure aging. It's obvious that he's flooded. Let's let it cool a little. Now let's disassemble the mold. Studied plastic product. As you can see, there is no shrinkage.
Plastic injection machine at home
Below is a video explaining how to make a plastic injection molding machine. What do you need for this in a DIY home environment? Rod with piston. Three-quarter pipe as a cylinder. Half inch adapter to 3/4 pipe. Fitting cut off for convenience. Metal gasket with mica for insulation. Thermostat. It regulates temperature up to 350 degrees. 600 watt ten. Two nuts and a box for attaching the thermostat. We put on the adapter. We tighten the washer. To prevent the nichrome from sliding down.
We begin to assemble the control unit. Then we attach the thermocouple from the thermostat to the cylinder body. The author did not show how he would assemble all this, but presented a diagram. The photo shows the device assembled.
We attach the control unit to the syringe. Tighten with nuts. The thermocouple is long enough. Now you need to secure it. Mica to prevent thermocouple from slipping through ceramic insulators. For rewinding, not just a thread is used, but a silica one. It is heat-resistant, that is, it does not burn or melt. You can use asbestos cord. But since the master did not have it in stock, he had to buy silica.
We wrap it with heating element. Next, you can use mineral wool or asbestos fabric. Necessary to avoid heat loss. The master used mineral wool from an old oven. Fixed it with aluminum wire. Assembly is complete. Pressure tests can be carried out.
Set the thermostat to 100 degrees. Let's see how the machine will work in this mode at home.
Self-production of a granulator
To manufacture granulators, you need to understand the features of this process. Here's what it is:
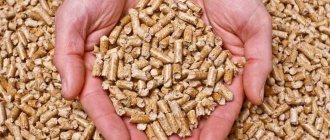
- The crushed raw materials are heated until melted and a homogeneous plastic mass is obtained.
- The melt is pressed through holes - dies, and the resulting threads are cut into granules.
- The resulting granules are cooled to prevent sticking.
To independently manufacture a granulator, it is very useful for a master to make such a device in a primitive, but quite workable version.
As equipment for processing plastic into granules, you can use a regular meat grinder, which you can turn into a granulator with your own hands.
A heated melting chamber must be attached to the receiving compartment of , to which a storage hopper is adjacent on top.
The meat grinder screw and its body must also be parts of the heated unit.
The granules coming out from under the knives must be cooled by air flow.
This primitive diagram will allow you to work out the key components of the design and understand the features of the process.
In the operation of a granulator, the ability to adjust technological operations is very important.
Many parameters need to be adjusted:
- melt temperature;
- intensity of melt supply to the cutting unit;
- cooling parameters and method (air or water);
- cutting speed of melt flows into granules.
Having gained practical experience in operating a granulator, a home craftsman can create a more productive machine . Using components and assemblies from other equipment will greatly simplify the work.
Here's what you can use:
- Heating elements or nichrome spirals.
- Metal containers for household use - buckets, drums from old washing machines.
- Elements of pneumatic and hydraulic equipment for extruding the melt.
- Temperature sensors in the range of up to 300 degrees.
A prudent master will make a granulator in such a way that the unit for cutting flows into granules will be removable, and instead of it a nozzle can be installed to obtain a solid melt flow.
Thus,
the granulator will work like an extruder .
Recently, extruder manufacturing has become the object of wide interest.
This device allows you to obtain filaments for 3D printers.
The need for DIY extruder production proves the possibility of profitable DIY processing of plastic raw materials.
Home plastic molding workshop
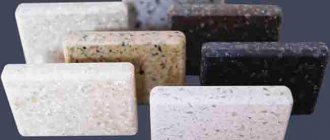
Nowadays, plastic products have become popular. They are convenient and practical to use. Plastic molding at home is a good idea for starting your own business or just for free time. Well-made items are elegant and interesting to look at and are easy to keep in order.
In addition, they have the necessary strength. To set up production of this kind on private property, you need to learn a couple of simple rules.
Preparation of material
First of all, you need to find plastic scrap to make a future product. This is not a problem, since in the modern world there is a huge amount of broken things, bottles and other scrap plastic.
However, it is necessary to take into account the fact that each type of plastic has its own melting temperature.
That is why one type of scrap is needed to cast a particular product. Mixing several varieties of plastic products, even when studying its melting point, at low tide often provokes the appearance of bubbles in the product.
The best option in this case is to buy liquid plastic in a store or replace it with dioxide resin, this will allow you to get a high-quality product that will last a long time. You will also need a number of additional aids:
Manual grinding
An enthusiastic craftsman can chop small volumes of extracted raw materials manually using ordinary scissors.
To practically implement this method, you can use two pairs of scissors - with long blades for easy cutting of the side walls of plastic dishes and with short blades for labor-intensive work with the necks of bottles and the bottom.
The material of PET bottles is perfectly cut with this tool.
Scissors allow you to manually perform the entire cycle of operations for preparing and crushing raw materials:
- Remove the protective ring of the cap from the neck of the bottle
- Cut the bottle into small pieces
- Grind the hard neck and bottom in a separate operation.
The craftsman may decide not to process the complex parts of the bottles, collecting them separately for special processing. Such processing takes a lot of time and its effectiveness is low.
Filling the part
Do-it-yourself plastic molding directly depends on the material that the craftsmen chose to make the future structure.
Resins and liquid plastics work well for cooking, but they have different degrees of viscosity, so they will last for different times. All parameters should be studied in the instructions upon purchase.
There are recipes for preparing pasta at home; they require the master to be meticulous and meticulous when forming the composition of the raw materials. To make the material, mix 5 parts of fine sawdust with 2 parts of talc. Pour the mixture with wood glue (its consistency should correspond to the state of sour cream).
Everything is thoroughly mixed to obtain a dough of the same consistency.
There is another tricky move: you should add 0.5 parts of aluminum alum, it will prevent the appearance of mold on the dough, and the plasticity will increase several times.
The process of making your own casting dough is labor-intensive and requires excellent knowledge on the topic. That is why many novice pourers give their preference to ready-made mixtures.
Plastic molding at home
Results
Ideas for cooperation are relevant in the field of plastic recycling. For an independent home handyman, it is important to cooperate with a large specialized company .
This is what such cooperation gives to an individual:
- constant contact with relevant specialists in all areas of recycling;
- clarification of market demand for plastic recycling products;
- receiving assignments and selling products.
A large enterprise also benefits from contacts with an amateur craftsman. He can be entrusted with work and operations that are unprofitable for large-scale production.
The best craftsmen can count on research orders. Such work is always important for refining old and developing new technologies . Recycling plastics requires special creativity.
Progress
Casting occurs in several stages:
- It is necessary to take the mold and clean it thoroughly. After preliminary preparation, it must be completely cleaned and dried. All remaining material after preparatory activities must be removed.
- If you need to give the future product a tint, you need to add a couple of drops of paint to the casting composition. Water-based paints are not suitable for this.
- Preparatory degassing of the mixture is not required. The thing is that at home the duration of operation is short. And to remove excess air bubbles from small products, you will have to apply force and remove them yourself.
- Gently mix the pouring compound and fill the template mold.
- Everything is poured slowly in a small stream.
- The mixture is poured until the volume is completely filled, touching a small portion of the casting channel. The fact is that after degassing, the volume of material will decrease and become necessary for casting.
- The final stage is cooling the future structure.
To obtain a high-quality product, the template must be cooled gradually.
Business ideas
If a small manufacturer decides to enter a large-scale production, it is worth thinking about starting your own business.
Having tried your hand at home, you should draw up a business plan, register as an individual entrepreneur and begin making your dream a reality.
But buying equipment will not bypass the entrepreneur. And it’s hard to cast molds to produce a lot of products with your own hands. It is necessary to prepare the first products and sell them, and with the funds received, buy a certain machine for plastic injection, a press.
How can you make the plastic injection molding process profitable in your region? Seven simple casting rules will allow you to prepare a high-quality product that will be interesting to look at and also pleasing to the eye. And over time, entrepreneurs will be able to ask themselves about expanding their skills and setting up a personal business.
Video: Plastic molding at home
What was the first artificial plastic?
The first artificial plastic was made in 1856 in Great Britain by Alexander Parkes. He made the first bioplastic and called it Parkensine. Parksin was made from cellulose nitrate. The first artificial plastic was flexible, hard and transparent. Over time, certain changes were made to Parkensine that made it celluloid. This was done by adding some camphor to the cellulose nitrate used to prepare Parkensin. Celluloid was a common component used to make billiard balls.
Speaking of synthetic plastics, Leo Baekeland from Belgium invented bakelite plastic, which is resistant to heat, electricity and chemicals. A very common non-conductor. Bakelite is very popular in the electronics field.
Melting plastic at home
Not long ago I became interested in the topic of recycling plastic waste.
.
There are already several articles on my channel about how you can melt down unnecessary plastic waste into something useful for yourself. And today, on the eve of the New Year holidays
, I decided to try to make a Christmas tree toy.
For this homemade product I used low pressure polyethylene
or
HDPE
(with the number
2
in the triangle). Various items are made from this plastic, for example, bottles for various household chemicals, as well as almost all drink caps.
As a casting mold, I decided to take the bottom of an aluminum can
. It is ideal for this kind of crafts. My particular bottom had one drawback. There were numbers written on it with some kind of ink, which slightly spoiled my craft, leaving fingerprints on it.
If you have the opportunity, use bottoms without inscriptions.
In this bottom I pour pre-shredded white plastic, which a couple of days ago were shampoo bottles
and
whiteness
. You need to pour enough of it to hide the bottom. At first I filled the plastic to the brim, but then I realized that I had gone too far.
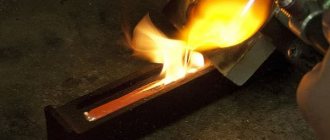
Next, we heat our plastic on a gas stove
until it softens.
Surely, you can use other heating methods, such as a hair dryer and an electric stove, the main thing is to achieve the required temperature, about 175 degrees Celsius.
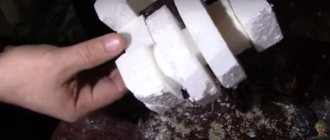
Then, this softened plastic must be compacted
, to obtain a mass with a uniform layer.
We must try to fill all the voids with plastic and squeeze out all the air that remains between the molten particles. hex bolt
for this . It is necessary to repeat the heating and compaction procedure several times to obtain sufficient surface quality.
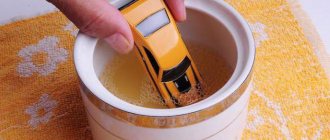
After thorough compaction, it is necessary to allow the plastic to cool.
.
Plastic retains heat very well and therefore takes a long time to cool down. To speed up this process, I placed my workpiece under running cold water
. Thus, in a matter of seconds I achieved almost complete cooling of the plastic.
Using a knife
, I separated the plastic blank from the aluminum bottom. As you can see, all the inscriptions that were on the can were imprinted on our part. They were partially wiped off with a steel wool for washing dishes, but it would be better, of course, to find a bottom without inscriptions.
What is the main ingredient in plastic?
In this article, for convenience, we will only talk about artificially synthesized plastics. The main ingredients of these plastics are crude oil, coal and natural gas. To purchase these materials, you need to do a lot of mining.
The first step before we actually start the process of making plastic is to distill the raw materials so that you can get the single compound you need and separate out what you don't need. This process occurs in an oil refinery on a massive scale. They are also called petroleum refineries or naphtha. This process is key in plastic production.
What we might need
To cast plastic with our own hands, we do not need any special tools or materials. We can make a template model, a kind of matrix, from almost anything - metal, cardboard or wood. But regardless of which option you choose, in any case it must be soaked with a special solution before starting work. This is especially true for wood and paper, because they actively absorb moisture and to prevent this process we need to fill the pores, preferably with liquid wax.
If we settled on this option, then we should buy it with the lowest viscosity - this will contribute to better streamlining of the part. Of course, the results will be more accurate. There are a great many varieties of it on the modern market, and it makes no sense to compare them with each other: we have neither the time nor the opportunity for this. We can only say with confidence that car sealant, preferably red, is ideal for coating. It will make pouring plastic at home much easier.
What was used before plastic?
There were and are many other items that can be used instead of plastic. Before the invention of plastic, people used wood, metal, glass, ceramics and leather. Resin from trees was also used. Rubber was also commonly used instead of plastic.
Conclusion
While we recognize that the invention of plastic has revolutionized many industries, it has also taken a toll on our planet. There are many alternatives to plastic that can be used in our daily lives.
To spread the importance of recycling and ridding our landfills and oceans of plastic, Plastic Collectors will do everything they can to promote the importance of recycling as well as compensate for their efforts. We are a growing group of energetic and hardworking people around the world. Plastic Collectors strives to create a plastic-free world by incentivizing and rewarding people to recycle plastic. Click to know how you can join the cause.
Deciding on the casting material
To be honest, there are even more molding materials than there are silicone varieties. Among them there is liquid plastic, and ordinary gypsum mixed with PVA glue, and even polyester resin. Substances for cold welding, low-melting metals, and so on are somewhat less popular. But in our case we will be based on some other characteristics of casting substances:
Regarding the first point, it indicates the time during which we can manipulate the material that has not yet hardened. Of course, if the production of plastic products takes place in a factory, then two minutes will be more than enough. Well, we, who do this at home, need at least five minutes. And if it so happens that you could not get suitable materials, then they can be replaced with simple epoxy resin. Where to look for it? In car dealerships or in stores for fans of aircraft modeling. In addition, such resin is often found in ordinary hardware stores.
The simplest equipment for cutting bottles
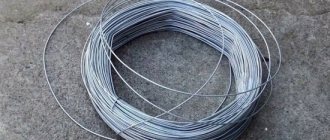
Ideas for a simple homemade device for cutting a bottle into an endless strip are widespread on the Internet. This technology is inferior to cutting into small pieces, but a thin narrow strip is suitable for heating in a compressed state .
There are also more complex devices that allow you to cut a bottle at high speed.
Further improvement of this equipment leads to the use of an electric drive for winding the tape and rotating the bottle.
On a limited scale, PET bottles can be crushed using suitable kitchen equipment, for example, using a juicer.
Use of suitable equipment for purposes other than those intended:
- ineffective due to accelerated wear of the cutting element - the toothed disc;
- dangerously unpredictable operating mode of the electric machine;
- creates difficulties by shredding the plastic too much.
Experimentation with such adapted equipment is valuable in accelerating the accumulation of experience in the field of recycling and the possibility of refining cutting technology.
You may find information about industrial crushers for plastic waste useful.
A little about casting technology at home
5 plastic products in two hours
To make plastic products, some preparation will be required - you need to make a silicone matrix, as well as a tabletop substrate from the same material.
Casting molds are made from high-quality Elastolux silicone. Master models made on a 3D printer or original industrial production models are taken as the source material.
Substrates are usually made from cheaper silicone materials, for example, Elastoform.
Process of making a plastic blank
Molding of plastics into silicone
As a casting material we will use two-component polyurethane “Unicast 9”, consisting of the polyurethane itself and a hardener.
The price for 1 package of this consumable in stores is about 900 rubles, where about 5 kg of base and 0.3 hardener.
Step No. 1 - preparing polyurethane
Since the product requires a dark color, you first need to add color to the base. It is sold separately. One package of Unicast 9 requires about 100 drops - for a dark blue color.
To ensure that the shades of the products do not differ, the color must be added to the entire volume of the polyurethane base.
Step No. 2 - preparing the injection mold
Before starting work, the silicone mold must be prepared - treated with a separator. Both Vaseline mixtures and kerosene-based separators are perfect for this role.
Step No. 3 – fixing the injection mold to the substrate
Adding pressure to the form
Since a substrate made of a similar material is used as the base for the silicone mold, they fit tightly to each other. However, in order to completely eliminate smudges of the solution, you need to press the mold onto the silicone substrate with additional weight.
Step No. 4 – casting funnel
We make a disposable funnel from paper and insert it into the mold sprue.
Step No. 5 - preparation of the polyurethane composition
Preparing reagents for mixing
For this purpose, it is better to use accurate electronic scales.
Place the plastic container on the scale and reset it to zero.
Pour the required amount of polyurethane base - for each form the volume is calculated separately.
We add hardener at the rate of 0.6 to 1. That is. For 20 grams of base you need 12 grams of hardener.
Step No. 6 - mix the reagents
No more than 30 seconds
Stir for no more than 30 seconds - a chemical reaction begins quickly, as evidenced by heating the mixture.
Step No. 7 - casting
Pour the contents from the container into the silicone matrix.
Step No. 8 - remove the product from the mold
To get it, you need to remove the legs from the sprues
After 20 minutes, you can remove the plastic product.
To do this, remove the funnel with frozen excess plastic, and select plastic from the sprues.
We take the finished product out of the mold.
Result and summary
The product turned out to be of excellent quality, the whole process took about 30 minutes. All that remains is to modify the workpiece a little: cut off the sprue legs, sand the product a little.
If we compare this technique for manufacturing plastic products with 3D printing, then we can say with confidence that casting wins in terms of production speed: 1 piece in 30 minutes versus 4 hours. As for the cost of raw materials, for 3D printing it is 3-3.5 times more expensive.