Aluminum is a metal that is widely used in industry and everyday life.
It is used to produce not only aircraft and ship parts, but also dishes and other utensils. Therefore, there is often a need to independently manufacture aluminum parts that have failed.
The ability of aluminum to melt at relatively low temperatures makes it possible to produce cast products from it in artisanal conditions. In order to independently produce cast aluminum products, you need to know the behavior of this metal at high temperatures and its physical and chemical properties.
Characteristics of aluminum
The melting point of aluminum depends on the purity of the metal and is approximately 660 °C. Its boiling point is 2500 °C.
Aluminum is distinguished by its lightness and ductility, so it bends well and can be processed by stamping.
This metal is an excellent conductor of heat and actively enters into a chemical reaction at high temperatures with atmospheric oxygen, forming an oxide film on the surface. It protects aluminum from further oxidation, but when scrap melts, it significantly affects the composition of the alloy. During the metal smelting process, the structure of aluminum changes.
When it cools sharply, internal stresses and shrinkage of the resulting alloy may occur. This must be taken into account when working with aluminum at home.
Technologies for home aluminum casting and necessary equipment
The principle of casting aluminum at home should be based on the technology for its production in production, adjusted for conditions that can be used at home.
Aluminum products are produced by casting in several ways. In domestic conditions, the most common and convenient method is the technology of casting molten aluminum into specially made molds.
Therefore, to carry out the process, two things must be ensured:
- build a furnace for melting aluminum scrap;
- create the desired shape to produce a cast alloy or a separate part.
The casting process must include several stages:
- Preparation of aluminum scrap, including cleaning from dirt, impurities and various fillers, as well as grinding it to a small size.
- Carrying out the smelting process in the planned way. When the metal is completely melted, slag formations must be removed from its surface.
- Filling the prepared mold with liquid aluminum melt. After solidification, the ingot is freed from the molding mass.
Let's consider how to melt aluminum at home, what designs of furnaces for melting metal can be used, as well as options for making molds yourself.
Homemade furnaces and methods for melting aluminum
In order to melt aluminum, you need to heat it to a temperature close to 660 °C. It is impossible to reach such a temperature on an open flame of a fire. Therefore, a closed space is needed, which a homemade stove can provide. It can be heated by burning coal and wood or using natural gas.
You can also use an electric muffle furnace if you have one on the farm.
With a self-made stove, forced ventilation must be provided to maintain the combustion process.
1. The simplest version of a homemade fireplace can be made from old pots.
Its design is as follows:
- As a frame, use a steel container, for example, an old pan, on the side of which you need to make a hole to supply air through a connected metal pipe.
- Air can be forced through the hose using a vacuum cleaner.
- Coal is placed inside the device.
- Then the coal is set on fire and air is supplied to keep the fire from going out.
- A container for melting aluminum is first placed inside an improvised furnace structure and lined with coal on its sides. When it burns, uniform heat distribution is ensured.
- To prevent heat from being lost to the surrounding air, the top of the “pan” stove should be loosely covered with a lid, leaving a small gap for the smoke to escape.
An ideal design would be a firebox with an oval arch made from a masonry mixture used for heat-resistant bricks. You can use a flower pot of the desired size as a frame to create an oval vault.
After the mixture dries, a good firebox is obtained that can withstand several heats.
Video:
2. The second version of the furnace involves using the flame of a household gas burner to heat aluminum.
It can only be used for piece products made of aluminum weighing no more than 150 grams. An imitation oven is created by using two containers inserted into each other with a small gap. These can be ordinary cans from canned food.
The outer jar should be larger. A hole with a diameter of about 4 cm is made in it to ensure the supply of flame to the inner can.
The flame jet should be directed towards the opening of the can. Only the inner container is heated directly, and the outer one serves as a shell that retains heat. The top of the structure must be covered with a simulated lid, leaving a gap for the removal of combustion products.
This design is disposable and can only be used for one melt, since the tin is thin and can quickly burn out.
Video:
Aluminum: characteristics
Before the discovery and implementation of an accessible method of industrial production, this metal was considered precious. At a certain historical stage, it was more expensive than gold. Its properties could be used in many industries. Aluminum is a lightweight and ductile material. It can be stamped, bends, and molds well into complex shapes, especially under pressure. Its melting point is 660 °C, which can be achieved without industrial equipment. This means that casting aluminum at home is quite possible.
Who will benefit from this? Aluminum is a proven material. It was used to make dishes and parts for the aviation and space industries. Castings with good thermal conductivity, corrosion resistance and acceptable strength are valued by tinkerers. The material is suitable for making souvenirs, decorative elements of utensils, for repairing or restoring parts and components in equipment.
Burnout casting: technology features
Manufacturing a part from aluminum using burn-out casting has its own characteristics, which will be discussed below. The work is performed in the following sequence:
- Foam plastic is used as a material for the model at home. Using cutting elements and glue, make a figure that resembles the required shape in outline.
- Prepare a container for making the model. You can use an old shoe box. Mix alabaster with water. Pour the mixture into the box. Place the foam model. Level it out. Give the material time to harden well. Due to the rapid hardening process of alabaster, perform the work at an accelerated pace.
- Remove the box. Heat the mold in the oven to dry the alabaster and remove any remaining moisture. Otherwise, all the water from the alabaster will enter the aluminum and turn into steam, which will lead to pores in the metal and aluminum splashing out of the mold during work.
- Melt the aluminum. Remove molten slag from the liquid surface. Pour the metal into the mold in place of the foam. Due to the high temperature, the latter will begin to burn out and aluminum will take its place.
- After the metal has cooled, break the mold and remove the resulting cast aluminum model. You can watch the process in more detail in the video.
Aluminum casting at home
The melting point can be reached without the use of industrial technologies in various ways. In the old days, blacksmiths forged steel and heated it with the energy of burning coal. This is the first option, but to implement it you will need a forced air furnace.
The second option is the use of natural or liquefied gas. The process can be organized in a homemade oven. There is another possibility if the melting volumes are insignificant. In this case, you can use a household gas stove.
Aluminum casting at home can also be organized if the household has an acetylene generator and a cutter. An option with an electric muffle furnace is also suitable. Such equipment can already be classified as industrial. But if you don’t want to make a stove, it’s quite possible to rent it and order the service of an operator.
Do-it-yourself casting box
The noble metal silver is one of the oldest metals mastered by mankind. Being in nature in its native form, as well as its low melting point - 962 °C, gave our distant ancestors the opportunity to use this metal in the 4th - 3rd millennium BC.
Silver
Silver is a soft, ductile metal, excellent for the production of jewelry, ritual objects, mirrors and for minting coins.
Silver has the best electrical conductivity among metals and is used in the most critical electrical appliances and components. Excellent thermal conductivity makes it possible to use it in heating engineering.
Thermal conductivity of silver
Noble metal was widely used in photography in the 19th and 20th centuries.
Bactericidal properties of silver
Another important property has long been noticed - bactericidal properties. Silver vessels and filters are used to disinfect water. In Christianity and some other religions, the so-called is prepared in silver vessels. “holy water”, which helps with appropriate prayer against all ailments.
Technological process
In principle, the situation of industrial casting should be modeled with a reservation for home conditions. In any case, it is necessary to prepare the raw materials. Aluminum scrap is cleaned of dirt, foreign impurities, and all kinds of fillers. Large parts are crushed to the desired size.
Aluminum casting technology consists of several stages. The prepared scrap is melted using the chosen method. When the fluid phase is reached, the slag is removed from the surface of the melt. In the final phase, the mold is filled with liquid metal. The disposable form breaks after cooling.
First you need to decide what is to be cast. Even if this is a trial attempt at melting, it makes sense to prepare at least some form. What if it is possible to reach the desired temperature? It is interesting to see the result of melting and evaluate the results: appearance, porosity, cleanliness. Any experience, even a bad one, will be beneficial.
Do-it-yourself molding sand for casting – vending-doctor.ru
Mankind knows many metals and alloys based on them. One of the most famous is brass. This is a copper-based compound to which third-party non-ferrous metals are added.
Various parts and elements for electrical equipment are made from this material. Casting brass allows you to make workpieces of various shapes and sizes from it.
It can be carried out at the enterprise or at home.
Brass casting
Characteristics and applications of brass
Brass is an alloy whose main components are copper and zinc. The traditional compound is a mixture of 70% of the first metal, 30% of the second. However, there are materials where the zinc content reaches 50%.
To understand how to work correctly with this connection, you need to understand its characteristics:
- Melting point - up to 950 degrees.
- Density - about 8.7 tons per m3.
- Electrical resistance - 0.08 microns per meter.
- Heat capacity - 0.377 kJ/(kg K)
Brass products can be a mixture of copper and zinc, or these two components and additional alloying additives. The alloy is used in various industries:
- production of components for watches;
- creation of figurines, jewelry, interior elements;
- production of parts used in mechanical engineering;
- creation of components for electrical equipment.
Brass has good weldability. In addition, it has a high corrosion protection rate. Due to these characteristics, the alloy is used as a protective coating for other metals in the manufacture of metal structures.
History of technology
Historians say that brass appeared simultaneously with bronze. Alloys were used to make jewelry, tips for tools, weapons, dishes, and cutlery.
To make any item, you had to know the technology of brass casting. Over time, the method developed and improved. Today, the material can be made at home or in production. To do this, you need to accurately carry out the technological process, follow the rules, choose the right tools and raw materials.
Product made of brass
Disposable flasks
Having learned what a flask is and how it is used, it is easier to understand the intricacies of the process. It no longer seems so complicated, but rather interesting and simple. Modern technologies allow you to try to make your own jewelry almost at home.
The Chinese market offers a wide range of disposable molds with ready-made molds. All that is needed to work with such a form is the required amount of precious metal and the ability to melt it.
They are used both by jewelers who do not have their own foundry, and by freelance craftsmen who make custom-made jewelry.
Anastasia Razulite
What is required for casting?
To melt brass, you must initially prepare equipment and tools for the work. This includes:
- Molding compositions. Made from fireproof materials. The shape is selected depending on the required finished product.
- Special tongs used to make it are removed from the molds after hardening.
- Heating equipment. You can use a purchased model or make a stove yourself. For assembly you will need fireclay bricks and fireproof mastic. For heating, you can use a gas burner or nichrome wire.
- A crucible is a container that is filled with consumables. They melt when heated. Then the master pours the molten metals into a mold prepared in advance. The crucible is made of clay or graphite. Additionally, heat-resistant coating is used, which increases the durability of the container.
In order to remove the crucible from the furnace, semicircular tongs are used.
Conditions and necessary equipment
When melting secondary raw materials, the coating burns, fumes are released, and there is smoke. Working in an enclosed space without an intensively functioning hood is problematic. The best option is open space.
Even in this case, an additional source of ventilation will be useful. Molding casting of aluminum into foam plastic is accompanied by intense release of combustion products. A fan with side ventilation of the work area will remove acrid smoke, which will ensure normal conditions for casting.
A well-equipped and well-organized workplace is also important. It is advisable to have sheet metal or another surface as a base on the table that is not susceptible to the high temperature of molten aluminum. The likelihood of splashes and spills of liquid mass is high. With this in mind, you should think about the need to carry out work in a residential environment.
Homemade smelting furnace
The easiest way is to take a few refractory bricks and build a fireplace out of them. It is convenient to do this in a suitable metal container (an old pan), which will be used as a frame. A hole is made on the side for connecting the air supply pipe. You can adapt a piece of metal pipe of suitable diameter. A vacuum cleaner hose, hair dryer or other air supply device is connected to it.
Charcoal (stone) charcoal is placed inside. The fire is lit and the air supply is turned on. The vessel where the aluminum will be melted is installed inside the furnace. It is also lined with coal on the sides. It is advisable to put a lid on the stove so that the heat does not go away in vain, but leave only a hole for the smoke to escape.
Ideally, the firebox is made solid with an oval arch. Special mixtures are used for laying heat-resistant bricks and lining furnaces. Such a structure can easily be built from an old bucket. The inner vault is formed using plastic flower pots of a suitable size. A metal mesh can be embedded inside the reinforcement mass. After the mixture hardens, you will get a high-quality furnace that can withstand more than one heat.
Using a stove
Piece casting of aluminum can be organized without the manufacture of a special furnace. The required temperature is achieved using domestic gas. The smelting process itself takes about half an hour if the volume of aluminum does not exceed 100-150 grams.
A tin of condensed milk, for example, is used as a container. Cleaned and crushed aluminum scrap is poured into it. But you won’t be able to melt it by placing a tin can on the grate over the burner - there won’t be enough temperature. To reduce the loss of thermal energy, the inventors came up with a clever design.
A can of raw materials for smelting is placed inside another tin and placed on spacers so that there is a gap of 5-10 mm from the bottom to the bottom and from the sides to the walls. The second jar, accordingly, should be of a larger diameter. A hole (3-4 cm in diameter) is made in it from below to supply a jet of flame. The divider is removed from the gas stove burner.
The flame is ignited. The structure is installed strictly above its wick. The flame should go inside and heat only the tin with the crowbar. A larger diameter jar acts as a shell and retains heat inside. The opening is covered from above, leaving only a gap for the combustion products to escape. The combustion intensity is adjustable.
Crucible and auxiliary equipment
A tin can can withstand one heat. Its further use is possible, but with the risk of being burned through. In this case, molten aluminum runs the risk of getting inside the stove, which can not only lead to clogging of the burner nozzles.
To work in a furnace running on coal or liquefied gas, and indeed for reusable melts, it is advisable to make a special container - a crucible. It is made of steel. A piece of pipe with a welded bottom will do. A good option is made from a cut-off fire extinguisher or a small-sized oxygen cylinder with an oval arch. It is advisable to make a side gutter for easy pouring of a thin stream.
What additional equipment may be needed for aluminum casting? Reliable pliers or their version with clamp fixation will come in handy. Ideally, the crucible can be equipped according to the principle of industrial designs: with side grips of a removable suspension and a lower fixed stop for ease of turning it over. You need a spoon with a long handle to remove slag from the surface of the melt.
Simple forms
What are the methods for casting aluminum? The easiest way is to pour the molten metal into a metal mold: an old mug, a frying pan, a tin can. After cooling, the blank is removed. It’s easier to do this if you tap the mold while it’s not yet cooled down. If it had grooved sides or reverse corners, the frame will have to be cut. You can simply pour a slightly cooled drop of metal onto a prepared fireproof surface. Such methods are called open.
If there is a need to make a special casting, you first need to prepare a mold to fit it. In order for the metal to acquire clear outlines after cooling, closed molds are made from two or more component parts. One of them is the main one, and the other usually forms the arch or lateral surface. Holes are made in it. Often another part of the form is added above them - funnel-shaped flyers for convenience.
Mold casting: manufacturing, sand, shell molds
According to historians, the bronze casting is 12 thousand years old. Initially, using this technology, jewelry and simple tools were made from bronze. Over time, this technology has been improved, and today it is a method by which many unique products are created from this alloy.
The current level of development of bronze casting makes it possible to produce various objects from this copper alloy not only in production, but also at home.
Thanks to the invention of bronze, as well as the development of its processing technologies, the main of which is casting, we can still enjoy the sight of works of art that were created by masters back in the Middle Ages and ancient times.
Antique bronze set of writing instruments
Bronze casting, as well as brass casting, another alloy based on copper, gained the greatest popularity in the era of classicism and European Baroque. It was in those days that people learned to use these materials to create unique interior elements and decor.
Such alloys created on the basis of copper are still actively used in the manufacture of:
- items used for interior decoration;
- gates and fences that perform not only a decorative, but also a protective function;
- sculptural compositions and souvenirs;
- bas-reliefs and design elements of lighting fixtures - chandeliers and sconces;
- elements of staircase structures and entrance groups.
Bronze casting for making knife handles
Many of these products, which are not large in size or complex in shape, can be made from bronze and brass not only in production, but also at home.
Stages of artistic bronze casting
In order to perform high-quality casting from a metal such as bronze, it is necessary to adhere to a certain sequence of actions. First of all, you should reflect in the sketch the shape of the product that you plan to cast from bronze.
Based on the sketch, which is created by professional artists and designers at modern enterprises, specialists create a drawing that accurately reflects all the dimensions of the future casting.
It is the drawing that is the basis for making an accurate model, which is used to produce a casting mold.
To create a model of a product that will subsequently be made from bronze by casting, various materials can be used, in particular:
- Ivory;
- wood (in this case, preference is given to such varieties of this material as pine, alder, beech, linden);
- gypsum;
- various types of polymer materials.
The cavities of the wax model of the future figurine are filled with clay, which will be removed after casting
To make the surface of the model as smooth as possible, it is primed, puttied and covered with several layers of varnish. When making a casting model, not only different materials can be used, but also different design approaches. So, models can be:
- detachable (these are complex structures consisting of several component elements that can be connected to each other along flat or complex surfaces);
- one-piece (monolithic models, the simplest type, most often used for casting at home);
- special (this includes skeletal or molding templates used in cases where it is necessary to make a casting mold for the manufacture of objects with a complex configuration).
The next step after creating an accurate model of the future bronze product is the production of a casting mold. For this purpose, special devices and equipment are used, and the main materials used in this case are molding mixtures created on the basis of clay and carefully cleaned quartz sand.
The longest stage of bronze casting is molding - making a casting mold
In such a technological process as casting, made from bronze and any other metal, the casting mold plays a decisive role.
It is into such a mold, the internal cavity of which must exactly repeat the product being cast, that the molten metal is poured, and in it it cools, forming the finished casting.
Foundry molds, used both in production and at home, can be single-use or reusable, which is determined not only by the material from which they are made, but also by the features of their design.
Microcasting at home
A lot of cast parts made of non-ferrous metals and their alloys are used in technology, including quite complex and miniature ones, the serial production of which can only be afforded by enterprises with precision technology.
However, single (or even small-scale) microcasting can be organized at home.
It turns out that modern technology can be rivaled by the ancient method of injection molding using a simple manual centrifuge.
Almost everything that is needed for such micro-casting can be made by hand. Costs are minimal.
Indeed, the flask required for casting in this case is a piece of ordinary steel pipe with a diameter of 50-60 mm and a wall thickness of 2-3 mm. For casting products of different sizes, it is good to have several flasks of different diameters, provided that each one fits freely in the centrifuge bucket. If you have such a set, you can cast a whole series of parts one by one.
A centrifuge matches the flask in simplicity. Its wooden handle has a length of about 200 mm and a diameter of 20-30 mm. An M8 bolt is inserted into the axial hole of the handle. A metal earring is attached to it using a locked nut so that both the handle and the earring rotate easily without interfering with each other.
A bucket for a flask is suspended from the earring on a rocker arm made of 6 mm steel wire. The side of the bucket is made of a 60 mm piece of 80x3 mm steel pipe, and the welded bottom is made of a steel sheet 3 mm thick. The 200 mm high bow is made of the same 6 mm steel wire.
In order to confidently use such a centrifuge, you must first practice a little, remembering how in your school years in the physics room you had to twist a bucket of water on a string while studying centrifugal force.
True, now, instead of string and a bucket of water, in my hands I have a homemade centrifuge with a bucket, on the bottom of which there is a plastic cup (to prevent it from breaking).
But the water in it is ordinary, like it was in school physics experiments. And the action of centrifugal force is similar.
Holding the handle firmly, you need to rotate the entire chain (earring - rocker - bucket and vessel with water) around the bolt-axis, trying not to spill a drop.
Technology for producing high-quality micro-injection molding of non-ferrous metals and alloys using a manual centrifuge:
1 — bolt-axle; 2 - wooden handle; 3 — metal, easily rotating earring; 4 — locked nut; 5 — steel wire rocker; 6— bow; 7 — side of the bucket; 8 — bottom of the bucket; 9 — flask; 10 - molding compound; 11 — wax model; 12 — wax ball with technological wire pins; 13—casting mold with sprue channels, formed after melting the wax and removing the pins; 14—molten metal (alloy); 15 — flame of a gasoline burner; filling the mold with the melt while rotating the centrifuge and subsequent operations for removing and finishing the finished product are not shown
Once you get the hang of it, you can subsequently deal not with water, but with molten non-ferrous metal (or alloy), which will be pressed by centrifugal force through the gating channels into the casting cavity in the flask installed in a bucket instead of a plastic cup.
Perhaps the most difficult and time-consuming thing in micro-casting is the production of a three-dimensional, life-size wax model.
This one is molded from wax by hand, using a heated eye scalpel or a hot darning needle. Even small details are worked out with the utmost care, because molten metal (as well as any alloy) does not forgive mistakes and sloppiness. Moreover, casting, performed in a centrifuge under pressure, reveals all the flaws of the model!
In my practice, I use wax models whose height is no more than 40 mm and diameter is 50 mm. At the same time, I try to maintain proportionality so that the mass of metal in the casting does not exceed 40 g. The limitations are mainly due to the low power of the burner I use for melting.
Subtleties of technology
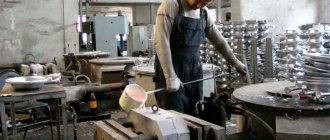
In order to perform artistic bronze casting or make a practical product from this alloy, it is necessary first of all to obtain molten metal.
Various types of furnaces are used for metal melting: induction, arc, flame, etc.
In the simplest version (when casting at home), you can use a regular gas burner to melt bronze, placing it under a special container for the melt.
The capabilities of small furnaces, which you can make yourself, are quite enough to melt non-ferrous metals and their alloys, which also include brass and bronze.
To melt a small amount of bronze you need a fire brick and a gas burner
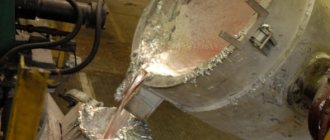
The most important step in bronze casting is filling the mold with molten metal. Despite the fact that such pouring lasts only 1–2 minutes, the correctness of its execution directly affects the quality characteristics of the finished product. The result of incorrect filling can be such defects as:
These bronze castings developed cavities due to poor cleaning of the crucibles before pouring.
When casting small-sized brass and bronze products, the molten metal is poured not from the crucible itself in which it was heated, but using a special device used as a hand ladle or spoon.
The metal, which has already been poured into the mold, must be allowed to cool to the required temperature, which, depending on the brand of alloy used, may vary.
The procedure for removing the finished product from the mold depends on what type it is - disposable or reusable. In the first case, it is simply broken with a hammer, and the casting is removed using pliers.
Reusable molds, accordingly, do not need to be broken: they are simply opened along the surface to be joined and the casting is carefully removed from them.
The newly removed casting needs to be reworked. This modification consists in the fact that the sprues, spurs, profits and bays formed during the casting process are removed from the surface of the product. This operation, which can be performed using various mechanical tools, is called trimming.
Jewelry casting at home for beginners
But how are we going to fuse paraffin onto a ring when it is incredibly fluid and unpredictable? It turned out that everything is much simpler. In the process, the master realized that paraffin remains plastic for a long time and can be deformed like plasticine. And so it happened. He simply molded the desired ring shape and continued.
True, it wouldn’t hurt to go through a soldering iron in order to fuse the molded boundaries. But the master decided not to do this. Later on the castings this will appear as a defect, but not so bad that you can’t wear this ring. Now we need to process the molded model.
The master decided to do it with sandpaper, but he doesn’t remember whether it was forty or sixty, but it was definitely very rough. And again for good reason. The fact is that a large grain of sandpaper leaves a deep mark on the paraffin and gives it texture.
Therefore, carefully walking along the front part of the ring with coarse sandpaper, we will leave the resulting texture for casting. Since the paraffin could fail at any moment, the master decided to leave the finishing work to the brass casting.
Material
Aluminum casting molds, depending on the method, can be produced using different technologies. There are several simple options. For open pouring into a simple mold, sifted earth (silica) is often used. It is laid in layers and compacted. After removing the forming element, the earth holds its shape and withstands pouring. This material is simple and cheap to use.
There are craftsmen who pour aluminum into sand. When mixing, use liquid glass (silicate glue). There is information about the use of cement. The mixture is mixed, oddly enough, with brake fluid. Knead with your hands and rub through a sieve to avoid lumps. The consistency should be such that when clenched in a fist, a lump forms. When tamping, sand and cement are well held inside the flask and even repeat small details of the workpiece shape.
Answers
The shape of the part is quite simple. I make a disposable form
.
What thoughts or experiences do you have? How to carefully avoid breaking a plaster mold
take out the plastic part.
the plastic part is a master model, it must be removed in order to pour aluminum into the plaster
Understood. I missed it. I'm sorry.
Do you need many copies or 1 and that’s it? if there is a lot, then it is easier to remove the silicone mold from the master copy and cast wax or paraffin into it. and then according to your scheme.
then casting into a mold according to a printed model that I saw - a person made a model from PLA and burned it out with preliminary blowing of the mold.
We constantly cast molds from plaster. True, they are filled with clay slip. But the essence is similar. We also remove from plastic. I really like removing plaster from PLA. Simply by heating the mold in the oven to about 100 degrees. The plastic becomes plastic and can be easily removed. At the same time, we do not lubricate it with anything! The complexity is often more complex than yours. ) Here are our works. https://www.livemaster.ru/keramyka?view=profile
Why can't you do it? I think the reason is in the plaster. What kind of plaster do you use? GVVS16 or stronger will do.. No gypsum putty from hardware stores will do!
A product formed by pouring a liquid alloy into a mold in which solidification occurs is called casting. It may be a finished product or require additional processing.
Castings are of the following types:
- semi-finished products that require further processing;
- ingots processed under pressure;
- castings formed by cutting;
- products that do not require any additional processing other than cleaning or painting.
To produce castings, metal and various starting materials for the alloy are used: wax, sand, cement, plastic and others. Approximately eighty percent of castings are made by casting aluminum into sand and plaster molds. But such products always require additional processing steps before being sent to the customer.
Manufacturing of complex shapes
Castings of complex configurations are made using a different technique. The most common material is gypsum (alabaster). Forms without reverse corners and undercuts can be collapsible and consist of two or more parts. They won't last long, but it's quite possible to get a few castings.
A complex knot or decorative three-dimensional model can be made once, but the mold will have to be broken. There are two methods at work. You can make a wax (paraffin) model and fill it with plaster. Later, during the intensive drying process, this material will melt and flow out through the flaps.
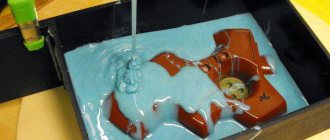
Casting aluminum into a plaster mold using foam plastic involves making a model of the future casting from this material. It is filled with the prepared mixture and cannot be removed. Molten aluminum is poured over the top. The temperature of the metal melts the foam, it evaporates in the process, and liquid aluminum fills the space vacated.
Materials for casting molds
With the open pouring method, the simplest material that is always at hand is often used, this is silica. First, the earth is laid with layer-by-layer compaction. A casting model is placed between the layers, which, after careful compaction, leaves an imprint in the silica. This mold is carefully removed and aluminum is poured in its place.
Some craftsmen use river sand with the addition of liquid glass when preparing the base of the mold. A mixture of cement and brake fluid is also sometimes used.
Plaster molds
When making a model of a complex shape, gypsum is often used, which can mainly be used for a one-time casting process. When casting aluminum into a plaster mold, paraffin or foam plastic is used as models.
The wax model of the product is filled with plaster and, after drying it at high temperature, it is melted and drained through a special hole.
If the model is made from foam plastic, it is filled with gypsum mixture and left in it until the mold completely hardens. Hot aluminum melt is poured directly onto the foam. Due to the high temperature of the metal, the foam melts and evaporates, and its place is taken by an aluminum melt, taking the shape specified by the foam.
When using polystyrene foam as a model, work must be carried out in an open space or the room must be well ventilated, since the combustion products of polystyrene foam are harmful to humans.
Typical mistakes and tips for proper casting
- When working with plaster, you should avoid common mistakes. Despite the fact that plaster molds are a convenient way to cast the desired configurations of parts, this material is very sensitive to moisture. During normal air drying, it remains part of the gypsum. This is detrimental to the quality of the aluminum casting, as it can cause the formation of small shells and bubbles. Therefore, plaster molds need to dry for several days.
- The metal must be hot enough before pouring to fill the entire mold before it begins to harden. Therefore, after reaching the melting temperature, taking into account the rapid cooling of aluminum, there is no need to delay pouring it into the mold.
- It is not recommended to immerse the resulting casting in cold water to speed up the hardening process. This can disrupt the internal structure of the metal and lead to cracks.
As an option, I can suggest making a mold for pouring from plaster or alabaster.
Provided that your part is not of complex shape and does not have intricate reliefs or internal cavities.
We prepare a container slightly larger in size than your part, you can use any ready-made cardboard box or make it yourself from any cardboard or corrugated cardboard, you can half a plastic bottle, dishes, the main thing is to then remove the resulting form for filling.
Coat the part with technical Vaseline or other thick lubricant.
We prepare two dowels for centering the shape of two halves, for example, saw off two 2 cm pieces from a pencil, coat them with Vaseline.
We choose alabaster to make the mold.
We dilute alabaster as follows: add the required amount of alabaster to a container with cold water, wait until the water is completely absorbed into the powder and then stir until a homogeneous consistency is obtained.
The solution should look like medium thick sour cream.
A viscous solution is obtained from the proportion of 1 part alabaster to 1 part water.
Dilute such an amount of solution to use it in one go, since the mixture will harden quite quickly and will need to be thrown away; there is no point in restoring it; the properties of alabaster are not restored.
Pour enough solution into the container so that your part is immersed halfway in it. This will be half of your shape.
It is important to position the part so that after the solution hardens, it can be removed from this half of the mold.
Along the diagonal of the mold, separately from the part, vertically immerse two dowels halfway.
When the solution hardens, we will try to carefully remove the part and return it to its place. Everything worked out, let's continue.
We make a gasket for the frozen mold from available materials: plastic film, tracing paper, thin paper, close only the mold, do not close the part. You can also lubricate it with Vaseline.
We make a cylinder with a funnel on the edge from plasticine at the distance from the part to the edge of the mold and place it in the mold, this will be the filling channel. Decide on the thickness yourself.
Read also: Setting up the carburetor of the Husqvarna 240 chainsaw
We dilute the required amount of solution and fill the part completely and wait for the second half of the mold to completely harden.
Then we remove the resulting form from the container, carefully separate it into two halves, take out the part and plasticine, and clean up the defects.
We connect the form, the funnel goes to the top, that’s it, you can pour aluminum.
After pouring and removing from the mold, it will be necessary to modify the poured part manually using sandpaper, needle files, a cutter, etc. to the size of the original.
For many, the term “foundry” is closely associated with back-breaking labor and specialized professional skills. In fact, casting a part from the required metal is possible for the most ordinary person without professional training at home. The process has its own subtleties, but it can be done at home with your own hands. Outwardly it resembles the production of lead weights for fishing. Features of the aluminum casting process are related to the technical characteristics of the material.
Casting errors
Making molds from plaster is a convenient and inexpensive way. But there is moisture in the material. With natural drying it remains. When molten metal is poured, moisture begins to evaporate rapidly. Even intensive oven drying does not guarantee its complete absence. Depending on the amount of moisture remaining in the mold, the aluminum casting may have small pits or large frozen bubbles and craters.
If the metal was not heated up enough or it had time to cool before pouring, the aluminum does not pour out well and does not fill the volume of the mold. In fact, a drop is formed that does not have sufficient fluidity. The same thing can happen when using a small amount of metal in a cold form. Aluminum gives off heat quickly and does not have time to spread.
Experienced craftsmen do not recommend immersing the casting in water to speed up its cooling. In such a material, damage to the internal structure and the appearance of microcracks is possible. Such workpieces may not be suitable for subsequent turning.
How to cast a complex-shaped part from aluminum
Industrial enterprises often use metal molds. Aluminum casting molds can be made from a variety of materials. Most often, gypsum is used. Gypsum can be purchased at any hardware store at any price acceptable to you. It is recommended to use sculptured or white plaster.
An excellent option is sculptural, which is marked G-16. Due to the high price, it can be replaced with G-7 - ordinary white plaster. It is strictly forbidden to replace it with alabaster, despite the fact that they are often interchangeable in construction work.
Let's look at a simple way to cast an aluminum part with your own hands at home.
To cast an aluminum part we need:
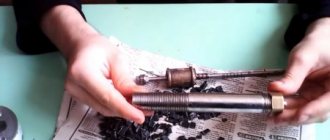
- melting vessel;
- scrap metal;
- melting mold.
Main stages of the process:
1. Prepare a vessel for melting (you can use a vessel from part of a steel pipe).
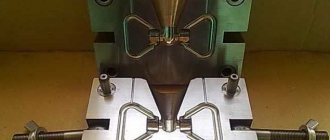
2. We make a mold for melting. If the part has a complex structure, then the shape may have several components.
Read also: Photo of how to remake footpegs on a snowmobile
In our version, the form will consist of two parts. First, think about how to simplify the part for convenience (we recommend strengthening the holes with tape).
The mold is very easy to make from sculpting plaster (do not use alabaster!). You can use plasticine.
3. Before pouring plaster, you should lubricate the container with oil so that the plaster cannot stick to the container.
4. Carefully pour the plaster, shaking the mold periodically to release the bubbles.
It is important to know:
The hardening process of plaster is quite fast, so be careful and try to install the model in plaster in time.
In addition, it is recommended to install an object (for example, a small stick) in the plaster, which will become a channel for pouring our part.
5. A primary layer is required for the upcoming filling.
Take a drill and make 4 small holes, treat the shape with oil. This is necessary to ensure that the finished mold parts lie as stable as possible during the casting process.
6. Fill the second layer.
7. After hardening occurs, you need to carefully remove the mold from the container and separate the halves.
8. Before casting, we treat the mold with soot to avoid sticking of liquid aluminum. The form must be dried. The natural drying process takes place all day long. It is advisable to dry the gypsum blank in the oven. Start at a temperature of 11 0 0 C - one hour and two hours at a temperature of 300 0 C. It is necessary to provide holes in the plaster for pouring aluminum and removing residual air.
This is how we melt aluminum.
9. Then we place the liquid metal in the mold and wait for it to cool completely.
As a result, we obtain the desired workpiece, then we grind it and make special holes.