In 2006, I bought a NEVA LUX-5013 gas water heater manufactured by OJSC Gazapparat, St. Petersburg. The Neva-3208 model gas water heater that had been heating water until this time worked for 6 years and continues to work to this day in another apartment. There were no problems with heat exchanger leaks. The only thing I had to do was periodically replace the rubber membrane in the water unit until I replaced it with a silicone one. For information on repairing other malfunctions of geysers, read the article on the site “Do-it-yourself geyser repair.”
Warranty period (three years) NEVA LUX-5013 worked flawlessly, and in the fourth year of operation water began to drip from it. The hope that one of the gaskets had worn out was not justified. When the casing was removed from the gas water heater, a fistula was discovered in the heat exchanger, from which water was gushing.
After discovering the fistula, the first desire was to replace the geyser heat exchanger with a new one, but when I found out that its cost was 1/3 of the cost of a new column, I decided to try to repair the geyser heat exchanger myself, soldering it with solder using a soldering iron. I reasoned as follows: water flows through the heat exchanger tube, the temperature of which, when heated, cannot exceed 100˚C. The melting point of solder, depending on the brand, is about 200˚C. Consequently, the solder will not melt and the soldering will seal the leak reliably. The repair of the geyser heat exchanger was successful.
Communication with sellers of spare parts for geysers and friends identified the existing problem of water leakage in heat exchangers, both in gas water heaters from domestic and foreign manufacturers. As it turned out, the service life of geyser heat exchangers is mainly determined by the method of water disinfection during purification in the city water supply system.
Currently, chlorine or its dioxide is mainly used to disinfect tap water. Water containing chlorine, passing through the copper tube of the heat exchanger, heats up during operation of the gas water heater, and, as is known from chemistry, when heated, chlorine begins to react with copper, forming copper chloride. Thus, the tube is destroyed from the inside, which leads to the appearance of fistulas. In cities where water disinfection at treatment stations is carried out by ozonation, fistulas practically do not appear in the heat exchangers of flow-through gas and electric water heaters.
It is also worth noting that currently manufacturers have begun to install copper tubes with thinner walls and made from lower quality copper into heat exchangers. This is also one of the factors that reduces the service life of heat exchangers.
How to solder the heat exchanger of a gas water heater if the fistula is located in a place accessible for soldering
Before starting soldering, it is necessary to drain the water from the heat exchanger, otherwise the water will remove heat and it will be impossible to warm up the soldering area to the required temperature. To do this, you need to open the hot water tap in the sink or sink and unscrew the union nut from the geyser pipe supplying cold water. Since the column is located at a level higher than the tap, most of the water will drain, but not all. I use a blower to remove residue. This can be done with a compressor, a vacuum cleaner or your mouth. When blowing with your mouth, you can use a flexible hose from a shower head. One of the union nuts of the flexible hose is screwed through the gasket onto the thread of the water supply tube of the heat exchanger, and through the second end of the flexible hose the heat exchanger tube is blown through the mouth. The remaining water is drained through the tap, and you can begin repairing the heat exchanger.
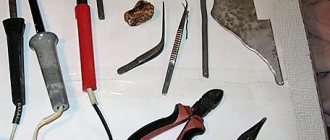
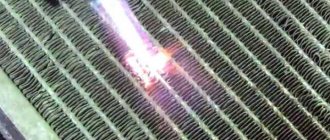
The soldering itself is not difficult. If you do not have experience with a soldering iron, you can familiarize yourself with the soldering technology on the website page “How to solder with a soldering iron.” Using fine sandpaper, clean the location of the fistula from oxides. As a rule, in this place the copper oxidizes and a greenish stain forms (clearly visible in the photo above). After cleaning, wipe the area with a cloth soaked in solvent to remove grease and dust. Tin with any solder, for example POS-61, (melting point not lower than 180°C) with a soldering iron with a power of at least 100 W.
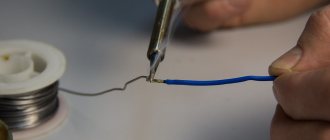
Rosin can be used as a flux; the kind that is used to rub violin bows is also suitable. If you don’t have rosin, you can successfully use aspirin tablets (sold in pharmacies in the form of tablets called “acetylsalicylic acid”). It’s a wonderful flux, I use it all the time in cases where it’s impossible to clean. For example, when tinning multi-core wires. You paint the tablet and sprinkle the tinning area with small crumbs, or rub the tablet over the heated surface. If, during tinning, the solder does not spread, but lies in a loose layer, it means that the soldering area is not heated sufficiently. In this case, you can additionally heat it with another 40 W soldering iron, hair dryer or iron, placing it next to the soldering area.
When the solder has evenly covered the required surface with a thin layer, you need to build it up to a thickness of 1-2 mm. The fistula on the heat exchanger has been eliminated and will never appear again.
Now carefully inspect the geyser heat exchanger tube along its entire length. If you find a green spot, it means that in this place there is most likely a microhole that allows water to pass through. You need to clean the tube with fine sandpaper until it shines and see if there is a small black dot. If there is one, then it should definitely be tinned and soldered. Otherwise, in a couple of months you will have to do repairs again.
Safety precautions when soldering copper pipes
One should never ignore safety precautions when a person is interested in how professionals solder copper products. First of all, you need to remember that any copper structure becomes very hot when exposed to a burner flame. Therefore, under no circumstances should you take the part with unprotected hands. You can use pliers to move short elements. It is recommended to wear mittens.
It is necessary to prevent flux from coming into contact with the skin. If such a situation does arise, then the aggressive composition is washed off with soapy water.
Work must be performed in thick clothing. It is recommended to wear cotton items. Clothes made from synthetic fabrics cannot be used during soldering, because artificial fibers easily melt.
The process of joining parts must be performed with good ventilation, since the flux often catches fire during soldering. Therefore, dangerous vapors appear in the air.
After completing installation work, the system must be washed with water. It should be hot and clean. This allows you to get rid of excess consumables inside the pipeline.
How to solder the heat exchanger of a gas water heater if the fistula is in a place inaccessible for soldering
If the location of the water leak occurs on the wall of the heat exchanger adjacent to the base of the gas water heater, then repairing the heat exchanger by soldering on site is impossible, and it must be removed from the gas water heater. The designers of NEVA LUX-5013 did their best. To remove the heat exchanger for repairs, you need to disassemble almost the entire gas water heater and, most unpleasantly, disconnect the gas pipe. I didn’t want to mess with gas pipes, as it’s dangerous.
The removal of the heat exchanger for repair was hampered by an umbrella for removing gas combustion products, secured with four aluminum rivets to the base of the gas water heater. I had to drill out these rivets with an electric drill, remove the umbrella, and only then did it become possible to remove the heat exchanger. During assembly, instead of rivets, the umbrella was secured to the base with two M4 screws. If the wall does not interfere, you can secure the umbrella with self-tapping screws.
Next, the repair of the gas water heater was carried out using the technology described above. Over the past two years, I have had to repair the heat exchanger, soldering the fistulas, five times. The last time, water began to leak from the side adjacent to the wall of the heat exchanger, and I decided to buy a new one, which I did. I'm going to repair the old heat exchanger of the geyser, I'll tin and solder the tube along its entire length. Photo of the heat exchanger from the side attached to the base.
When purchasing a heat exchanger for a geyser, I was surprised to find that they gave me not a new one, but an already repaired one. The heat exchanger tube had the same soldering that I did when repairing my old heat exchanger. As a result, out of four available in the store, only one heat exchanger was not soldered. It turns out that the plant ships repaired heat exchangers for spare parts that failed during the warranty period. They seal fistulas in them and sell them again. The heat exchanger has a warranty period of only 1 month. It turns out that in a few months the gas water heater will have to be repaired again!
If you have to buy a heat exchanger for a geyser, carefully inspect it. If soldering is detected, it is better to refuse the purchase. If you replace a heat exchanger in a gas water heater under warranty, make sure that you are not getting a refurbished heat exchanger that was in use, but a new one.
see also
Comments 45
There is most likely high-temperature solder containing silver, which must be melted with oxygen. The solder itself is sold in stores for refrigerators and air conditioners.
Copper soldering iron cleaver heated on gas and treated with phosphoric acid. Almost everything solders
soldering iron with tin
go to the store for air conditioners, you will find everything there, including solder and what to solder with, and all the fluxes are there
The bars contain 5% copper solder. Burner: oxygen + propane. And you can easily solder everything.
At one time I soldered tubes on refrigerators with a torch (Propane + oxygen) with special solder.
I usually heat it with brass, borax and autogen. You can use solder for soldering copper pipes with a gas torch. Plumbing stores have paste, solder and a sponge for stripping pipes.
Are you heating with oxygen or something?
Certainly. Acetylene does not burn without oxygen.
It's the other way around)))) Oxygen does not burn without combustible gases. oxygen supports combustion)))))
Ssory didn't put it that way. The combustion temperature will not be required! )))))
But I don’t mean a new tube? I mean a whole one without any gimmicks, why the adaptation?
you need to assemble and connect a circuit of tubes
for autogas pipes there are connectors copper-copper, plastic-plastic, copper-plastic, etc.
different diameters and shapes, it won’t work like that
you need to assemble and connect a circuit of tubes
not brake pipes for an hour?
neither the name of the solder nor the paste is visible, it has been erased from old age (((I once squeezed it at the plumbers, they made copper plumbing
you need to assemble and connect a circuit of tubes
But I don’t understand WHY SOLDER THE TUBES, according to your photo... cut off the tip, drill a hole in the (new) tube, insert the tube and solder it, (100 watt soldering iron, simple tin, and an aspirin tablet or acetyl solicate) and you will be happy ... just like that, handset to handset...
Repair of a replaced geyser heat exchanger
For almost three years, the NEVA LUX-5013 geyser worked properly after replacing the heat exchanger, but the happiness did not last forever, and suddenly water began to drip from it. I had to do the repairs again.
Removing the casing confirmed my fears: a green spot appeared on the outside of the heat exchanger tube, but it was dry, and the fistula, from which water was oozing, was on the side inaccessible for inspection and soldering. I had to remove the heat exchanger for repairs.
A problem arose while searching for the location of the fistula on the back of the removed heat exchanger. The fistula was located at the top of the heat exchanger tube and water oozed from it and flowed along all the tubes below. As a result, all the turns of the tube below the fistula on top turned green and were wet. It was impossible to determine whether this was a single fistula or whether there were several.
After the green deposit had dried, it was removed from the surface of the heat exchanger using fine sandpaper. An external inspection of the heat exchanger tube did not reveal any blackened spots. To find leaks, we had to pressure test the heat exchanger under water pressure.
To supply water to the heat exchanger, the above-mentioned flexible hose from the shower head was used. One end of it was connected through a gasket to the water supply pipe for supplying water to the gas water heater (in the photo on the left), the second was screwed to one end of the heat exchanger tube (in the photo in the center). The second end of the heat exchanger tube was plugged using a water tap.
As soon as the water supply tap to the gas water heater was opened, drops of water immediately appeared in the suspected locations of fistulas. The rest of the tube surface remained dry.
Before soldering the fistulas, it is necessary to disconnect the flexible hose from the water supply network, open the plug valve and drain all the water from the heat exchanger, blowing it out. If this is not done, then the water will not allow the soldering area to be heated to the required temperature, and the fistula will not be able to be soldered.
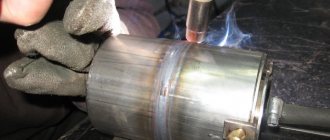
To solder the fistula, which was located on the bend of the heat exchanger tube, I used two soldering irons. One, with a power of 40 W, was placed under the bend of the tube for additional heating, and the second, one hundred watt, performed soldering.
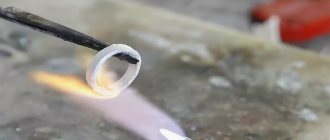
I recently purchased a hair dryer for my household and soldered the fistula in a straight section, additionally heating the soldering area with it. It turned out that soldering with a hairdryer was much more convenient, since the copper heated up faster and better. The soldering turned out to be more accurate. It’s a pity I didn’t try to solder the fistula without a soldering iron, using only a hair dryer. The air temperature from the hair dryer is about 600˚C, which should be enough to heat the heat exchanger tube to the melting temperature of the solder. I'll definitely check it during the next repair.
After repair, the place of the heat exchanger tube where the fistula is located is covered with a millimeter layer of solder, and the path to water is reliably blocked. Repeated pressure testing of the heat exchanger showed that the tube was leak-tight. Now you can assemble the gas water heater. Water will no longer drip.
I bring to your attention a short video on how to solder a gas water heater radiator.
Total views: 31379
It is worth noting that with the help of the presented technology it is possible to successfully repair not only the heat exchangers of geysers, but also copper heat exchangers and radiators of any other types of water heating and cooling devices, including copper radiators installed in cars.
Conclusions and useful video on the topic
Inexperienced installers are recommended to conduct a training cycle using waste pipes. After completing 5-6 test seams, it is allowed to begin making connections on the pipeline. Since with insufficient experience there is a risk of errors in marking, the pipeline is assembled on the floor of the room. After checking the correct dimensions, the joints are connected in series using hard or soft solder for soldering the copper pipeline.
Video #1. Features of high temperature copper soldering:
Video #2. How to solder copper fittings correctly:
Video #3. What types of fluxes are there for soldering?
Videos shot by installation crews show how to properly solder copper pipes at home. A novice installer does not always accurately determine the degree of heating of parts, so it is recommended to seek the help of an experienced mentor. Since copper pipelines and technological components of water supply networks made of non-ferrous metals are very expensive, performing installation work on your own will save money (even taking into account the need to purchase tools).
There is no secret that copper pipes are ahead of steel, cast iron and PVC pipes in terms of flexibility, heat resistance and durability. The high price of the material pays off with the long service life of copper products. Knowing how to solder copper pipes, you can save money on installation.
Copper is an excellent material for soldering; its surface does not require the use of aggressive substances when cleaning. There are many low-melting metals that create good adhesion with copper. When heated, this material does not require expensive fluxes, since violent reactions with atmospheric oxygen do not occur when melting copper.
Finding a fistula by pressing the heat exchanger with air
As a result of operating the geyser heat exchanger after eliminating leaks by soldering, it turned out that pressure testing with water from the water supply does not always guarantee the identification of all fistulas.
According to regulatory documentation, the pressure in the water supply network can range from 0.3 to 6.0 atmospheres (bar). As a result, the heat exchanger did not allow water to pass through at low pressure in the water supply, and when the pressure increased under the column, dampness occasionally appeared on the table.
To search for even microscopic fistulas in the heat exchanger, the technology of pressure testing it with air was used by pumping it with a car pump to a pressure of 7 atmospheres.
But here an obstacle arose. To connect the quick-release tip of the pump to the heat exchanger, an adapter had to be made.
For this purpose, a bicycle inner tube that could not be repaired was taken, the fitting of which was the same as that of car wheels and an American union nut.
Since the fitting was securely fixed in the rubber of the bicycle inner tube, a washer of suitable internal size with an outer diameter of ⌀ 22 mm was put on it and circled with a marker. Further along this line the rubber was cut.
In this way, an adapter was made for a sealed connection between the coupling tip of a car pump and the heat exchanger tube. The rubber gasket of the adapter was placed against the water tap and pressed with a union nut.
The car pump was connected to a 12 V DC power supply, designed for a load current of up to 15 A. If there is no electric pump, then a manual or foot pump can be successfully used. The union tip is attached to the fitting and the pump is turned on for a while until the pressure gauge shows a pressure of 7 atmospheres. The tests were successful.
The tap with the adapter was screwed onto one end of the heat exchanger tube, and a plug, which was a blind union nut, was screwed onto the other.
After creating a pressure of 7 atmospheres in the tube, all suspicious places were coated with a brush dipped in a soap solution. As a result, microscopic fistulas were discovered that did not appear under water pressure.
Using a wire brush and sandpaper from the tube in places where leaks were found, the copper was cleaned of oxides until it was shiny.
One of the fistulas was located in the area of contact of the tube with the sidewall of the heat exchanger and it was impossible to detect it by visual inspection. The gap was generously lubricated with FIM flux. Several pieces of solder are placed in it and with the help of a hair dryer and a simple soldering iron the solder is melted. It leaked well into the gap and clogged the fistula. Testing with a soap solution under pressure confirmed the tightness.
To be completely sure that there were no fistulas, the pressure heat exchanger was immersed in a container of water and kept for about 10 minutes. No bubbles appeared on the surface. As a result, the heat exchanger, which was planned to be scrapped, received a chance for a second life.
Installation of a heat exchanger repaired by soldering into a gas water heater and its operation for more than a month showed the tightness of the device. I hope that diagnostics of the heat exchanger under pressure will significantly increase its service life until the next repair.
Theory
Copper is one of the oldest metals, which is used by people to create various decorations, devices and communications. It is characterized by high plasticity and pinkish-red color, sometimes with a golden tint. In the household, copper is most often used in water pipes and heating, because it does not corrode and is resistant to temperature changes.
Photo - copper connections
There are many types of soldering; capillary soldering is used for copper. It allows you to connect two parts of a pipeline or radio components as accurately and firmly as possible. This thermal effect is also divided into:
High-temperature soldering is characterized by higher weld strength. In addition, it allows the connection to be thermally stable, which is very important for various communications. But at the same time, this type of work is not used on threaded connections. To carry out such soldering, special equipment is required - a burner with piezo ignition and acetyl, propane.
Photo - copper elements
Low temperature is used when working with soft solders (pastes, gels). The main advantage of this technique is the simplicity and ease of work. It is carried out at a temperature lower than 425 degrees, so soldering can even be done with a soldering iron. It lies in the fact that, under the influence of a certain temperature, the solder applied to the gap between the part and the area being connected expands, closing the gap.
Photo - soldering process
There is also one important rule that must not be violated under any circumstances. Soldering copper and aluminum, or aluminum and brass, is strictly prohibited. It is performed for electrical wires, for example, if you need to branch the wiring in old houses. This is prohibited due to the difference in linear thermal expansion of the metals and the likelihood of a short circuit at the joint.
Restoring geyser pipe flanges by soldering
Somehow my eye caught two pieces of copper tubes with flanges, onto which American union nuts were put on. These parts are designed for installing a water supply system made of copper pipes.
When soldering the heat exchanger of the gas water heater, I remembered them, and the idea arose to restore the previously cracked copper pipe connecting the outlet pipe of the heat exchanger to the hot water supply, soldering to them new flanges that had been collecting dust on the shelf. The task was somewhat more complicated, since the copper tube for the available parts was bent at a right angle. I had to take a hacksaw for metal.
First, a part of the tube with a flange was sawed off at the place where the bend begins. Next, the expanded part of the tube was sawed off from the opposite end for further use as a connecting ring. If the tube were straight, there would be no need to saw. The result was two pieces of tube about a centimeter long.
The next step is sawing off the cracked flange from the pipe. The sawn piece of pipe should be equal in length to the section of pipe with a flange prepared for repair in the previous step.
As you can see in the photo, the sawn-off piece of the gas water heater pipe had many cracks at the place where the flange formed.
The photograph shows parts prepared for soldering. On the left is the end of the gas water heater pipe, on the right is a new flange with a union nut, in the middle is a connecting ring.
Before soldering, you need to check how the prepared parts fit together. The pipes of the nozzle should fit into the ring easily, with a small gap.
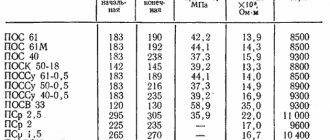
Before joining by soldering, the mating surfaces of the tubes and rings must first be cleaned with fine sandpaper to remove the oxide layer. It is convenient to clean the inside of the ring by wrapping sandpaper around a round rod, such as the handle of a small screwdriver. Next, the cleaned surfaces must be tinned with a thin layer of POS-61 tin-lead solder using a soldering iron with a power of 60-100 watts. As a flux, it is best to use acidic zinc chloride flux, in other words, hydrochloric acid slaked with zinc. Since copper parts are soldered, rosin or aspirin will also work.
When soldering, you need to ensure that the joint of the pipes is approximately in the middle inside the ring. If after tinning the tubes do not want to fit into the ring, then you need to heat them with a soldering iron, the solder will melt and the tubes will fit. Do not forget to put a union nut on the tube before soldering the pipe.
Once the tubes are joined, all that remains is to fill the gap with molten solder. As you can see in the photo, the result is a completely sealed and mechanically strong connection. The pipe has been repaired, and you can install it in place in the gas water heater; it will serve no worse than new.
The check showed that the pipe was tight at the soldering point, but a leak arose at its other end, and a microcrack appeared for the same reason. I had to repair the other end of the pipe in the same way. The geyser has been working with the repaired pipe for more than a year. No water leaks were observed.
Using this technology, it is possible to restore the tightness of not only copper and brass tubes, but also stainless steel and iron tubes. The technology is applicable not only for repairing geysers, but also for repairing other devices and machines, including cars.
Basic mistakes
High-quality connection of copper parts is carried out only with experience. Beginners often make the following mistakes:
- Elements with surface defects, which often arise during cutting, are connected. Soldering should not be done over flaws, as it will not be possible to obtain a strong seam.
- All contaminants are not completely removed from the place where the joint is made. Preparing the area to be joined includes cleaning and removing grease.
- The parts do not heat up enough, so the solder does not connect well with the pipeline elements. The integrity of the created seam is easily damaged even with minor impact.
- A connection that is not wide enough is created. Its value should be 7-50 mm if pipes with a diameter of 6-108 mm are joined.
- The surfaces of the elements are not completely covered with flux. This does not allow all oxides to be removed from the parts. Therefore, a poor-quality seam is created.
- The segments overheat when connected. Flux burns out and scale forms.
- The seam is checked ahead of time. The operation must be performed only after it has cooled, otherwise deformation of the joint will occur, which will negatively affect the strength of the joint.
Masters are well aware of all possible mistakes. Many of the specialists even encountered them in practice at the beginning of their careers. To reduce the likelihood of errors, it is recommended that the first soldering of copper pipes be carried out under the supervision of a professional.
Connecting the gas outlet pipe to the geyser hood
To repair the heat exchanger, it is necessary to dismantle the gas exhaust pipe. When installing this pipe in place, it is necessary to ensure the tightness of its connection with the geyser hood.
Even a large gap of up to a centimeter can be easily sealed using asbestos soaked in water. This is a heat-resistant material that is available in sheet form. In water, asbestos disintegrates like cardboard and forms a soft mass that molds well. After drying, asbestos becomes quite hard and dense again. Asbestos can be reused. Soak the extracted pieces of it in water.
Video instruction: how to solder copper pipes
Soldering is a physical and chemical process in which a permanent connection is created between a part and liquid solder. The filler material melts, spreads, fills the gap between the joined elements and crystallizes. Any metals and alloys can be soldered.
There are copper tubes connected by some kind of white welding. What can you solder with? I bought a burner and a cylinder with Gas1, but it does not take this alloy. And you need to connect copper tubes. What solder should I use? I'm looking for advice from those in the know.