DIY kitchen meat hatchet
DIY kitchen meat hatchet.
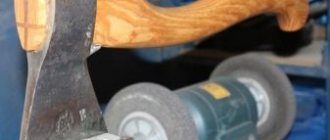
How to make a kitchen hatchet with your own hands. DIY camping hatchet. These instructions will help you make a good, strong, small but heavy hatchet. You can use it to chop meat, firewood, take it with you on a hike, and so on. The metal must be hardened, so that the ax does not become dull for a long time. The author used a plow from a tractor as material. Making an ax is not difficult; you can draw out the necessary profiles with an ordinary grinder. For ease of work, of course, it is advisable to have a belt sander, but this is not necessary.
Materials and tools for homemade work:
— a source of steel with a high carbon content (the author used a tractor plow); — grinder with cutting and grinding discs; — a set of files; - wood for making handles; - epoxy adhesive; - drill with drills; — it is advisable to look for material for making pins; - sandpaper of different grain sizes.
The process of making an ax:
Step one.
Hatchet profile First of all, imagine what your hatchet should be like. It is advisable to draw it on thick cardboard and cut it out. This will give you the opportunity to hold it in your hands and evaluate whether it will be comfortable. Next, we transfer the profile to the metal and cut it out. To work, you will need a grinder with a cutting disc.
Step two. Grinding and setting the blade profile
After working with a grinder, the profile needs to be thoroughly sanded in a circle, remove burrs and smooth out other irregularities. The metal here is quite thick, you won’t be able to make a serious mistake, so work only with an angle grinder.
You will also need to thoroughly sand the entire surface of the metal, as there will likely be rust, dirt, and so on. This can be done using the same grinder, installing a grinding attachment on it.
Next, you can begin making bevels, that is, forming the profile of the blade. If you want the sharpest possible ax that will practically cut rather than chop, make the bevel as far as possible. That is, the blade should be as thin as possible. And if you think about constantly chopping something with an axe, subject it to heavy loads. Make the bevel smaller.
The author forms the bevels with a grinder, although this is done more professionally on a belt sander.
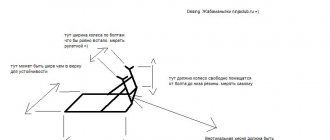
To form the bevels you must first place everything on the axe. Draw a line up to which the bevel will extend, and also divide the future blade into two parts so that you are guided by this center line when working with an angle grinder.
Finally, you will need sandpaper to smooth out any rough spots left by the grinder. Files will also come to the rescue here.
Step three. Drilling holes
Before we harden the steel, be sure to drill holes in the workpiece for the pins. The author decided not to install them, but this is highly recommended, since the handle turns out to be strong, and the appearance of the ax becomes more attractive.
Even if you don't put pins, you will still need to make holes, since thanks to them the handle will stick well.
Step four. Metal hardening
If you need a really strong ax, harden the metal. It will be problematic to heat such a piece of iron to a bright yellow color; you will need a powerful oven. However, you can try to harden only the blade. The author uses goal for such purposes. The author cools the metal in water.
In general, the hardening method described above is questionable, since not all of the metal is heated, and no one tempers it. It is recommended to use oil instead of water, since water cools the steel very quickly, and this can cause the workpiece to crack or become deformed.
Source: oleor.ru
Kitchen hatchet for chopping meat
Cooking utensils and cutlery play an important role among kitchen accessories. With their help, daily food preparation work is carried out, and the result of cooking depends on the quality and reliability of the products. An important role is also played by kitchen knives of various shapes and sizes.
They are designed for slicing meat and fish products, vegetables, bread, cheese, etc. Among the tools, you can often find a kitchen hatchet, which was popular back in the USSR. It is required for chopping small meat, as well as cutting it frozen, chopping bones and cartilage.
Unlike even the highest quality steel knife, a hatchet will be preferable for processing meat and fish with your own hands.
Knives can crumble or become dull when working with hard foods, especially bones. Using a kitchen hatchet it is easy to carry out such work without much effort.
This tool is highly durable, reliable, and almost impossible to dull.
In addition to the kitchen, such a hatchet can be bought for trips to nature, for example, on a hike, to a barbecue or to the country. In addition, not a single restaurant or cafe can do without this tool.
Varieties
A kitchen hatchet is somewhat different from a regular axe. Products intended for home use look less bulky and are more comfortable. A regular ax consists of a wooden handle and a metal blade. Its kitchen counterpart has a one-piece design, thanks to which the hatchet does not slip during operation, and the center of gravity is located exactly in the middle: between the butt and the tip.
In addition to the classic models of a kitchen hatchet, there are other varieties designed for processing meat, which can be bought in a specialized store.
Hammer-hatchet for processing meat
Almost no kitchen can do without this tool. Such products were often found on the farm during the USSR. In addition to chopping, you can also chop prepared pieces of meat with such a hatchet. To keep the room clean, it is recommended to wrap the meat in cling film.
Uzbek hatchet
Some dishes prepared from meat with your own hands require that it have the consistency not of minced meat, but of finely chopped pieces using a knife. This meat is used for chebureks, manti, samsa, lula kebab and other oriental dishes. In this case, a specially shaped hatchet comes in handy, which allows you not to cut by pressing, but to chop, and the juice does not leak out.
Kitchen hatchets can be washed in the dishwasher, but experts advise using predominantly hand washing so as not to quickly dull the blade. Like any kitchen knives, the hatchet will need periodic sharpening.
Criterias of choice
A hatchet in the kitchen can be very useful if you need to cut up meat or fish, chop bones, etc. Unlike a knife, a hatchet will cope with this process much faster and easier.
Before you buy a product, you should pay attention to its cost. More expensive models are made of high quality steel, which means they will not require too frequent sharpening.
It is not so easy to visually determine how high quality the metal is, but this can be done by clicking on the hatchet with your fingernail. The sound should not be dull.
It is also equally important to carefully inspect the blade and handle. It is best to buy a product with a thick and wide blade, so it will be much more convenient to use the hatchet. The handle can be made of plastic, wood or steel.
The first option is more durable, but to prevent the hatchet from slipping in your hands, the material should not be too smooth. Wooden handles are convenient to use and environmentally friendly, but wear out too quickly during use.
The steel handles are just as comfortable, but the downside is the heavy weight of the product.
The comfortable shape of the handle is the key to successful cooking. Before purchasing, you need to hold the kitchen hatchet in your hand and make sure that it will be comfortable to use in the future.
A handle that is too massive or long is unlikely to be comfortable; you will have to spend too much effort processing the meat with your own hands. The fasteners should not be very visible.
It is better if the handle and blade look monolithic.
Kitchen hatchets were used for chopping meat back in the USSR. Now manufacturers from different countries offer their own options, differing in price, material, shape and size of products.
Today, one of the best tools is considered to be a German-made hatchet. The models are distinguished by a stylish modern design, reliability, ease of use, propylene handles, etc.
Japanese products are also of high quality. Chinese samples are considered less durable and reliable.
Some products have a small hole in the design - an “eye”. It is intended for hanging a hatchet on a kitchen panel. There it is dried and stored along with knives and other accessories.
How to properly care
Like any kitchen item, knives and hatchets require careful care and storage conditions. Thus, the products will be able to last much longer without losing the original appearance and quality of the blade.
Many people probably still have kitchen hatchets from the times of the USSR, and they have not lost their quality.
Now, the most convenient way is to immediately purchase a set of knives, which will include several items of different shapes and purposes, including a hatchet.
- It is best to store knives separately from other cutlery. There is a special stand for this that comes with the set.
- Immediately after use, the hatchet or knife must be washed and wiped dry.
- Wooden or plastic cutting boards should be used to process meats and other foods. Ceramic or glass products will quickly dull the blade of a knife or hatchet.
- To sharpen products, it is better to contact a workshop.
A kitchen hatchet is one of the items that can become very useful when cooking. It is used for chopping meat and, unlike a knife, it does it much faster and better.
But, as with other kitchen utensils, you should inspect the product carefully before purchasing it.
Check the reliability of the handle, the quality of the material, the thickness and size of the blade, as well as other important nuances.
Kitchen hatchet made from a saw blade
Hello everyone, today we will make such a useful thing for the kitchen as a kitchen hatchet. Using this homemade product, you can chop or cut vegetables, meat, bones and other products. The author used an old saw blade made of thick steel as the material. As a result, the hatchet became weighty, which makes it convenient. The product was also quenched and tempered, which made the steel durable. The handle covers are made of wood, which is impregnated with epoxy resin; as a result, such a handle will not be afraid of water. The only drawback of the chosen steel is that it rusts, but if the ax is used often, over time the steel will become covered with a patina. You can make the patina yourself, using etching and so on. If the homemade product interests you, I suggest you study the project in more detail!
DIY kitchen hatchet for chopping meat - Metalist's Handbook
Cooking utensils and cutlery play an important role among kitchen accessories. With their help, daily food preparation work is carried out, and the result of cooking depends on the quality and reliability of the products. An important role is also played by kitchen knives of various shapes and sizes.
They are designed for slicing meat and fish products, vegetables, bread, cheese, etc. Among the tools, you can often find a kitchen hatchet, which was popular back in the USSR. It is required for chopping small meat, as well as cutting it frozen, chopping bones and cartilage.
Unlike even the highest quality steel knife, a hatchet will be preferable for processing meat and fish with your own hands.
Knives can crumble or become dull when working with hard foods, especially bones. Using a kitchen hatchet it is easy to carry out such work without much effort.
This tool is highly durable, reliable, and almost impossible to dull.
In addition to the kitchen, such a hatchet can be bought for trips to nature, for example, on a hike, to a barbecue or to the country. In addition, not a single restaurant or cafe can do without this tool.
Communities › Do It Yourself › Blog › A simple DIY kitchen knife-hatchet in an evening.
The knife is made from a 2 mm thick circular saw. The knife turned out to be 31 cm long and 8.5 cm wide. Handle thickness 22 mm. The handle is made of oak, impregnated with linseed oil and a piece of beeswax.
I printed a 1:1 picture from the Internet of the model I liked and the one that is realistic for my capabilities. I cut it out with a small grinder.
Sanding the edges with emery, where it is not possible to reach, then manually with files. Grinding the surface with a grinding machine.
Rivets made of 4 mm wire.
How to make an ax with your own hands from a simple ax and other materials: step-by-step instructions
An ax is a tool that appeared at the dawn of civilization, but people still use it to this day. Over time, different types of these instruments appeared. They will come in handy at home, hunting, hiking, etc.
Such tools are sold in stores, but you can make them yourself. Learn how to make an ax with our simple instructions.
To do this, you will need reliable and durable materials and strict adherence to the instructions.
First, let's figure out what types of axes there are:
- Tourist. The dimensions and weight of the tool are small: 350 mm/0.5 kg. It is suitable for simple work.
- Household and catering.
This tool is used at home, in the country, or in cafes and restaurants for cutting meat and chopping bones. An ax with a wide steel blade will last a long time. - For firewood. The ax blade is made of hardened steel (sharpening 40-60°), the ax handle is made of wood. The tool is simple and convenient to use.
- Taiga.
This device has a shape and dimensions that differ from the parameters of a regular ax. It is in camping and other harsh conditions. - Plotnitsky. This ax has a sharp blade and a comfortable handle. It is not used for chopping wood.
- Cleaver. This hatchet easily splits logs.
- Combat.
Battle axes are edged weapons. They are bought only as collectibles with documents.
Features of a homemade ax
Homemade handmade axes are easy-to-use devices that will help you in your work. If the product is made correctly, a good result will not be long in coming.
You can make a simple ax from wood with your own hands or make a more complex version. In this case, you will create the tool yourself, and it will exactly meet your requirements.
To make a hatchet correctly, follow our instructions.
Tools and materials
Before making an axe, choose your materials and tools. How convenient the tool will be to use depends on how well the handle is made. The blade is made of steel. The handle is made from the following wood: birch, ash, oak and maple.
You can make a Viking ax or other type of tool with your own hands from a simple axe.
To make a hatchet, you will need these tools:
- welding machine;
- abrasive sharpener;
- file;
- magnetic corner;
- sandpaper;
- sharpening disc (blade sharpening);
- marker (marking);
- Bulgarian;
- chisel;
- clamp.
DIY ax
Any ax can be made at home. By following simple rules, you can make simple, hunting, taiga, tourist, throwing or decorative hatchets, tools from car springs with your own hands.
You can also modify an old tool or completely remake it, creating a new and easy-to-use axe.
For example, make a taiga ax from an old one with your own hands. To do this kind of work yourself, you should prepare drawings in advance.
From a spring
A small tool is made from a spring from a car with your own hands. It can become either a working object or an original decorative item, similar to a Viking axe. Whatever you have in mind, it can be easily accomplished if you follow all the steps consistently. Just select the option you want, watch the video and get started.
A tool made from strong and durable materials will last a long time. You can do this by following these tips:
- Take a used car spring (width - 10 cm, length - approximately 40 cm), using a previously prepared template with a marker, draw the contours of an ax on its surface.
- Cut the product along the contour with a grinder, then sand the workpiece well to give it the appropriate shape.
- An ax handle can be a leg from an old chair. For fastening, make several holes in the spring.
- Saw off any excess from the leg, then saw it in half.
Drill 3 notches in both halves. Then assemble the handle, secure it with screws and bolts, and then grind it using the machine. - Sharpen your blade.
From reinforcement
The reinforcement is very strong and durable; splitting axes are made from it. These hatchets will be useful to you at the dacha, during camping and other conditions. They are well suited for chopping wood. You will make a durable ax from reliable material, and it will serve you for many years. Mark the parameters on paper. Please include all measurements as they may vary.
The handle of a hatchet can be large, medium or small, like its blade. How to make a hatchet with your own hands from rebar:
- Take 2 reinforcement bars (length 50 cm) and blanks (8 pieces) from which the upper and lower squares will be made.
- Use a welding machine to weld a couple of squares, and then the posts.
- It is better to make the blade from steel up to 10 mm thick. Weld it to the fittings too.
- Sharpen your blade.
From a circular saw
It is possible to make an ax with your own hands from a circular saw. A durable and strong tool is made from a carved disk. In this case, the disk will not need to be pre-hardened, since it has already been hardened.
A product made from a circular saw will be very reliable. A hatchet from this tool is made as follows:
- Sketch the product, then cut out the finished template. It needs to be placed on the cutting disc.
- Use an impeller to cut along the contour of the template.
- Heat the part with a torch, then drill holes.
- Wipe the ax thoroughly with sandpaper.
- Make a handle from wood. Apply glue to both halves of the handle, then secure the 2 screws.
- Sand the handle, then coat its surface with varnish.
From stone
A durable and reliable ax is made from natural stone. Such raw materials will produce durable blades. Just keep in mind that such work will be labor-intensive and time-consuming.
But the result is worth it, because the ax will serve you for a long time. These types of stones are suitable: granite, quartzite and sandstone. The best solution for such a tool is an oak handle. Oak products are more reliable and wear-resistant.
A workpiece made of smooth wood, without bulges or knots, is suitable.
Making an ax handle is simple: cut the wood, use a template to give it a shape that will be comfortable to hold in your hands. Sand the stone so that the material can fit as closely as possible to the end of the handle and is well fixed to it.
There is no need to use special machines and other equipment. It is enough to remove the surface layer from the surface of the stone. The handle cannot be made from raw wood: when it dries, it will decrease in size.
Because of this, you will not be able to use the axe.
Making an ax handle with your own hands
A good result in your work largely depends on how well the tool is made. It is important that you feel comfortable using it. The handle of the hatchet must also be made correctly. It happens that the cutting edge becomes dull, the piercing part can fly off, etc.
Masters advise making an ax handle at home so that it fully meets your requirements. How to make an ax handle for an ax with your own hands? The diagrams are well illustrated in the photo.
A reliable handle is suitable for making a Viking ax with your own hands from an old axe.
Sketch and template of an ax
To make an ax handle of the required size, you should first make a sketch and template from thick cardboard. The drawn handle is placed on cardboard and outlined with a pencil. This sample will help you cut a wooden handle according to the specified parameters, and working with such a tool will be convenient and easy. The sizes are determined depending on the person’s height and build.
The result itself depends on how accurately you take measurements and how carefully you prepare the template. You can make a taiga or any other ax out of an old one with your own hands.
Wood for an ax
A do-it-yourself wooden ax is made from hard and durable wood. The durable ax handle is resistant to impacts and other damage. Craftsmen recommend hardwood. The material is thoroughly dried, sometimes in a special drying chamber.
The raw materials must be dry so that the ax does not change its shape in case of high humidity.
Pay attention to which direction the fibers are directed. The durable hatchet handle withstands impacts well and does not crack.
The fibers on such a handle are evenly spaced and there are no weaves on it.
Blade sharpening
After you make the tool, you will need to sharpen the blade. A sharpened ax will become dull over time, and it is advisable for you to learn how to sharpen it yourself. It is better to sharpen the ax with your own hands first than to work with a dull blade.
Sharpen the product according to the template; it is prepared in advance. It is possible to sharpen a metal ax with your own hands using tin. Axes can also be sharpened with a grinder. Whatever method you choose, prepare protective equipment: respirator, goggles, face shield. Follow safety precautions.
Making a storage case
When you have made a taiga or other ax from an old one with your own hands, sew a bag for it. It is safe to transport and store tools in it. Make a case from durable material, taking into account the size of the ax. There are three simple options:
- You can easily make a case for an ax with your own hands from a bag or an old briefcase. Draw contours with allowances on the material. Then sew the leather with a gypsy needle, to make it easier for you to make stitches, use an awl.
- Make your own ax bag from old leather. Craftsmen advise making the case from thick leather. Draw the head on the inside with a pencil, and then cut out two identical parts and sew them together.
Photos of hand-made ax options
Share with friends
Tags: kitchen hatchet, do it yourself, from a saw, simple
Comments 27
I made three knives from saw blades, the first one was clumsy due to inexperience, the second one was made from a piece of a thick disk 5mm thick, the metal is a bit soft (although the disk was without soldering) it lies in the form of a blank waiting for its use, the third one was more or less a success, but it also seems a little soft, hardening yet I haven’t mastered it... By the way, I wanted to make the same cleaver, but the disk ran out))) Then, if I succeed, I’ll post pictures of the knives. Another spring from ZIL 131 is lying, waiting for its turn...
Bones for broth are definitely good!
The first photo is valid...
the knife is garbage but the main thing is the process (((
Was he boiling something out of her ass? :))))
Wrap it up so it doesn't rust.
What about the strength of steel? On which bone will the first nicks appear and will it become dull?
I sharpened it at 30 degrees, but to chop bones you would need 45-50 degrees then it’s normal, but to chop meat the knife still needs to be heavier, with a blade thickness of about 4-6 mm, but here it’s 2 mm, that’s why I sharpened it by 30 degrees, but during the sharpening process I will reduce the angle
What about the strength of steel? On which bone will the first nicks appear and will it become dull?
Source: www.drive2.ru
Homemade hatchet knife using simple tools
Greetings to those who like to work with metal, in this instruction we will look at how to make a hatchet knife with your own hands. With this device you can chop branches, sharpen sticks, cut and more. This knife is also useful for culinary purposes. The knife is made of high-quality steel and is hardened, so it keeps its edge for a long time and does not become dull when cutting fairly hard materials. But here everything will depend on the correctness of the hardening.
Making such a knife is not at all difficult, as it might seem at first glance. The author makes it using available tools, and everything turns out quite well. The blade is cut using a grinder, with the help of which the bevels are formed and the main grinding takes place. As for hardening, if you don’t have a furnace, that’s also not a problem; you can handle the task with a gas burner. When making the knife, the author damaged the handle, so part of it was made from cold welding. But with a skillful approach, you can make the overlays entirely from wood, as was originally planned. So, let's take a closer look at how to make such a knife!
Materials and tools used by the author:
— high-quality high-carbon steel (tool steel or from a car spring will do);
- a wooden board for making overlays;
- copper tubes, brass rods (or other parts for making pins);
- epoxy glue for the handle (the author did not use it);
- cold welding (used to finish the handle).
— welding machine (optional);
— grinder with cutting and grinding discs;
— gas burner, refractory brick and oil for hardening;
- varnish, oil, paint or other for the handle;
The process of making a knife-axe:
Step one. Preparation of material
Do-it-yourself ax for chopping meat: drawings, dimensions, instructions
A meat cleaver is a common kitchen utensil. It is used by professional chefs to cut up animal carcasses. A useful device in any kitchen.
Kitchen hatchet.
Characteristics of a meat ax
Its main difference is its wide blade and curved handle. They sharpen mainly on one side. Double-sided sharpening is a rarity. Options:
- blade length – 13.5 – 18 cm;
- handle length – up to 30 cm;
- It is based on alloy steel (it is durable and resistant to corrosion).
A convex cutting edge can:
- split the bones;
- penetrate the pulp without difficulty.
The curved shape of the handle with a thickening at the tip prevents injury to the hand. Hardwoods are the best materials for handles. The strength of the blade depends on its special hardening. It chops thick bones without splinters. Also suitable:
You can make a hatchet with your own hands.
Functions of an ax for chopping meat
The functionality of the device depends on its size and shape:
- A device with a wide blade and heavy weight does not cut. He cuts any pieces and bones. This helps maintain the integrity of the pulp of the connective fibers;
- The middle handle ensures perfect balancing. High-quality cutting of bones occurs. To do this, you do not need to debone the carcass first. A high-quality device will not leave crumbs and splinters in the pulp.
Advantages and disadvantages
The tool has a number of advantages:
- the ability to chop the hardest products, as well as frozen pieces;
- ability to perform the functions of a meat grinder;
- ease of care;
- the blade does not require regular sharpening;
- very strong steel.
The disadvantages include:
- fragility of the handle made of soft wood;
- the use of great physical effort at work;
- large mass.
The hatchet is heavy and bulky.
Butcher Ax Options
The device is:
- kitchen;
- professional.
Kitchen
Has a medium size. Works great with:
- bird;
- rabbit;
- small and medium-sized pieces of pork, beef;
- small bones.
Blade width – 15 cm. Sharpen on both sides. This helps to chop the fibrous product, even without skill.
You can use a device with a blade width of 17 to 20 cm. This option is close to the professional model. With his help:
- chop bones;
- separate the pulp;
- tendons are cut out.
Kitchen hatchet.
Professional
Differs in blade width. It ranges from 25 to 35 cm. The blade is all metal. Thanks to this, the product is very resistant to mechanical stress.
The handle is based on hard wood. A special liquid is applied to them to prevent drying out. The professional model promotes:
- chopping fish and meat of various densities;
- maintaining the integrity of the pulp.
How to make an ax for chopping meat with your own hands, collecting materials
For production you need to prepare:
- high-carbon steel, tool steel is also suitable;
- wooden board - as a stand for workpieces;
- grinder with cutting grinding discs;
- brass rods, copper tubes;
- drill;
- construction marker;
- hammer;
- jigsaw;
- sandpaper of various grain sizes;
- file and vice;
- gas burner;
- fire bricks;
- hardening oil;
- varnish
Hatchet knife: drawing.
Step-by-step instruction
By following all the instructions and observing safety precautions, you can make the equipment yourself. The work process includes several mandatory stages.
Work process
Methodology step by step:
- Prepare the material. The steel is clamped in a vice and burned with a gas torch to remove dirt.
- Next, it is annealed - the workpiece is placed between refractory bricks and heated with a burner until redness appears. Ideally use 2 pieces. Cool so that the workpiece softens.
- Cut out the profile. Make a mold template from cardboard. Contours are outlined and cut with band saws.
- They refine it, remove burrs, and form a cutting edge.
- Form bevels. The edge is divided into 2 parts lengthwise with a marker. Using a grinder with a grinding wheel, symmetrical bevels are made on each side.
- Overlays are made. To do this, you need to cut out 2 pads of the same shape as the future handle. Drill a hole for the pins. Assemble the handle and install the pads.
- Glue with epoxy glue, insert pins. Dry for 24 hours.
The process of creating a kitchen hatchet.
The following steel grades are used:
Algorithm:
- Heat until red.
- Place in oil 3 times.
- Installation of wooden overlays is done only after hardening has been completed.
Chamfer width
Represents the distance between two planes. The width is:
- one-sided;
- dihedral;
- trihedral.
Kitchen appliances are suitable for two-sided width. When sharpened independently, it remains the same. Usually ranges from 18 to 20 mm. It is possible to change the size on one side. Thus, the sharpening angle changes.
Double chamfer contributes to:
- saving time;
- simplifying the processing process.
Sharpening angle
The chopping properties depend on this indicator. Hardening with perfect sharpening extends the life of the equipment. The angle is 25 - 30 degrees.
If necessary, cut out the template. The lowest value means the most spiciness.
Care Tips
A few care tips:
- The appliance is not stored near other kitchen utensils. Can be hung on the wall using special loops on the handle;
- Wash after use with dish sponges and detergents. The use of abrasive cleaning agents is prohibited;
- A cutting board is used for work. Usually wooden or plastic. The cutting edge can easily be damaged on a stone, glass, or ceramic surface;
- the metal part is treated with kerosene, the blade is lubricated with vegetable oil.
Conclusion
A kitchen hatchet is a versatile kitchen tool that you can make yourself. By following all operating rules, the service life will be long and the result will be of high quality.
PreviousNext
You may also like
Main stage of work
In order to make a cleaver, you will first need to arm yourself with a pencil and draw a sketch on paper. After this, you need to make a blank. In our case, the ideal source would be a large-diameter steel saw blade. The blade of the future cleaver should be drawn on it. You can cut the workpiece along the contour using a grinder. Now all that remains is to sand and clean our workpiece, giving it the required shape.
You will need to drill several holes in the tail of the cleaver. This is where the handle will be attached. Each should be carefully processed with a round file. When everything is ready, you can move on to creating the blade and cutting edge. We harden steel in the most accessible way - heat it and then dip it in oil. After this, we grind with sandpaper and polish the product.
The final stage of work
There is very little left. At the final stage of work, you should find a fairly hard type of wood and cut a handle for the cleaver from it. We cut, clean, polish and attach to the knife using rivets. Can be coated with mineral oil for better protection. If everything was done correctly, the end result will be a very neat and functional kitchen cleaver.
Need something else interesting? Then look at a simple and effective way to get rid of scratches under the car handles, which everyone is already tired of.
Did you like the article? Then support us, click
:
Source: novate.ru
Features and Benefits of Kitchen Ax for Chopping Meat
A kitchen chopping ax is an indispensable device not only for professionals, it is also great for everyday use.
The tool allows you to cut tendons and bones of any size in one precise movement. A high-quality ax for chopping meat will be useful both in agriculture for cutting up cattle carcasses and in any kitchen.
The advantages of the product will be noticeable only if you choose the right tool.
Features and purpose
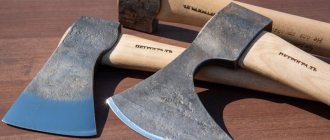
A classic ax for chopping meat consists of an extended blade and a medium-length handle. It is sharpened to quickly and accurately cut meat and chop bones. The weight of such a device is approximately 3 kilograms. The tool differs from the usual household ax in its shape and material of manufacture.
It is not so massive, making the product easier to work with. Due to the special configuration, the tool does not slip during operation; the center of gravity is located just between the butt and the tip, which allows for more accurate blows. This cleaver is used for chopping any type of meat, including frozen meat.
The tool easily copes with cartilage and bones, and is also suitable for cutting fish.
Kitchen models have a one-piece design, while ordinary household tools consist of a handle and a blade.
Characteristics
The functions of a kitchen meat hatchet are inherent in the very name of the tool. The product does not cut, but rather chops without destroying the connective fibers of the fabric - this is facilitated by the width of the blade and increased weight.
The balanced shape and minimal thickness of the metal prevent bones from crumbling and cracks from forming. In operation, such axes are much more ergonomic than knives, which can also be used to chop meat, with some effort.
The efficiency of the product is high, and the user’s hand does not get tired.
Material
To create a butcher's hatchet, metal is used that is resistant to corrosion and scratches.
Companies often produce tools from alloy steel grades X12MF, AUS-8, VG-10, which are best suited for this purpose. The advantage of this material is its long service life.
If nicks and scratches appear on the blade, it becomes more difficult to work with - in this case, immediate grinding and sharpening is required.
A meat cleaver can have different shapes, so the choice of the right type will depend on the purpose of use. To work without extra effort, you should give preference to a product with a very wide blade and a slightly convex shape of the cutting side.
This will make the process of splitting bones much easier. The described shape allows the ax to penetrate the meat at an acute angle. The blade is usually made elongated so that a larger area of the carcass is captured.
The optimal blade size in a kitchen hatchet for chopping meat is considered to be 135-180 mm.
Sharpening
The sharpening angle of the tool is of great importance. It is desirable that it be within 25-30 degrees. The sharpening should not be an even cone, but rather have a slightly rounded shape, with a slight acute angle. This will make it easier for the metal to penetrate the product - even with a slightly dull blade, the bones will break without problems and the meat will be cut quickly.
It is important that sharpening is carried out according to all the rules, then the cutting process will be easy and safe. In specialized workshops, all manipulations take no more than half an hour.
You can make the blade sharp yourself. One of the important aspects of such work is a correctly formed chamfer. The process is carried out in several stages.
The best material for this purpose is a ceramic musat (has some similarities with a file), which is a rod with a handle with an oval or round cross-section.
For sharpening, you can use a diamond stone or a sharpening wheel.
Handle
The length of the handle usually does not exceed 30 centimeters. The ax handle has a slightly curved shape, and the thickening at the tip prevents slipping during use. The product is durable and comfortable.
Regarding manufacturing materials: it is recommended to choose handles made of hard wood, it can be birch, beech, oak or ash. Such a handle will be durable and resistant to aggressive environmental factors.
The wooden handle can be modified independently if you have the tools and special skills.
Pay attention to the processing of the handle. It is often coated with a layer of varnish to prevent damage to the wood. In this case, you can purchase additional protection in the form of a spray.
Professional cleavers
The average blade width of a professional hatchet for chopping meat and bones is 23-25 cm. It is made by forging from an all-metal template, which eliminates mechanical damage of any kind.
Due to the strength and hardness of spring steel, such axes can withstand heavy loads and have a long service life. The holder is made mainly of wood.
Professional axes are designed mainly for chopping meat products of different densities, while maintaining the integrity of the processed raw materials.
With medium blade width
This model is close to a professional cleaver. The width of the blade here is smaller, approximately 17-20 cm. The ax does an excellent job of cutting up carcasses and can be used to separate bones from meat. Some housewives use it instead of a meat grinder. The 20 cm ax is especially convenient for use on a small farm.
With small cutting element
Recommended for simple cutting of carcasses. It's more like a kitchen meat hatchet that won't cope with the task of chopping. Can be useful in everyday life, does not require special skills in this area. The blade width here is small, approximately 15 millimeters.
Tips for use and care
In order for a tool to serve for many years, it needs to be properly cared for and stored properly. Recommendations to follow:
- It is better to store axes for chopping meat in a separate box, away from all other tools. If it is convenient for the housewife to keep the product at hand, on an open kitchen surface, ideally she will need a special stand for this. You can store the ax in a case made of thick leather, or in a suspended state if there is a recess or hook on the handle - this will save space in the kitchen and extend the life of the product.
- It is important to remember that the worst enemy of metal and wood is a damp environment. A prerequisite for storing the instrument is a dry and warm room.
- The hatchet will serve for a long time if you use it exclusively for its intended purpose, and immediately after use, rinse it well with a special product and wipe it dry with a towel. For cleaning, it is permissible to use a dishwasher.
- Work should be carried out on a cutting board. You can use a wooden or plastic variation; glass models quickly dull the hatchet.
- The blade of a meat cleaver stays sharp for a long time, but sooner or later it will still need to be sharpened. For this purpose, it is better to contact professionals who specialize in servicing such products.
- Be sure to periodically wipe the metal parts of the product with kerosene, and lubricate the blade itself with vegetable oil to protect the material from premature destruction.
- When using an ax, you must ensure that the blow is completed in one approach, otherwise there is a risk of crushing the bones into small pieces. This will negatively affect the quality of the cut meat and its subsequent preparation.
- If the handle is made of wood, you can purchase special protection for it in the form of a spray. Treatment is required if the product is to be stored for long-term storage.
The most important thing is not to forget about safety precautions when working with a tool; you should not use an ax whose structural integrity is in doubt.
You need to chop with an ax on a cutting board. Be sure to sharpen it in time. If the handle is made of wood, it must be treated with a special spray.