Flaws
Despite all the strengths of pen nozzles for woodworking, they have one single drawback. It lies in the fact that this tool has a limited cutting diameter, which does not exceed 6 cm. As a result, only pointed end cutters take part in the drilling process. In this case, the rounded sides of the drill come into contact with the edges of the groove, on which wood fibers are formed. As a result, the surfaces of the holes are rough and not neat enough. Judging by the few reviews, these wood cutting bits become dull very quickly and require frequent re-sharpening.
Drill accessories
There are several accessories for drills that can make the process easier and make a large hole smooth:
- Drilling jig. This device is a housing in which there are several guide bushings for drills of different diameters. The material used to create the bushings is harder than drill bits, so you don't have to worry about the tool moving to the side while drilling and widening the hole.
- Drill guide. This product allows you to fix the tool in such a way that it does not deviate to the side during drilling. If such a product is not available, the tool may move to the side, resulting in an uneven edge. It can also be mounted at an angle. But when drilling metal products, this is usually not required.
- Drill stand. A DIY product like this can be an inexpensive replacement for a drilling machine, as it allows you to carry out work more comfortably. When using a stand, a fixed tool moves along the bar using a lever. In this case, displacement is completely eliminated, since the workpiece being drilled is securely held due to the presence of a clamp.
Using these products, you can greatly facilitate the process of drilling metal products.
Making a homemade drill
If necessary, a drill can be made from hardened steel. Among the main recommendations for carrying out such work, we note:
- Rods are selected that are made from tungsten and cobalt alloys. People call this metal victorious. Compared to a conventional drill, this version is characterized by increased wear resistance.
- To process the workpiece, you need to secure it in a small vice. Otherwise, the work will be quite difficult.
- To sharpen such a surface, a diamond stone is required. The usual one will not withstand long-term work.
- The end surface is sharpened to create a surface that resembles a flat-head screwdriver. The cutting edges are then sharpened to produce a sharp tip.
In order to reduce the degree of surface machinability, oil is added. This ensures long-term processing due to reduced friction and lower temperature.
Homemade drill bits
In conclusion, we note that processing of hardened steel should be carried out exclusively with the use of special tools. The work requires a drilling machine, since a manual one will not allow you to get the required hole.
If you find an error, please select a piece of text and press Ctrl+Enter.
Easily! Any Victory drill will take such steel. You can also use diamond if you don’t have pobedite on hand.
If, according to operating conditions, it is acceptable that the area where a hole is needed may not be hardened, then you can locally heat this place to temper it and then drill a hole in this place with an ordinary drill.
Drilling a hole in hardened steel
The widespread question of how to drill through hardened steel can be associated with the fact that when using conventional technology, the tool quickly becomes dull and becomes unusable. That is why you need to pay attention to the features of drilling hardened alloy. Among the features of the technology, we note the following points:
- It is necessary to properly prepare the hardened workpiece.
- In some cases, a special tool is required.
- Coolant is being used.
If necessary, you can make a drill for hardened steel with your own hands, which requires certain equipment and skills. However, in most cases, a purchased version is used, since it will cope better with the task when cutting hardened steel.
Hardened steel drilling process
Keep the drill straight!
Large diameter holes
should be performed at low rotation speeds and with little pressure on the tool; to cool the drill, it is recommended to drill in several stages
For concealed fastening with screws
First, holes of a larger diameter are drilled, and then there is a hole in it for the screw itself.
Drilling at the edge of the workpiece is performed using guide attachments for the drill and the substrate.
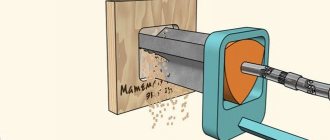
Enlarging the hole is quite easy
. First, using a Forstner drill, drill a hole of the required diameter in a piece of thick plywood or a piece of wood, place this template on the workpiece with the hole that needs to be embroidered, and drill. The template will guide the drill in the correct direction.
Drilling at an angle is performed as follows; a hole is drilled in the workpiece to a depth of several millimeters at a right angle, then, without turning off the drill, point the drill into the workpiece at the required angle and drill to the full depth.
Large-diameter holes must always be made only on stationary machines or with hand tools with guide attachments, otherwise if the machine is skewed, drilling may go in the wrong direction, which will entail significant and difficult to repair damage to the surface being processed.
Forstner drill
This type of wood drill is a combination of a drill bit and a shank.
They can drill large diameters (usually from 12 mm to 100 mm).
On smaller drill bits, two or four main cutting edges are located around the centering tip, the semi-circular outer cutting edges ensure a clean cut of wood fibers from the edge of the hole.
Forstner drills can only be used on stationary drilling machines or hand drills with guide attachments. The centering tip sets the correct direction for the large-format drill.
Restoration of holes by surfacing
When restorative boring of cylindrical surfaces, their diameter increases significantly, sometimes by several millimeters. And if when repairing internal combustion engines this problem is solved by using larger repair pistons and liners, then for other types of equipment the rough size of the hole is restored by applying a layer of metal to its surface. For these purposes, various types of welding are used, as well as spraying and tinning. After restoring the size of the hole by surfacing, it is bored to the required dimensions. This technology is one of the most widespread, so manufacturers of repair equipment, in addition to boring and welding installations, offer consumers comprehensive solutions: boring and surfacing kits of various sizes and power.
Has anyone had to actually participate in boring holes on mobile boring machines? If yes, please tell us in the comments how such devices are mounted and positioned, as well as how their accuracy and alignment are adjusted.
Hole without chips: recommendations
To avoid chips that spoil the appearance of the tiles, you must adhere to the following rules:
- Careful selection of the tool, namely its cutting part. It is necessary that the glazed layer gradually deteriorates, and only then the ceramics.
- Failure to comply with work standards. The tiles are placed on a hard surface, horizontal or vertical.
- Excessive pressure on the tool. The selected drilling option should be focused on cutting the ceramic sheet without additional pressure.
Depending on the purpose of the hole and the available tools at hand, the drilling method is selected. However, when performing work, it is necessary to observe safety precautions and adhere to recommendations to reduce the risk of chipping.
How to drill a perpendicular and vertical hole
Although it is sometimes necessary to drill at an angle, it is most common to make vertical holes (that is, perpendicular to the surface). In order for drilling to take place strictly at an angle of 90 degrees, it is necessary to use special guides. They will allow you to drill perpendicularly without deviating in any direction.
The simplest guides allow you to make only vertical holes, but there are also more complex designs that allow drilling at certain angles.
4.b.
However, not all people use a screwdriver that has power adjustment; why buy an extra power tool when you have a drill and a screwdriver attachment for self-tapping screws. A drill, unlike screwdrivers, does not have power adjustment, and therefore when tightening self-tapping screws or screws of large diameter or to great depth, 4 scenarios are possible:
- You will break the slots on the head of a self-tapping screw or screw - a very high probability, especially when tightening at high speeds.
- You will very quickly ruin the screwdriver attachment. However, if the nozzle for self-tapping screws is Chinese, this can also happen with relatively small loads on the nozzle.
- You will break a self-tapping screw that cannot withstand the torque - not often, but it happens. The fact is that self-tapping screws, unlike screws, are pre-hardened and therefore more fragile than screws.
- You will burn the drill when tightening a large number of screws at low speeds.
I don’t think you will like at least one of these options, so it’s better to spend extra time drilling holes than to spend this time repairing the drill, buying new attachments, or unscrewing a broken screw.
4.g.
There is another method that is now little used - do not tighten screws or self-tapping screws, but hammer them in. However, this method is more suitable for screws; self-tapping screws, due to their increased fragility, more often break than bend, and only if the self-tapping screw sticks out 0.3-0.5 cm above the surface of the wood, then you can try to finish it off. We are not talking about special screws driven into dowels here.
In Soviet times, there were other recommendations for tightening screws (there was a lot of cheap electricity back then, but for some reason there were few available power tools), for example, it was proposed to first tighten the first screw until the slots were licked, then unscrew and throw away the first screw and screw the second one in its place , and if the slots on the second one stick together, then unscrew the second screw and screw the third one in its place. Another option was more gentle; it was proposed to lubricate the screw with soap before tightening it to reduce the friction force of the screw shaft on the wood. Nowadays, such methods of screwing in a screw seem exotic, however, the choice of method is yours.
Sometimes it is also necessary to drill holes for metal screws if the screws are blunt. This is especially often done when assembling a metal frame for plasterboard, plastic panels or MDF panels. The fact is that blunt screws do not cut through the tin of the frame, but push through and, accordingly, the contact area of the screw increases even more and you need to press very hard on such a screw. In this case, drilling holes will not only facilitate and speed up the assembly of the frame, but will also help to avoid unnecessary injuries, because it is very easy to damage your hand if a nozzle comes off a screw.
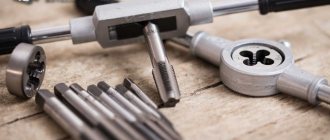
Classification of drills for square openings
The name "square drill" comes from the shape of the hole the bit is capable of drilling. Externally, such drills have the shape of a triangle (tip), but with their help it is possible to obtain square-shaped openings. The nozzles in question are classified according to a number of the following characteristics:
- Type of working material - it can be wood, metal or plastic
- The material from which the nozzle is made. Depending on the material in which it is necessary to obtain a square opening, the nozzles are made of alloy, carbon or high-speed steel
- Type of production of nozzles - they come in two types: solid and composite type. Composite attachments have a hinged (cardan) shank, through which the load on the tool chuck is reduced. Today, cardan attachments are extremely rare
- Shape of the shank - depending on this parameter, you can use attachments on drills, drilling machines and other types of equipment. Watts drills are available with cylindrical, conical and hex shanks. Mills with tapered shanks are installed directly into the drill chuck, while cylindrical and hexagonal bits require the use of a special chuck for fastening
- Drill length - they come in long, medium and short
- Accuracy class - normal and increased
- Diameter - depends on what size square you need to get in the end
- The length of the working part is another important parameter, which is responsible for the ability to drill corresponding holes with different degrees of depth
- Design - cutters for square holes come with an overlay frame, as well as an adapter or without it
Domestic-made square drills are produced in compliance with the standards GOST 886-77, GOST 4010-77 and GOST 10902-77. However, foreign-made drills, which are manufactured in compliance with relevant standards, are very popular. The marking is indicated on the tail of the cutter, where information such as diameter, material of manufacture and company name is presented.
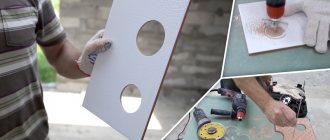
Expanding the hole with a feather drill
Please note that the example is shown on wood. In fact, widening a hole using feather drills is a completely ignoble task, and only for the reason that the feather drill will have nothing to grab onto
But there is a very simple way to carefully enlarge the hole. It also happens that a hole was made, for example, with a No. 20 pen, but then something was changed in the project, and the hole should be made larger, up to 2.5 cm in diameter, and in such a way that the center is not displaced. The whole problem is that a drill of a similar diameter cannot be inserted into a drill, and to expand with a feather drill, it must be rested against something so that the center is not displaced.
See what it will look like. As you can see, the larger diameter feather bit will then hold the sides of the wide hole and the feather can be drilled through the center of the smaller diameter hole. Next, drill, while holding both boards together (or better yet, secure all the boards with clamps, and then the drilling will be much more accurate). The feather will begin to rest against the sides of the wide hole, and it will not move to the sides. In fact, there is nothing difficult, but sometimes this method helps a lot. In order to fully understand the process, we suggest you watch the video.
Source
How and with what to drill deep holes
Drilling deep holes in metal is very difficult. As working equipment, experts recommend using machines in which the drill is a stationary element and the workpiece is rotated. During the work process, it is necessary to use coolant. Drilling lubricant will dissipate heat and allow for greater productivity.
It is necessary to ensure timely removal of drilling by-products. They can clog the channels and lead to drill breakage. A small workpiece can simply be turned over - the chips will fall out of the hole under the influence of gravity. For massive parts there are special devices with magnetic tips.
For home work, it is better to purchase drill guides. This is a convenient support mechanism that holds the tool in place, allowing you to drill holes with high precision.
If there is no guide, you must carefully monitor the perpendicularity of the drill location. The slightest deviation can break the tool or damage the workpiece.
How to drill with a screwdriver?
You can drill metal workpieces not only using industrial equipment or an electric drill, but also using a cordless screwdriver. This power tool is low power. Because of this, it is suitable for drilling holes of small diameter and depth.
Drilling is performed using industrial equipment and power tools
It is important to choose the right equipment and take into account the depth and diameter of the hole. To ensure the equipment lasts longer, use coolant
You need to drill perpendicularly to avoid damage to the workpiece or tool.
Boring hole restoration technology
Using boring, cylindrical surfaces that have been worn out during intensive use are restored. Such repairs can be performed both in stationary conditions on lathes and boring machines (vertical and horizontal), and using mobile units in the field. Lathes are indispensable in cases where it is necessary to restore the accuracy and alignment of several mounting holes. And boring machines are usually used in cases where increased accuracy is required or the part has large dimensions. A clear example of the massive use of vertical boring machines in equipment repair is the restoration of cylinder surfaces of internal combustion engine blocks.
Mobile units are used for boring cylindrical surfaces directly at the site of equipment operation. This method is used to bore holes in the eyes of mining equipment buckets, rotation surfaces of mining machines, flanges and shut-off valves of existing pipelines, seats for power equipment, and much more.
A typical mobile installation consists of an electric drive with a spindle and chuck, a boring bar with a cutting tool, rear and intermediate supports. All its components are attached directly to the workpiece, and rigidity, accuracy and alignment are ensured by the boring bar.
Advantages of cone drills
Stepped products have the following positive properties:
- allow you to make a hole with smoother edges compared to spiral and feather counterparts;
- For holes of different diameters, one step drill is used;
- perfectly centers the hole;
- used for processing very thin sheet metal;
- ideal for processing non-ferrous metals;
- for large volumes of work, it saves time due to the absence of the need to frequently replace drills of different diameters.
A step drill allows you not only to perform high-quality drilling of metals, but also to correct hole defects that were made with other types of products. For example, if the center of the hole is displaced when using spiral analogues, a conical one can completely correct the defect.
It is also possible to expand the holes if necessary to a fixed diameter. Despite the higher cost of cone drills, significant savings can be achieved with frequent use. Due to the absence of the need to purchase a large number of tools of different diameters.
Nuances when drilling
The technology in question has a fairly large number of features that need to be taken into account. Drilling of hardened metal is carried out taking into account the following points:
- Before carrying out work, pay attention to the hardness of the surface. This parameter is used to select the most suitable drill. Hardness can be determined using a variety of technologies.
- During drilling, a large amount of heat is generated. This is why rapid wear of the cutting edge occurs. In this regard, in many cases, cooling liquid is supplied to the cutting zone.
- When cutting difficult-to-cut material, it is necessary to sharpen the cutting edge from time to time. For this, a conventional sharpening machine or a special tool is used. Only diamond-coated wheels are suitable as an abrasive.
Subtleties of drilling for various materials
The technique of drilling any material has its own subtleties that the repairman must take into account.
Each material has its own drilling technique
Vertical or horizontal hole
When starting to make a hole, it is necessary to firmly secure the canvas. This can be done using a workbench or a vice. You can also use a dowel.
The drilling process is as follows:
- The drill is switched to drilling mode.
- Set the speed. In this case, it is worth remembering the main rule: the smaller the diameter of the nozzle, the higher the speed should be.
- If a through hole is needed, then a wooden block is placed under the material.
- If it is necessary to make a blind hole, then the parameters of its depth and diameter must correspond to the screw for screwing in.
- The tool must only be used at right angles. After the end is fixed in the block, the drill must be switched to maximum power.
To make a horizontal hole, you only need to move the workpiece.
Hole perpendicular to surface or at an angle
To make a perpendicular hole, you will need a protractor or square. If the work is done at home, it is recommended to place a regular CD disc under the product, so that the reflection of the disc equipment coincides with the piece that is visible. In this case, the perpendicularity of the hole will be maintained.
Those who are interested in how to drill a hole at 90 degrees with a drill should choose a vice as a means of fixation. The part is pressed tightly so that the drill can be screwed in perpendicularly.
How to drill metal
In this case, it is important to choose the right drill bits. Conventional ones can be used for metals that are not too hard, such as copper, but for stainless steel you should choose products made from titanium carbide
There are also a few other key points to consider:
- before drilling a thin iron plate, it is fixed between two pieces of wood;
- to facilitate the drilling process and cool the drills, it is recommended to use lubricating oil;
- if it is necessary to make a hole in a metal pipe, it must be firmly secured and a wooden beam placed inside so that the pipe does not flatten during operation.
For drilling metal, it is best to choose a diamond drill bit.
How to drill concrete
In everyday life, every man encounters concrete drilling when it is necessary to hang a picture or hanging shelves on the walls to decorate the house. Of course, it is best to choose a hammer drill or impact drill in this case, however, if the wall thickness is no more than 12 cm, then you can use a regular drill.
For the job to be successful, you should consider these tips:
- before starting work, you need to make sure that there are no communication systems at the drilling site;
- you should choose parts made of hard metals or alloys.
- If during drilling you encounter dense areas of concrete, it is best to break them with a punch.
How to drill wood
Wood is the most pliable material that is easy to sand and lends itself well to drilling. To work with a drill, you will need special attachments.
Many repairmen are interested in the question of how to drill a perpendicular hole in wood with a drill. It should be noted that the process is not complicated. Initially, you need to make markings with a pencil to determine the points for drilling. Then, turn the drill on at full power and drill a hole.
Wood is the easiest material to drill
How to make a groove in a wooden board
To make a groove in wood, you can choose a simple scheme:
- around the wood drill, mark the holes so that their middle is at a distance of approximately ½ of the diameter of the drill;
- then drill the marked holes with a depth of no more than 3 mm;
- all holes are deepened;
- use a file to remove all irregularities.
How to drill a brick
To drill into a brick wall, proceed as follows:
- perform marking;
- Place an old drill or core on the marked points, hit it with a hammer several times to form a depression;
- place a drill in the drill and turn it on impact mode;
- Drill holes using smooth movements.
Drilling tiles
When working with tiles, the impact mode of the drill should be used with caution. It is best to turn it off before work, otherwise chips will form on the tiles
If you need to make a small hole, then you should choose a special drill for working with tiles and glass. They drill the hole until it stops. Next, change the equipment to a concrete drill and continue working.
It is impossible to drill tiles using the impact mode of the drill.
How to drill a hole at a right angle - as-interior.ru
Do you have such a problem that you drill something, but the hole turns out completely different from what was intended? Let's see if this device can solve it. The idea is simple: we aim at the drilling site from a certain height, so this jig sets the perpendicularity of the drill axis to the surface that is being drilled. This is what they sent us:
Opening:
The set contains a jig, five bushings, two fixing screws and a key for them.
Bushings with a diameter of 6,7,8,9 and 10 mm. I would replace the seven with a five, but there are already some.
The device turned out to be larger than you might think when looking at the photos in the store.
Hole for installing a sleeve with a diameter of 13.3 mm.
Drill bushings are installed with a gap of less than one tenth of a mm.
Approximately the same gap is obtained between the drill and the sleeve.
Install the bushing. She is not exactly the same as in the photo in the store. A little shorter and without a hole for a fixing screw. The steel of the bushing is clearly hardened; the bushings are heavy, when you tap one against the other, a characteristic clanking sound of high-hardness metal appears. I install:
This is what it looks like assembled:
As you can see, perfect perpendicularity.
There is no play between the bushing and the device when drilling. But there is a gap between the drill and the sleeve. But it cannot be absent - the drill must rotate freely. As a result, the tip of the drill can move along the surface within a radius of a couple of millimeters from the drilling point. So it’s better to punch the beginning of the hole, of course.
One more point: the drill must be completely straight and the chuck must not have any runout. Otherwise, the entire device begins to crawl on the surface and drilling becomes difficult.
Well, of course, the length of the drill should be enough for drilling, taking into account the height of this jig.
Considering these circumstances, the device is quite functional.
The product was provided for writing a review by the store. The review was published in accordance with clause 18 of the Site Rules.
- 23 August 2022, 07:14
- author: tykhon
- views: 9354
- PavelK
- 23 August 2022, 07:22
- silent-service
- 23 August 2022, 08:06
- Ulises
- 23 August 2022, 09:39
and somehow not very good at all. Moreover, the price tag on it... All this is very beautiful, cool in appearance and very status-worthy. Well, how about it? A solid conductor, not bullshit.
What do we actually have? A guide sleeve made of hard (hardened) metal is not the best thing that can be placed in contact with the drill strips. In addition, in carpentry they use “wood drills”, in Russian this means “from a nail”, and with frequent use in a jig they will wear out.
It’s not even a P6M5 (HSS in their name). The second point is the frequency of use of such a conductor. It is absolutely clear to me that a manufacturing carpenter has a drilling machine and the issue of perpendicularity of holes is no longer relevant. This means that this device is needed for one-time work at the amateur level.
And, as a rule, for certain operations - 99% of this is drilling for gypsum joints. Two types of tongues are used - usually 8mm and less often 6mm. Therefore, you need to purchase (select during analysis) a pair of bearings with the required internal diameters.
And then a simple jig is made for the required work - with stops for installation on the part and drilling without marking. The guide in the jig is a block with drilled holes for installing bearings on both sides.
Safe drilling of walls with your own hands
Drilling into a brick wall is much easier than drilling into a concrete one.
You can make a hole in the wall yourself. It is important to do the work safely, but at the same time efficiently and quickly. Different wall materials have their own instructions for performing work - these rules must be followed.
Before starting drilling, the technician must carefully inspect the surface of the wall. There should be no cables - electrical or any other - in the area of the future recess. If you rush at this stage, you can seriously damage the wiring. Moreover, even the master’s own health may suffer due to such carelessness. Fortunately, it is possible to bypass the cables while drilling.
How to avoid getting caught in wires when drilling walls
When drilling, it is important not to get into wiring or fittings
Sockets and switches are usually located on the walls. They need to be examined carefully. It is from such nodes that network wires diverge vertically. They go to the junction box.
If this is the case, then this is an ideal situation, which rarely happens. As a rule, electricians do not adhere to the recommendations in all cases and go straight ahead to save cables. That is, diagonally wires are located everywhere in houses and apartments.
- Usually, instruments are used to check whether there is a cable on a section of the wall or not. They are not expensive and determine the location of the wiring accurately;
- If you don’t have such a device at hand, you should understand that the wire is usually located at a depth of up to 1 cm in the wall surface. To find out whether it is there or not, you can carefully make a small hole using a blunt instrument. If there is no cable, you can safely drill. Experts say that a recess can be made up to 2 cm - to make sure there is no cable;
- There is no need to press the drill too hard against the wall. Every few millimeters the technician should inspect the hole to see if there is wiring there. The electrical network wire can be found with a special device - it is presented in almost all specialized stores. When purchasing such a product, it is worth checking whether it is of high quality. It is worth choosing the best - after all, the health of the master depends on his testimony. Such a device will show the places where reinforcement lies in concrete surfaces - this is also important when drilling;
- Copper electrical wires are found faster - if they are located no further than 1 cm in the wall. And the search for aluminum wiring can only be done with a device with a metal detector function. During the search process, you need to constantly look at the indicator - it is made in the form of an LED light bulb. However, it also emits a signal, so you need to keep an eye on it - the “assistant” will definitely inform you if it detects something;
- If the metal detector mode is turned on and something is found, the diode will start to glow, the master will hear a continuous sound. Any modern device also has a sensitivity regulator. The finder is powered by the standard Krona.
Any builder who installs tension and suspended structures on a ceiling surface cannot do without such a unit. Systems on the ceiling are most often fastened with self-tapping screws - this is where all the electrical cables run. In a word, you can’t do without insurance - you need to use the device.
Drilling holes on brick or reinforced concrete surfaces
To obtain a recess in the wall you have to make several holes
Use of lubricants
When drilling through hardened steel, serious friction occurs. That is why it is recommended to purchase and use various lubricants. Among the features of this processing method, we note the following points:
- First, the drilling area is processed. A small amount of lubricant is applied to the surface where the hole will be located.
- Oil is added to the cutting edge. To process hardened steel, a small amount of the substance is required, but it must be added from time to time, since it scatters when the tool rotates.
- During work, it is recommended to take breaks to cool the cutting surface and the surface being processed.
Lubricating steel with special oil
This is because oil can reduce the temperature of the cutting edge.
How to make a hole in a tree?
In addition, a hole in wood can be drilled with a drill, a milling cutter, and even an ordinary nail, and a very small hole can be drilled with a sewing needle, if its broken eye is used as the cutting edge. When drilling wood, you need to take into account the characteristics of this material.
Interesting materials:
What does the word contemplate mean? What does the word specific mean? What does the word trainee mean? What does the word steppe mean? What does the word dumb mean? What does the word tiramisu mean? What does the word stick around mean? What does the word comrade mean? What does the word tract mean? What does the word transcription mean in Russian?
How to drill with a feather drill
stephen jones (steve p2008), flickr.com CC BY
In construction and finishing works, drilling holes does not play a dominant, but quite noticeable role. And only at first glance it seems that drilling is simple - press the drill button and that’s it. Each material requires the selection of a suitable drill, the required speed and pressure on the drill, a method for cooling the drill and removing chips - all this is felt literally intuitively with experience. And our advice will help beginners.
First, let's determine whether the existing drill can handle the holes you want to drill. The determining parameter in this case is the power of the drill. An ordinary household drill with a power of 500-600 W can handle holes up to 10 mm in steel and up to 25 mm in wood. An impact drill of the same power can drill a hole up to 13 mm in concrete or brick. If your work requires more, then you need to choose a more powerful drill.
The choice of tool and drilling modes greatly depends on the material to be drilled and the diameter of the hole.
How to drill wood, plywood, fiberboard correctly?
Drilling small holes in soft materials does not pose any particular problems even for beginners. There is no need to press hard on the drill; the speed should be slightly higher than average - this will result in a cleaner hole. Too high speeds can cause the drill to become hot due to friction, and the wood will begin to burn. This is a good way to make fire, but the part will be ruined.
For holes up to 10mm in diameter, you can use regular metal twist drills. When drilling deep holes in wood, especially in resinous rocks, the drill must be removed more often (every 10-15 mm drilled) and the spiral grooves must be cleared of chips
This must be done carefully so as not to get burned on the hot end of the drill.
When drilling very small holes (up to 1.5-2 mm), any careless movement of the drill, the slightest misalignment will lead to breakage of the drill. Drills less than 1 mm can generally be broken by the weight of the drill by placing the drill at the drilling point
In order not to use such drills in batches, keep in mind that wood, fiberboard, and simple plywood can be drilled with a piece of paper clip or a nail. The end of the “tool” is bitten off with side cutters at an angle - and a passable drill is obtained. The drilling point needs to be pricked with an awl.
Special twist drills for wood at first glance resemble drills for metal, but their cutting part is sharpened differently (with a point in the center and edges), and the grooves are wider. This allows for cleaner holes and improves chip evacuation. The diameter of such drills is from 3 to 50 mm.
Large diameter drill bits often have a hex shank, which prevents the drill bit from twisting in the chuck. There are also extensions for the hex shank for drilling deep holes with regular short drills.
The rotation speed when drilling is selected based on the diameter of the drill and the hardness of the wood. Holes up to 15 mm can be drilled at 1400-1600 rpm, 15-25 mm - at 1000-1200 rpm, 25-50 mm - 500-600 rpm. For hard wood, the speed should be reduced by 1.5-2 times.
To drill holes from 10 to 60 mm in wood, feather drills are produced. Outwardly, they resemble a spatula with a point in the center.
Such pen drills of large diameters are much cheaper than twist drills, this is their main advantage. Drilling deep holes with feather drills is not very convenient. The drill does not throw out chips; it has to be removed and the hole cleaned manually. The rotation speed when drilling can be kept higher. For holes up to 25 mm - up to 2000 rpm, over 25 mm - 1500 rpm. For hard wood, the speed should be reduced by 1.5 times.
see also
Comments 78
In short, I had to do an experiment against my will. The main circulation system jammed in traffic jams. It has a plastic piston. In short, I warm it up with a hairdryer and warm it up (outside). And the piston jams. Those. the hole decreases in diameter! As the GCS cools, the piston is released!
The hole will widen. Excess metal will go into the deformation of the washer “belly”.
The hole expands if the entire material is heated
Have you tried heating a part measuring 50 mm on one side to 300 degrees so that the other was cold)))))
What you are doing is called a “press fit.” With such a fit, the expansion of the shaft diameter is not taken into account; the diameter of the pulley hole is calculated: how much smaller it should be than the shaft diameter in order to create the necessary tension. Not a single technologist will give you the right advice because some data is missing, such as: pulley material (steel, cast iron, aluminum, etc.), the area of the contact surfaces, and most importantly, the force transmitted by this press connection. Type “press landings” into a search engine and try to figure out for yourself what you need.
I'm not up to anything at all. I just asked what I asked: what will happen to the hole when heated.
Well, from the answers above, you probably already understood that the hole will expand, and what I wrote is the answer to the question Fndrei-w116, he is the one who is planning to put a pulley on the shaft and asking questions.
What you are doing is called a “press fit.” With such a fit, the expansion of the shaft diameter is not taken into account; the diameter of the pulley hole is calculated: how much smaller it should be than the shaft diameter in order to create the necessary tension. Not a single technologist will give you the right advice because some data is missing, such as: pulley material (steel, cast iron, aluminum, etc.), the area of the contact surfaces, and most importantly, the force transmitted by this press connection. Type “press landings” into a search engine and try to figure out for yourself what you need.
It’s more like a hot landing))) the press goes without heating. There is also a hot-pressed fit)) the fit is selected not so much by the material as by the diameter and operating requirements of the given unit. If you google it, there are two landing systems, a shaft system and a hole system)
Construction hair dryer 300 degrees somewhere. Well, let’s assume that the exterior of 50 mm expands by 4-7 acres, the hole is 1-2 acres maximum. Technologists, correct me if anything. Like so. Damn, one of these days I will need this myself. A 25 mm shaft needs to be fitted with a 300 mm pulley. How much tension should I apply? I will heat it at 350-400 degrees.
Perelman's entertaining physics will help you! itexts.net/avtor-yakov-is…erelman/read/page-12.html Answer to problem 125
Where have you seen metal that has such a clear boundary between hot and cold? One of the characteristic properties of any metal is thermal conductivity.
Well, I'm sorry that I didn't draw a full palette of colors with halftones. Well, it’s a no brainer that the drawing is schematic and not 1:1 reliable on a temperature scale.
It's a no brainer. It’s not him who has any misunderstandings)))
Types of holes in metal and how to make them
- Through.
- Deaf.
- Deep.
- Half (incomplete).
- For internal thread.
- With a large diameter.
Threaded holes require determination of diameters with tolerances, which are established in GOST 16093-2004.
End-to-end
Through-type holes begin to fully penetrate the workpiece and create a passage inside it. A special feature of the process will be to protect the surface of the tabletop or workbench from the drill going beyond the workpiece, and this can damage the drill itself and provide the workpiece with such “good” as a burr. To prevent this from happening, you will need to adhere to the following methods:
- Use a workbench with a hole in your work.
- Place a gasket made of wood or a special “sandwich” under the part, that is, wood-metal-wood.
- Place a metal block with a hole for free entry of the drill under the part.
- Reduce the feed speed at the last stage.
By the way, the last method is definitely needed if you are drilling holes “in place” so as not to damage parts or surfaces that are located closely. Holes in thin sheets of metal should be cut with spade bits because twist drills can damage the edges of the workpiece.
Deaf
Such holes will be made at a certain depth, and will not penetrate the workpiece through. The depth must be measured, and this can be done in one of two ways to choose from:
- Limit the length of the drill using a stop sleeve.
- Limit the length of the drill using a chuck that is equipped with an adjustable stop.
- Using a ruler that is attached to the wall.
- Combining several methods at once.
Not all, but some machines are equipped with an automatic feeding system to a certain depth, and after that the mechanism simply stops. When drilling, you may need to leave the work a couple of times to remove the chips.
Complex shapes
Making a hole in metal is not so difficult, but if we are talking about complex shapes, you will have to try. Those holes that are located on the edge of the workpiece (that is, half holes) can be made by connecting the edges and clamping both workpieces or the gasket and the workpiece with a vice, and then drilling a full hole. The spacer must be made of the same material as the workpiece being processed, because otherwise the drill will begin to move towards the minimum resistance. A through hole in a corner (that is, in a rolled metal profile) is made by fixing the workpiece in disks using a wooden lining.
It will be much more difficult to drill a cylindrical workpiece tangentially. Such a process will be divided into two main operations - preparing a perpendicular guide to the hole of the platform (countersinking or milling), and then directly drilling. Creating holes in surfaces that are placed at an angle also begins with preparing the site, and then inserting a wooden lining between the planes, creating a triangle and making a hole through the corner. Hollow parts should be drilled so that the cavity is filled with wood plug.
- Drilling - for this you need to drill a hole to the full depth using a small-diameter drill, and then drill to a given depth using drills with a diameter from smaller to larger. The advantage of this method is that the hole is perfectly centered.
- Reduce the diameter. To do this, you will need to drill a hole with a maximum diameter to a given depth, and then the drill must be changed with a consistent reduction in diameter and deepening of the holes. With this method it will be much easier to control the depth of all steps.
Let's consider another way.
Large diameter and annular drilling
This ring drilling method will be less energy-consuming, but it may be more expensive financially. In addition to drills, the power of an electric drill is very important, and it should also be able to work at low speeds. Moreover, the thicker the material being processed, the more you will want to make a hole on the machine, and if there are a large number of holes in a sheet with a thickness of more than 1.2 cm, you should immediately find such an opportunity. In a thin sheet workpiece, a large diameter hole is obtained using narrow-toothed crowns/cutters, which are mounted on an angle grinder, but in the latter case the edges leave much to be desired.
Increase the diameter of a hole in a thick iron at home
Hello, At home we have iron plates (which hang on a barbell), their hole diameter is 23 mm.
I need to increase the diameter by 3mm so that the plates will fit the new bar. Can this be done at home without a special tool? I tried it with a file - you can suffer until retirement. I have an Interskol 450W punch drill and an old Soviet drill, maybe I can try drilling it somehow?
PS. I've been to all sorts of garages nearby, and no one there can help.
WantToDrill wrote: Can this be done at home without a special tool?
No! You will also be your instrument
WantToDrill wrote: suffer until retirement.
It’s easier to reduce the diameter of the barbell to fit old plates. To the turner.
To increase the diameter of the hole, you can use a three-flute countersink (see GOST 12489-71) with a conical shank and a powerful drill with a Morse taper and low speed. If you increase the diameter of 23mm to 26mm (1.5mm per side), then you can carefully, slowly, get by with three countersinks, respectively, with diameters 24, 25 and 26mm.
The price of countersinks is comparable to the price of two pancakes.
Def461 wrote: The price of countersinks is comparable to the price of two pancakes.
Maybe so. But it depends! “KETTLER” pancakes, for example, stand like a cast-iron bridge, and only one pancake. And a countersink can be found at some flea market. In Volgograd, at Ptichka, a month ago I bought a 20mm countersink for 60 rubles. The seller didn't even know what kind of x it was. Nya, drill, he says such a stupid thing.
There are probably a lot of craftsmen in Tolyatti with a home router - they will bore holes for a small fee. Announce here: " >
Try to buy a grinding head, a thicker one is better, and grind it at high speeds. I’m not sure that it will work out quickly, but still, in my opinion, it’s the cheapest option, after a file, of course.
IMHO, high precision is not needed. Take a drill of a suitable diameter, drive a thick nail strictly in the center (to secure it in the drill chuck), wrap it with sandpaper or spread it with a *****-shaped mixture of sand, office glue and water. And little by little, at low speeds, you wear off the excess iron using the side surface with winding or lubrication. It will even take white cast iron, from which ordinary drills and cutters bounce off.
a metal cutter (for steel) and a drill, 1.5 mm on the side, I think you can handle it.
Drill size 26, sharpen the shank for the chuck. cut so that the cutting edge is 10 cm. Cut 1-2 cm to a diameter of 24, (it will be a centering guide). Sharpen the angle so that it does not bite too much.
15 minutes at the turner and a symbolic payment VS an unknown amount of time spent, money, effort, NERVES in the end Who will give preference to whom? I probably would have tried it under such conditions by wrapping some sandpaper around a thick drill bit to open the hole in the pancake at low speeds and turning it with an IMPACT drill so that there would be rotational-translational movements. The pleasure, of course, is dubious.
Vasily.N wrote: Drill size 26, sharpen the shank for the chuck.
How do you imagine turning the shank of this drill into a chuck at HOME? Nobody canceled centering.
And you finally want to use your finger. It’s not a problem to sharpen a drill, even in a school workshop (approach Trudovik) but tell me the diameter of the pancake? where to look for the machine, clamp it at least 300 mm. at the factory, and who and how will bring them back there.
Thanks everyone for the answers! Pancakes with a diameter from 110 to 250 mm. It seems like I found a person in the garage next door who can help (as I understand, he has some kind of machine), but it seems like he won’t be able to do big pancakes
Vasily.N wrote: where to look for the machine, clamp it at least 300 mm. at the factory, and who and how will bring them back there.
A long raincoat, a good belt on the waist, a rope in the hole of the pancake and between the legs
BV wrote: Long raincoat, a good belt on the waist, a rope in the pancake hole and between the legs
You still have communism at the factory. Metal detectors have been at the entrances for a long time, and the perimeter fence is guarded with IR rays.. Not those days..
Baho wrote: get by with three countersinks, respectively, with diameters of 24, 25 and 26 mm.
There are adjustable reamers with a ball. True, it will cost like 10 countersinks. Well, again, maybe you’ll get lucky in the market, at the hands of a forgetter...
DSP007 wrote: Take a drill of a suitable diameter, drive a thick nail strictly in the center (to secure it in the drill chuck)
No nail or drill needed. Fasten one end of the drine to a stool, rest the other on another stool. Rotate the pancake with your hands. Instead of sand, it is better to use coarse lapping paste. Work for 20 minutes for each pancake.
4eh wrote: you still have communism at the factory.
I remembered an old story about how an anvil weighing about 100 kilograms was taken out of the workshops of the Bauman Moscow Higher Technical School for a bet. Nesun was supported by the arms of two comrades. At the checkpoint they said that the person had become ill and was being taken to a doctor.
Safety precautions
In order to make holes in metal, you will need not only skills and tools, but also following safety rules:
- Check all fastenings before starting.
- When working with a drill or on a machine, clothing should not contain elements that could be affected by rotating parts.
- The drill must rotate when approaching metal, otherwise it will quickly become dull.
- You need to remove the drill without turning off the device, gradually reduce the speed.
- If the drill does not go deep into the metal, then its hardness is less than that of the workpiece.
- If a drill of small diameter is poorly secured in the chuck, then you should wrap brass wire around the shank to increase the diameter of the grip.
- If the surface of the material being processed is polished, then you need to put a felt washer on the drill - this will help prevent scratches.
As you can see, everything is very simple.
Methods for drilling hardened steel
Drilling hardened steel is characterized by high heating of the surface of the workpiece and tool, which leads to rapid wear of the latter. Therefore, during processing, they try to remove excess heat or make the area where the channel will be softer.
The first method, which allows you to make hot metal more pliable, is based on the use of acids. Suitable substances may include nitric, perchloric or sulfuric acid. These liquids are used pointwise, that is, they are used to treat specifically the place where there will be a hole in the future (the area is etched). To prevent the acid from leaving the working area from materials not exposed to acid (polymers, paints, paraffin), something like a side is organized around the future hole. The hole is filled with active liquid and left for a certain time. Next, drill with a regular drill.
Another method of weakening the hardness of hot metal in the channel receiving zone is based on heating this zone to high temperatures. A welding machine copes best with this. In this case, you need to choose the right arc strength so that the metal does not melt or deform. When the workpiece in the drilling area is hot, you can make a hole with a regular high-speed steel drill.
The easiest way, but not the cheapest, is to purchase a special drill designed for making holes in hardened metal. The cutting edges of such a tool are reinforced with pobedit tips or made of pobedit plates. In this case, it is also desirable to use additional cooling of the work area.
When working with acids, you need to be extremely careful and perform the operation in a well-ventilated area. This will help prevent burns or poisoning from harmful fumes.
Drills and accessories for Metaltool drilling machines
The Metaltool group of companies sells high-quality equipment and metal-cutting tools from the best domestic and world manufacturers, providing delivery throughout Russia and the CIS countries.
Own brand core drills are reliable and productive, they can be used with turning, milling and drilling equipment. Qualified consultants will help you select products and place an order, comment on the characteristics and advantages of the products offered. A long warranty will ensure that equipment and tools are replaced or repaired as quickly as possible, and regular promotions will be a pleasant bonus when purchasing.
Concrete cutting tool
The formation of holes in concrete structures is carried out using a specialized cutting tool:
- concrete drill;
- drill;
- crown
Drill
- cylindrical shank;
- working part with spiral grooves for chip removal;
- cutting part.
The specificity of the drill for concrete is the presence of carbide brazing. The strength properties of the latter allow it to withstand impact loads that destroy concrete.
The insert looks like a small rectangular plate placed across the cylindrical end of the tool.
The maximum diameter obtained with a Pobedit drill for concrete does not exceed 12 mm. Minimum – 4 mm. Drilling depth limited to 30
Borax (species)
The drill is equipped with a two- or four-sided cutting plate. The maximum diameter of the hole formed by the drill reaches 40 mm. Depth – up to 800
Types of concrete drills:
- pass-through – drilling holes of various diameters;
- flat – used to form a shallow hole;
- spiral - for deep passages;
- screw, – deep drilling, the presence of spiral grooves for removing sludge;
- breaking – used for operations with dimensional products.
A subtype of drill is a crown for concrete.
What and how to drill deep and large holes in metal parts
Drilling large holes is not a problem if you choose the right tool. For example, such work may be necessary to secure a channel or metal corner. The easiest way is to use an electric drill, but getting a hole with a diameter of, for example, 15 mm requires a lot of effort. To drill a large diameter hole in metal, special devices and core drilling technology are used.
- Features of creation
- Drill accessories
- Feature of deep holes
- Features of large diameter holes
- Hassle-free drilling
- Cone drill
- Metal crown
- Hole press