With this tutorial you will learn how to drill a hole in glass. Instead of throwing away your glass, turn it into something beautiful and practical. A bottle from a trash can can turn into a real treasure. But first, you need to learn how to drill holes in glass or mirror.
In this article we will look at methods of drilling in glass and analyze the mistakes.
Here are some rules to follow when drilling through tempered glass:
- Be careful!
- Be patient.
- Be smart.
If you have any doubts when drilling glass at home, go to rule No. 1.
First method (the easiest)
To drill a hole in glass we will need: a flat surface (board, table or other), a screwdriver or low-speed drill, plasticine and turpentine.
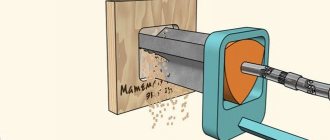
So, first, place the glass on a prepared, flat surface so that it lies stable (does not “play” on the surface) and its (glass) edges do not hang down. Now we insert the drill into the drill (screwdriver) and set the minimum possible drilling speed. We scroll in the air, determining the “runout”; if it is large, then you should choose another drill. Having selected a drill, degrease the surface of the glass with alcohol and sculpt a boundary circle on it from plasticine, into which we pour turpentine (a small amount). Now you can drill, the main thing is not to use much force so that your glass does not crack under pressure.
How to drill through thin glass
After this, we take a drill or screwdriver into which a regular drill designed for working with metal is inserted, or one that has a sharp tip coated with pobedite. We insert the end of the drill into the hole and begin drilling.
The methods described above are characterized by their unreliability and impracticality. After all, it is very difficult to predict the result of these experiments, and not everyone has the opportunity to melt tin at home or do something similar.
You may need skills in cutting and drilling glass without turning to specialists. You may want to make your own coffee table with a glass top. You have purchased a new aquarium and want to make a hole in it to drain the water without any problems. How to drill glass yourself without damaging it.
The most correct way to drill holes in glass is to purchase and use an expensive set of specialized glass drills. However, if you do not drill holes in glass professionally (you provide such services and work with glass every day), then you should not spend fabulous sums on the purchase. They won't justify themselves.
The “plus” of this technique is that there is no need for further processing of the glass, the edges of the hole will not have chamfers or cutting edges. The edges of the hole formed by overheating the glass will be smooth and even.
In order to drill glass efficiently, it must be carefully prepared for the upcoming procedure. To this end, use liquid soap, a sponge and hot water to wash the workpiece, removing dust, dirt, grease stains and other substances from it. Then using 96 percent alcohol, turpentine, lighter gasoline, white spirit, acetone, thinner, etc. degrease the glass surfaces, and then wipe dry with a soft flannel, bringing to a shine.
How to make holes in the skin. How to carefully make a hole in a leather belt
Hello, dear readers. Today I want to share with you information on how to make a beautiful and neat hole in a leather belt. This is of course not entirely on the topic of our blog. It’s just that I’ve been running for a year and a half now, and my figure has changed somewhat. So I had to remember how to adjust the belt to fit myself. I’ll say right away that I’m an expert in this matter, I’ve made dozens of beautiful holes. Moreover, he made a hole not only in pure leather belts, but also in pressed leather. For some reason, some expensive brands produce combination belts. I even held a belt in my hands that cost $21,000, and it wasn’t purely leather, it was a combination. Anticipating the next question, why so expensive, I will say that the buckle was gold with diamonds. Yes, I just didn’t shorten it. I didn't have a tool to take the buckle apart without scratching it. But somehow I didn’t really want to talk about this topic with the owner of the belt. But let's get back to the product in which you need to make a hole. Or rather, what we will do.
Safe work with fluorescent lamps
CFLs can be disassembled, but not for the purpose of further use for crafts, but only if you need to repair the launcher. It is better not to touch the bulb of a fluorescent lamp at all, since you need to stay away from toxic mercury vapors.
The wires coming from the lamp filament to the board are sometimes not soldered to the latter, but wound onto special pins
This lamp consists of five parts:
- U-shaped or spiral flask;
- the upper component of the body with the bulb attached to it;
- an electronic board with a ballast mounted on it;
- lower housing element with electronic ballast placed in it;
- plinth - together with the bottom of the case, this is an integral structure.
To disassemble and access the launch controller, use a flat-head screwdriver with a wide tip. With its help, the housing latches are disconnected one by one. To perform the operation, you need to insert the tool into the groove and turn it.
This is not so easy to do. After prolonged use, accompanied by constant heating, the plastic loses volatile substances and becomes hard. The latches themselves often break during the disconnection process.
The lamp opening line is located in the place where the technical parameters of the device and the name are written. The base of the flask is also located here.
If the constipations do break, they are simply cut off with a sharp tool or sawed off. To do this, you need to arm yourself with a small disk cutter. You can buy it or make it yourself.
First, measure the circumference of the body with a caliper. Then a pin with a cutter is inserted into the chuck of the drilling machine. This is done in such a way that the latter is above the frame at a height equal to ½ the diameter of the lamp body.
The drilling equipment is turned on, the lamp body is pressed against the cutting tool and the outer part of the body is carefully cut. Similar cuts are made at intervals of 1.5 cm along the entire contour.
A screwdriver with a thin rod is inserted into the slots and the cuttings are lifted. Then take a screwdriver one size larger and open the housing of the lighting fixture.
Next, check the lamp bulb for serviceability. Why take a multimeter and check the conclusions in pairs. Resistance within 15 ohms is considered normal. If everything is normal, they conclude that the ballast module is faulty.
If the filament breaks, the ballast may still be operational. In this case, the flask is disposed of, and the working device is used as a spare part.
If there is a fuse in the control circuit, it may blow. The issue is resolved by installing a resistor with a resistance of several ohms in its place.
Burnt elements on the electronic board are visible to the naked eye. Based on the power of the lamp, this could be one or a pair of resistors, transistors or swollen capacitors (+)
If only one filament has burned out, it can be shunted with a resistance, but this will result in an overload of the ballast. Such a restored lamp will not be able to work for a long time - a year maximum.
Once the repair is complete, the two halves of the lamp are simply glued together. To simplify the reconstruction process, the product is sometimes heated using a hair dryer.
If the lamp cannot be repaired, it must be disposed of. Read about where to dispose of used fluorescent lamps in this article.
How to drill a hole in a glass jar
If you need to make a hole in a glass bottle, then you do not need to buy special equipment. This can be done at home with your own hands. You can drill with either a regular drill or a screwdriver.
It is preferable to use a screwdriver, since it has fewer revolutions (high speeds are not needed for drilling glass). It is recommended to use a drill with pobedit inserts, but if you don’t have one, you can take a regular drill for metal work, for example, in this instruction we use a drill with a diameter of 8.2 mm made of P6M5 steel. Don’t believe those who say that you only need to use pobedit drills and nothing will work with ordinary ones. Now we will make sure of this.
You can learn how to make a hole in a glass bottle by watching the video:
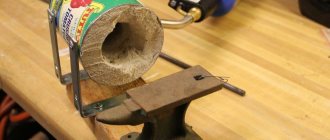
So, to drill a hole in a bottle you will need: - The bottle itself, for example, from wine; - A stand for the bottle so that the bottle does not roll when drilling a hole; - Paper tape; - A regular drill or screwdriver; - A regular drill; - Water for cooling;—Drills—And syringe.
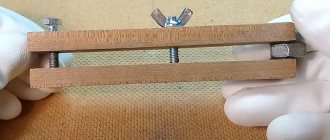
It is necessary to secure the bottle from rotation. To do this, a stand was made in advance from ordinary wooden blocks: two long and two short, fastening them together with nails. If it is not possible to make such a stand, then you can make a small depression in the ground if you are drilling outside, or place two bricks or something else on the sides. In general, it depends on your imagination.
How to drill a hole in glass at home and why make a hole in a bottle
With this tutorial you will learn how to drill a hole in glass. Instead of throwing away your glass, turn it into something beautiful and practical. A bottle from a trash can can turn into a real treasure. But first, you need to learn how to drill holes in glass or mirror.
In this article we will look at methods of drilling in glass and analyze the mistakes.
Here are some rules to follow when drilling through tempered glass:
- Be careful!
- Be patient.
- Be smart.
If you have any doubts when drilling glass at home, go to rule No. 1.
: Drilling a Growler bottle
The process for drilling a Growler bottle is the same as shown on YouTube. The only difference is that you and I water the drilling site with water every 20 seconds, rather than using a “pool” as in the video. The drilling process takes no more than 2 minutes. Use a file to file the edges of the hole.
How and with what polymer to seal a hole in a glass bottle?
How and with what polymer to seal a hole in a glass bottle?
#1 Post by strannik » Aug 24, 2012, 12:57 pm
Re: How and with what polymer to seal a hole in a glass bottle
#2 Post by Maks42 » Aug 24, 2012, 4:03 pm
Re: How and with what polymer to seal a hole in a glass bottle
#3 Message PlastSter » 24 Aug 2012, 19:02
Re: How and with what polymer to seal a hole in a glass bottle
#4 Post by kei0112 » Aug 24, 2012, 7:23 pm
Re: How and with what polymer to seal a hole in a glass bottle
#5 Post by strannik » 24 Aug 2012, 21:54
Re: How and with what polymer to seal a hole in a glass bottle
#6 Post by kei0112 » Aug 24, 2012, 9:59 pm
Re: How and with what polymer to seal a hole in a glass bottle
#7 Post by Serjio » Aug 24, 2012, 11:30 pm
Re: How and with what polymer to seal a hole in a glass bottle
#8 Post by MASV » 25 Aug 2012, 15:59
Re: How and with what polymer to seal a hole in a glass bottle
#9 Post by Behemoth » Aug 25, 2012, 4:50 pm
Re: How and with what polymer to seal a hole in a glass bottle
#10 Post by sonarr » 27 Aug 2012, 09:24
Re: How and with what polymer to seal a hole in a glass bottle
#11 Post by Maks42 » Aug 27, 2012, 11:03 am
Re: How and with what polymer to seal a hole in a glass bottle
#12 Post by Sergpolimer » Aug 27, 2012, 12:19 pm
Re: How and with what polymer to seal a hole in a glass bottle
#13 Post by strannik » 05 Sep 2012, 17:19
Re: How and with what polymer to seal a hole in a glass bottle
#14 Post by Sergpolimer » 05 Sep 2012, 18:25
Source: https://forum.e-plastic.ru/plastics-and-polymers-f5/-t13461.html
How to drill glass using sand
The sheet must be placed on a completely flat surface. There are some nuances here: the edges should not hang down, and it should not wobble.
To drill holes in glass you will need the following:
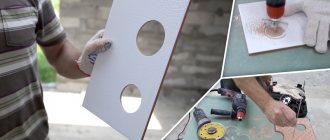
1. Using a marker or felt-tip pen, create the necessary contours along which the processing will take place.
The drill or screwdriver must be set to the lowest rotation speed. Clamp the required drill bit into the chuck. After this you need to check the drilling. If there is increased runout, then it is advisable to change it. The lowest speed for drilling is 250 rpm, and the highest is 1000 rpm.
For example, such a bottle can be used as a decorative lamp if you fill it with a garland through a drilled hole.
And so, we clamp a drill of the required diameter into the chuck and select the bottle in which to make a hole.
To work you will need the following:
Step 2.
Step 1.
THE TWO MOST IMPORTANT CONDITIONS WHEN DRILLING ARE:
Friends, today we won’t do any crafts, but we’ll talk about how you can make a neat hole in glass. Perhaps this information will be useful to someone, I will be very happy about it.
For drilling I used:• Drill bit (feather) for tiles;• Screwdriver or drill;• Water.
See how to drill a hole in a glass bottle, tile or glass. Drilling glass is not difficult, but tiles are generally simple. The main condition is NOT TO PRESSURE TOO MUCH WHEN DRILLING, otherwise the glass will burst. And yet, the drilling site should always be wet.
A glass bottle can have different wall thicknesses, so some drill quickly, others take longer.
How to drill a hole in a glass bottle when making a lamp. MK
How to make a lamp base from a bottle.
I am often asked HOW to make a hole in a bottle to create a lamp base. Here is a short master class on how I do it.
* Wide-neck wine bottle with screw cap * E14 lamp socket * electric cord with switch * Matte ENERGY-SAVING light bulb with E14 base, power 7-8W * Metal tool * Screwdriver * Drill for glass and ceramics * Diamond needle file (forcon recommendation
) * Jar of water * Scissors * Glue gun * Safety glasses (
ntl
) * Protective mask
I am often asked how to make a hole for a cord in a bottle. To do this, you need to purchase a special drill for glass and ceramics at a hardware store. For the Hole, I use a #6 or #8 feather drill bit. You will also need a drill or screwdriver. Here are a few photos of the materials you will need.
Procedure: Take a bottle and wrap the area where the hole will be located with masking tape 2-3 times.
Mark the drilling location with a cross. Please note that bottles have seams, it is best not to drill directly into the seam of the bottle. Move the drilling location 1-2 cm.
We begin the drilling process. We dip the drill in the water and try to hold the drill very evenly at medium speed and begin to drill. The most important thing is not to put pressure on the bottle under any circumstances. Act confidently, but not harshly.
Drilling will take 10-15 minutes. The pen drill will seem to scratch out the glass.
While drilling, regularly lower the drill into water and drip onto the drilling site.
After the drill has gone through, carefully drill the hole for some time, making light rotational movements. This will make the cut of the hole smoother.
Use a regular file or coarse sandpaper to sand the edge of the cut. This is what you should get:
Now take the cord with the switch
And we pass it through the hole, pulling it up.
I want to immediately make a reservation that if you plan to decorate a bottle, then the order of work should be as follows: First you make a hole, then you decorate the bottle, then you put everything together. Now a few words about light bulb sockets. I use light bulb sockets with a base size of E14. A regular light bulb has a power of 40W or an energy-saving one 7-8W. I prefer energy-saving lamps; they do not heat up the lampshade. There are two types of cartridges: “without a skirt” and with a “skirt”. We need cartridges with a skirt and a fastening ring.
These are NOT the correct cartridges, WITHOUT a “skirt”
The CORRECT cartridge with a “skirt” and a ring.
Now we take a bottle cap (I wasn’t free, so I took a regular cap as an example).
We make a mark on it with the middle. We measure the diameter of the cartridge and select the appropriate perk for metal.
What to do if there are no metal perks? I suggest this method: Punch holes in a circle with an awl, often and close to each other, and then saw through with utility scissors or a needle file.
The entire hole is ready and we begin to put everything together. We bring the cord through the neck of the bottle. We connect the cord and the cartridge. We pass the cartridge through the hole in the lid. The lower “skirt” of the cartridge will prevent the lid from falling off. For reliability, we drip some glue from the gun around the skirt and attach the lid to the skirt.
Close the bottle with a lid. All our cartridges are securely fastened. Using the upper clamping ring, you can subsequently attach the lampshade to the socket.
Attention, there are situations when the lampshade mount is larger in diameter than the fastening ring. What to do? It is necessary to make a gasket that equalizes the diameter of the lampshade and the diameter of the fastening ring.
To make the lamp stable, I recommend putting pebbles inside the bottle.
Your imagination for decorating bottles and lampshades remains in your hands! Create and you will definitely succeed!
Source: https://www.liveinternet.ru/users/allinka_decor/post119908920
: Failures
The first attempts to drill a hole in the bottle will most likely fail. Don't try to drill through the bottom. The glass bottom has too much internal stress, which can lead to cracking. Also, do not try to drill through the bottle - this is a bad idea, because... it will most likely crack. A low-quality or worn drill can also lead to an accident.
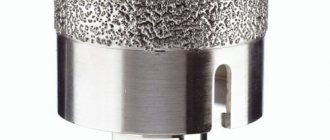
When working with a drill with a carbide tip for tiles and glass, you should not press the drill too hard, otherwise the bottle will immediately crack. For drilling, it is preferable to use a diamond tubular drill.
These drills can be purchased on Amazon.
How to drill a bottle with a simple drill
How to make a hole in a glass bottle Hello, my dear friends! Romance with you, as usual. There were two questions: one was how to make a hole in a glass bottle, and the second was how to cut a glass bottle. I'll answer the second question a little later, as I'm experimenting and looking for the most convenient way to do this.
Let's start answering the first question. Here's a bottle of wine. I made this stand with a simple wooden railing in advance. This will help prevent the bottle from moving when drilling the hole. If you can't make such a stand, you can dig a hole in the ground, put two bricks or two cattle, it depends on your imagination. The first thing we need to do is wrap some paper tape around the bottle near the hole. For example, we'll wrap it here. Then mark the drilling site. We are going to use a simple drill, of course it is better to use a screwdriver as it has a low rotation speed and we do not need a high rotation speed to drill the glass. The drill is simple, dust-free tungsten carbide.
This is an 8.2 mm drill, steel R6M5. Let's start. It is important not to press too hard on the drill, because the glass may crack and we will not be able to process it. So let me show you what we got. As you can see, the glass has begun to drill. It is also important to add a little water to the hole so as not to overheat the drill and glass bottle. Well, we made a hole. Let's remove the tape and see what we have there. We have such a hole. If you look closely you will notice small cracks inside, this is caused by the excess pressure of the drill at the end. If you control the pressure of the drill, especially at the end of drilling when the hole is almost done, you will get a perfect hole. So you can see that we did it well without using tungsten carbide or special tooling.
Snowball
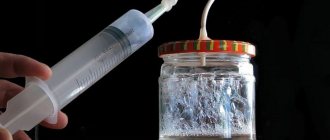
Have you always dreamed of a snow globe? You can make it yourself from a lamp. It is necessary to mix water (70%) and glycerin (30%), but in principle, the proportions may be slightly different.
The basic rule is that the less glycerin is used, the slower the glitter will sink to the bottom. If there is too much glycerin, then the glitter will remain in place, no matter how long and how hard you shake the ball.
That’s why a simple recommendation is to experiment in search of optimal proportions.
So how to drill glass?
First of all, we need to decide which drill is suitable for us for glass processing. After all, tools used, for example, for iron, are not suitable in this case - they will simply break the glass.
That is why, to make a hole in the glass, we will need an unusual drill with an arrow-shaped tip. Such devices are coated with a unique coating, which allows you not only to drill, but also to remove one layer after another from the surface, confidently thinning it.
In addition, there are so-called tubular drills, in which the cutting part is coated with small diamonds. They are ideal for glass or tiles. We will not be able to do without this tool when we need to make a large hole.
What tool should I choose for such a drill? To be honest, the simplest drill, which provides adjustment of the rotation speed, will do (this is necessary because we will be working at extremely low frequencies).
Regarding tempered glass, we will not even try to drill it - it will certainly deteriorate. But if you really need it, then seek help from specialists.
Terrarium
A cute craft made from a burnt out lamp, a souvenir - a terrarium. Yes, some will say that the craft is completely useless, but still it is quite cute and will complement the interior.
Numerous photos of crafts made from light bulbs confirm this - it seems like a cute little thing, created with your own hands, but how perfectly it fits into the interior of a particular room.
The terrarium can be filled with moss, pebbles, toys, cute twigs, shells - whatever you want.
The terrarium is installed on a structure made of wire or on any other stand. The wire should be made of copper, thick - it is flexible and will fit perfectly with the lamp.
How to drill with a homemade drill
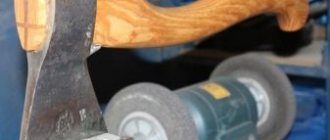
Drilling glass at home will require preparing a special drill, which consists of a diamond roller located in a regular glass cutter and a metal rod. It is necessary to make a cut in this rod into which this diamond roller will be placed so that it is stationary in relation to the rod.
Having prepared such a drill, fix it in a screwdriver or drill and start drilling a hole. It can be called a modification of conventional diamond-coated drills. Therefore, if you do not have the opportunity to purchase such a factory drill, then you can easily make it yourself.
There is another way to prepare a homemade drill. You need to take any ordinary drill, clamp it in pliers and hold it in the flame of a gas burner for several minutes. After the end of the drill turns white, you need to quickly cool it by dipping it into sealing wax. Once it has cooled, remove any remaining sealing wax if present. Through this simple operation you get a hardened tool that can be used to drill through hardened material.
LiveInternetLiveInternet
—Categories
- Interior design, decor (63)
- Clocks, panels and other small items for the home (52)
- Decoupage (39)
- We do it ourselves (37)
- There are different master classes on decor. (37)
- Sewing, patchwork, accessories (31)
- Glass, stained glass, painting (29)
- Useful tips for home (29)
- Books and magazines on decor (27)
- Paper, quilling. (19)
- Light, lamps, fixtures. (19)
- Modeling, plastic, fimo (17)
- Useful links (17)
- New life for old things (15)
- Creative materials (15)
- Drawing and painting lessons (10)
- For furry and tailed pets. (8)
- Green corner in the house. Flowers and plants. (8)
- DIY soap (5)
- Candles (5)
- Batik, fabric painting (4)
—Tags
-I'm a photographer
Lubricating the area to be drilled
In order to successfully drill through any material made of metal (stainless steel, steel, cast iron) in a short period of time, it is recommended to use special lubricants. The area in which drilling will be carried out is treated with lubricant before performing work. Thanks to this, the drill used glides better and does not heat up too much. For example, to process stainless steel, you can make your own special lubricant from machine oil and colloidal sulfur. To do this, you need to take pieces of sulfur, grind them and mix them with oil. In this case, during material processing, lubricant must be supplied to the drilling area on a constant basis.
There are many different ways to use fine drill bits to make large holes in thick, strong materials. During their use, it is recommended to set low speed on the electric drill. Also, when using power tools, when carrying out such work, safety precautions should be observed. It is necessary to use safety glasses or a mask, and wear gloves to avoid accidental injury.
Drilling a hole in glass at home
Sometimes even the simplest procedures (for example, how to drill glass) can cause confusion among inexperienced people. Indeed, working with such a fragile material requires advanced skills that you are unlikely to obtain when cutting glass.
In the article we will talk about how this should be done so as not to damage the surface of the glass.
Burning holes in glass
Drilling holes in glass is a difficult, labor-intensive and unsafe task. To perform high-quality work, you must have the appropriate competencies - knowledge, skills and abilities. This is the reason why we often turn to specialists when the need arises for jewelry work with glass, mirrors, etc.
: Tools and materials
You can drill with a drill, but it is better to use a drilling machine for this purpose.
You can buy yourself this machine for $59.99. It will make your life easier.
- Cushion (placed under the bottle while drilling).
- Drilling machine (preferable to a drill, much more stable and easier to use).
- Diamond tubular drill with a diameter of 6 mm; or
- Drill bit with carbide tip for tiles and glass.
- Leather gloves to protect your hands from glass shards (just in case).
- Water.
- Glass bottle.
Give preference to a diamond tubular drill.
What can lamp elements be used for?
Most often they are used to make such crafts as:
- florarium for mini-plants;
- miniature aquarium;
- flower vase;
- kerosene lamp;
- container for storing paper clips or other small items.
Miniature florarium
To make a florarium for plants out of a light bulb, you need to remove everything unnecessary from it and leave only the base and bulb. You can put beautiful stones at the very bottom. Next, filler is laid, it can be forest moss. Sometimes soil and pieces of tree bark are added. If there are stones below, you can pour sand on top of them.
Fig. 7 – florarium made from an incandescent lamp.
Next, you need to take the plant with tweezers and carefully insert it into the soil or sand. You can close the flask not only using the base. A cork cut from wood or an acorn cap is suitable for this. It is better to use a large incandescent lamp.
Inside the hermetically sealed flask, oxygen is produced, carbon dioxide is consumed, and the water cycle occurs. There is no need to water a closed florarium. It's like a miniature planet with its own climate.
The open option requires moderate watering as the soil dries. If you overfill the water, mold will appear. Mosses can be sprayed occasionally. Just like on earth, plants in a light bulb will gradually grow and develop.
It will be useful to read: Why light bulbs explode.
: If there is no drill, use a tube and a screw
This method is an even more complicated version of using a duralumin, copper or aluminum tube, from which something like a homemade drill is made.
For this:
- We tightly insert a 2-3 cm long wooden plug into the hollow hole of one of its ends, into which a screw sticking out about 1.5 cm is screwed.
- We saw off the head of a securely seated screw.
- We cut out the other end of the tube with a 3-sided file so that we get several teeth.
- We insert the protruding part of the screw into the drill and secure it.
- We cut out 2 cardboard washers with a cross-section according to the diameter of the hole, and glue them to the glass on both sides at the drilling site.
- Cover the supporting surface on which the glass will lie with rubber (to create greater elasticity), and sprinkle the drilling area with abrasive powder from emery.
- We carefully soak the teeth of the tube (playing the role of the drill head) in turpentine - after which we immediately begin drilling at low speeds until 1/4 - 1/3 of the hole is passed.
- We turn the glass over and repeat the procedure - after which the flip follows again (1 or 2 times until a through hole is drilled).
- At the end we carry out cleaning using the first method.
Is it possible to open a light bulb without breaking it?
Since the base is securely attached to the glass, it is very difficult to open the light bulb without breaking it. If the lamp is old, the glue has already dried out and will crumble when exposed to needle-nose pliers.
Another safe way: use a screwdriver or knife to bend part of the base at the junction with the glass and carefully tear off one strip. Further work will go easier. You need to crumble the remaining glue and get rid of the remnants of the base.
How to unscrew a lamp using WD-40
What is used to drill glass?
A regular drill for drilling glass will not work; you need to use special tools.
You need to select a drill with specific parameters:
- its diameter must correspond to the diameter of the hole that needs to be made;
- the length must correspond to the thickness of the glass to be drilled;
- the shank should be round (if you plan to use a drill) or hexagonal (if you want to use a screwdriver).
What types of glass drills exist:
- "Feather". The working part of this drill is shaped like a feather and made of hard alloy. Perhaps this is the most budget-friendly tool that can be used to drill glass (as well as ceramics and tiles). This type of drill should be chosen if the diameter of the hole to be made is from 3 to 12 millimeters.
- "Crown" (tubular drill). It is designed for drilling larger holes (12-80 millimeters).
- Feather cutting drill. It is designed to make holes of even larger diameter. Its peculiarity is that the working surface has a central tip for the primary recess and teeth around the circumference.
- "Cylinder". In fact, this is an ordinary cylinder, one cutting edge of which is coated with diamond sputtering. They are used only with forced cooling.
: From PEV resistor
For such a soldering iron, you will need an old ceramic insulated resistor, which will be used as a heating element. You can use a resistor from old electrical equipment; the required parameters are calculated using the formula: P = U 2 /R,
Where P is the power of the soldering iron;
U – supply voltage;
R is the ohmic resistance of the resistor.
This homemade soldering iron is designed to operate on low voltage of 12 or 24 V, which should be taken into account when calculating the power of the device. Thanks to this, it can be powered both from a step-down power supply and from a car battery. If necessary, you can select a resistor for a 220 V supply voltage, but in this example we will consider a low-voltage option.
In addition to the PEV resistor, for manufacturing you will need pieces of textolite, getinax or dry wood for the insulating handle, the main thing is that they can withstand high temperatures. Two copper rods of different diameters for making a heat sink and a soldering tip. Connecting wires or factory 12V power supply. You will also need elements for fixing, a file, a jigsaw, a drill, a tap, a drill.
The soldering iron manufacturing process consists of the following steps:
- A copper rod is selected for the current collector, which should fit tightly into the internal hole of the resistor. The quality of heat transfer from the heater to the soldering iron tip will depend on the density.
Rice. 1: fits tightly into the hole - For the sting, a copper rod or wire of smaller diameter is selected. Sharpen the edge of the rod to obtain the desired shape; the shape of a flat-head screwdriver is considered the most convenient for beginners.
- Drill holes on both sides and cut threads into them with a tap - one for the fixing bolt with a washer, the second for the copper tip.
- Insert the heat sink into the resistor and measure the depth of the location, make a mark on the surface. At the mark, make a radial groove using a file - a retaining ring will be inserted into it, which can be made from a spring or washer.
- At one end of the copper wire for the soldering iron tip, cut a thread and screw it into the heat sink.
Rice. 2: screw into the heat sink - Assemble the entire structure together, secure both copper rods with threaded connections and a retaining ring.
- Strip the ends of the power supply from insulation, if necessary, remove it and the plug will no longer be needed.
- Secure the ends of the copper wires from the power supply to the contacts of the resistor. To do this, use a bolted connection, be sure to tighten the nuts tightly to get good contact.
- Using a jigsaw, cut out a handle from the old board; in this example, it will consist of two halves, between which there is an electrical cord. You can also cut a groove for wires in it.
Rice. 3: Place the power cord into the handle - Assemble the handle - secure the halves with bolts or rivets.
The cordless soldering iron is ready, it can be used for soldering microcircuits, electrical contacts of automotive wiring, etc. If you don't have a ceramic resistor at hand, you can make a soldering iron from nichrome wire.
Decorative decorations
Using your creative imagination, fill the clear lamp bulb with soil, moss, small rocks, shells or twigs.
Such crafts are hung or mounted on a support, which is most easily made from thick copper wire. The stand also uses sticky silicone holders, sold in many stores.
Video tutorial - drill a hole in glass with your own hands
Drilling glass with a drill
Before starting work, we must treat the surface of the glass with alcohol and then dry it thoroughly. Then we lay it on a flat plane, preferably wooden. In this case, the edges of the glass should under no circumstances protrude, and the piece itself should “sit” firmly on the wood.
The place that we intend to drill should be sealed with construction tape. Then on its surface we mark the place of work with a dot - it will serve as our center. It is advisable not to start drilling the required piece right away; it is better to first practice on unnecessary glass.
Let's start drilling. At the same time, remember that you do not need to put pressure on the tool, even if it seems to you that the drill is “stuck” in one place. After all, the glass actually moves, albeit very slowly and imperceptibly to the eye.
Hole in glass
When making a homemade shade for a lamp or candle, it may be necessary to drill a central hole in the glass bulb. You may need to make a hole in the glass for other purposes. You can drill anything, glass jars, bottles or other containers, beads, glass doors.
You can drill glass at home in several ways and with several types of drills. Here we show how this is done using a special kit. But this option is not essential; you can purchase a diamond drill and diamond bits separately.
A diamond drill (drill) is suitable for drilling holes of small diameter. A crown is a special circular drill; unlike a drill, it drills around the circumference without touching the central area. Thanks to this, the crown is suitable for drilling large-diameter holes.
We cover the drilling area with adhesive tape crosswise to reduce glass chipping. It is advisable to tape the inside as well, so the edges of the hole will be smoother and you won’t have to sand them for a long time.
Mark the center and start drilling. If you use special crowns, they have a spring-loaded guide drill in the center.
To use such a tool, you first need to drill out the center with a drill, and then continue drilling with a hole saw.
In other crowns there may not be a center. Of course you can drill, but it will be more difficult to start in the right place. It is more convenient to do this on a stationary drilling machine, but in a pinch, a screwdriver will do.
DIY artistic holes on jeans
By creating unusually shaped holes in jeans, you don’t need any special equipment or skills. Everything can be done quite simply at home. The most basic thing is to adhere to the principle: pull out the dark threads in the shape of the hole . The cuts should be parallel to the white threads and for the most part they are necessary only to remove unnecessary threads, leaving the necessary outline.
Initially, it would be useful to make a pattern according to the shape of the future hole. This will help avoid uneven edges. It is best to cut with a sharp utility knife or scalpel, since a regular knife and scissors will not be able to cut through denim. Directly when cutting, it is worth placing a hard board or plywood under the product.
However, it is worth remembering that when cutting a hole of this shape, you should definitely secure the edges . Otherwise, there is a risk that the work done will be in vain. You can glue the wrong side with non-woven fabric or do a zigzag stitch. It is also possible to perform manual finishing of the edge (stitching should be along the edge of the hole, and not through it).
to contents ^
Working with a glass cutter
If you need to make a hole in glass of a large diameter, a glass cutter can again come to the rescue.
To do this, use a special glass-cutting compass. It is a central support attached to the surface in the center of the future hole on a suction cup. A bar rotates around this support, on which the handle of the glass cutter is attached in a sliding clamp. The glass cutter makes a circle around the suction cup to cut through the glass. The tool must be moved smoothly, with constant pressure. After the cut line is closed, it must be tapped with a handle. the cut circle is then lifted on a suction cup.
It is better to treat the cut surface with an abrasive stone or a file to blunt the sharp edges and eliminate the possibility of cutting during further work.