Drilling square holes. Watts drill. Reuleaux triangle.
When performing various plumbing and repair work, sometimes it becomes necessary to make a square hole in a metal workpiece. If to obtain round holes a standard set of tools is used, which every master has at hand, then for a square profile you need a specific tool.
Of course, without having the appropriate tool, you can get a square hole by drilling a round one, followed by manual processing to a square profile. But this method is low-productivity, labor-intensive and does not allow obtaining the exact shape and dimensions of the required profile.
To obtain a high-quality profile, a square hole is most often drilled using a Watts drill, the operation of which is based on the peculiarities of the movement of a geometric figure called the Reuleaux triangle. From a technical point of view, it is more correct to call such a drill a milling cutter. It will not be possible to use a Watts drill directly with a drill; you will need an additional special adapter spindle, which will provide the necessary trajectory of the tool.
Peculiarities
In terms of its design, the device for drilling square holes is more like a cutter than a drill. However, domestic craftsmen are more accustomed to calling it a drill, and manufacturers also call the product that way.
According to the kinematics in accordance with which this device moves, it is obvious that the cut of the material being processed occurs exclusively through the side surface, or rather, 4 such surfaces. This method is typical not for a drill, but for a cutter. But rotational movements are not enough to drill a high-quality and even square hole. The cutter must not only rotate, but also make rocking movements - also around its axis.
It is also important that rotation and swaying should be directed in mutually opposite directions.
At what speed the drill-cutter will rotate can only be determined based on the characteristics of the electric drill or other tool that you plan to use. However, it must be borne in mind that drilling a square hole will not occur very quickly, and the work productivity will be low.
One Reuleaux triangle is not enough to obtain a square hole - the drill must have grooves along which chips, which are waste from drilling, will be removed. It is for this reason that 3 semi-elliptical circles are cut out on the working surface of the drill.
Due to this, the moment of inertia of the cutter is reduced, the load on the spindle is reduced, and the cutting ability of the nozzle is increased.
How to cut a circle in plywood - rules for doing the work
- The diameter range varies from 10 to 60 mm.
- The work is done quite quickly, but the quality of the hole is low, and it is unlikely to achieve an ideal result.
- The maximum drilling depth is approximately 150 mm.
- Products are sold either in sets of 5-6 pieces or individually, so you decide which option is right for you.
- If necessary, you can buy an extension that clamps the drill and increases its length by 300 mm.
Fraser
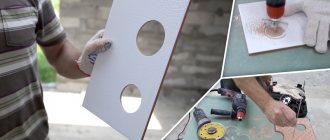
A furniture router is great for cutting out thick plywood. Of course, you can’t make a complex shape with it, but cutting an arc or circle is easy:
- We fix the standard ruler included in the router in the center of the circle using a self-tapping screw.
- If the length of the ruler is not enough, you can assemble a simple bracket from a metal profile or wooden planks.
- By rotating the cutter along a fixed radius, we select a groove along the circumference, resulting in an almost perfect hole.
Note! When calculating the diameter of the circle, you should take into account the dimensions of the working cutter. The instructions for the device will tell you the exact numbers.
In this way, you can cut not only circles, but also individual arcs - for example, in order to make grooves for furniture brackets.
How to cut a circle in plywood: selection of tools, shape cutting technologies with a jigsaw, router and improvised means
You may also need to cut out the correct circle from plywood for subsequent use of a sheet with a hole:
Expert opinion
Strebizh Viktor Fedorovich, leading construction foreman
The fact is that now I mean the cutting element and not the machine itself, you need to align the cutter not in the center of the drawn circle. If you want to clarify something, please contact me!
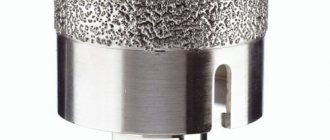
Square hole drill
A non-obvious and fascinating stray - Mortising Chisel Woodwork Square Hole Drill Bit. More specifically, a drill-device for square holes in wood.
Suitable for drilling holes and grooves in wood materials.
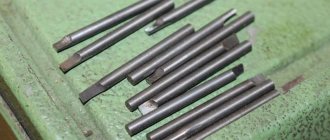
Now we will talk about a device for creating square-shaped holes and grooves by drilling. The device consists of two parts: a wood drill and a square cutter - the outer shell of the drill. The cutter has a hole for chips. There are two sizes of sets for square holes to choose from in the lot: 10 and 16 mm. In general, in the vastness of Ali and Ebay, I came across a huge number of similar sets, branded (expensive) and not so much. The meaning is the same for everyone - the drill removes excess wood , and the cutter shirt seems to squeeze out the excess into a square shape. The edges of the shirt are pointed, the cut wood shavings go inside and are removed with a drill out through the hole . To work on a vertical drilling machine, you will need a small device-press holder, which holds the cutter jacket while simultaneously ensuring rotation of the chuck and drill. An example of gradual “punching” of a hole; marks from the jacket and from the drill itself are clearly visible. There are a lot of options for such holders, purchased ones are quite expensive, but it is quite possible to make them yourself. Common features - attachment to a fixed spindle sleeve, lowering together with the drilling head. The mount simultaneously holds the cutter, and the chuck with the drill rotates inside. Gradually, as the head is lowered, a square hole . Now about the drills themselves. I have already said that there are two sizes in the lot to choose from: 10 mm (above in the photo) and 16 mm (below). Packed in a simple plastic case, the sets are in oil. In the photo there is a “small” set - 10 mm. The drill is the longest, so it can be clamped in the chuck for the fixture. But the “shirt” is not very long, about 13 cm. The drill is slightly different in shape from the usual drills, including those for wood. Its shape is more like a drill (for concrete). This shape enhances the flow of chips to the top. The shape of the drill tip fits the notch on the jacket (conical). In general, these places rub, you can lightly lubricate them before use. The corners of the shirt are sharpened, made with arches - the corners are pressed in first, then sharp arches cut off the plane. On one side there is a narrow hole for the chips to exit. Complete set. The same is true for the 16 mm kit. 16 mm drill bit The shape of the tip is the same - conical. The edges of the drill are sharp, the wood gnaws only on its way, but the corners are small, it removes a little bit at a time, and drills cleanly. Shirt. Sharp corners are clearly visible. The edges are also sharp. The diameter of the clamping part (in the holder) is 19 mm.
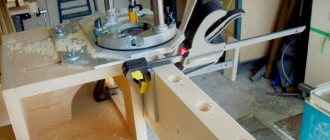
An example of a drilling kit installed in a holder on a machine. Preparing the workplace Setting the drilling height
Maintenance - slight lubrication of rubbing parts.
READ Drilling Holes In Concrete Diameters
You can make a clamping device yourself from scrap materials.
To begin with, I just check the drill - it drills well, the feed needs to be small. The hole is even. An example of the resulting holes. The only thing I will note is that for the first time you need some skill; I pinched the shirt a little higher than necessary, resulting in a slightly uneven hole . Same thing for 16mm. The drill is separate - the quality of the holes is clearly visible. Trying on a shirt Insert a drill, height and try. Well, I’m a little shifted again. The grooves are made by sequentially selecting material between the holes. The main thing is not to rush anywhere. There should be something like this with the proper skill.
And of course, just a jigsaw!
- Link
> Usually all the corners are drilled and from there they either use a saw or a jigsaw to go from hole to hole.
And yes, the diameter depends on the files, if we are talking about a jigsaw. You should also take into account that the saw blades swing, although usually on jigsaws the swing can be turned off. 8-10mm behind the eyes
Thank you. But does this mean that at the corners the hole will be slightly larger than the specified 100 cm?
By the way, what size are the saws for hand jigsaws?
- Link
> This is what happens when schoolchildren are not taught labor lessons...
We conducted them in the computer science classroom.
- Link
>Drill a hole and saw from it?
two holes
so that the blade fits
- Link
This is how I made holes for the sink in the countertop. you take a drill with a large diameter, 10 somewhere, and make holes in the corners of the rectangle. Then you use a jigsaw to go in a straight line and connect the holes.
- Show answer
- Link
Good prices. But why Germany for one-time work? So that it would then lie on the shelf and take up space at such a cost? It's not like building a house.
- Link
A little history with geometry
Back in the 15th century, the legendary Leonardo da Vinci, while studying the properties of geometric figures, drew attention to the so-called geometric objects with equal thickness. There are an infinite number of such figures, but the simplest - besides a circle - is a rounded triangle, which can be formed as follows. An equilateral triangle is drawn, each of the corners of which is connected by an arc of a circle drawn from the center of the opposite side. The peculiarity of such a triangle will be that all its sides will have a constant width, which is equal to the length of the side of the original equilateral triangle.
L. Euler drew practical benefit from this fact, who three centuries later demonstrated the rotation of such a rounded triangle: first around its own axis, and then with some eccentricity, since the cardan mechanism was already known to science and technology of that time.
The German engineer F. Relo went even further in the practical use of this figure, who drew attention to the fact that the trajectory of the corners of a moving triangle with certain methods of its rotation is very close to a square. Only directly at the corners of the square does the outer surface describe an arc, however, of a small radius. In modern technical literature, such a triangle is called the Reuleaux triangle, although this figure actually no longer has any angles.
A few more decades will pass, and the Englishman G. Watts will come up with a device that can provide a guaranteed square trajectory for a metal-cutting tool. The technical solution for the Watts drill was patented in 1916, and a year later mass production of such tools began.
Re: This is what happens when schoolchildren are not taught labor lessons...
> Maybe you’ve never worked on a lathe?
Actually, I had a choice of what to write on my certificate: turner or PC operator