There are situations when a reliable connection cannot be made using a welding machine. In such cases, threaded connections are used. It allows you to assemble and disassemble metal structures without deformation. However, to create a connection you need to know how to properly cut a thread with a tap.
Thread taps
How is the operation performed and what is its essence?
The main task of the mechanic is to create a technical hole in the metal thickness with the subsequent formation of hollows from the inside. They need to be made so that the turns fit the bolt, stud or other fastener.
A threaded element may be needed in everyday life for the most durable connection of two parts. Here it is necessary to achieve absolute cleanliness - so that there are no shavings, deformations, or broken threads left. It is also very important to follow GOST standards for the size of the device. The diameter should match the screw that will go inside.
Many parameters are important - the type of material, its density, as well as condition, for example, temperature, the presence of corrosion. First you need to prepare the workpiece - remove excess dirt. Then you need to choose the right tool, and only then begin metalworking in two or three stages - from roughing to finishing.
Several parameters are significant:
- hole diameter;
- cutting depth;
- number of threads (these are entries, the most common is the presence of three cavities);
- pitch, that is, the distance between two furrows.
How to restore threads in a hole without a tap
The question of how to restore the thread in a hole without a tap is often asked by people who do not understand threaded connections at all. There is only one answer to this question. It is impossible to restore the thread to obtain maximum reliability without using conventional or special taps. There are only ways to build up damaged surfaces and strengthen the strength of joints to certain levels.
Using Epoxy Glue
This method is not suitable for restoring and strengthening connections subject to high loads and vibrations. There is also no point in using epoxy glue if components and structures operate at high temperatures.
Photo No. 4: epoxy glue for thread restoration
If there is no need to ensure high connection reliability, proceed this way.
- Fill the hole with epoxy glue.
- Wait until the polymer hardens.
- Screw in the bolt.
- Wait for the depravity to set.
How internal threads are cut on a rod - general information
The device is called a tap. It can be of two varieties - manual and machine, in accordance with the methods of making furrows. The material that is processed is metal, but not only it. There are also lightweight models that cut into plastic or wood. The last option cannot be called the most common.
Factories use mechanized technology - metal drills make through holes (or a blind cavity), and after the blade, several turns are applied with a predetermined pitch. The advantage of such a prima is high accuracy. Calculations are made using computer-aided design programs, then the data is entered into the control module - manually or using CNC. The second advantage is that skew of the spiral angle and errors are virtually impossible.
But at home and in small industries, a simpler, but less accurate procedure is often used - cutting the internal thread with a tap manually (you can cut it evenly even with your own hands). The work can be carried out on site; for this you need to buy the device itself and a drill to make a preliminary hole.
The tool resembles a herringbone shape due to the fact that the working surface is a ribbed blade. Structurally, the product is a rather complex configuration made of tool steel. This material is used because of its strength and ability to process most alloys, even cast iron. It is not very good to work only with hardened metal - it has stress inside, so it is considered fragile and can crumble in the process.
Features of the technology used
carry out the work in question with your own hands at home. To do this, you need to consider the recommendations below:
- Before creating a hole, it is recommended to make a small recess, which will ensure the correct entry of the drill. You can use a core for this. When drilling through metal, it is recommended to set the drill speed to low, which will allow you to achieve high quality processing. Before drilling, you can treat the cutting edge with a special compound, which will make it easier for the tool to enter the metal.
- At the time of creating the hole, the drill with the drill bit must be positioned strictly perpendicular to the surface being processed. When using the tap, the cutting edge should be constantly lubricated with engine oil, and you should also ensure that the tool is positioned strictly parallel to the axis of the hole created.
- In almost all cases, chamfering is carried out at the entrance of the hole, the size of which is 0.5-1 mm. To do this, you can use a countersink or a larger diameter drill.
- When using a set of taps, thread cutting should begin with tool No. 1. The direction of the thread should be strictly controlled at the very beginning of the work, since in the future it will be almost impossible to change the inclination of the tool used.
- To obtain high-quality grooves, it is recommended to make two turns along the thread and one in the opposite direction. The reverse rotation is done in order to remove chips from the cutting edge, due to which the stroke becomes smoother.
- After using tool No. 1, the second one is installed, and after a complete passage, the third one is installed. It is worth considering that with great force it is recommended to make one or several revolutions in the opposite direction, due to which the chips are removed from the cutting zone.
It is not recommended to apply a large load to the handle by using a lever or a gas wrench. Do not forget that the tap may burst due to high load, then removing the remaining part inside will be quite difficult. While working, the master must feel how the tool moves: easily or with great effort. The shape of the cutting edge does not allow removal of chips from the working part at the moment of rotation along the thread.
Types and areas of application of taps
According to the drive method, they are divided into:
- Manual - they are distinguished by a square tail, which is inserted into the knob. There are two handles that make it convenient to turn the product. It is important not to allow distortion. This result can only be corrected by drilling and cutting a larger diameter.
- Machine - used on metal-cutting machines. They are firmly fixed in the holder, accurate, and do not allow deviations.
By cutting method:
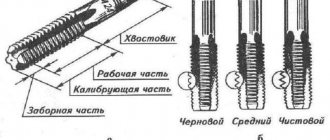
- Universal. Their design can be called classic. A tool with a running gear (its length determines the depth of insertion of the screw later if the hole is not through), which is divided into sections. Each of them has certain geometric parameters - angle, direction, distance, step. There are usually three of them, each designed for rough metalworking, intermediate and finishing. Thus, you can achieve the most accurate indicator with one movement.
- Complete. The name speaks for itself. You will need a set of 3 taps, since the internal thread must be made with high precision. First, the coarsest tool is used, then the thinnest, and finally with grinding and sharpening of the smallest corners. Buying a set is more expensive, but the result is much higher quality.
By hole type:
- For through. They are distinguished by a long working part. It gradually expands, moving into the area that is responsible for precise cutting.
- For the deaf. On the cutting section, calibrating turns immediately begin. Therefore, it is very important to sharpen them or promptly change the set as they wear out.
According to the groove design:
- straight – I work well with soft alloys;
- screw, their section is staggered, they can easily pass even through cast iron;
- shortened - removes chips well.
The shape of the product resembles a cone (full or truncated) or a cylinder. They also all differ in diameter.
Types of instruments
The tool that is used to create threads is called a tap. These are cylindrical metal rods, on the edges of which there are sharp incisors located in a certain sequence. Taps are divided according to several factors:
- Method of use. A special wrench for carrying out the work is supplied with hand tools. Tooling for machine tools is fixed in the chuck thanks to a cylindrical shank.
- According to the type of holes processed. Devices are divided into two groups. Some are used for processing through holes, others for blind holes.
- For cutting internal, metric and pipe threads.
The shape of the taps can be either cylindrical or conical.
Technology: how to use a thread tap
There are several stages, each of which is important. These are preparatory procedures, 1, 2, 3 or more approaches of rotation, finishing grinding. We'll talk more about preparation below. The manipulation of the tool itself is relatively simple. It is necessary to direct the tip, set it level, and then use the crank to make rotational movements.
Special recommendations:
- We do not recommend starting to cut unprepared workpieces. If you already have a sheet of metal where the through hole was obtained by stamping or other metalworking, you need to drill it out and then countersink it - cut off the edges.
- Remove the top 0.5 cm of chamfer from the sample. This must be done at an angle of 60 degrees.
- The device must be lubricated and cooled during the process, otherwise it will result in thermal treatment, during which the metal surface can acquire additional strength.
- Apply reverse stroke every 1-2 turns. This allows you to clear the working area from chips sticking to it.
Let's watch the video. It shows how to make a hole not only with a tap for cutting internal threads, but also with a die for cutting external threads:
Preparatory stage
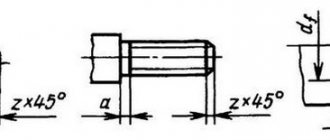
To ensure that the work of obtaining threads does not cause many difficulties, careful preparation should be made for such a technological operation. All methods used related to cutting internal threads assume that a hole of the required diameter has already been obtained in advance. You can obtain the standard thread size when creating a hole according to the correspondence table. For example, for an M10 thread, a hole with a diameter of 8.5 mm is created.
There is often a situation where it is necessary to obtain a thread of a non-standard size. In this case, the required hole diameter is calculated using a universal formula. Calculations are carried out as follows:
- The marking of the tool used is studied. You need to pay attention to the type of thread being cut, pitch and diameter.
- You can determine the required hole diameter when using an M5X0.75 tap as follows: 5−0.75=5.25 mm.
The easiest way to carry out the work is when you need to get a standard thread, since all the necessary information can be taken from various tables of regulatory documentation.
To get a quality hole, you need to choose the right drill. When drilling, it is recommended to use equipment that prevents runout during operation. When choosing a drill, it is worth remembering that it must have high-quality sharpening. Experts recommend selecting the sharpening angle depending on the hardness of the material being processed. As the hardness increases, the recommended sharpening angle also increases, but it should not exceed 140 degrees.
Preparatory procedures
The beginning of any work is the choice of material and tools. The workpiece must have a hole. Those produced by casting or stamping are the worst to undergo transformation. It is better if pressure or melting was applied. But in any case, the most suitable conditions are created during fresh metalworking using drilling or countersinking.
The drill and its cross-section are selected in accordance with the required result according to the regulatory document - GOST 19257 - 73. This is a Russian standard, but it complies with international standards. It must be new or well sharpened. It is important to secure it tightly in the working tool (or in the machine chuck) so that there is no beating or wobbling.
How to correctly determine the diameter and cut a thread with a tap manually - table
There are special standards for determining the cross-section. Let's present all the data in the form of tabular values. Let’s say right away that they are not suitable for all tasks, but only for standard ones. These include all nuts on sale that fit the screws. Therefore, if you require a connection with a specific fastener, pay attention to its markings.
| Marking | Turn pitch | Drill diameter | ||||
| 2 | 0,4 | 1,6 | 0,25 | 1,75 | — | — |
| 3 | 0,5 | 2,5 | 0,35 | 2,65 | — | — |
| 4 | 0,7 | 3,3 | 0,5 | 3,5 | — | — |
| 5 | 0,8 | 4,2 | 0,5 | 4,5 | — | — |
| 6 | 1 | 5 | 0,75 | 5,2 | 0,5 | 5,5 |
| 7 | 1 | 6 | 0,75 | 6,2 | 0,5 | 6,5 |
The table can be continued, it is large, but we will not do this within the scope of this article. For more detailed values, we recommend that you refer to the document - GOST 19257 - 73.
These are standard sizes, but there are special purposes, unique connections. For them, everything is very simple to calculate independently. If the thread is marked M10 and the pitch is 0.3, then 0.3 mm must be subtracted from 10 mm. The result will be equal to the hole diameter - 9.7 mm.
If it is made smaller, it will be difficult for the tap to pass, and areas with poor processing will form. And if it is more, then the grooves will be shallow, the screw will wobble inside or even fall out over time.
Let's also imagine the international marking system in inches:
| Designation, inches | External | Interior | Thread, mm | Step |
| G 1/8 | 9,37 | 8,858,8 | 28 | 28 |
| G 1/4 | 13,16 | 11,89 | 11,8 | 19 |
| G 3/8 | 16,66 | 15,39 | 15,25 | 19 |
| G 1/2 | 20,95 | 19,17 | 19,00 | 14 |
| G 5/8 | 22,91 | 21,13 | 21,00 | 14 |
| G 3/4 | 26,44 | 24,66 | 24,50 | 14 |
| G 7/8 | 30,20 | 28,42 | 28,25 | 14 |
| G 1 | 33,25 | 30,93 | 30,75 | 11 |
| G 1, 1/8 | 37,90 | 35,58 | 35,30 | 11 |
| G 1, 1/4 | 41,91 | 25,59 | 39,25 | 11 |
| G 1, 3/8 | 44,32 | 45,00 | 41,70 | 11 |
| G 1, 1/2 | 47,80 | 45,48 | 45,25 | 11 |
| G 1, 3/4 | 53,74 | 51,43 | 51,10 | 11 |
| G 2 | 29,61 | 57,29 | 57,00 | 11 |
| G 2, 1/4 | 25,17 | 62,96 | 63,10 | 11 |
| G 2, 1/2 | 75,18 | 72,86 | 72,60 | 11 |
| G 2, 3/4 | 81,53 | 79,21 | 78,90 | 11 |
| G 3 | 87,88 | 58,56 | 85,30 | 11 |
| G 3, 1/4 | 93,98 | 91,66 | 91,50 | 11 |
| G 3, 1/2 | 100,33 | 98,01 | 97,70 | 11 |
| G 3, 3/4 | 106,68 | 104,3 | 104,00 | 11 |
| G 4 | 113,03 | 110,71 | 110,40 | 11 |
Tools for manual thread cutting
When cutting threads manually, the workpiece (rod, pipe) is stationary, and the tool itself rotates. In this case, there is no peripheral sliding speed, so the thread cutting tools practically do not heat up to high temperatures. To reduce mechanical wear of the thread-forming profile and reduce the effort, the area of the workpiece required for cutting is lubricated. If there are large differences between the diameter of the original workpiece and the diameter of the thread, it is also necessary to lubricate the inner surface of the hole.
It is believed that in order to form a full-fledged threaded profile, the diameter of the initial workpiece (for the most popular diameters) must correspond to the following values:
| Diameter of cut thread | M6 | M8 | M10 | M12 | M16 | M20 |
| Diameter of the original rod (or tubular blank), mm | 5,80…5,95 | 7,75…7,90 | 9,70…9,95 | 11,80…11,95 | 15,80…15,95 | 19,80…19,95 |
Note : The data given in the table can also be used to determine the diameter of the initial workpiece for subsequent thread shaping on machines with flat dies.
An important element for choosing the right lecher is the material from which it is made. The peculiarity of the thread cutting process - a gradual increase in force, with a sharp decrease towards the end of the process - determines the increased viscosity of the threading material, otherwise the thread profile will intensively chip. Therefore, the optimal choice would be levers made of alloy tool steel X12F1 or 9ХС, with a hardness of 59…61HRC. For cutting threads on heat-resistant and alloy steels, a tool made of high-speed steel grades R6M5 or R9K6, with a hardness of 60...63 HRC, is suitable. The price of such blades will be high, so their use is justified only for large volumes of production of threaded parts. For domestic purposes, it is quite acceptable to use lerks made from carbon tool steels U10 or U12.
Among the enterprises that produce such tooling, the highest ratings are those of Izhevsk, Chelyabinsk, Vladivostok, Samara, Bryansk, Nizhny Novgorod (Russia), Orsha, Minsk (Belarus), and Lvov (Ukraine). Foreign-made lechers from UFC (Italy) and CM Tools (Finland) have proven themselves to be excellent in operation.
Useful tips
- Determine the level angle and check the square after each turn for the first 3-4 rotations.
- Make turns in the opposite direction to get rid of metal shavings. It may stick.
- Use linseed oil or drying oil, kerosene, turpentine, lard or regular soap for lubrication. But if you are working with cast iron or bronze, it is better to carry out the procedure dry.
In the article, we described how and how to cut an internal thread with a tap manually, presented cutting rules and auxiliary tables so that you can avoid cutting the product. To complete the topic, watch a video on how to create hardware using a die:
Contact Rosta LLC if you decide to buy devices for industrial use. We have manual and semi-automatic band saws in stock and on order, as well as pendulum, vertical and two-post units. The price of goods has been reduced by 1.5 - 2 times compared to foreign analogues. To clarify the information you are interested in, contact our managers, we will be happy to help you select equipment.
How to cut external threads using a die
To cut external threads manually, a special tool is used - a die holder with dies of various diameters.
Die holder with dies for different diameters
In hard-to-reach places, for example near walls, a die holder with a ratchet is used.
Selection of dies
Nominal thread diameter is the diameter at the vertices of the thread triangles. The die cuts the metal, forming depressions and leaving the tops intact, thus both the rod and the die must be the same diameter. The diameter of the thread, for example, is M3 - this is “M” - metric thread, and the number is the nominal diameter of the thread in mm. Accordingly, to cut a thread on a 3 mm rod, we take an M3 die. Measurements of the rod are made with a caliper.
To make the die cut better into the rod, a chamfer is cut off from its end.
Principle of thread cutting with a die
To secure the workpiece you will need a vice. The workpiece is firmly fixed in a vice and lubricated with machine oil for easier movement of the die, reducing friction and tool wear.
When cutting threads with a die, you must avoid large accumulations of chips in the chip removal holes.
The die is installed on the end of the part perpendicularly. With slight pressure, they begin to rotate the die holder clockwise if the thread is right-handed, respectively, if it is left-handed, then counterclockwise.
Cut the thread as follows:
- First make 2-3 turns.
- Then half a turn back to remove chips.
- Lubricate after every 3-4 turns, using a syringe.
- Etc.
I recommend: Foundation bolt: characteristics, dimensions, types, scope of application and selection tips
The thread is checked with a nut or ring gauge. You can buy nuts for your thread here → https://rus-metiz.com/categories/gaiki (RusMetiz).
Ring gauge
