The sinker is one of the consumable components of the tackle and often disappears along with the hook when biting large and strong prey. In stores, the cost of sinkers increases in direct proportion to their weight. Therefore, if catching large fish is carried out using several tackles, then purchasing sinkers becomes quite expensive.
At the same time, this element of equipment is quite simple to manufacture and practically does not require careful processing and complex preparation for use.
The material for the sinker is also quite common and accessible, so even complex sinkers can be made independently using appropriate blanks.
Content
- Materials
- Samples
- Mold making
- Casting sinkers
- Pros and cons of making your own sinkers
Hi all! Today I want to share my ideas, best practices and experience in making lead weights for spinning fishing.
I’ll say right away: this method is only suitable for small batches and simple shapes of sinkers. For example, I would recommend making collapsible Cheburashkas using aluminum molds, which I use myself)
Before the start of the season, I decided to add weights to my collection - “bullets”, for the increasingly popular jig-rig.
Materials
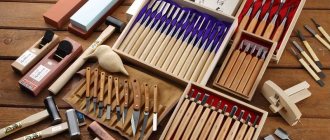
So where do we start? First, we need to prepare a set of materials for making molds for our future sinkers. I make the forms from ordinary building plaster.
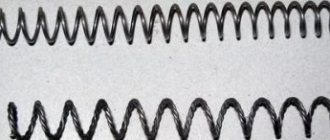
I use stainless steel wire with a cross section of 0.8 mm. Also, we will need ordinary disposable containers, any fatty cream, such as “baby”, water and an old spoon.
Samples
These are ready-made sinkers, purchased or previously manufactured. Any thing can serve as a model. I made one sample from a real bullet)
The shape can be slightly adjusted with plasticine, but only a little, because... When the gypsum sets, it releases heat and a large volume of plasticine will simply melt. In this case, I took the bullets I had previously made and equipped them with wire loops, fixing it all with green plasticine.
Mold making
You need to prepare the gypsum mixture according to the “powder to water” rule, in a ratio of approximately 1:1, you need to focus on the consistency, it should be creamy.
Pre-lubricate our mold and samples with the prepared fatty cream.
Pour the mixed plaster into the container to fill exactly ½ of the container and tap it on the surface, expelling air bubbles. As soon as the gypsum begins to set, it is necessary to immerse our samples halfway in the hardening plaster. The setting time of the gypsum depends on the brand of the powder itself, the minimum time is 2 minutes, i.e. after 2 minutes we begin to carefully look at the surface of the plaster. As soon as it becomes matte, it’s time!
We insert guides along the edges of our form. It can be anything, I use pieces of wire, toothpicks, lollipop tubes.
Now we wait for complete hardening, 20-30 minutes is enough.
Then we lubricate the surface of the mold and the samples recessed in it with our rich cream.
We dilute the plaster again and fill the container to the top. We also remove air bubbles by tapping and leave to harden for the same 20-30 minutes.
After hardening, carefully remove the mold from the container and carefully separate it into two halves, removing the samples.
That's it, the form is ready! We leave it to dry for a couple of days near the battery - the water should completely evaporate.
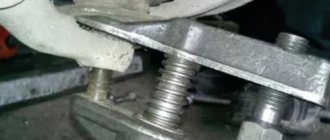
So I made 3 molds with different weights. Before the molds become unusable, the weights cast in them will last me for 2 or 3 seasons). The main disadvantage of such forms is their fragility. Gypsum is a fairly fragile material, so molds quickly crack, caverns and chips appear in them, especially for split molds. Bullet molds last much longer. For example, the uniform shown in the photo in the article is already in use for the second or even third season.
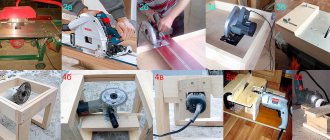
After the mold has completely dried, it is necessary to make sprues. To do this, mark the line of the sprue, connect the mold and drill out the sprue in the shape of a funnel using drills of different diameters. For the top point of the funnel I use a 10.1mm drill, for the bottom I use a 3.5mm drill.
DIY lead products - Metals, equipment, instructions
IT IS IMPORTANT TO KNOW! Fishermen caught 25 kg of fish using the Fish XXL ! Read more…
For feeder fishing, you can use various types of feeder feeders, both industrial and self-made.
Poachers who caught 317 kg of fish were not punished
A group of fishermen revealed the name of the secret bait during interrogation.
Category: regional news.
MORE →
This method allows you to obtain not very attractive products, but they are quite suitable for fishing. One should take into account the fact that the feeder is a consumable element of fishing, and appearance is not of fundamental importance. They can successfully compete with feeders made from curlers or plastic bottles.
The advantages of this method of making feeders
- simplicity - you need to spend minimal time making a mold for casting the load of the feeder;
- ease of giving the desired shape and weight of the feeder;
- The output is not expensive material.
To make your own feeder for feeder fishing, you need the following materials and tools:
Over 7 years of active fishing, I have found dozens of ways to improve the bite. Here are the most effective ones:
- Bite activator . This pheromone additive attracts fish most strongly in cold and warm water. Discussion of the bite activator “Hungry Fish”.
- Increased gear sensitivity. Read the appropriate manuals for your specific type of gear.
- Pheromone -based lures .
- any metal mesh that can be bought at a hardware store or a store for beekeepers (wire diameter 0.6 mm, cells measuring 5x5 mm);
- metal for sinkers (lead, tin, third);
- soft, flexible wire with a diameter of 0.7 mm;
- tin for mold, thickness 0.4-0.5mm;
- pliers or pliers;
- wire cutters;
- metal scissors;
- ruler;
- hammer;
- casting mold.
Mold for casting feeder sinkers
When making such a form, you should take into account the fact that you will have to pour out more than one feeder, and maybe more than a dozen. This is due to the fact that after fishing there is more than one feeder left in the reservoir, especially since you have to fish not in ideal conditions, but in extreme ones.
As a rule, there are more fish where it has the opportunity to hide from a predator. Such places may be places with a lot of snags or places with dense aquatic vegetation. In this case, you cannot do without hooks, which means that the next feeder may remain in the pond.
Based on this, the mold must be reliable and durable, capable of withstanding more than one casting. To make this form, a piece of tin with a thickness of 0.4-0.5 mm is used. As an example, you can use a tin can, the main thing is that this piece has the appropriate dimensions (12x4cm).
In order to accurately determine the shape, you need to pay attention to the drawing and, according to this drawing, cut the desired shape from a piece of tin.
As a result, you will get a blank for making the required shape of the sinker. To make a mold, you need to make bends on the workpiece along the lines indicated on the workpiece. As a result, you should get a groove with a handle.
When making the appropriate bends, you need to ensure that the structure is as tight and neat as possible. To prevent lead from sticking to the tin, aluminum foil is placed at the bottom of the groove. As a rule, it easily takes the desired shape.
Making the desired shape for the feeder feeder
To make a mold, you need to take a metal mesh and cut out the desired blank from it. As an option, a blank with dimensions of 14x4 cells is offered.
Of these 14 cells, two should be left for pouring into the casting mold, and the rest should be formed into a feeder. It is very easy to make round or spherical shapes from the mesh, but to make a square shape, you need to practice.
Having bent a suitable shape from the mesh, you need to take a piece of wire about 15cm long.
This piece of wire is used to stitch together the shape of the feeder at the joints, after which a loop is made on the edge of the wire for fastening. The lower part of the joint, as well as the entire joint, will subsequently be filled with lead or tin. To ensure that the mold is securely held in the ingot, bends are made at the junction of the feeder outward or inward of the mold. If you look at the picture, you can easily understand the whole technology.
Pour out the weight for the feeder
Pouring sinkers at home is not so difficult, especially since every amateur fisherman has done it at least once. Still, it should be recalled that such work requires great caution. Molten metal can burn through the body right down to the bone, and burns, especially deep ones, are very difficult to treat.
You also need to know that during the melting of metal, harmful substances are released that can harm the human respiratory system. There is only one conclusion that suggests itself, indicating that such work must be carried out in protective clothing and in a room with good ventilation. And it’s even better if this operation takes place outdoors.
It will not be superfluous if the work is carried out in protective glasses.
IT IS IMPORTANT TO KNOW! Fishermen caught 25 kg of fish using the Fish XXL ! Read more…
The casting mold must be clean and dry. To make the metal melt faster, it needs to be cut into small pieces (5x20mm).
For the melting process, you can use a barbecue or gas stove.
In order to know how much weight the feeder will have, the prepared metal is weighed on scales, after which it is poured into a mold and placed on fire.
After the metal has melted, you need to take the prepared form of the feeder and lower it into the molten metal at the joint. After this, the casting mold is removed from the heat and left to cool completely.
As a result, you will get a feeder similar to the one in the photo. After this, the feeder is weighed again and the weight is set on it. Since the metal is soft, it is enough to use a sharp metal object to mark the load.
Poachers who caught 317 kg of fish were not punished
A group of fishermen revealed the name of the secret bait during interrogation.
Category: regional news.
MORE →
To make them more attractive, they can be painted any color using spray paints and enamels. But if the mesh is covered with a protective layer or made of stainless steel, then it is better to make a higher-quality casting mold in order to obtain high-quality castings. Then there is no need for further work on the cultivation of the product.
The video shows another simple way to make feeder feeders:
DIY floating boilies
DIY PVC boat anchor
Homemade sled for fishing in winter
Over 7 years of active fishing, I have found dozens of ways to improve the bite. Here are the most effective ones:
- Bite activator . This pheromone additive attracts fish most strongly in cold and warm water. Discussion of the bite activator “Hungry Fish”.
- Increased gear sensitivity. Read the appropriate manuals for your specific type of gear.
- Pheromone -based lures .
Do-it-yourself winter fishing tent…
DIY boat electric motor
DIY ice drill from a screwdriver
Do-it-yourself bottom tackle
Homemade fishing rod stand
How to make a hinged transom for a PVC boat?…
Casting sinkers
Now we can start casting the lead weights! To do this we need wire for the ears, lead, a torch or crucible and a clamp.
We bend the ears from the wire using pliers and put them into the mold.
We connect the two halves of the form and fix them with a clamp.
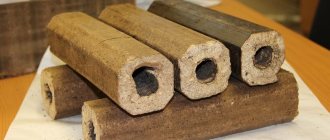
Melt the lead. I have old cheburakhs, tire weights and other lead scrap. I heat up the lead with a gas torch, it literally takes a few minutes, it’s very convenient! Next, pour the lead into the sprues and let it cool, that is, when you pour it into the last mold, the first one has already cooled down, everything is very fast!
Now we separate the mold and remove our weights.
Next we repeat in the same sequence.
Weights are cast very quickly, sometimes before fishing I remember that I have run out of a load of a certain weight, and then, in literally 20 minutes, I cast the dozen or one and a half weights I need. It takes less time than going to the store for the same goods)
In this way, you can experiment with the shapes and weights of sinkers, and invent some special shape of sinkers that are not available in stores. For example, last season I experimented with stick weights, making several versions of non-snagging weights with different lengths and diameters. The weight of such “stick” sinkers can be reduced directly while fishing, thanks to the small diameter of 6 and 8 mm (if you need to reduce the weight, you can simply bite off part of the sinker with pliers). Also, thanks to such diameters, the load passes 95% of hooks!
Another simplest form for casting weights is the “bullet” for Carolina. To make such a mold, you need to pour plaster into any sufficiently high mold, I took the cap from an aerosol can, and simply place the bullet samples coated with the same cream on top with the sharp side into the hardening plaster - that’s it, the mold is ready.
To cast such bullets, it is necessary to insert a “mortgage” made of steel wire, lubricated with ordinary toilet soap, into a mold, and pour lead on top. That's all.
The insert is removed from the bullet, leaving a hole for the fishing line.
Lead sinker - how to properly make a casting of the desired shape using available materials?
Every self-respecting fisherman usually has in his arsenal, in addition to hooks, floats and baits, several options for sinkers - lead castings that ensure accurate casting and immersion of the bait in the water.
And no matter how sad it is, if the cast is unsuccessful or the fish leaves the hook, in addition to the bait and hook, the sinker is also lost, a thing that is not very expensive, but very necessary.
So we have to open a foundry for lead weights in the kitchen several times a season.
Characteristics of the material and use in the manufacture of sinkers
For those who are just starting their career, experienced fishermen advise not to hesitate to stock up on a whole set of sinkers at once. Both very tiny and quite substantial ones are suitable here.
But, this is for the first time, and then, when the fisherman gains experience and thoroughly studies all the nearby bodies of water, it becomes necessary not only to replenish the supply of weights, but also to make them as convenient as possible for fishing.
This is where a soft, fusible and fairly heavy metal that does not react with water or air comes to the rescue - lead.
One of the reasons why lead and its alloys have become so popular for casting weights is the availability of the metal.
First as the main metal for casting shot, and later as a metal widely used in the automotive industry, in railway transport, and in communication lines, lead, in fact, has never been a big problem.
On the other hand, it was possible to melt the metal with a melting point of only 327.5 degrees using kerosene gas or a fire, and it could also be melted in an ordinary large tablespoon or tin can.
Pros and cons of lead sinkers
Like any other tackle, a lead sinker has its pros and cons. Here, to understand, you need to take into account both the consumer qualities necessary for fishing, and those issues that relate to manufacturing issues, for example, the availability of materials or the complexity of the work.
According to experienced fishermen, the main parameters that a sinker must meet should include:
- Sinker weight – it must be heavy to ensure accuracy of casting the tackle;
- Have a streamlined shape - in the air, the irregular shape of the sinker, rectangular shape or roughness greatly influences the casting distance and accuracy, and in the aquatic environment this creates turbulence that scares away fish, prevents the bait from being guided correctly, and contributes to entanglement in aquatic vegetation;
- The casting should not only have smooth shapes, but also provide reliable fastening to the fishing line;
- Be inconspicuous, not stand out against the background of bottom vegetation, have, if possible, a matte color that is natural for the aquatic environment;
- Made from available materials;
- If possible, be manufactured in the simplest conditions using a minimum of auxiliary tools;
Among the advantages of lead sinkers is the availability of the material
As you can see, the basic requirements for sinkers are quite simple and quite applicable to a material such as lead. Therefore, the positive aspects of lead sinkers are:
- Availability of material;
- Ease of working with lead castings;
- The ability to independently smelt the required amount of sinkers;
- Cheap production, even if one or two are lost, it will not be a big tragedy;
- The ability to independently choose the weight and shape;
- The material has a natural color, ideal for the environment of most bodies of water.
However, it is worth mentioning the problems associated with the manufacture of lead weights:
- The work carries some risk of injury;
- It is not always possible to achieve results the first time;
- To work, you need a tool.
Technology for making lead weights at home
Casting lead sinkers, despite the ease of technology and availability of materials, is still a mini metallurgical production, so before starting work it is necessary to at least superficially study the basics of metal melting. And although there is nothing special here, it is very important to listen to advice and instructions - both the result of the work and the safety of the work depend on it.
Materials
For the work you will need several types of materials - plaster, cardboard, tape, twine, wax or paraffin, and of course, lead.
Plaster or alabaster is usually used to make molds. Gypsum is more reliable than alabaster, but alabaster is more affordable. These two materials are required to make casting molds.
The auxiliary material for the work will be wax or paraffin. From them, models of future sinkers are made.
Clamps are used to secure the halves of the forms, but it is cheaper and easier to use twine or a clothesline, or, in a very modern way, adhesive tape.
Lead for melting can be found at any scrap metal collection point. Not only rechargeable battery scrap is scrapped; often lead-sheathed communication cables, lead alloys such as babbitt or typographical lead font are scrapped.
Mold making
The classic method of making a mold consists of sculpting a sinker model from wax or paraffin and then casting a reusable mold from plaster or alabaster.
Several models of sinkers are made from wax or paraffin. In principle, you can use plasticine, but then, in order for the model to separate from the plaster mold, it will be necessary to lubricate it with Vaseline or fat-based hand cream.
After receiving the models, a gypsum solution is made and poured into a plastic or cardboard mold, so that the top surface is as smooth as possible. Until the plaster completely hardens, the model is pressed halfway into it at a distance of 1-1.5 cm from the top edge of the mold.
After final hardening, the entire surface, including the model, is smeared with Vaseline, grease or fat-based cream and filled with plaster on top. When pouring, make sure that the height of both forms is the same.
Lead weight mold
After drying, the molds are separated, the model is removed, and the place where the wax was is cleaned of any remaining grease. After the plaster molds have completely dried, grooves are made from the mold to the surface using a sharp knife or the tip of a thick needle. These channels are necessary to remove air from the filling cavity. A neck is made in the upper part for pouring metal.
In principle, the melting point of lead makes it possible to make sinkers without casting plaster molds. You can use wooden blocks, potatoes or beets as a mold; even ordinary office paper rolled into a cone in several layers can be cast into a good sinker.
Casting sinkers
It is recommended to grind the lead before casting. For melting, it is enough to achieve a metal size weighing 10-20 grams. This is necessary so that the metal melts completely and reaches the casting temperature of 400-450 degrees.
The form is connected and tightly tied with rope, tape or pressed with a screw clamp. They do this tightly, but not too rigidly, so that the form does not crack due to the temperature of the metal.
Melt lead in a melting bowl or spoon. Experienced fishermen use a regular ladle with a curved handle or a large stainless steel spoon for these purposes. After the lead has melted, the film is removed from the metal surface. The mold heats up for 5-7 minutes.
After the metal has acquired the necessary fluidity, it is carefully poured into the neck of the casting until molten metal begins to appear from the air channels. After all the necks are filled, the mold is left to cool at room temperature.
It is recommended to open the form 4-6 hours after filling.
Final processing
After the casting has cooled, they begin to separate the molds and remove the castings. First, remove one part, and then carefully remove the casting from the second part of the mold.
The resulting lumps of lead are bitten off with pliers or cut off with a knife. The next step is making holes in the weights. This is usually done with an awl or a thick needle. And giving the final shape is done using sandpaper and a file.
What finished lead weights look like
Just like that, with the help of basic tools and available materials, you can pour out the required amount of sinkers of various shapes.
Today, with the availability of technologies and materials, casting sinkers is becoming even easier, because on fishing forums you can order not only ready-made sinkers, but also entire sets with ready-made molds for casting and all the necessary tools.
Pros and cons of making your own sinkers
The most important advantage is the low cost of the resulting weights. It is also important that you can always cast the missing weights within 10-15 minutes if you have ready-made molds. I practice this quite often; before fishing, I quickly cast a dozen weights, if necessary.
Another plus for these homemade products is that you can choose a special shape and weight of the sinker for your fishing conditions, equip it with any accessories, “play” with the diameter and size of the loops, etc. Also, this is a quite exciting and educational lesson in physics and chemistry for your children! Children are happy to get involved in the process, even for this alone it’s worth trying to make a mold and cast weights yourself!
Now about the disadvantages: the most important one, as I already mentioned, is the fragility of the form. You can add reinforcing additives to gypsum, such as lime and others, but this will not fundamentally change the situation. Also, one of the disadvantages of this method is a certain amount of flash on the finished weights, this applies to collapsible forms. A mold for a “bullet” with a hole is the most successful option both in terms of durability and ease of making the mold, and in terms of casting the sinkers themselves. I 105% recommend making a mold for bullets! Another disadvantage is the difficulty of marking such cargo. The grams have to be marked manually.
In general, making such sinkers does not require any special equipment or any special knowledge or skills, everything is extremely simple!
That’s probably all, if you have any questions, write in the comments, I’ll be happy to answer;)
DIY lead crafts
- How to protect figurines from oxidation after melting lead
- How to cast plastic parts at home
- How to melt and process plastic
What is needed for this?
Also prepare a pack of paper napkins, and for working with acid, chemical glassware, gloves and a respirator.
Home and industrial methods
There is literally a homemade way to protect lead surfaces from corrosion. There is always sunflower oil on the farm. Pour it into a bowl and immerse the newly smelted figurine in it. Hold for about five minutes, remove, place on a layer of napkins and let dry.
In production, to protect lead parts from oxidation, it is usually used, in a word, where industrial oil is sold. You can order graphite lubricant through the online store. The lead product will retain its shine for a long time.
If the product is large, you can simply wipe it with a cotton swab dipped in vegetable oil.
Fishing varnishes
You can coat the lead figurine with metal varnish. In a store that sells products for fishermen, you can often find a special “fishing” varnish designed specifically for such purposes. There are a variety of colors available, but if you want to maintain a metallic sheen, clear is best for you. The industry also produces fluorescent “fishing” varnishes.
Forms for casting sinkers - svoimirukami.org
Do you like fishing? Tired of making molds from plaster? Do you have lead lying around? Molds for casting lead weights from an aluminum alloy - perhaps this is what you have been looking for for a long time.