Safety when working with homemade equipment
When working with any tool, you must follow safety precautions, as ignoring them can cause various injuries. We will briefly list the recommended measures to ensure the safety of the master’s work on this machine.
- It is recommended to remove sharp chamfers and sand all manufactured parts to eliminate the possibility of hand injury (splinters, etc.)
- When working, it is necessary to use a chip extractor or a special vacuum cleaner, for example, a cyclone type, to remove sawdust and dust from the sawing area, which can cause the following harm:
| To the Master | Respiratory and eye contact |
| Tool | Getting inside the instrument and:
|
| Process | Chips and sawdust getting between the workpiece and the table, resulting in poor fit and misalignment - the result is uneven processing. |
- When working, it is necessary to use pushers, since when working with small parts, it is possible that the master’s hands will get into the cutting zone, which will lead to injury.
Machine parts
A homemade jointer is represented by a combination of various units that are connected together. The manufacture of the jointer must be carried out taking into account the information below:
- Base. It is represented by the lower part, on which various nodes are based.
- Side wall. It acts as a load-bearing element to which various components are attached for mounting.
- The table is rear or fixed. This element is attached to the side wall and forms the plane of movement of the workpiece.
- Front table. Often this element can change its height. A special mechanism is created for this.
- Side support. It is mounted on the back table; its main purpose is to direct the movement of the workpiece.
- Spacer corners. They are used to strengthen the structure and increase its stability.
- Electric planer. An electric planer is used as a basis in the manufacture of the structure.
This mechanism is characterized by a fairly simple design. To connect individual units, various fasteners are used.
Methods for sharpening knives
Today, two main methods are used for tool dressing: machine processing and manual dressing. For the first method, an electric sharpening machine or a manual sharpener is used. For the manual method, abrasive stones of different grain sizes or sandpaper are used.
For knives with a straight edge, this is most often done in two stages - first sharpening on an electric sharpener, and then finishing on a stone by hand. And for curly or semicircular blades, the shape is first edited with a file or on a thin abrasive wheel of an electric sharpener. The second step is checking the shape - the blade is inserted into the plane and the correct shape of the cutting edge is checked. At the very end, finishing is done on a sharpening machine with a vulcanite wheel.
For critical work, in addition to an electric sharpening machine with abrasive wheels of different grain sizes and hand stones, a technique such as finishing on a leather belt using polishing pastes is also used. In this case, the edge turns out to be perfectly sharp.
Required materials and tools
Let's consider the manufacture of the simplest design, designed for a planing depth of up to 1.2 mm and a width of processed wooden workpieces of up to 120 mm. To assemble such an electric plane with your own hands, you will need the following materials and parts:
- bearings;
- steel strips;
- pressure plates;
- M6 and M8 screws with nuts;
- spring washers;
- metal corners (20x20x3 mm);
- staples;
- sheet of plywood (10 mm) or metal (3-5 mm thick);
- belt drive pulleys installed on the shaft of the electric motor and drum;
- a drum (with one or two knives) from an old planer or electric planer, on which you can change cutting attachments;
- a working electric motor from a grinder, an old electric plane or a planer;
- belt;
- button (switch) to turn the electric planer on and off;
- wires and cord with plug;
- residual current device (RCD);
- capacitors (if the electric motor used is three-phase).
Installing a separate RCD for an electric plane in the panel (even directly on the machine) will increase electrical safety when working with equipment. Protection is selected according to the power of the working engine. The cord and wires must be of a suitable cross-section, taking into account the power of the installed electric motor.
Phase shifting capacitors must be connected in parallel. In this case, the required total capacity is determined by the power of the installed electric motor: approximately 100 μF per 1 kW. Capacitors must be designed for mains voltage.
To implement the project you will need the following tools:
- several wrenches designed to tighten the nuts on the bolts;
- roulette;
- building level;
- marker or pencil;
- welding machine with electrodes;
- an electric drill with drills and a circle of small diameter intended for cutting;
- a jigsaw with files for it for wood and metal or hand saws for a similar purpose;
- angle grinder complete with wheels for cutting metal.
Manufacturing
For work you need to use the following materials and tools:
- Electric planer or motor, depending on the chosen design option.
- Plywood 10-15 mm thick for tables and 15-20 mm for making the side wall of the bed, which will serve as the basis of the structure. For manufacturing, you can use chipboard, but such a jointing machine will be less convenient.
- Drill with drill bits of suitable thickness.
- Jigsaw.
- A circular saw.
- Electric screwdriver.
- A wooden board or timber for making a side support.
Making a jointer from an electric planer is easier than using a separate motor, but the latter will be less powerful. Before starting work, you need to select a suitable design and make a drawing.
We make the bed
It is the basis of the entire structure. All other parts are attached to it. When making it yourself, it is convenient to use a sheet of plywood of a suitable size for this purpose.
The frame must ensure high structural stability. All parts must be securely attached to it. The method of attachment depends on the material used. For metal parts, you can use welding or screw fastenings; for wooden parts, screws and glue. When choosing a frame option, you need to consider whether you plan to make the structure collapsible. In this case, it is more convenient to use screw connections.
Installation of the blade shaft
You won’t be able to make a shaft for a jointer yourself. It is better to order this unit from specialists or purchase it in a store. The saw consists of three blades, which, when rotated, remove a layer of wood from the workpiece.
The drum is mounted on the frame using bearings. A roller must be provided at the edge of the shaft on which a belt connected to the motor shaft will be attached.
Table
The design provides two tables for the jointer - receiving and feeding. They are located on both sides of the shaft with knives. The surface must be smooth, because the workpiece must be pressed against the surface during processing.
In order for the processing to be of high quality, the height of the tabletop surface must correspond to the blades. The lower it is, the greater the layer of wood that will be removed during processing. To adjust the height of the table, a special mechanism is installed.
Motor Drive Installation
To make an electric jointer, you need to choose the right electric motor. It is enough for its power to exceed 1000 W. It is convenient to use models that are powered by 220 V.
The pulleys of the engine and drum with knives must be in the same plane. In order to achieve this, it is necessary to use special tools (level and other measuring tools). In this case, the belt will transmit rotation in the most efficient way.
The belt must be tight. Otherwise, it will not be able to provide the required rotation speed. When providing space for the engine, it is necessary that it be possible to adjust its position. In this case, it will be convenient to select it so as to ensure the desired degree of pulley tension.
Hard stop
It is necessary to install a wooden piece perpendicular to the surface of the table, which will serve as a guide. It is needed in order to ensure the linear movement of the workpiece. To do this, you can use a wooden piece of a suitable shape. In this case, it is necessary to clean its surface so that there are no burrs or irregularities on it.
Making a jointer from an electric planer at home
[hide]
- Machine design
- How to make a jointer tool
- Step-by-step instruction
- Alternative option
- Professional homemade jointer
Planing is one of the methods for finishing wood. Boards and beams acquire a smooth, polished surface. The jointer has a simpler design than its thicknesser counterpart. The installation is easy to assemble yourself using available equipment.
Machine design
The jointing machine is equipped with a table. The table has a technological hole; a knife shaft operating from an electric drive is placed in it. During the planing process, lumber is fed onto the shaft using a roller mechanism. The support elements for the workpiece can be tilted at the required angle. The thickness of the board is adjusted by the tabletop by feeding it up and down.
The knife shaft can have a single-sided or double-sided design . In the first case, one plane of the board is processed. The double-sided shaft allows you to joint wood from both sides at the same time.
There is equipment with four knives that provide four-sided grinding. These samples are most often installed at large woodworking enterprises. The cleanliness of the processing depends on the diameter of the knife shaft.
The larger it is, the higher the quality of grinding.
Two types of knives can be installed on a homemade jointing machine:
- Single-edged. Subject to periodic sharpening.
- Double-edged, disposable. When worn out, replace them with new ones.
Planers differ in shaft rotation speed, tabletop length, and planing width of lumber. The surface of the tabletop is divided into two transverse segments, with the front part located lower than the back to regulate the thickness of the removed layer of wood. The optimal cutting thickness is 0.5 cm. If more removal is necessary, several cycles must be performed.
For stability and improved load-bearing characteristics, the jointer frame is made of cast iron, and the frame is supplemented with steel plates. The knife shaft is fixed between the two halves of the tabletop. For convenience, the table is equipped with guide rulers.
How to make a jointer tool
The jointer has a simple design, it can be made in a few hours: the process does not require special skills and knowledge. A power planer is useful in carpentry, but the quality of wood processing is inferior to a jointer. Therefore, it is necessary to improve the existing sample to achieve a better result.
An electric planer with a sliding blade guard that can be retracted during jointing is well suited as the main element of future equipment. It is better if the plane is equipped with a fastening with knives facing upwards.
During the assembly process you will need:
- boards,
- plywood sheet,
- fasteners.
Step-by-step instruction
First you need to make a base of boards. It should have the shape of a box without a bottom or lid. The length of the frame will correspond to the length of the working surface.
At the next stage, a sheet of plywood must be laid on top of the box, a technological hole must be formed, and the plane platform will be installed in it.
Two more similar sheets are laid on top of the plywood, serving as the back and front plates. The sheet that the tree will accept when planing should be 2 mm thicker. It is necessary to maintain parallel placement of plywood sheets. This can be verified with a sliver probe. Before fixing the panel to the frame, the edge of the material is processed .
The hand-held electric planer fits onto a mount mounted with the knives facing up on the bottom sheet of plywood.
You will need wood to cut out the mounting lugs. Adjusting bolts will be threaded through these elements, setting the machine knife to a given height relative to its base.
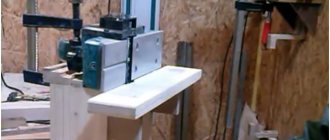
You need to install a side stop made of the remaining plywood on the jointer . After this, you can begin processing lumber.
Alternative option
If you don’t plan to work with long workpieces, you can make a compact household device. This circular saw can be easily equipped with special supports and turns into a full-fledged machine.
First you need to form a box from thick plywood, wood or MDF. The structure is fixed with wood glue or reinforced with self-tapping screws. The role of the countertop is performed by the electric planer platform.
The most complex element that a jointer is equipped with is a side stop . It will move on special grooves.
Its fixation is ensured by two screws and wing nuts. The cutting tool is held in the box by side fasteners.
For convenience, a home electric jointer can be improved by forming in its design an outlet for connecting an industrial vacuum cleaner.
Professional homemade jointer
The figure shows drawings with detailed explanations. You will need a 1.5 kW electric motor connected to the shaft using a drive belt. You can make the knife shaft yourself or order it from a turner.
During the work, it is necessary to weld a frame from a metal profile or angle. Then the base plate and the base for the screw are welded to the frame. The side strips are attached to ensure free movement of the guides. To do this, you need to create technological gaps.
The lead screw is welded to the machine after it is installed on the support . The equipment must be provided with a front plate, consisting of a top part and a guide rail. They are connected to each other by side elements. The end parts of the surfaces must be made parallel, after which they are carefully ground.
To ensure that the dimensions of the sidewalls installed on a homemade jointer are the same, they are processed and provided with holes for studs. After welding the sidewalls and guide elements, the temporary studs are removed.
At the last stage, the knife shaft is installed. At the same time, raise the front tabletop to its level so that the edge of the panel is parallel to the axis of the shaft. The back of the tabletop must be fixed in a stationary position. The center of gravity of this woodworking unit is high. To reduce vibration, it is recommended to additionally strengthen the jointers.
The process of assembling a circular saw table
First, adjust the base to the optimal size. The wooden countertop is treated and left to soak in the antiseptic composition for a day. The metal base is sanded along the edges to avoid nicks.
Wood antiseptic is a modern building material that protects wood of any species in structures.
Electric saw
Electric saw table assembly process:
- First, prepare the beams, which are trimmed using a plane. A strong frame is assembled from them. Holes with a diameter of 5 mm should be drilled on each side of the base.
- Holes of the same diameter are also made in the drawers.
- Legs and drawers are installed on the tabletop. To ensure fixation, it is recommended to use clamps. They will help secure the legs while the glue dries. They are additionally fixed with metal corners and tightened with self-tapping screws.
- Fastening the saw with M4 bolts. The process is performed from the reverse side.
- To make a parallel stop, two strips are sawn off from plywood. Their width should be similar to the width of the tabletop. The average size is 10 cm. The corners must be rounded and polished.
The key property of the created table should be convenience
Important! When installing an electric saw, you need to fix the start button
For this purpose, a wire is suitable, which is threaded through the hole in the handle and twisted in the desired position.
Hand saw
For a hand saw you will need a 20mm sheet of plywood. The tabletop blank is made according to the selected size. The markings are made with a pencil, and the cutting is done with an electric jigsaw. Finally, the edge is milled. The workpiece must be sanded with sandpaper.
Care should be taken to ensure its stability. No loosening is allowed, otherwise it will negatively affect safety.
Subsequent assembly technology:
- The header is turned over, and markings are made on the bottom side for a hand saw. You need to attach a saw without a disc to the base and mark the dimensions of the sole.
- Using a hand router, a 10 mm recess is made.
- Next, the saw is tried on and the markings are adjusted.
- Markings are made on the bottom side, which are intended for stiffening ribs. For them, blanks are prepared from boards measuring 50x100 mm. The optimal location is up to 10 cm from the edge of the table.
- The longitudinal stiffening ribs are sawn and attached to the tabletop using wood glue. Clamps are used for fixation. Using a similar principle, side stiffening ribs are attached from beams.
- After the glue has dried, holes are drilled in the stiffeners and tightened with self-tapping screws.
- For table legs, boards measuring 50x100mm are used. The average optimal height is up to 110 cm. The legs are attached to the outside of the stiffeners with strong bolts. To improve stability, you can use ties made of beams measuring 50x50 mm.
The tabletop should have as smooth a surface as possible. This will reduce the likelihood of injury while working. The hand-held circular saw is installed in the finished groove from the bottom side, the sole is fixed with bolts. A toothed disk is inserted into the slot. By following the technology and completing all the steps, you can make a homemade table at minimal cost to suit your height.
Regularly check the position of the table and its strength. The structure must be stable, without loosening.
Homemade thickness planer from an electric planer
To process wooden products, you can use a special thicknesser from an electric planer, made independently and intended for finishing wood blanks. To make a surface planer with your own hands, you can use an electric planer, which has been used for work for quite a long time, but has retained all its performance characteristics.
Design of thickness planer
The thickness planer includes:
- horizontal work table for processing wooden products;
- working processing shaft;
- pressure rollers for feeding the workpiece into the processing zone;
- table height adjustment system;
- a safety device that prevents the return of the workpiece.
Thicknesser using an electric planer
Thicknessing machines are manufactured at industrial enterprises and are used in production where surface finishing of wooden workpieces is required.
The use of a thicknesser significantly reduces the processing time of workpieces, but if the selling price of the machine is quite high and one-time operations are performed, it is better to make the unit yourself with your own hands. Using an electric planer, which has been in use for quite a long time, you can make a thickness planer, which can be used to process various products with fairly high quality and accuracy.
In order to make a surface planer from an electric planer with your own hands, you need the following units and components:
- electric plane;
- wooden bars;
- plywood 10-15 mm;
- clamps;
- barbell;
- hairpins;
- pads.
The principle of operation of the machine is to carry out the operation of processing a wooden workpiece, fixed with clamps and fed into the area of the working shaft of the plane.
Manufacturing of the machine
To manufacture a thicknessing machine, several operations are carried out during which the work is performed:
- The base for the desktop is made of plywood (10-15 mm), 400x500 mm in size.
- The stands for the platform with the electric planer are being fixed. Plywood is used to make stands. The structure is assembled using screws and fixed to the base, followed by installation of an electric planer.
- A platform is cut out for mounting the electric planer. A plane is attached to the platform, taking into account a special hole cut exactly in the center, matching the size of the plane. For fastening, special strips are used, which are fixed with screws.
- Threaded screws with gears are mounted on the platform. A special mechanism is installed to raise and lower the platform. 4 screws are mounted at the corners of the base.
- The platform is mounted on ready-made stands and, together with the electric planer, is secured with screws. Electrical wiring is laid to power the plane, taking into account the possibility of preventing damage to the wiring when processing workpieces.
- The platform control handle with an electric planer is being installed.
- A bar with a scale and a special pointer are installed. A measuring bar is necessary for accurately measuring workpieces and maintaining specified dimensions.
After completing the assembly of the thickness planer, testing and adjustment are carried out. After work, the electric planer must undergo cleaning and lubrication of working parts.
Features of manufacturing a thicknesser
Initially, before manufacturing a surface planer, a drawing of the machine is made indicating the exact dimensions of all parts.
The dimensions of the machine’s structural elements are precisely established, which must be made, observing:
- width of guides;
- length of guides;
- hairpin length,
determining the dimensions of the processed workpieces.
The installation of the pin is marked, which should be located between the two handles exactly in the middle, which ensures ease of operation on the machine. To displace the pin, a bearing is mounted in the upper part of the housing cover, and a nut is welded to the plate to adjust the height of the workpiece.
It is also necessary to take into account that the length of the guides made from bars must be greater than the base. This ensures parallel flow of the workpiece during processing relative to the knives of the electric planer.
If you find an error, please select a piece of text and press Ctrl+Enter.
Manufacturing stages
The process of creating a jointing machine is carried out in several stages. Each is worth considering in more detail.
bed
First of all, the master should start assembling it. You can do it yourself if you take into account some points.
- The frame is usually made of a metal profile. The most common is a channel with a wall thickness of 6-8 mm.
- When creating a drawing of the frame, it is necessary to take into account that the load from the equipment and the workpiece is evenly distributed throughout the structure.
- During the assembly process, it is necessary to ensure that the elements are firmly fastened.
- Fixation of channels or other rolled metal elements is carried out by welding or threaded connections. If you need to manufacture a mobile machine, it is better to give preference to the second option.
Shaft with knives
To operate, a jointer requires a drum equipped with knives for processing wooden surfaces. It is with their help that it will be possible to remove a small layer of the workpiece to ensure smoothness. Features of shaft installation begin with its design.
The shaft is a separate mechanism, the design of which involves the use of blades and bearings. The shaft itself ensures the rotation of the blades. Assembling the structure of the unit will require taking into account some points.
- You won't be able to make blades yourself. Therefore, it is better to purchase suitable knives made of durable steel in advance. You can take blades from a router or grinder.
- The drum must be installed on the frame, securing it to bearings. They have special grooves.
- When attaching the mechanism with blades, you should carefully ensure that it fits firmly. It is this unit that bears the entire load during operation of the machine, and poor-quality installation will lead to damage to the device.
- At the end of the output shaft it is necessary to install a roller for fastening the rotation belt. When making a video with your own hands, it is recommended to take a responsible approach to choosing a profile. It is better to give preference to elements that fit the belt profile.
Table
Next in line is the table, which should be placed on opposite sides of the drum. The process of making a table is quite complex. This is explained by the need to achieve rigid fixation of the elements through the use of a special mechanism.
In addition, the surfaces of the countertops must be smooth.
Additionally, during installation you should monitor the level of the countertops. They should be flush with the drum
It is important that there is a possibility to adjust the height of the element. To achieve the desired result, it is recommended to install a special mechanism. The width and length of the table must correspond to the workpieces that are planned to be processed
The width and length of the table must correspond to the workpieces that are planned to be processed.
Engine
The rotation of the shaft with blades occurs due to the operation of an electric motor. The installation process of such a unit requires taking into account important points.
- First you need to choose the right electric motor. This can be done by first calculating the required power, which is enough to process the workpieces. For domestic use, electric motors with a power above 1 kW are a suitable option.
- The motor pulley should be positioned in the same plane as the drum pulley. During installation, it is recommended to use a level and measuring tools to achieve the required installation accuracy.
- Before mounting the engine, it is necessary to select pulleys, taking into account their diameters.
- The pulley belt should be well tensioned. Additionally, it is necessary to check the distance between the pulleys and bring it into compliance with established standards.
- It is worthwhile to provide a seat for the motor on the jointer in order to ensure possible adjustment of its position.
Emphasis
Another element, the installation of which requires taking into account some nuances. The stop is designed to hold the workpiece in the required position while it moves along the table. It must be secured at the far end of the table. You can use a strong piece of wood as a support.
A homemade jointer should be made as safe as possible. To achieve this, it is recommended to additionally manufacture a special protective casing that will prevent damage to the motor, rollers and belts during rotation of the blades.
To learn how to make a jointer with your own hands, see below.
Making a planing machine
As already mentioned, you can make a thickness planer yourself. The most common option is based on an electric planer.
Necessary materials and equipment
In order to make a surface planer with your own hands using an electric planer, you will need the following materials and tools:
- electric plane;
- sheet of plywood 1-1.5 cm thick
- barbell;
- wooden bars;
- plywood 10-15 mm;
- pads;
- clamps;
- hairpins.
It is also worth stocking up on screws, screws with gears, a measuring bar (a regular ruler, including a plastic one, will do) and a control knob.
Step-by-step instruction
Even with minimal experience, it is quite possible to assemble a homemade thickness planer from an electric planer and auxiliary materials. You need to act like this:
Plywood 1.5 cm thick will be used as a base. The dimensions of the base should be 50 by 40 cm. Then you need to attach the tool stand mount to the base. The stands will be made of the same plywood. Everything is attached with screws. At the next stage, a platform is made for the electric planer with a hole in the middle
It is important that the dimensions of the hole exactly match the dimensions of the tool, so it is better to use a jigsaw. The tool is secured with clamps and screws. Now you need to assemble the threaded screws. They will ensure the platform moves up and down
At each corner of the base on which the electric planer is installed, you need to attach a screw with a large thread. This will allow you to adjust the thickness of the chips removed from the workpiece. In the next step, the platform is mounted on stands made of the same 1.5 mm thick plywood. The upper part of the thickness planer is placed on them along with a plane fixed to the platform. All this is secured with screws. At the same stage, it is necessary to correctly lay the electrical wiring. It is important that the cable is not damaged during operation of the machine. Next, a handle is mounted for adjustment and control. The platform is regulated by it. The handle is mounted on one of the threaded screws using nuts and washers. To ensure that the electric planer is securely fastened and does not fall, you need to make a hole in one of the screws and carefully tighten the nut that holds the fastener. This will ensure a secure fit and prevent the tool from moving off the platform. At the final stage of work, an indicator arrow and a special measuring bar are installed. This is a mandatory step, because it is with its help that the thickness of the parts being processed is measured. It’s easy to make a bar – an ordinary school ruler will do. The arrow can be made from a small sheet of tin.
They will ensure the platform moves up and down. At each corner of the base on which the electric planer is installed, you need to attach a screw with a large thread. This will allow you to regulate the thickness of the chips removed from the workpiece. In the next step, the platform is mounted on stands made of the same 1.5 mm thick plywood. The upper part of the thickness planer is placed on them along with a plane fixed to the platform. All this is secured with screws. At the same stage, it is necessary to correctly lay out the electrical wiring.
It is important that the cable is not damaged during operation of the machine. Next, a handle is mounted for adjustment and control. The platform is regulated by it
The handle is mounted on one of the threaded screws using nuts and washers. To ensure that the electric planer is securely fastened and does not fall, you need to make a hole in one of the screws and carefully tighten the nut that holds the fastener. This will ensure a secure fit and prevent the tool from moving off the platform. At the final stage of work, an indicator arrow and a special measuring bar are installed. This is a mandatory step, because it is with its help that the thickness of the parts being processed is measured. It’s easy to make a bar – an ordinary school ruler will do. The arrow can be made from a small sheet of tin.
At this point, the production of a thickness planer from an electric planer can be considered complete. However, before starting the main work, it is necessary to carry out initial setup and debugging. It is also necessary to thoroughly clean and lubricate all parts after finishing work, and from time to time monitor the sharpening of the blades.
Another simpler option:
Description of the tool
Thicknessers are machines for processing wood
, which allow planing and leveling the surface of lumber to produce boards of a given thickness. This type of wood processing is carried out by using lumber in construction and making various structures from them. Planing equipment is in demand on the market and is popular with ordinary homeowners who independently engage in construction at the dacha and in their own home.
Self-made surface planers are distinguished by their simplicity of design, which allows them to be made using an electric planer, grinder and other similar power tools as a basis. You just need to make sure that you have the appropriate diagram, which you should adhere to when making homemade equipment.
Various designs of jointing machines
Before remaking an electric planer, you should consider what types of jointers are. Modern jointing equipment is often manufactured in industrial conditions; homemade designs differ significantly. Differences may lie in the type of material, technology and auxiliary equipment used.
There are a wide variety of jointers that can be used for planing wood. There are two main types:
- Single-sided machines. They are often made by hand due to the simplicity of the design. It is worth considering that when using such equipment, you can remove material from only one surface in one pass.
- Double-sided jointers. Such tools can be used to process two surfaces simultaneously. The only and main condition is that they must be adjacent. Such a tool is characterized by increased efficiency, but the design is quite complex to manufacture independently.
Do not also forget that all devices are divided into two main categories. The main one is represented by stationary mechanisms, there are also mobile tools that are widely used
When creating a jointer from an electric planer, it is recommended to take into account that a homemade design is in many ways inferior to industrial versions. The main disadvantages are the following:
- The device is characterized by relatively low accuracy in use.
- The width of the surface that can be processed in one pass is usually insignificant and is only 110 mm.
- Lightness of the device. A tool that is too light is inconvenient to use, as it is characterized by low stability.
- Low power. It is almost impossible to make a homemade device with a high power rating.
- In most cases, wood is used in manufacturing, which has a short service life.
Despite the above information, there are quite a large number of advantages that have determined the spread of homemade planes. These include the following points:
- Low cost. As practice shows, industrial versions cost several hundred thousand rubles, while a self-made one costs only a few thousand.
- Mobility and compactness. These qualities can also be called the main advantages of a manual jointer, which is made from an electric planer.
- Simplicity of design. This point largely determines that the device can last for a long period and at the same time it is possible to carry out independent repairs.
- You can make the tool to your own size. For example, the size of the table is being increased.
You can assemble the mechanism in a home workshop if you have a small amount of materials and components. Moreover, such a jointer can last for a long period.
Do-it-yourself planer based on an electric planer
Wood planing is an indispensable stage of woodworking. Planing can be done either with a hand plane or with an electric one, but for more professional work, a planer is better suited. An industrial design costs a lot of money, so here we will try to figure out how to make a jointing machine with our own hands, using a household electric hammer.
main idea
Yes, such a homemade jointing machine, unlike serious industrial designs, has a number of disadvantages, namely:
- Cannot boast of high processing accuracy;
- The width of the workpiece is very small - only 110 mm;
- Lightweight is a disadvantage, since a heavy massive base always gives the device stability and, as a result, ease of use, which ultimately improves the quality of the result.
- Low power, limited by the power of a household electric planer;
- The body material is wood, that is, not durable;
However, it also has undeniable advantages that make it very useful for achieving certain goals and performing a number of tasks, since it has the following advantages:
- Low cost - serious jointing machines cost tens and hundreds of thousands of rubles, and the cost of this homemade jointing machine consists of the cost of the plane and materials;
- Compact and portable - it can easily be stored anywhere in the workshop and can be deployed for work in a matter of minutes.
- The simplicity of the design affects its reliability and maintainability.
- The ability to make the necessary dimensions of the machine “to suit you”, for example, you can increase the length of the work table or change the height.
Preparing the necessary accessories for work
To make a jointing machine with your own hands, you will need materials, equipment and tools, namely:
- Manual electric planer. Will be used as a woodworking tool. It is best to use high-quality, branded Makita or Bosh power tools - this is an additional guarantee of productive, long-term work;
- Jigsaw with files. Alternatively, you can use a regular hand jigsaw, since we will only need it once to make one part;
- Drilling machine with drills or drill;
- Circular saw or any other sawing machine. Alternatively, you can use a simple handsaw;
- Electric screwdriver;
- Wood screws (3.5x40 or 3.5x45);
- Plywood 10-15mm, for tables and other small parts, 18-20mm - for the side wall of the bed. Alternatively, you can use chipboard or OSB, but this is an extremely undesirable option;
- Solid wood for making a side support, approximately 15-20mm thick.
This is an indicative set of what you might need to make a homemade jointing machine.
Machine parts
Let's look at the main structural elements:
| Name | Description and purpose |
| Machine base | The bottom part of the machine where everything is mounted. |
| Side wall | The supporting structure of the machine, which serves to mount the electric planer and both tables. |
| Rear table (fixed) | Together with the front table it forms the plane of movement of the workpiece. Attached to the side wall. |
| Front table (adjustable height) | Together with the back table it forms the plane of movement of the workpiece. Attached to the side wall. |
| Side stop | Fixed on the back table. Used to give direction to the movement of the workpiece. |
| Spacer corners (stiffening ribs) | They serve for general strengthening of the structure, as well as to support a given 90-degree angle. |
| Electric planer | The main element of workpiece processing. |
Homemade surface planer from an electric planer
A wood jointing machine is made with your own hands from an electric planer; it is the main component of the tool. They plan the lumber directly with it. There is no need to worry about the performance of a hand-made mechanism - as practice shows, the quality of products does not decrease much when using such a machine, in comparison with purchased equipment.
First, you need to decide on the size of the parts that you plan to create on the future tool. In accordance with the selected dimensions, the dimensions of the machine itself are already selected. The width and height of the equipment body, the length of the pin, and the length of the thicknesser guides are determined.
What you will need to make a homemade surface planer with your own hands:
- Unoccupied manual electric planer.
- DIY drawings of a surface planer from an electric planer.
- Plywood and bars for assembling equipment casings, as material for assembling the casing.
- A small amount of free time.
It would be best to draw up your own drawing, focusing on the specific features of both the existing electric planer and the parts that will be made using a tabletop jointer. You can, of course, follow a ready-made drawing, but this is a more difficult task.
Studs and guides
Then you need to correctly determine the location of the pin with which the surface planer will rise and fall. The efficiency of the future machine in working on parts directly depends on how well it is located.
For example, you can place it in the very middle of the body of the instrument, which is done quite often by inexperienced craftsmen.
But this is far from the best option, since it does not provide ease of use, and also does not provide reliable and easy fixation.
Ideally, in order to avoid any particular difficulties when working with the tool, you need to place the pin between the front and rear handle of the tool.
Making a jointer with your own hands: manual and jointer
Various tools are always needed to perform various carpentry and carpentry jobs. Every craftsman, and even those who like to “tinker” with wood, should have various chisels, knives, saws, planes and other devices on hand.
At the same time, very often true professionals prefer a tool made by hand or to order. In this case, the work will definitely be done efficiently and with minimal effort.
How, for example, can you make a jointer with your own hands? What is needed for this and what are the stages of completing such a task?
Video works Electric room Interskol
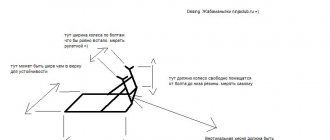
The parts are connected together in such a way that the bed in which the tool is fixed during operation has protrusions and recesses due to its shape.
To accurately determine the configuration of the rack components, you must first make a template from a poster plate that will fit snugly on the body planner, and then cut it from half of the rack, adjust the Edge cutting tool, which is attached to an electric drill.
The remaining parts are fixed together with screws and duralumin corners and screwed onto the substrate.
The height of the stand is selected by calculation, so the center of gravity should be as low as possible, so the structure will be more stable. The distance between the tool body and its base is 20mm, and to ensure that the posts do not become detached, they can be fixed with a metal bracket.
We recommend that you familiarize yourself with
- A set of power tools for wall repair. Power tools always need repairs on walls or hanging shelves, images.
When working on a wall surface, you need a range of power tools that every home should have.
Airplane: the invention continues. Making airplanes is quite simple. The shoes consist of three parts of oak. The midsection of the shoe is 1.5mm wider than the gland to allow for lateral adjustment. On it, at the desired angle, Garden Tools presents a new brand - luxury garden and parking tools Manor of the British company - manufacturer of hand tools RemoColor Tools Limited.
The yard tool is beneficial. Simple grinding system. At the first stage of tool grinding, the grinding wheel usually has a profile groove (Fig.
1). On the second, the edge of the blade is sharpened and filled. Leftovers and decks. In rotation
Universal tongue and groove Shpuntubel is a carpentry tool that brings a narrow rectangular groove - a handle on the edge or on plates, processed construction furniture Data at some distance from its edge. In progress
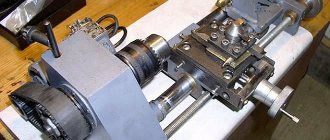
Electric planer
Making a homemade jointer is not a difficult task. Anyone can do this kind of work, especially if they love working with wood. And the presence of such equipment in the workshop will significantly expand the capabilities of the master and make his work easier.
In order to make a jointing machine, you first need to prepare the required materials and tools. To work you will need:
- hacksaw for cutting blanks;
- hammer;
- carpenter's chisel;
- wooden blocks made of durable material. The best option would be parts made of larch or oak;
- plywood, preferably multilayer;
- bolts with nuts.
You can easily find all these materials and tools in your workshop. But the most important and main device that you will need to create a jointer with your own hands is an electric plane. He is the one who will do all the work.
An old electric planer is quite suitable for making a jointer.
At the same time, you should not run to the store for a new tool; a device that has already been used is quite suitable for a jointing machine.
Very often, modern electric planers are made with a plastic body. Such tools are cheaper and more convenient to use. But such a case begins to crack and become loose after prolonged use. It is already inconvenient to use such tools in work, but for a jointing machine it is quite suitable.
The main thing is that the shaft with knives and the electric motor are in good working order. We only need to turn the old electric planer upside down and secure it in place.
In this video you will clearly see how to make a small jointer out of plywood using an old electric plane.
Video: Homemade jointer from an electric planer
There are some other requirements for an electric planer that will help make your task much easier.
First of all, you should take a closer look at the design itself. Modern manufacturers produce some models that are already adapted for our purposes. If you have this option, then your jointing machine will be the most productive.
In addition, it is worth paying attention to the planing width. As a rule, for most modern electric planers it is 82 millimeters
This width is quite small for a full-fledged jointing machine.
The best option would be to use an electric planer with a planing width of 100 or even 110 millimeters. In this case, you can run workpieces 10 centimeters wide at a time.
But quite often there is a need to process wider boards. In this case, each workpiece will have to be run through the jointer several times. This can significantly reduce your productivity. Many craftsmen use a machine with a built-in special shaft instead of an electric planer.
Stationary jointer
This version of the jointing device is quite powerful and productive, but is not without its drawbacks.
Firstly, the special shaft itself is a rather expensive part. Its cost can be up to half of the total cost of assembling a jointing machine.
Secondly, in addition to the shaft, you will have to purchase a fairly powerful electric motor, and also provide a mechanism for transmitting torque. All this will require certain knowledge and skills from you, and of course financial investments.
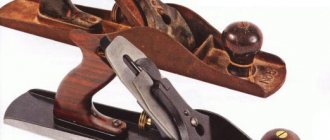
Making a manual version of the jointer
If you like to do everything with your own hands, including processing wooden workpieces with a hand jointer, then you can easily make this tool yourself. First prepare a wooden block. Its dimensions must match the future jointer. The block should be taken from hard wood, for example, larch or oak. The stronger the workpiece, the longer your plane will last.
During production, you should take into account some recommendations on the size of the future tool. Experts recommend using the following parameters:
- Most often, the length of the jointer is 60-70 centimeters. Of course, you choose this option yourself, everything will depend on which tool is more convenient for you to use;
- for the workpiece, take a beam with the length you need, with a width of 76 millimeters, and a height of 70 millimeters;
- the size of the knife should be 200 by 65 millimeters;
- To make the handle comfortable, its height is made at least 10 centimeters.
Using a chisel, a through square hole is punched in the block. In this case, its sides should be located at an angle of 45 degrees. The knife will be inserted into this hole. The block itself must have a perfectly flat bottom surface. After all, it is along it that the future workpiece will be leveled.
When choosing a knife for a jointer, you should pay attention to rectangular and durable models. In many specialized stores you can find a large assortment of similar products.
The knife is inserted and fixed in the opening made.
Next, a thin wooden plate is installed (which will act as a wedge). Next, the shock plug should be installed. To do this, select a place in the middle between the edge of the hole and the front edge of the jointer itself. At this point, the main working part is ready for use.
But it will be difficult to work with such a tool. For convenience, it is necessary to attach a handle. Its shape should ideally fit your hand, so it is made individually. To make a handle, you can use multilayer plywood.
For even greater ease of use of your new jointer, you can optionally install a second handle. Also, some models are equipped with two blades. But this will depend on your personal preferences. The most important thing is that before work, the knife blade does not protrude beyond the underside of the tool by more than one millimeter.
Review of factory models
| Model | W0108 | W0106FL | W0103FL | W0100 |
| Engine | 0.75 kW 220V | 0.75 kW 220 V | 2.2 kW, 220V | 3.7 kW 380V |
| Cutting width | 153 mm | 153 mm | 203 mm | 400 mm |
| Maximum cutting depth | 3 mm | 3.2 mm | 3.2 mm | 3 mm |
| Number of knives of the cutting shaft | 3 | 3 | 4 | 4 |
| Cutting shaft diameter | 61 mm | 61 mm | 78 mm | 98 mm |
| Table length | 1210 mm | 1535 mm | 1800 mm | 2250 mm |
| Feed table length | 700 mm | 760 mm | 880 mm | 1090 mm |
| Reception table length | 590 mm | 755 mm | 880 mm | 1090 mm |
| Table width | 255 mm | 255 mm | 330 mm | 420 mm |
| Table height from floor | 820 mm | 850 mm | 795 mm | 820 mm |
| Stop dimensions | 740 x 98 mm | 889 x 124 mm | 889 x 124 mm | 1195 x 150 mm |
| Packaged sizes | 1245x515x275 mm | 1600x360x250 mm | 1850x450x300 mm | 2300x820x1025 mm |
| Gross weight | 104 kg | 135 kg | 208 kg | 570 kg |
| Price | 52000 rub. | RUB 68,000 | 112000 rub. | RUB 229,000 |
Review of factory models
| Model | W0108 | W0100 | ||
| Engine | 0.75 kW 220V | 0.75 kW 220 V | 2.2 kW, 220V | 3.7 kW 380V |
| Cutting width | 153 mm | 153 mm | 203 mm | 400 mm |
| Maximum cutting depth | 3 mm | 3.2 mm | 3.2 mm | 3 mm |
| Number of knives of the cutting shaft | 3 | 3 | 4 | 4 |
| Cutting shaft diameter | 61 mm | 61 mm | 78 mm | 98 mm |
| Table length | 1210 mm | 1535 mm | 1800 mm | 2250 mm |
| Feed table length | 700 mm | 760 mm | 880 mm | 1090 mm |
| Reception table length | 590 mm | 755 mm | 880 mm | 1090 mm |
| Table width | 255 mm | 255 mm | 330 mm | 420 mm |
| Table height from floor | 820 mm | 850 mm | 795 mm | 820 mm |
| Stop dimensions | 740 x 98 mm | 889 x 124 mm | 889 x 124 mm | 1195 x 150 mm |
| Packaged sizes | 1245x515x275 mm | 1600x360x250 mm | 1850x450x300 mm | 2300x820x1025 mm |
| Gross weight | 104 kg | 135 kg | 208 kg | 570 kg |
| Price | 52000 rub. | RUB 68,000 | 112000 rub. | RUB 229,000 |
W0108
W0100
If you decide to make yourself a surface planer from an electric planer with your own hands, drawings, visual videos and our recommendations will help you achieve your goal. The electric planer itself is a useful tool on the farm. But buying a surface planer for household purposes is quite an expensive pleasure. That’s why many people decide to assemble the equipment themselves, using an electric plane as a basis.
To assemble a surface planer from an electric planer, you will need a set of materials and tools necessary for the future machine.
If you need a thicknesser in order to generate income from products that you will process on the machine, then the best solution would be to purchase a ready-made device. If the thicknesser is a purely household tool for home work, then you can safely make it yourself.
The main components for assembling the unit are:
- Electric planer. Please note that each time you will not be able to re-equip the surface planer into a regular electric planer and reassemble the machine from it. Therefore, it is better to make a unit from a planer, which is not a pity;
- Blueprints. You can draw up your own drawing, based on the characteristics and features of the electric planer, the planned work and the parts that the machine must process. It is more difficult to adapt ready-made drawings for yourself, since each of them is based on certain models of electric planer, materials used, parameters, etc.;
- Wooden blocks and plywood. From these you will assemble the body of the future thickness planer;
- Free time. To make a machine with your own hands, you won’t need much time. But you shouldn’t try to assemble the unit in a couple of hours, otherwise the result may disappoint you.
The main emphasis when designing a surface planer based on an electric plane is on matching the characteristics and capabilities of the machine with the workpieces being processed. Before starting assembly, make sure that the equipment receives a body, studs, and guides that perfectly match the parts you will be dealing with.
Studs and guides
These components of a surface planer based on an electric planer should be discussed separately, since they play a significant role in the performance and efficiency of the surface planer.
- The pins allow you to lower and raise the thicknesser when processing workpieces.
- Often, beginners install the pin exactly in the middle of the machine body. But this decision is wrong. If you decide to make a machine, the pin should be installed in the middle between the front and rear handles of the device. This arrangement will ensure convenient work with the equipment and will allow you to securely fix the tool in the desired position. There will be significantly fewer problems during operation.
- When converting an electric planer into a surface planer, try to give the tool pin maximum mobility. To do this, install a rolling bearing on the top cover yourself.
- Attach a nut to the middle plate of the machine, which will be responsible for adjusting the height. This solution will provide you with the ability to adjust the position of the equipment in small increments and with increased accuracy. This is relevant for particularly delicate processing using a surface planer.
- Guides are used for precise and efficient processing of workpieces. They are made from wooden blocks, so the cost of assembling the equipment can be considered minimal.
- When making guides for an electric planer, make a certain margin in length. It is not recommended to make them identical in length to the processed workpieces. Do these elements a little more.
- The lower plane of the thicknesser from an electric planer is made so that when processing the product it moves immediately parallel to the cutters of the device. If the plane starts under the power tool, you will not be able to achieve high precision machining. Therefore, the effectiveness of such a machine will be reduced to a minimum.
Step-by-step creation of a surface planer
- Creating the base, choosing plywood.
- We mount the stand for the electric planer.
This part is also made of plywood; it needs to be fastened from the back with screws.
- Creation of a platform on which there will be an electric planer.
Use a jigsaw to make a hole in the shape of an electric plane.
- Assembling threaded screws for the platform.
We install screws with large threads at all corners of the platform.
- Installation of the platform on stands.
We make a stand from a sheet of plywood, on which we will need to install the upper part of the machine with a platform and an electric planer, we secure all this with screws. We are thinking about how and where to lay the cable from the electric planer.
- Attaching and installing a handle to control the surface planer. You need to install it on one of the threaded screws. You need to secure it with washers and nuts. To prevent the electric planer from falling off the mounts, we create a through hole on one of the screws.
- Installation of the bar and indicator.
The measuring bar on a thickness planer is considered an indispensable part, thanks to it you can measure the thickness of the material. Any piece of a ruler from 6–8 cm will pass for the bar. For the indicator, you can choose a regular arrow made of tin. That's all, now our hand-made surface planer is ready.
Remember to test it on any material and always remember to care for this device, clean it and sharpen it on time. To do your job efficiently, you should familiarize yourself with the drawings of the surface planer and watch a video of how to make a thickness planer with your own hands.
Safety when working on a homemade machine
- When working on such a machine, eye protection is always required.
- Gloves should be worn during rough work.
- Before work, you should check the functionality of the machine and the fixation of all its parts.
- Hairpins and knives must be free of defects and various cracks.
- Only clean material that is free of nails and other metal particles can be processed on the machine.
Thicknesser from an electric planer
How to work on a homemade thickness planer:
- The machine pin is placed at the required distance from the edge of the part, the required size is set and the block is fixed. After these actions, the machine tilts away from itself and then the cutting part of the pin opens. Next, you just need to pull the tool towards you and that’s it.
- If you properly operate a surface planer made by yourself, the work will be done perfectly and will not differ from work in specialized workshops.
Studs and guides
We need to talk about these details based on the electric planer separately. They play the most important role in the operation of the surface planer.
- The pins lower and raise the thicknesser when processing workpieces.
- Guides help with precision and processing of workpieces; they are created from wooden blocks, so equipment costs can be considered minimal.
- You need to install the pin correctly, because mobility is very important for it.
- When creating guides for an electric planer, you need to make a certain margin in length.