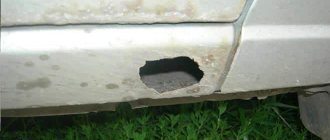
For a car with high mileage, corrosion of the bottom is a common thing. Mechanical damage, high humidity, and deicing agents destroy iron over time. The metal turns to dust. Driving such a car is dangerous, the car needs repairs. It is not profitable to contact a service station; the technicians may overcharge you. Having a welding machine, it is easy to weld the underbody of a car in the garage. It is important to take into account some nuances and adhere to technology. It is more convenient to carry out the work together; a partner will help fix the patch before tackling.
Tools and materials
To weld the bottom, in addition to welding equipment, you will need consumables. When choosing which metal to cook with, you need to consider two points:
- thin steel is more difficult to weld; experience is needed to choose a temperature regime that eliminates the risk of burns;
- Thick iron is more difficult to process.
The patches are made of metal with a thickness of 1 to 2 mm - these are the optimal parameters.
What you will need when working:
- welding machine, when working with manual arc welding you will need thin electrodes, maximum size 1.6 mm; for a semi-automatic machine you need copper wire and carbon dioxide;
- grinder with cutting and grinding attachments;
- gas welding plus carbide, oxygen for cleaning rust from hard-to-reach places;
- regular or electric metal shears, they are used to cut out patches;
- electric drill;
- a hammer, used to tap the bottom of the car to identify defects;
- a chisel or hammer drill to remove sound insulation;
- screwdriver or screwdriver.
The bottom is viewed on an overpass or in an inspection hole in good lighting. The metal is tapped with a hammer to test its strength. A lift will be needed to provide access to the damaged areas.
You will need a rust converter, soundproofing coatings; anti-corrosion compounds; primer for metal; solvent or other degreasing compound.
Unexpected expenses
It is necessary to provide for the purchase of spare parts. Their necessity is determined after inspecting the car. During repair work, dilapidated elements of the machine are replaced:
- rotten and bent sills, they are removed first, and during installation they control the geometry of the body;
- floor spars;
- floor panels, they are mounted from below;
- brake and fuel pipes stuck to the metal.
Sometimes other elements of the machine require replacement. It is better not to purchase spare parts for future use; they may not be needed.
Preparatory work
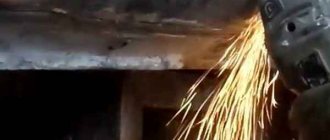
When the iron is rotten in several places, it is easier to digest the entire bottom. In some cases, replacement is more profitable than installing a large number of metal patches. Repairing the underbody of a car with your own hands begins with the preparatory stage. Areas with large defects are cut out, small ones - just cleaned of rust. When it is difficult to reach with a grinding wheel mounted on an angle grinder, turn on gas welding.
The seam areas on the machine and patches are coated with a rust converter, then cleaned to a shine. After this it is degreased. The patches are adjusted to the bottom configuration using heat, the metal is easier to deform, or special bending devices.
How to cook the bottom - the main warnings from experts
Experienced craftsmen who have worked in welding shops for many years know some of the secrets of car body repair. Welding the bottom and threshold has many features that are often not observed in the workshop. For example, you can replace the sills separately - kits for this work are available on almost all cars. The lower suture should be localized more often. Such repairs eliminate incipient corrosion processes. The secrets to competently repairing the underbody of a car are as follows:
- when choosing a master, it is better to give preference to a good station with high-quality equipment; a garage master, even with a strong desire, will not be able to do everything efficiently;
- for repairs, prepared metal is used without the beginnings of corrosion, otherwise rust will begin to seep out again even during processing, such effects shorten the service life of the car;
- before welding, it is necessary not only to remove the damaged area, but to completely cut it out with a reserve and clean the edges of the remaining metal to a shine to make sure there is no corrosion;
- welding is performed on semi-automatic equipment using special wire, this is a method used for machine tools, in this case no electrodes will be suitable;
- after welding, treatment is carried out immediately, it would be better if the place is primed and prepared for further actions to protect against rust, the lower parts will also be primed after installation.
If you've ever seen the process of making a car in a factory, you know that after assembly, the entire body is immersed in a huge earthen bath. This means that every metal part is coated with an acid primer, which provides good protection against aggressive influences. If this procedure is not followed after welding, the effect of the process will be much worse than expected.
Welding process
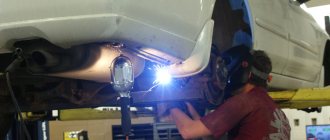
Before hot work, for safety reasons, the gas tank must be dismantled. The patch is first grabbed at 3-4 points, then completely scalded. Small defects are filled with short seams up to 3 cm long. Welding the bottom is difficult to do alone. When a partner holds the patch, the repair speeds up.
It is important that the patch fits tightly to the repair site. Gaps increase the risk of corrosion damage. The seams are hammered for strength. In good lighting, all repair areas are checked. If necessary, boil the connection again. Only after inspection do they begin to clean the seam rollers.
How to treat the bottom after welding
Before applying corrosion protection, primers are first used. They are applied to clean surfaces according to the instructions and dried. The primer ensures reliable adhesion of steel to anti-corrosion. Manufacturers offer various compositions:
- Tectyl is produced in three modifications: a) classic creates an organic microfilm; b) Tectyl zinc provides an additional zinc coating that protects the metal from the action of salts; c) Tectyl NT zinc is intended for intensive use in urban environments;
- Movil is an economical product that has proven itself for half a century;
- bitumen mastic is produced on a rubber, polymer, mineral-shale and polymer basis;
- Dinitrol based on polymer rubber.
After welding the car body parts, the sound insulation must be restored. To cover the bottom, Prim anti-noise with micro-rubber crumbs is convenient. The composition is diluted with water and simultaneously acts as noise insulation and anticorrosive.
Useful tips
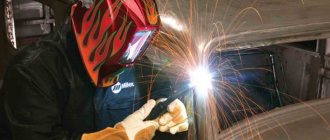
To repair the underbody of a car with your own hands, experts recommend using semi-automatic machines. The additive is supplied at a fixed speed, the burner provides uniform heating. The seam is of high quality and even. When working with electrodes, an inverter with additional functions that support constant operation is convenient. They reduce the risk of electrode sticking.
Before cutting a sheet of metal, the exact dimensions of the defect zone are determined. The patch must be suitable in size and adhere to the geometry. To deform, the sheet is not heated for a long time - the strength characteristics of the alloys decrease and they become friable. Movements of the hand with the holder or attachment should be uniform, without jerking. Large sections are connected with a continuous seam, leaving gaps of up to 3 cm. Such connections better withstand dynamic loads and increase the strength parameters of the body. Such connections require a durable insulating coating. Mastic prevents moisture from getting into microscopic gaps.
Protective fluxes are used to work with galvanized iron; they preserve the coating from boiling and burning. Knowing the intricacies of the process, making the connection is not difficult. The main thing is to take your time and carefully prepare the surfaces before work. Anti-corrosion work should not be neglected. The bottom is subjected to heavy chemical load during operation. Protective compounds are applied in an even layer.
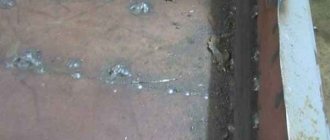
And so, hello everyone, last week I decided to continue making a Shumka in the car and after opening the floor I realized that it was CRAP... pictures are attached. I have a question for the experts, how to treat the bottom floor after welding? A special THANK YOU for the repost! I’m thinking of doing this: Acid primer, any paint, rubber-bitumen base, oh, and all the welds should be sealed with a construction sealant. HOW DO YOU LIKE IT? Am I thinking correctly?
We digest the thresholds with our own hands. Part 2. How to properly process
We continue the story about how to digest rapids with your own hands.
In the first part, you learned how to replace old thresholds with new ones, how to properly remove old thresholds and weld new ones. Of course, there were some surprises, but we dealt with them all and now move on to the second part, in which you will learn how to properly process the thresholds after overcooking.
We noted traces of bitumen on the rapids. Therefore, you will need to go over them in a hairy circle and remove everything along the seam.
After this, take a degreaser and wipe the entire threshold with a well-moistened rag to remove any remaining bitumen. Next, we rub the entire threshold with sandpaper P240, fill it with a line to put putty.
Once again we go through the degreaser. After this, mix the putty, take a little on a spatula and push it into the seam.
After the first light layer has been applied, the second can be applied more thickly. In the summer, it is not recommended to stir a lot of putty, because, most likely, you will end up throwing away most of it.
After that, we tighten everything and remove the excess along the edge. We leave the putty to harden, after which you will need to go through the 80th and it is important not to forget to wash the spatula with solvent after each application.
The thresholds are puttied and sanded; if small pores remain, no need to worry, they will close. It can be seen that the paint was slightly damaged during welding, so we need to put the “fur coat” higher, up to the top edge. To do this, we lay the paper along the edge, after which it will need to be lifted.
Car surface preparation
So that we don’t end up with the epoxy primer that lies underneath coming out from under the “fur coat.” To do this, we will close the upper part so that we can fill it with soil below, and then lay a “fur coat” along the upper edge. Therefore, before starting work, you need to prepare the surface. To do this, take Scotchbrite and wrap the top edge.
Having walked along the entire length, we take tape, a sheet of paper and, overlapping just a little, attach it to the edging.
It is important that the tape does not stick to the sheet of paper that was attached to the door a little earlier. Afterwards you need to take a rag, remove the dust, then degrease it all and you can apply epoxy primer.
Everything on the bottom is treated with a fur coat, and since it has strong adhesion, primer can be applied to it.
Treating the threshold with epoxy primer
To treat the threshold we will use two-component epoxy primer App. Convenient dilution system: 100 parts primer, 33 parts hardener and 30 parts solvent. Shake the jar with soil a little before mixing. We will dilute according to the measuring scale in grams. It is better to use rubber gloves when mixing.
The soil dries within 24 hours. Interlayer drying takes 1 hour. A “fur coat” is then applied to the ground. Also after 1 hour. For application we will use an LVLP gun. That is, we apply the first layer, after 1 hour - the second, and after an hour we apply anti-gravel. Thin layers of primer must be applied. Also, don’t forget to use a filter mesh.
When working with this soil, you must use a respirator. When we apply the second layer, wash the gun and tear off the paper that we pasted on the edging.
To apply the “fur coat” on the threshold, we used a “fur coat” gun and anti-gravel. First we applied it from below the threshold. When performing this work, it is better that the container is full, since when tilted, the tube inside may simply not reach the product.
This is what the processed thresholds look like. We insert the bushing into place.
Internal threshold processing
Now you need to process the thresholds from the inside. We have special holes here through which we will blow through the thresholds. We sealed the other holes with tape so that the product we apply would not blow out. For processing we will use the MOVIL product. We take a “fur” gun, unscrew the nozzle and screw the hose onto it.
https://www.youtube.com/watch?v=Ge1Tedca6lM
After this, take an empty anti-gravel bottle and pour MOVIL into it. What we do next: we screw the cylinder onto the gun, connect it to the compressor and blow the thresholds through the holes.
We used one can for each threshold.
The film formation time is 30 minutes, based on this, you will need to apply half a can to one threshold and half a can to the second, and after half an hour we will apply another layer.
The main thing that needs to be done when performing such work is to properly process the threshold so that it serves for a long time. We repeat once again: you need to apply epoxy primer on the outside, seal the seams with joint sealant, and apply MOVIL on the inside. The coating formed by it can be renewed once a year.
Recommendations
Comments 48
Clean mechanically, ideally with sand, or at least a pistol. no tsinkari, you'll just ruin it. Then cover the whole thing with acid, acrylic, epoxy. Paint it if you want, or put the Shumka as you wanted. Then the paint will be of no use.
Read also: How to renew your compulsory insurance policy AlfaStrakhovanie
You take a coral circle on a grinder, clean everything down to bare metal, then degrease it, go over it with an abrasive material (120+ grit) and epoxy primer (necessarily 2-component), you can paint it on top and it will be fine.
And it seems to me that this is all bullshit. You can’t treat the surface properly, anyway. You only need to spray with soil once the rust has been completely eradicated. My suggestion is to apply zinc or orophosphoric acid, rinse, dry and coat with some oil-based anti-corrosion agent. For example, pushsalom. You can put cling film on top to prevent any smell.
I'm dealing with the same issue now. I took zinc primer, coated it with epoxy primer, then applied joint sealant under the brush (I covered the bottom panel on the boxes completely with sealant) and covered the whole thing with a rubber-bitumen mixture.
Roast stop mixed with lard or Movil. 50 to 50
I do this with an acid paint brush, then acrylic, epoxy, any paint, brushed with a thick layer... The seams are done with joint compound, but first clean them with a brush to remove scale and carbon deposits
Lead lead on top of the soil instead of pushsal?
Red lead for metal
"Hammerite" with a brush in a thick layer. Simple, fast and very reliable!
I would clean up the seam, if the car is being made for a good person :) or my own, then I would invest in epoxy, clean up the seam, blow epoxy, then body sealant, and then either anti-gravel, they say sealant based on MS-polymer is also quite good, I haven’t tried it myself still, but the coating is similar to raptor. In 2012 I made my own car, I remember that I used a thin layer of body acidifier, then primer-filler-base-varnish, bottom: body acidifier-3M sealant-body anti-gravel. I periodically tinted this sandwich and treated it 2 times with kindling, and blew it under the locker with a pushsal before the winter and that’s how it is now, there are no holes, light rust, not swelling, except in Taiwan of course)) www.drive2.ru/l/505180788937982920/ photos from the restoration www .drive2.ru/l/58583/
Yes, you described a generally accepted method, which is quite expensive and labor-intensive. I used to do this myself, but about ten years ago (in the beginning as an experiment) I switched to Hammerite and am happy as an elephant! At first I asked clients to come back in a year for examination, then I stopped, and I was so sure that everything was fine. Under epoxy, rust spreads from the damaged area at normal speed, but under hammerite it does NOT spread! Believe it or not…
So is this your Hamerite on bare metal or on the ground?
He is not mine)). That’s the beauty of it: on bare metal and even rusty metal. No spray guns, just a brush! Apply without sparing. In particularly dirty, rusty, or greasy places, brush longer with a brush (no need to degrease!)...
Hmm, I'll know, thanks.
He is not mine)). That’s the beauty of it: on bare metal and even rusty metal. No spray guns, just a brush! Apply without sparing. In particularly dirty, rusty, or greasy places, brush longer with a brush (no need to degrease!)...
Is Hamerite an anti-rust paint? I understand correctly?
Yes, she is the one. There are many similar paints on sale, and they’re cheaper, I don’t recommend it, or the coat...
He is not mine)). That’s the beauty of it: on bare metal and even rusty metal. No spray guns, just a brush! Apply without sparing. In particularly dirty, rusty, or greasy places, brush longer with a brush (no need to degrease!)...
in 2014 I painted levers with it after sandblasting, basically ok
So is this your Hamerite on bare metal or on the ground?
I used Hammerite for the iron gates. Applied to bare metal. I’ll say more - there was rust in some areas. And for several years now the gates have been standing and at least henna. I painted over the rust, and it no longer appears, the paint does not peel off, as happened before with other companies.
Yes, you described a generally accepted method, which is quite expensive and labor-intensive. I used to do this myself, but about ten years ago (in the beginning as an experiment) I switched to Hammerite and am happy as an elephant! At first I asked clients to come back in a year for examination, then I stopped, and I was so sure that everything was fine. Under epoxy, rust spreads from the damaged area at normal speed, but under hammerite it does NOT spread! Believe it or not…
I painted the rear levers with it after sand, they’ve been running for 4 years now, there’s no obvious rye
Yes, you described a generally accepted method, which is quite expensive and labor-intensive. I used to do this myself, but about ten years ago (in the beginning as an experiment) I switched to Hammerite and am happy as an elephant! At first I asked clients to come back in a year for examination, then I stopped, and I was so sure that everything was fine. Under epoxy, rust spreads from the damaged area at normal speed, but under hammerite it does NOT spread! Believe it or not…
We have a harsher climate in St. Petersburg, there are a lot of reagents, I’ll take a photo of the levers and post them later)
2007? and already holes?
Bro, 11 years isn't enough? for the Russian basin?
Use zinc and acid primer through the mark or tin the seams with solder paste. Be sure to remove all rust.
Mastic or mavil
Malicious and useless components
Movil dries out and falls off. The mastic cracks and a “greenhouse” is formed under it, in which everything rots instantly
Like I did. Heated up the lard and applied it with a brush
And then put carpet on it right away or did you put polyethylene on it so as not to smear it?
Moisture will collect under the film. I laid down felt batting, then Shumkov and carpet. Everything's fine for the rest of the day. Or look for a material that is not moisture-absorbing at all.
I sanded it a little, went through it with zinc, wiped it down, and “painted” the body 930 or 950. That’s it. If desired, you can paint it with paint. Nothing will rot in this place for five years
So that's rubbish?! Look in my blog about rust treatment.
And who can say what about the welding primer as a primary one? Then acrylic and further, whatever suits your needs.
They once told me that nothing sticks to the welding primer afterwards; I can’t confirm it yet, since I haven’t gotten around to painting it yet.
Yes. He loosens this soil. Apparently from zinc
Read also: Is it possible to degrease galoshes with gasoline?
If you remove all the rust, there is no point in pouring sour. Better epoxy then. Then the usual barrier or insulator and paint. It’s better to cover the seams with autoplasticine. His fat will get everywhere, and the seam will leave voids in the sandwiches and will creep in from there again.
Just knead the plasticine with something like lithol or pushsala. It dries out in about two years.
As I did (perhaps incorrectly and those in the know will correct it) - after welding, acid, then acrylic. Next is the seam stitch and paint and varnish.
I didn’t have rye, Movil for cavities, the rest was cordon mastic.
You're eating a sandwich wrong, Uncle Fyodor)))
The acid tank cannot be painted or sealed.
1) if there are no rusty spots left, apply epoxy primer. If there are any left, then in those places there is an acid agent, followed by an acrylic filler, and then you can move on to the second point or apply an epoxy for “better shine”
2) apply sealant - if beauty is needed, then from the interior and from the bottom. You can use a brush, you can use air (spraying or stripes). But my opinion is that sealant is needed on the outside, and it’s good to anticorrode the interior side (with any composition for hidden cavities, depending on taste and color)
3) depending on the specification of the sealant (most likely it will indicate that it can be painted), we either prime it or paint it.
4) good anti-corrosion material for hidden and external surfaces. And since the interior is being analyzed, we forget about the rolling of the doors (from the inside), thresholds and other closed cavities.
That's right, seal the seams with sealant, wet the bottom (acid or epoxy) with mastic on top.
It’s a good idea to throw primer in front of the sealant.
I’ve encountered this myself now, I want to initially treat everything with a rusty converter, then wash everything with a soda solution to extinguish the acid, then with anti-corrosion primer, where the putty is on top, then base and paint... this is a budget option...
Soda doesn’t have to be enough soap, alkaline, but it’s better to scrub it fresh and rinse immediately so it doesn’t dry out...
The main enemy of a car body is corrosion; rust primarily appears in areas of the body with unprotected metal, not covered with paint, primer, or special anti-corrosion agents. How to treat the underbody of a car so that it does not rust is a hot topic for many motorists, because not all compounds provide reliable protection, and it is also necessary to correctly apply the protective layer, following the technology.
Properly performed processing in compliance with all rules guarantees a long service life of the body and prevents rusting of the car. And you must not forget to keep the car in good condition, because over time, defects may appear on the treated surface, the anti-corrosion agent (anti-gravel) may peel off or fly off.
Canadian approach
Canada has a humid, cold climate that favors the appearance and development of corrosion. Therefore, it is Canada that is considered the legislator of the so-called ML method of body protection, although it was invented in Scandinavia.
The method involves pouring ML oils (analogues of the usual Movil and the popular Rast Stop product) into hidden cavities of the entire body through existing factory technological holes and drains. Penetrating compounds well impregnate welds and cover the internal surfaces with a film that reliably insulates from contact with air. The outside of the bottom is covered with the same materials.
Compositions for treating the underbody of a car
How best to treat the underbody of a car is a pressing question; choosing the “right” composition from the entire range of mastics, Movils, rust converters, anti-gravel coatings is not easy, the industry offers many brands and brands of various auto chemicals. Users and automotive experts have compiled many ratings published on the Internet; among anti-corrosion agents, the following chemical brands are considered the best:
Anticorrosive compounds are produced for both hidden and external surfaces, and the requirements for these compounds are different. The main properties that an anti-corrosion drug should have are:
- good adhesion (reliable adhesion to the body surface);
- the ability to reliably protect metal;
- low toxicity;
- tightness;
- fire resistance;
- elasticity (the coating should not crack or peel);
- heat resistance (the properties of the material should not change and depend on temperature).
Treatment of the underbody is carried out in several stages, and several chemical agents are almost always used. Each of the anticorrosion agents can perform several functions at once, not only prevent the appearance of rust and fight corrosion, but also serve as noise and vibration insulation, and act as body protection from impacts (pebbles, gravel, glass fragments flying from the road).
When is underbody treatment necessary?
Often car owners think about protecting the car body only when it begins to rust. But a rusty bottom is already quite a big problem; to restore it, you often have to use welding, apply patches, and carry out quite labor-intensive work. The machine should not be allowed to rust; it is necessary to carry out anti-corrosion treatment:
- once every 3-4 years (or more often, the frequency depends on how well the body of a particular car model resists corrosion);
- immediately after purchasing a used car;
- in case of collision with an obstacle with the bottom and damage to the anti-corrosion layer (its tearing off).
It is no secret that many new cars do not receive high-quality treatment, so immediately after purchase it is recommended to look under the car and assess the condition of the anti-gravel coating. With a thin protective layer of anti-gravel, additional treatment is required; the anti-corrosion composition should be applied before the car begins to be used. If the car has not yet been driven on the roads, it will take less time to prepare; you do not need to thoroughly wash the bottom and wheel arches.
How to diagnose the body and determine damage?
Today you can find hundreds of offers from specialists in body inspection and diagnostics. Such specialists will help you make decisions when buying a car. You can inspect the body yourself; to do this, it is enough to understand the stages of corrosion development. It is usually worth looking for signs of rust on the wheel arches in the places where the wheel arches are installed, as well as on the sills in their lower part. Door corners and bottoms often rust if left untreated. There are several stages of rust appearance:
- a process invisible to the eye begins under the paint in microcracks and various leaking spots, this can only be seen under special devices, but this is not critical damage;
- the paint in these places swells further, and this is a really serious sign of the development of rust, this is not yet due to corrosion, but it is already necessary to work closely with the body so that there are no problems;
- peeling of paint at the site of rust, growth of a stain that gradually exposes the metal and continues to enlarge the site of damage, undermining adjacent layers of paint and varnish material;
- through corrosion is an irreversible phase in which it is already necessary to perform complex welding work; it will not be possible to perform simple processing starting from this phase;
- destruction of the body part - if repairs are not carried out at this stage, the car can soon be sold for scrap, with a completely destroyed body; transportation costs nothing.
Welding work is really only needed at the fourth stage, when pitting appears. Before this, you can start cleaning the damaged area, treating it with special primers, painting and careful operation in the future. Once through holes appear in the metal, no treatment will help. You will have to do welding work and expose the body to further problems. In addition, the price for such work is often very high.
Preparing the body for anti-gravel treatment
The entire process of applying anti-gravel consists of three main stages:
- surface preparation;
- soil covering;
- treatment with anti-corrosion compound.
The complexity of the preparation depends on the condition of the body itself: if there are pockets of corrosion, it is necessary to remove rust, if necessary, cut out pieces of rotten metal, install patches if holes appear in the bottom. But first of all, the surface to be treated must be thoroughly scraped, washed and dried, only then should body work be performed. When removing dirt, there is one caveat - dust and debris are quite difficult to remove in hard-to-reach places, for example, from hidden cavities; it is better to get rid of it using compressed air.
Before washing, dry cleaning of dirt is always carried out; it is convenient to clean the body with a wire brush, and in places of bends - with sandpaper.
When removing rust with sandpaper and cleaning the metal, it would be a good idea to give the surface some “dullness”; this is done so that the primer lays more firmly on the metal surface and adheres to the metal.
Before thoroughly cleaning the corrosive areas, the rust is treated with a special compound - a rust converter; this chemical can always be found in stores selling paint and varnish materials for cars. The converter is applied to the metal surface with a soft brush to make it easier to dip the brush; part of the liquid from the bottle is poured into a convenient wide container
After applying the composition, rust almost immediately begins to react with the chemical, the liquid begins to foam, and the rust is “eaten up.”
Read also: A taxi license is issued for a car or a person
Let's sum it up
A modern car must fulfill its main function - to transport the owner every day in comfort and safety to the right places. With a rusty body, the car cannot perform these functions in any way. So it is important to properly protect body parts and always monitor the presence of rust and its development in your car. If the body is damaged by through rust, in some cases it will be impossible to repair it. This means that you will have to look for ways to dispose of or urgently sell the car for pennies. It is much more profitable to monitor your car and prevent such troubles as complete destruction of entire sections of the body.
Choose a good station and an experienced technician to prevent the unexpected appearance of through holes in body elements. Inspect the body regularly to ensure there are no significant operational problems. This will help you keep your vehicle in perfect order without any problems and not worry about a possible reduction in service life due to unpleasant rust. It is also worth regularly carrying out anti-corrosion treatment to prevent unnoticed processes from completely destroying your car. You can do inexpensive anticorrosive work yourself; you don’t have to overpay for it in workshops. How do you deal with corrosion on the body of your car?
#1 bartik226
- Users
- 285 messages
- Gender: Male
- Moscow city
There are a lot of similar topics on the Internet, but there are no specifics. There are also a great variety of different techniques.
I would like to hear the opinions of people who directly encountered this and did everything with their own hands.
How I see step-by-step processing.
Removing rust. Many people recommend zincari. But I heard a lot of negative reviews: like it doesn’t work.
Is it necessary to remove it from the metal before starting other work, and how to do it?
If butt welding. — Seam sealant then primer
Overlap welding. — Prime the piece to the cotrum after work there will be no access and then apply joint sealant.
For these two cases, I’m interested in what kind of soil to put?? + after this additional questions arise, because as far as I know, not all primer can be painted over. And how does the putty behave on them?
It’s generally not clear here, someone says that it’s better to use putty with fiberglass everywhere, someone says not to use finishing putty because you can rub it with fine-grained sandpaper.
In general, the main questions are:
What soil should I use and in what places?
The interaction of these layers with each other.
Nothing is clear about the putty either.
It would be great if you could also give an example of the name of the materials used.
Please don't throw stones, I'm just learning.
Rust converters - types and features
Rust converter is an effective chemical agent in the fight against corrosion; most often the main component of the composition is phosphoric acid. This chemical not only allows you to get rid of rust, but also protects the metal for a long time, creating a protective film. In Russia, the most widespread and popular brands of converters are:
Converters are not only liquid, but also paste-like, in the form of a gel; some products are applied by spraying; the bottles contain a spray bottle. As a rule, 15 minutes after processing the metal surface is enough for the rust to transform and be ready for further processing. After the converter has dried, the area to be treated must be cleaned with sandpaper or a metal brush, and then degreased.
How to protect the body from corrosion with a guarantee?
No technician can guarantee that a vehicle will be free of corrosion. Roads in Russia are watered with different types of salts in winter, which have an extremely negative effect on the body. Climatic conditions are ideal for the development of rust. Therefore, every 2 years it is recommended to carefully inspect all parts of the body and update the corrosion protection. This will help maintain the integrity of the body longer and get rid of problems. The treatment has the following characteristics:
- Putty. This is the simplest composition that can be used to treat all invisible exposed metal elements. You can even cover the bottom with a simple brush.
- Anti-corrosion. There are dozens of mixtures specially designed for anti-corrosion treatment of metal surfaces. But it is better to fill them under pressure using special equipment.
- Primer. When painting parts or after welding, a primer is required. Buy high-quality primer; it is better to use acidic options to protect the metal.
- Scratch repair. It is important to get rid of all chips and scratches over time, since over time these problems inevitably turn into pockets of corrosion and destroy the entire body.
- High-quality restoration after an accident. The most common cause of rust development is poor recovery from an accident. If damaged, the factory body protection will be severely damaged.
Don't just rely on the fact that your car has a galvanized body. Many manufacturers write in catalogs and specifications that the body is not subject to corrosion at all. But the problem is that galvanizing standards are different in each case. And if Volkswagen really resists rust for 7-10 years, then Daewoo or Renault rust after only 3 years of operation. So you shouldn’t take the manufacturers’ word for it; it’s important to monitor all negative changes in body parts and fix problems in a timely manner.
We invite you to watch a video about do-it-yourself body repair:
Body primer treatment
After complete preparation, the protected areas of the underbody must be treated with a primer, in other words, primed (a primer is the same primer). It is more convenient to apply the primer with a spray bottle, you can also use a regular paint brush, but in the second case, the processing will take longer, and the primer material will not lie so evenly on the body surface. Another plus of a spray gun is that it is more convenient to cover metal with primer in hard-to-reach places; the spraying method guarantees an even layer over the entire bottom of the car.
It is necessary to treat all areas of the body with bare metal and areas etched with a rust converter with a primer, but if the primer gets on the protected parts of the bottom, it will not make it worse. The next stage is to coat the entire body surface from below with primer, but if the bottom has not suffered from corrosion, you can skip this stage, making do with good preparation (cleaning) and degreasing. After this, it will not be superfluous to treat the welding seams and recesses with sealant, and also seal the surface around the welded cups.
The primer and sealant must dry thoroughly, only then can you proceed to the next stage of processing - applying an anti-corrosion coating.
Corrosion of the bottom and sills is the main problem of your car
One of the most destructive types of body rust is underbody corrosion. The problem is that you don’t inspect this part of the body every day and the rusting process that has begun may go unnoticed. In addition, this part of the body is in the most favorable place for the development of corrosion processes. There is often a lot of moisture here, and when the engine is running, the bottom of the exhaust pipe gets hot. All this contributes to the accelerated development of corrosion processes. The consequences are as follows:
- at first everything seems quite safe: the metal parts are simply covered with a barely noticeable coating of rust, this does not bother the owner of the car at all, even during inspection;
- then deeper processes occur, not always visible to the naked eye, through holes are formed, passing directly into the hall to the elements of the carpet and sound insulation;
- the decomposition of fabric parts in the interior begins, moisture constantly accumulates and rust affects absolutely all parts of the lower part of the body, these are already irreversible processes of destruction;
- further corrosion reaches joints and welds, passes to the thresholds, and whole pieces of the bottom may simply fall out, which are subject to maximum destruction;
- the next stage - the driver runs the risk of running his feet on the asphalt, the attachment points of the arms and suspension beams often rot, the wheels fall off while driving, these are catastrophic consequences.
If door corrosion can be solved by a simple replacement, then replacing the lower part is extremely difficult. Despite the fact that there are individual parts on the market in the form of metal lower parts, they are incredibly difficult to weld. And the welds in the workshops are not nearly as high quality and sealed as in the factory. In addition, this part comes from the factory together with the side parts, which ensures the strength and safety of the body in operation, so repairs at the last stage are already pointless.
Application of anti-gravel
The anti-corrosion agent comes in various types; it can be a preparation like Movil, mastic or anti-gravel. The protective coating is applied to the body surface in three ways:
- spraying from a bottle (if the packaging bottle is equipped with a sprayer);
- using a spray gun (if you have this device and a compressor with compressed air);
- with a brush or roller, this method is usually used if the bottom is treated with mastic.
The use of a spray gun is the most effective method of treatment: the anti-gravel layer is applied evenly to the body, while high productivity is achieved and time costs are minimal. But not all car owners can carry out such treatment, as they do not have the necessary equipment.
The anti-gravel composition is also applied quite evenly from a spray can, but the productivity here is low, the processing takes longer. You can coat the bottom with a brush, but you need to be patient and get used to applying the anti-corrosion layer evenly. The body is covered with Movil or anti-gravel in two or three thin layers, after each treatment it is necessary to allow the composition to dry for 20-25 minutes.
How to use sealant correctly
The application of auto sealants has its own nuances, and to obtain a high-quality result, the following rules must be strictly followed:
- Before work, thoroughly clean the surface, remove rust, degrease,
- To enhance adhesion, clean the substrate with red Scotch Brite,
- carry out priming with special primers for metal, if this measure is indicated in the instructions for the sealant.
To seal the seams, you need to prepare the composition: if necessary, dilute or print the tube, insert the cartridge into the gun, open the package with tape. You may also need a spatula or brush for the job. Afterwards, you need to apply the composition to the area of the future seam, acting at the same speed along its entire length - this will help make the joint smooth, like a factory one.
Excess sealant should be removed immediately with a spatula or your fingers. If the composition is very sticky, you can sprinkle it with a little water. In the future, it is allowed to paint the seam, but only after the time specified by the manufacturer has elapsed. This usually becomes possible after the sealant has completely polymerized.
Movil for anti-corrosion treatment of the bottom
There are many chemical preparations for anti-corrosion treatment of the underbody on the automotive market, and one can argue endlessly about which product is better. Movil is very popular in Russia; this anticorrosive agent was developed in laboratories in Moscow and Vilnius. It is believed that Movil is more suitable for treating hidden cavities, however, it is often used to cover the bottom; depending on the brand, the composition is quick-drying and may not dry for a very long time. There is no big difference between the product and the manufacturer; all companies produce anticorrosive agents with similar chemical properties.
Movil "Zinc" is most often sold in half-liter bottles, applied with a brush, treatment is carried out in two or three thin layers, after each application you must wait 20 minutes. The main advantages of this composition:
- very low price;
- high elasticity;
- Possibility of applying the product to a painted surface.
Disadvantages of Movil - strong odor, poor resistance to mechanical stress. The layers when applying anti-corrosion protection must really be very thin, otherwise everything may simply fall off.
Sealant selection criteria
Automotive stores sell a variety of sealants: for hatches, bodies, and pipe connections. They differ in terms of heat resistance, elasticity, and service life. The highest quality, but most expensive, are professional products, which are sold in large containers and are usually used in auto repair shops.
For home use, sealants are purchased in tubes of suitable volume (40-200 g). If you decide to give preference to the latter option, it is better to purchase the material in an aluminum tube: it fully retains its properties throughout its shelf life. Cheaper products are presented in plastic tubes, but when purchasing, be sure to check the remaining shelf life: it should be at least 6 months.
Some sealants have a convenient dispenser tip: they can be easily applied even to surfaces in hard-to-reach areas. Body sealant in a cartridge requires the additional purchase of a glue gun, without which you will not be able to use the product.
Anti-gravel compounds
Anti-gravel is often produced under foreign brands and comes in black, gray and white. The most well-known brands of this product for treating the lower part of the bottom:
- Tectyl Bodysafe;
- Tectyl Zinc Bodysafe;
- Dinitrol 479;
- Protex;
- Mercasol 3;
- Liqui Moly.
The anti-corrosion material Dinitrol 479 is often called “liquid fender liners” and is used to treat both wheel arches and the outside of the car’s underbody. Usually the product is sold in liter and 5-liter jars; Dinitrol is based on polymer rubber. The anticorrosive color is black, the manufacturer guarantees the reliability of the coating for seven years.
The protective layer of Dinitrol 479 tolerates high and low temperatures well, the maximum permissible temperature at the upper level is +85 degrees Celsius. To make the composition more fluid, it is recommended to warm up the anticorrosive agent before applying it. In addition to its protective functions, Dinitrol also improves sound insulation qualities and has good ductility. The disadvantages of this anti-gravel coating are that the price is not too low, the consistency is thick, and it must be diluted with white spirit.
The anti-corrosion composition Liqui Moly is a mixture of synthetic resins and bitumen, as it has good adhesion and can be applied to the surface to be treated in one thick layer (up to 1.5 mm). The product is sold in bottles of 0.2/ 0.5/ 1.0 l, complete drying of the anticorrosive agent takes from 12 to 24 hours.
How to properly remove sealant
If the composition is applied incorrectly or if there is old sealant, the seam must be removed and the work done again. To clean hidden seams, use a mechanical method - remove a layer of material with a sharp spatula, knife, pumice stone, or sandpaper. To make sure you don’t scratch the base, you can use a chemical method - moisten the sealant with white spirit, and then use a knife to separate the softened compound. After preparing the base, you can apply a new layer of sealant, following the manufacturer's instructions.
Mastics for treating body underbody
To protect the car body, three main types of mastic are used:
- rubber bitumen;
- polymer-bitumen;
- epoxy.
Any mastic is characterized by a fairly low cost, is characterized by ease of use and high durability. Products under the Bikar and Allright trademarks are known on the Russian market; anti-corrosion material is applied with a brush or spray gun and has good adhesion.
It is better to dilute the bitumen-rubber mastic “Oilwright” with regular gasoline and apply it in warm or hot weather. Mastic on the bottom of the car holds better than anti-gravel sprayed from a can, does not crack and resists mechanical stress well. As a rule, treatment with this product is enough for 2-3 years of car operation, but the big disadvantage is that bitumen mastic stains everything possible, and it smells quite unpleasant.
Types of anti-gravel for car thresholds
The number of anti-corrosion treatment agents for car sills is large. By and large, they are not much different from each other.
Means for protecting car thresholds from rust can be divided into several groups:
1. Period of use.
- permanent protection;
- temporary protection;
2.Packaging.
- aerosol can ready for use;
- aerosol can for a special gun;
- metal cans;
- plastic containers.
3.Color.
- transparent;
- white;
- black;
- gray;
- color.
4.Additional effects.
- containing a rust converter;
- anti-corrosion substances;
- increased adhesion;
- enhanced strength.