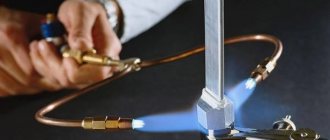
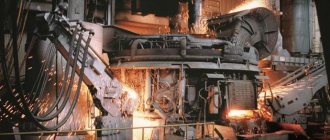
Heating to high temperatures is a necessary component of many technologies that are used in home creativity, commercial activities and industrial production. Factory heating devices are highly efficient and, accordingly, have a price that not everyone can afford. A do-it-yourself muffle furnace for hardening metal can be assembled at minimal cost with excellent performance characteristics. To achieve the desired result, you should familiarize yourself with the device, operating principle and possible options for assembling a 1000 degree oven with your own hands.
What to look for when choosing a stove?
Muffle units are more suitable for amateur ceramists. For professionals engaged in more or less large-scale activities, the best option is camera equipment. When choosing a device, you need to rely on:
- on the volume of daily firing;
- product dimensions;
- electrical wiring requirements (some units are designed for three phases).
The format of loading ceramics is also important. You need to build on your own preferences and financial capabilities. Vertical loading equipment will be appreciated by specialists with a limited budget. Moreover, the result in the “cheap” case is no worse than in the other case. The degree of comfort in viewing products from above depends on individual characteristics.
Figure 7. Top-loading wood burning equipment
When loading horizontally, it is not so easy to assess the distance between products, but there is an excellent overview of the tiers. To get a 360-degree view of the ceramics being processed, you should purchase bell-type furnaces. It is also the most expensive.
The cost of budget, “home” models starts from 30,000 rubles. The lower price level for professional options is about 100,000 rubles. The price of powerful, productive furnaces reaches half a million rubles.
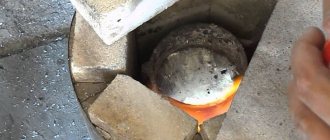
Figure 8. Furnace chamber with hot ceramics
Types of furnaces
There are different types of thermal energy sources:
- The oldest is the wood stove. The masters kept the secrets of firing and passed them on only to their students. Today, wood burning is very rare. Technological types have replaced them.
- The most popular is natural gas. With forced air injection, products can easily be heated to temperatures above 1500 °C. Gas equipment is easy to make with your own hands, and gas can be purchased in liquefied form in cylinders.
- The most high-tech is electricity. Electric spirals are evenly laid inside the oven, quickly and accurately heating the chamber with the products. Such equipment is more difficult to manufacture; high voltage requires compliance with safety precautions and electrical installation rules.
Photo 1. Small electric kiln for firing ceramics with evenly laid out spirals inside.
Wood-burning: structure and principle of operation
This is a great option for a beginner potter. It does not require large material costs to manufacture, and dry firewood is available everywhere. Wood stoves come in several types:
Earthen
A descendant of the ancient technology of burning in a fire flame. Above the narrow pit - the firebox - a clay roof is built on which the products are laid. A vault of bricks or strips of clay is built around the products, and a smoke hole is left at the top. The design works like this: charcoal is burned in the firebox, which gives a high temperature and does not smoke.
Hot gases without flames pass through the chamber with the products, heating them, and exit through the hole at the top. The temperature is regulated by the amount of coal and the “latch” on the chimney. After cooling, the stove roof is disassembled and the finished products are taken out.
Such a stove is suitable for one-time work, since each time you have to lay it out again. But, despite the labor intensity, the option is the cheapest - the cost of components is zero.
Brick
They are assembled from fired clay bricks and fire-resistant fireclay bricks. The operating principle is similar to earthen ones. They consist of a firebox with a grate, a chamber for products and a chimney.
Photo 2. Kiln for firing ceramics made of refractory bricks with a chimney and firebox on the street, next to the house.
The difference is that the design is reusable and more efficient. Products are placed into the chamber through a collapsible wall or door; the stove can be heated with wood - the flame does not reach the products.
Reference! It is important to use dry firewood, otherwise the products will pick up moisture and become cracked. Brick has high thermal conductivity, the stove cools down, so this design is voracious
Metal with lining
Thanks to the use of basalt and kaolin insulation, a wood-burning stove becomes more heat-resistant and efficient. Such a stove consists of a firebox on which a metal container is installed.
Photo 3. A ceramic kiln with an unheated metal body and lining has heat-resistant properties.
The walls and roof are insulated with non-flammable material; sometimes the metal frame does not even heat up. The heat from burning wood in the firebox rises, heating the products, and the cooled streams of air descend and rush through the chimney into the chimney. These stoves are much more economical than brick stoves and are easy to manufacture.
The downside is the need to use expensive insulation, the plus is the durability and mobility of the structure.
Gas
Has a number of advantages:
- The gas burns completely and contains no moisture.
- Gas burners develop high temperatures.
- Temperature regulation is easy.
A gas furnace for firing ceramics is made using different technologies:
Muffle. A muffle is a separate sealed chamber in which ceramics are heated and makes it possible to produce earthenware and porcelain, since the workpieces do not come into contact with hot gases - combustion products.
The muffle is placed in the combustion chamber and the flames are distributed evenly over the entire area.
Chamber. Excellent for firing conventional ceramics. Products are loaded into an insulated chamber through which hot gases pass. The burner is installed lower and separated by a partition. The temperature distribution occurs evenly, when cooled, the gases exit into a special hole at the bottom of the chamber.
Scheme and drawing
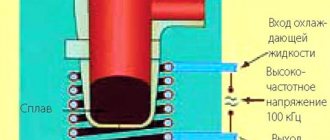
Designing a heating device yourself is a rather labor-intensive process, but making a properly functioning unit is quite possible. A schematic diagram of an industrial muffle furnace is shown in Figure 2.
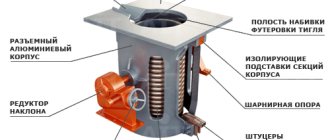
Figure 1. Diagram of a muffle furnace for firing ceramics
A special feature of the muffle furnace is the location of the heating elements inside the chamber (muffle).
Before starting work, it is advisable to sketch out a drawing of the device in order to understand the laying of layers and the connection diagrams of the heating elements. The device drawing may look like this:
Figure 2. Approximate drawing of a muffle furnace for firing ceramics.
The main thing is that a person understands the structure of the future device down to the smallest detail. Next, select the necessary materials, components and tools.
Device
Regardless of whether you are making a ceramic kiln from a barrel or using an industrial version, each design is made from several main parts:
- The outer casing of the unit can be made of stainless steel or an old refrigerator. Its main task is to create a power frame around the internal firebox and oven. Steel structures are not competitors to brick buildings, which will last a long time. To manufacture the steel outer casing we use steel, sheet thickness from 2 mm.
- Inner layer of thermal insulation. To do this, use fireclay brick or other heat-insulating material that can withstand heating temperatures above 2000. The performance of the device and heat loss depend on the heat-insulating qualities of this layer.
- A layer of thermal insulation between the inner layer and the oven body. Use mineral wool, basalt wool, and perlite. It is not recommended to use sheet asbestos. At high temperatures, the material releases substances harmful to humans.
- Chambers for laying clay products and heating elements. For electric furnaces, nichrome spirals or air heating elements are used. These devices are installed in grooves that are selected in fireclay bricks. Nichrome wire is the best option for electric furnaces. Gas burners are installed for gas.
Design Features
An electric muffle furnace for firing ceramics consists of a heating chamber and a heat-insulating body that retains heat and protects the environment and workers from it. Temperatures inside the oven can reach 1000°C or higher.
The best thermal insulation effect is obtained using refractory bricks, which are additionally insulated with modern materials. To achieve and maintain the set temperature, the oven door must be tightly closed.
Depending on the design features, there are several types of muffle furnaces. But you can only make an air unit with electric heating yourself. Such a unit can be constructed of any shape, horizontal or vertical, from available materials.
Operating rules
The electric oven may only be plugged into a reinforced socket. You can also run a large cross-section wire directly from the shield. In addition, it would be useful to install a circuit breaker.
Since this device model has exposed wires, you need to be extremely careful with it. Do not touch the coils while the oven is running. To avoid accidents, it is recommended to install a limit switch on the door, which will turn off the unit when the door is opened. If you are not very good at electrical work, seek the help of a specialist who can help make the device as safe as possible, including grounding it.
Disadvantages of homemade design
Each device is not without certain shortcomings, and a homemade device also multiplies them. Given the set goal, you can sacrifice some requirements for the sake of fulfilling others. However, everyone should know the list of negative consequences.
A homemade design is deprived of all guarantees, including safety guarantees. Evaporation of metal from the heater coil can lead to it being contained in the form of impurities in the composition of the precious metal being processed. Homemade thermal insulation will not provide full concentration of heat in the firebox, so the body of a homemade stove is very hot and requires careful handling. By the way, this is also a disadvantage of some factory models. Failure to properly monitor and regulate temperature may result in the oven not being able to perform a particular heat treatment task. https://www.youtube.com/watch?v=ABWK3hD9f1E
Ready-made factory-made ovens are designed to perform a fairly narrow range of tasks, but this is more an indicator of professionalism than a disadvantage. The main parameters and scope of application of a particular device are indicated in its passport.
The leaders in the production of compact and stationary muffle furnaces are such companies as TSMP Ltd (England), SNOL-TERM (Russia), CZYLOK (Poland), Daihan (South Korea). The presented list reflects the top list of companies for evaluating suppliers of high-temperature equipment to the Russian market.
Method two. We make a stove without having a metal casing at hand
The manufacturing process in this case is not much different from that described above, but there are definitely some nuances here. Let's start with the fact that the working volume of the design below will be about 13 liters. The spiral, as mentioned above, can warm up to a thousand degrees in just 1.5 hours, while the temperature of the outer walls of the device will not exceed 100 degrees. The algorithm of actions should be as follows.
Step 1. First, using a 4x2 centimeter profile pipe (with a square cross-section), we build a stand for the device. After this, we paint the finished stand with enamel.
Step 2. We attach a sheet of galvanized steel on top of the stand (its thickness should be approximately 0.1 centimeters), using “metal” self-tapping screws.
Step 3. We make the walls from fireclay bricks and a special fireplace composition (everything is the same as in the previous version). After the solution hardens, we make grooves for the spiral.
Step 4. We assemble the bottom from brick separately, and use the same mortar for fastening. Before continuing work, wait until the structure is completely dry. Do not forget to wet each brick immediately before laying.
Step 5. We lay a thermal insulation layer on top of the metal base (we can use the same basalt wool for this). In order to maximize compaction of this layer, it must be moistened before fixing the brick bottom.
Step 6. We continue the traditional laying of the stove, but we try to ensure that all voids and seams are carefully filled.
Step 7. We traditionally make the lid for the chamber from fireclay bricks, but at the same time we fasten them together with a metal tie.
Step 8. Place the spiral in the prepared grooves and insulate the structure from the outside with thermal insulation material. Next, we cover everything with sheets of galvanized steel, which are cut according to the dimensions of the resulting chamber.
As you can see, this requires knowledge not only in the furnace business, but also in the field of electricity. You can see another possible manufacturing method in the video below.
Video - wood burning stove
How to make a Bubafonya stove yourself
Previously, we talked about how to make a Babufonya stove on your own, in addition to this article, we advise you to read this information, see all the details here
Lining and arrangement of the firebox
The very concept of a muffle furnace implies the presence of a muffle - an internal heat-resistant capsule that covers the heating circuit spiral, protecting it from small debris and scale. The muffle, as a rule, is removable in furnaces, which allows for repair and replacement of heating elements.
The main difficulty is to manufacture the muffle and the heating assembly body at the same time. To do this, you will need two types of heat-resistant ceramics: one for making the body with grooves, the other for the thin-walled muffle. For a ceramic base, it is better to use a mixture of refractory clay with an aluminum oxide content of at least 30%. The clay should be diluted with excess water and left to swell for a day, after which the settled water should be removed from above and only the swollen sediment should be left.
The ceramic body of the heater is massive, so it cannot be made from a pure binder; a filler is needed. Glass fiber, dry quartz sand or crushed fireclay are good options for the latter. The total clay content in the solution should not be less than 50% by volume; as a result, the mixture acquires the consistency of a viscous plastic paste. If the composition turns out to be more liquid, excess moisture is removed by adding small portions of building gypsum immediately before use.
Fireclay powder
The heater body is made on a three-dimensional corrugated cardboard template, the dimensions of which should be 15–20 mm larger than the planned dimensions of the firebox on each side. First, you need to wind a cord or silicone hose of the appropriate diameter onto the template, forming the required number of grooves for the spiral. After this, the template with the cord must be covered with clay on all sides, avoiding the formation of voids and achieving a wall thickness of at least 40 mm. The addition of alabaster helps the piece maintain its shape before firing. Carefully remove the cardboard insert from the dried ceramic body and pull the cord out of the grooves.
For the lining of the firebox, ceramics made from higher quality kaolin are used. Enriched clay of the KFN-2 brand is optimal; as a filler it is better to use crushed fireclay of high purity with a content of about 20–25% by volume of dry components. The mixture is mixed as described above and used to form the internal lining.
To ensure that the muffle can then be easily separated, spirals are inserted into the ceramic body in advance. Then the inner surface is covered with scraps of newsprint according to the papier-mâché principle. You should get at least 8–10 layers, while the inner surface should contain as few irregularities as possible. After the paper has dried, a refractory lining compound is applied to the inside. It is better to do this in several passes, giving time for excess moisture to evaporate; as a result, the muffle wall should reach a thickness of 15–20 mm. In this state, the entire assembly dries for several days until the plasticity is completely lost and a ringing sound appears when tapped.
After drying, primary firing is carried out - voltage is applied to the spiral and the hot product is kept for 4-6 hours. During the firing process, fechral passes the crystallization threshold and, becoming more fragile, takes the form of channels. The clay in the ceramic liner and muffle is baked and vitrified, becoming resistant to cyclic temperature changes. Well, the paper and glue residues simply burn out, forming a minimum technological gap for easy removal and installation of the muffle.
With this manufacturing method, you can use some tricks. For example, forming a ceramic body on a cone-shaped template to make it easier to remove the muffle. It would also be a good idea to extend the front part of the assembly, where there are no heaters, or place a small coil at the bottom of the chamber. Several copies of the muffles themselves can be made at once for one furnace.
How to choose the right camera size
Which oven to choose based on the size of the chamber. Someone immediately thought, the more, the better and immediately passed it by. In fact, it's better to speculate a little. Estimate how much work is approximately being done and how much will be offended at one time. If you buy one that is too small, the firing time will make any ceramist nervous. The work will be idle and deteriorate. This will also happen if the size selected is too large. The energy consumption will be enormous, but only a small part will be fired. The master will begin to put several works aside, which will wait their turn, when at this time I could already paint the finished works and cover some with glaze.
Thermocouple
The thermocouple has been used for measuring the temperature in a furnace for quite some time. At the same time, it has established itself as a reliable measuring device. Essentially, these are two wires consisting of different alloys, which are connected to each other by welding.
When measuring temperature, a current is generated at the ends of the wires, and the higher the oven temperature, the more millivolts we get at the output. Using special devices, you can easily convert millivolts into a temperature indicator.
There are a huge number of types of thermocouples, which consist of different alloys. A type K thermocouple is intended for the muffle furnace. It consists of a chromel-alumel alloy and is designed for temperatures up to 1300 °C. For high temperature environments, it is recommended to use a thick wire thermocouple.
You can measure the temperature inside the furnace with a thermocouple using various devices. We will describe some of them below.
A multimeter is an affordable measuring device; in its design, the function of determining temperature with a K-type thermocouple is immediately thought out. Basically, this type of converter is immediately sold in a set with a multimeter. The only drawback is that the TCA proposed in this version is thin and quickly breaks down at high temperatures.
You can also use type S thermocouples based on platinum-rhodium-platinum alloys. They are more expensive than K-type thermocouple alloys, but withstand high temperatures better as they are rated for 1600 °C and will last longer. According to the standard, such a thermocouple is supplied already in a protective casing.
The thermal converter TPP, like the thermocouple K, is connected to an electronic converting device. Thus, it is possible to easily determine the temperature in the oven and regulate it using a user program.
The TXA converter is another type of meter connected to the controller
It is important here that the length of the wires is sufficient. If the wiring is initially short, then you can use special temperature compensation wires
It is important to understand that the material of the extension wire must consist of the same alloys as the material of the converter itself. But its diameter should be smaller.
By connecting a thermocouple to the controller and connecting them to power, you can immediately find out the temperature in the muffle furnace. To make firing even easier, use the controls and automatically control this process.
On the Tekhnonagrev website you can choose the most suitable thermocouple option and extension wires. If necessary, contact our managers for advice.
When working with a muffle furnace, do not forget about protective equipment. Even when a stove is more than adequately insulated, its outer surface can become hot enough to seriously burn someone if touched with unprotected skin. Therefore, use the following personal protective equipment:
Kiln mitts or gloves: These should be worn when handling any part of the kiln (other than the control panel) while it is firing or cooling. Even after turning off the power, the oven will remain hot for several hours. Do not open or touch it until completely cooled.
Sunglasses. It is recommended to use special safety glasses to observe openings in the oven. They protect your eyes from radiant heat. Regular sunglasses are not suitable for this purpose and can even cause harm, because... not designed for high temperatures. Safety glasses may also allow you to see your cones, if you are using them, more clearly.
Automation with temperature-time tasks
There are three types of automation for hardening furnaces. The cost of organizing furnace control increases along with the comfort of use. The simplest option is a simple thermostat with a thermocouple as a temperature sensor. This device will simply maintain the set temperature with a hysteresis of about 30–50 °C. The holding time is controlled manually, as is the moment the temperature point is reached.
More advanced automation is being developed specifically for electric ovens. Thermal controllers of the Autonics TCN4 type have a proportional power control function, providing adjustable hysteresis up to 1 °C. The device is also equipped with additional functions, such as an alarm when the set temperature is reached. If desired, the alarm channel can be used to activate a time delay relay installed in series with the thermostat.
The most advanced in this regard are automation devices for Profile-M type furnaces. They differ not only in built-in power relays, but also in the possibility of more flexible configuration. Such controllers have a preset timer, and also have the ability to configure heat treatment with a complex temperature profile, sequentially setting the duration of time periods during which a certain temperature should be maintained.
rmnt.ru
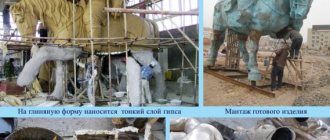
How to make tiles yourself Technology overview
| Different types of dry mix and wet clay | Before starting work, wet clay is kept in a bag | After the clay dries, its color and mass will change |
In modern factories and factories, tiles are often produced by pressing and firing dry mass. Huge, expensive pressing machines and special ovens are responsible for this. At home, this is not the best option, so you will need to use wet clay, which you will shape into any shape.
Briefly, the process goes like this: take wet clay, shape it, dry it, fire it, glaze it, and fire it again (to set the glaze).
Now a little more detail
Before starting work, the wet clay rests in a bag and waits for you to make something out of it. When you start making tiles, they turn into raw ceramic products. While you are molding the tiles, they will gradually dry out, and by the end of molding they will harden a little. This stage, when the clay is still wet, is called the hard skin stage.
Once your tiles are completely dry, you will find that the color of the clay has become lighter. Now we can say that it is at the raw stage. At this point, the tile is already quite hard, but if you hit it lightly, it may crack or crumble. If you leave such tiles to dry outdoors and they get exposed to rain, the tiles may become limp and turn into a lump of clay. There is no need to be upset about this, because this property of clay is very beneficial. If you make a bad sample, just toss it in the clay scrap bucket and forget about your troubles. Later, when the clay has lain, it can be reprocessed and made into something new and beautiful.
After all the moisture has evaporated from the clay and the tiles have reached a raw state, they are ready to be placed in the kiln and fired. What you do next depends on what glazing technique you use; but in accordance with general practice, during the first firing, which is called biscuit, the clay is not specially fired. Depending on the temperature of clay maturation, the biscuit firing temperature can range from 850°C to 1000°C. Under these conditions, ceramic products remain porous and are able to easily absorb glaze.
The second (glaze) firing occurs at the temperature required to mature the glaze. This temperature may be lower - but never higher - than the temperature required for the clay to mature; otherwise, the glaze will melt and turn into glassy balls.
FAQ
Many questions that arise during the assembly of the stove are the same for most users. This allows you not to wait for them, but to immediately clarify:
Is there a need for a power reserve for the spirals, or is it necessary to wind the spiral exactly as calculated? In this case, the power reserve acts in the opposite way - if you give a reserve length, the resistance will increase and the degree of heating will decrease. It is recommended to act in strict accordance with the calculated indicators. Is it possible to use regular construction bricks instead of fireclay bricks? Ordinary brick cannot withstand high temperatures and begins to crumble. In addition, it has high thermal conductivity, due to which the furnace body will become very hot. Is a metal casing required, or is it possible to tighten the fireclay bricks with metal clamps and plaster them with a composition for stoves? The housing is necessary so that the stove can be moved from place to place. If this is not necessary and the oven is stationary, you can do without the housing. If you use ready-made heating elements, will you get a normal muffle furnace? No, heating elements should not be used for such installations. It will not be possible to obtain the required temperature; the heating elements will take up too much space and will quickly burn out. If the electrical wiring in the house and in general in the area is dilapidated, is it possible to connect a muffle furnace to it? The stove can be connected bypassing the house wiring - run a separate cable to the common panel. However, if the line itself is in poor condition, it is better not to take risks. You can leave all your neighbors without electricity.
What should you consider when choosing a ready-made muffle furnace?
When choosing a factory muffle furnace, the type and composition of the products being fired are taken into account. Factory ovens allow you to set a wide temperature range and set the firing time.
The choice is influenced by:
- type of materials to be fired;
- volume of products for firing.
Processed materials: clay, porcelain, earthenware, stone
Firing materials are based on clay. The following are fired in muffle furnaces:
- red clay (pottery and decorative items);
- terracotta (interior decorative elements, sculpture, tiles);
- chamotte (pottery, decorative crafts for the interior);
- porcelain figurines, dishes;
- stone products;
- earthenware products.
Firing is carried out in one, two or three stages. The number of stages increases if glazing and painting are applied to the surface of the products.
Red clay and terracotta are fired at a temperature of 900-1100 degrees. The first (recycling) firing is carried out at 900-960 degrees. The temperature of the second (poured) and third firing depends on the characteristics of the enamel and paint.
During the first firing, porcelain and stone masses are heated to 800-1000 degrees. The temperature of the second and third firing is in the range of 1250-1420 degrees and depends on the technical parameters of paints and glazes.
Earthenware is first processed at a temperature of 1200-1250 degrees. The temperature of the second and third firings is 900-1250 degrees.
Fireclay ceramics and pottery are fired at a temperature of 1350-1400 degrees (waste firing). Irrigation and decorating are carried out at a temperature of 900 degrees.
Product volume
The volume of products has a decisive influence on the choice of the finished device. There are front-loading and top-loading models on sale; the volumes of their working chambers vary greatly.
For firing small products produced in small batches, the compact muffle electric furnace PM-8 (Russia) is suitable. The size of the working chamber is 19x12x30 cm, the maximum volume of products for firing is 0.0068 cubic meters. m.
For firing large ceramic products, a Russian electric muffle furnace, model PK-1000/14, is suitable. The internal dimensions of the muffle are 160x78x78 cm. The chamber allows for firing products with a total volume of 0.97 cubic meters. m.
For firing products with a volume of up to 0.064 cubic meters. meters, an electric muffle furnace from the German manufacturer Welte, model WF-35 (internal muffle size 40x40x40 cm) is suitable.
Photo 1. Muffle furnace WF-35 from the manufacturer Welte (Germany). The working chamber with heating elements is visible.
The maximum number of products is usually loaded into the chamber in order to use the entire working volume of the muffle. If products are produced inconsistently, in small batches, or souvenirs are small in size, it is enough to purchase a stove with a compact working chamber. If the products are large in volume (or the master creates small products in large batches), you should choose a unit with a spacious firing chamber.
Reference. When loading, the linear expansion coefficients of each type of ceramic are taken into account.
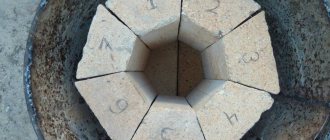
Fireclay refractory brick for laying a furnace:
As already noted, fireclay bricks are used to create the furnace. You need seven of it. They should be docked. It is recommended to lay the products in the form of a pipe. This will then become the functional oven chamber and protrude.
Fireclay refractory brick
Bricks are laid in the chamber using a composition that includes clay. Place all the bricks you use in a row in advance. Make a cutting mark on each one. The presence of marks will then (after cutting) allow you to make a pipe out of them. Cutting is carried out with a grinder. Also, for ease of laying, the bricks can be numbered. Make grooves on their inner base, into which you then insert the wire. But first create a spiral from wire. Its parameter is 6 mm. To comply with this indicator, wrap the wire around a special electrode or pencil. Apply the formed spiral to the brick and calculate the markings for future grooves. The grooves are cut with the same tool.
The installation of the wire should be strictly in a spiral. The spiral shape should be along the entire length, from bottom to top. Any contacts of turns are excluded. Otherwise a short circuit will occur.
If you are building a stove and using brick, then prepare the composition necessary for its laying, including clay of the highest quality. A mandatory requirement for it is homogeneity. It is better to buy it in reliable stores.
When building a furnace using the indicated technology, bring out the wire to connect to the machine. Therefore, arrange a special channel between the joining bricks. It requires pre-prepared cut tile elements.
No matter how you build the stove, using the brick or steel method, all materials used must be of the highest quality. After all, the furnace is awaiting serious thermal tests.
Finishing work
The working chamber for the furnace is made of brick or ceramics. After this, it is placed in a pre-prepared steel case, which already has thermal insulation
It is very important to note here that there must be a distance of at least 4 cm between the walls of the chamber and the walls of the housing. Insulation is placed in this gap
The cover for the muffle furnace must be made of two layers of metal, between which there is a layer of thermal insulation. Naturally, you must not forget about arranging a handle for opening the oven.
After this, you need to make several holes in the housing through which the wires of the heating element and thermal sensor can be brought out. The connection occurs to a separate cable, which, to increase security, will be attached to a 20A machine. A ceramic cartridge can be used to connect the output and cable. Steel pipes are used as legs for the body. They can be welded or screwed. If a bolted connection is used, the bottom of the chamber must be raised so that the bolts are on the outside.
What should the ventilation be like?
In reality, manufacturing, or rather the process of firing ceramics itself, is not so beneficial to health. And then many can conclude that the stove has no place in the house at all. There should be a special closet for her. Many people think even longer that they pollute the air a lot and so on and so forth. But compared to other indicators of pollution, the emissions from such a stove are simply nothing to the air.
But for those who dared and brought the stove into the house. What kind of ventilation should there be so as not to cause harm. So, the room must be well ventilated, since the firing time is many hours and during this time there is a constant release of substances that are harmful to health. Ventilation options for a room with a stove for firing ceramics:
- several open windows will help make air move and remove all odors and harmful particles immediately from the window;
- a special design of the ventilation system (a hole with a fan in the wall itself, through which air from the street will be taken into the room and emissions from the stove will be removed);
- Downdraft system and Updraft are special ventilation systems that craftsmen have thought out specifically for rooms where kiln firing takes place.
Here are many ways to help your hands not give up your favorite activity, and your health not to suffer from the harmful release of substances during firing.
Difficulties in manufacturing
Note:
- Safe connection of the cylinder to the burner. Do not use a rubber gas hose near a hot stove - use a metal one.
The gas cylinder must be located at a safe distance and be sure to use a reducer with a check valve.
- Seal all cracks with clay, asbestos or basalt cord.
- The stove is installed away from flammable objects.
- When working, do not touch the oven elements with bare hands.
Attention! Do not allow children onto the playground!
- The outlet for the burnt gases must be of sufficient diameter, otherwise the flame will “choke”; it can be regulated with a piece of insulation.
Where is the best place to install?
It is better not to place the installation in small and enclosed spaces that do not have ventilation (closets or closets). The stove should not be installed in the room where people live, where they sleep, eat, etc. It is better to choose a separate room for it, with an open window. Where you can create a small studio specifically for firing.
Be sure to maintain a distance from the stove and to any object or wall. It should not be less than 30 cm. And according to fire safety rules, the ceramist should not store near objects or materials that can easily ignite
It is also very important to check the material of the walls that surround the stove. It must not be drywall or other flammable material.
The ideal option is tile or concrete walls.
But the floor should not be ignored; it should also consist of a special material. And it should not be a carpet, parquet, or linoleum sheet. If the floor is not made of concrete or another material that is not on the flammable list, then you should not immediately destroy and break everything. In some cases, it is enough to simply lay a sheet of iron directly on the floor surface and carefully install the stove on it. Date: September 25, 2022
Purpose of the equipment
Why do you need a homemade heating chamber at home? It can be intended for various needs: firing of ceramic products, hardening of cutting steel elements and melting of metals. The thermal chamber can be heated either by electricity or run on gas.
The external shape and internal design of the furnace can take different configurations. The main task is to achieve a certain temperature regime in a limited container space.