Many people are accustomed to thinking that the most affordable and economical type of fuel is natural gas. But it turned out that this product has a good alternative option - hydrogen. It is obtained by splitting water. The initial component for obtaining such fuel is obtained free of charge. A DIY hydrogen burner for a heating boiler will help you save a lot and not have to think about going to the store. There are special rules and methods for creating a technical installation designed to produce hydrogen.
How is hydrogen produced?
Information about the production of hydrogen is often given by chemistry teachers to children in secondary school. The method of its extraction from simple water in chemistry is called electrolysis. It is with the help of such a chemical reaction that it is possible to produce hydrogen.
The device, simple in design, looks like a separate container filled with liquid. Under the layer of water there are two plastic electrodes. Electric current is supplied to them. Due to the fact that water has the property of electrical conductivity, contact is built between the plates with minimal resistance.
The current passing through the created water resistance leads to the formation of a chemical reaction, as a result of which the required hydrogen is produced.
At this stage, everything seems very simple - all that remains is to collect the resulting hydrogen to use it as an energy source. But chemistry cannot exist without small details. It is important to remember that if hydrogen combines with oxygen, then at a certain concentration an explosive mixture occurs. This state of substances is considered critical, which limits a person’s ability to create powerful home-type stations.
Types of electrolyzers
Let's briefly look at the design features of the main types of water splitting devices.
Dry
The design of a device of this type was shown in Figure 2; its peculiarity is that by manipulating the number of cells, it is possible to power the device from a source with a voltage significantly exceeding the minimum electrode potential.
Flow-through
A simplified design of devices of this type can be found in Figure 5. As you can see, the design includes a bath with electrodes “A”, completely filled with solution and a tank “D”.
Figure 5. Design of a flow electrolyzer
The operating principle of the device is as follows:
- at the entrance of the electrochemical process, the gas together with the electrolyte is squeezed into container “D” through pipe “B”;
- in tank “D” gas is separated from the electrolyte solution, which is discharged through the outlet valve “C”;
- the electrolyte returns to the hydrolysis bath through pipe “E”.
Membrane
The main feature of devices of this type is the use of a solid electrolyte (membrane) on a polymer basis. The design of devices of this type can be found in Figure 6.
Figure 6. Membrane-type electrolyzer
The main feature of such devices is the dual purpose of the membrane: it not only transfers protons and ions, but also physically separates both the electrodes and the products of the electrochemical process.
Diaphragm
In cases where diffusion of electrolysis products between the electrode chambers is not permissible, a porous diaphragm is used (which gives such devices their name). The material for it can be ceramics, asbestos or glass. In some cases, polymer fibers or glass wool can be used to create such a diaphragm. Figure 7 shows the simplest version of a diaphragm device for electrochemical processes.
Design of a diaphragm electrolyser
Explanation:
- Oxygen outlet.
- U-shaped flask.
- Hydrogen outlet.
- Anode.
- Cathode.
- Diaphragm.
Alkaline
The electrochemical process is impossible in distilled water; a concentrated alkali solution is used as a catalyst (the use of salt is undesirable, since this releases chlorine). Based on this, most electrochemical devices for splitting water can be called alkaline.
On thematic forums, it is advised to use sodium hydroxide (NaOH), which, unlike baking soda (NaHCO3), does not corrode the electrode. Note that the latter has two significant advantages:
- Iron electrodes can be used.
- No harmful substances are released.
But one significant drawback negates all the benefits of baking soda as a catalyst. Its concentration in water is no more than 80 grams per liter. This reduces the frost resistance of the electrolyte and its current conductivity. If the first can still be tolerated in the warm season, then the second requires an increase in the area of the electrode plates, which in turn increases the size of the structure.
How does a hydrogen burner work?
To create hydrogen-powered generators with your own hands, the classic Brown installation scheme is most often used as a basis. An electrolyzer of this type has an average power and includes several groups of cells, each of which, in turn, has a group of plastic electrodes. The power of the created installation will depend on the total surface area of the plastic electrodes.
The cells are installed in a container that is qualitatively protected from external factors. On the body of the device there are special pipes for connecting the water line, hydrogen output, as well as a contact panel that acts as an electrical supply.
A self-created hydrogen burner according to Brown’s scheme, in addition to all of the above, includes a separate water seal and a check valve. With the help of such parts, complete protection of the device from the release of hydrogen is achieved. It is this scheme that many craftsmen use when creating a hydrogen installation for heating their home area.
Water seal and fuse
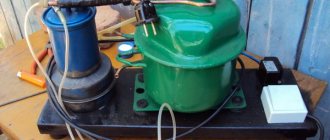
Pay your attention to figure No. 1 - there are two containers (I labeled them A and B), and a needle from a disposable syringe (B), all of this is connected by tubes from droppers. You need to pour water into the first container (A), this is a water seal
It is necessary so that the explosion does not reach the electrolyzer (if it explodes, it will be like a fragmentation grenade)
You need to pour water into the first container (A), this is a water seal. It is necessary so that the explosion does not reach the electrolyzer (if it explodes, it will be like a fragmentation grenade).
Figure No. 5 – Water seal
Please note that there are two connectors in the water seal cover (I adapted all this from a medical dropper), both of them are hermetically glued into the cover using epoxy glue. One tube is long, through which hydrogen from the generator should flow under the water, gurgle, and through the second hole go along the tube to the fuse (B)
Figure No. 6 – Fuse
You can pour both water (for greater reliability) and alcohol (alcohol vapor increases the combustion temperature of the flame) into a container with a fuse.
The fuse itself is made like this: You need to make a hole in the lid with a diameter of 15 mm, and holes for the screws.
Figure No. 7 - What the holes in the lid look like
You will also need two thick washers (if necessary, you need to expand the inner diameter of the washer using a round file), two plumbing gaskets and chocolate foil or an ordinary balloon.
Figure No. 8 – Sketch of a safety valve
It is assembled quite simply; you need to drill four coaxial holes in the iron washers, lid and gaskets. First you need to solder the bolts to the top washer; this can easily be done using a powerful soldering iron and active flux.
Figure No. 9 – Washer with screws
Figure No. 10 – Screws soldered to the washer
After you have soldered the screws, you need to put one rubber gasket on the washer and your valve itself. I used a thin elastic band from a burst balloon (this is much more convenient than putting on thin foil), although foil also fits quite well, at least when I tested my hydrogen torch for explosiveness, there was foil in the valve.
Figure No. 11 – Putting on the gasket and protective elastic band
Then we put on the second gasket and you can insert the protection into the holes made in the cover.
Figure No. 12 – Finished valve
Figure No. 13 – Protection elements
The second washer and nuts are needed to tightly and firmly fix the protection by tightening the nuts (look at Figure No. 6).
Please understand and take note that safety rules must not be neglected, especially when working with explosive gases. And such a simple device can save you from unpleasant surprises. The protection works according to the principle “where it’s thin, it breaks”; an explosion knocks out the protective film (foil or rubber band), and the explosive force does not go into the electrolyzer; moreover, the water seal also prevents this. Take my word for it, if the electrolyzer explodes, you won’t think it’s enough :)!!!
Figure No. 14 – Explosion
It should be understood that an emergency situation is inevitable. The fact is that the flame burns at the outlet of the nozzle (for which a needle from a disposable syringe is quite suitable) only because gas pressure is created (the pressure is agreed upon).
Figure No. 15 – Nozzle from a syringe, on a pedestal
For example, you are working with your burner and the light goes out, believe me! You will not have time to jump away from the burner, the flame will instantly go back through the tube and the explosion of the protective valve will thunder (it is needed so that it explodes and not the electrolyzer) - this is quite normal when the burner is homemade - be vigilant and careful, stay away from the hydrogen burner and wear personal protective equipment!
Personally, I’m not very enthusiastic about the hydrogen burner, I tried to make it only because I already had a ready-made electrolyzer. Firstly, it is very dangerous, and secondly, it is not very effective (I’m talking about my hydrogen burner and not about burners in general) and it was not possible to melt what I wanted with it. And therefore, if you came up with the idea of making this type of burner, ask yourself a completely rational question, “is it worth it,” since assembling an electrolyzer from scratch is quite a troublesome task, and you also need a powerful power supply so that it is enough to match the hydrogen pressure and diameter of the outlet nozzle. Therefore, “if only it was”, I don’t recommend you do it, but only if you really need it.
Thank you for visiting bip-mip.com
Hydrogen station for home use
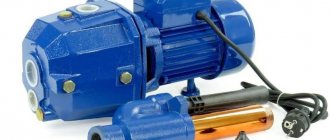
How to make a hydrogen burner with your own hands? This question continues to be the most popular among owners of private houses who are trying to produce a reliable and high-quality heating source. The most common way to create such a device is the following option:
- pre-prepare a sealed container;
- plate or tubular electrodes are created;
- the design of the device is planned: the method of controlling it and equipping it with current;
- additional modules are prepared for connection to the device;
- special parts are purchased (fasteners, hoses, wiring).
Of course, the master will definitely need tools, including special devices, a frequency meter or an oscilloscope. Once all the tools and materials are prepared, the master can proceed to the creation of a hydrogen heating burner for home use.
Device creation scheme
At the first stage of creating a hydrogen burner for heating a house, the master needs to make special cells designed to generate hydrogen. The fuel cell is distinguished by its completeness (slightly less than the length and width of the generator housing), so it will not take up too much space. The height of the block with electrodes inside reaches 2/3 the height of the main body, into which the main structural parts are installed.
The cell can be created from plexiglass or PCB (wall thickness varies from 5 to 7 millimeters). To do this, the textolite plate is cut into five equal parts. Next, they are formed into a rectangle and the borders are glued together with epoxy glue. The lower part of the resulting figure should remain open.
It is customary to create the body of the fuel cell of a hydrogen heater from such plates. But in this case, experts use a slightly different assembly method using screws.
On the outside of the finished rectangle, small holes are drilled for holding the electrode plates, as well as one small hole for the level sensor. For comfortable release of hydrogen, an additional hole with a width of 10 to 15 millimeters is required.
Electrode plates are inserted inside, the contact tails of which are passed through drilled holes on the top of the rectangle. Next, a water level sensor is built in at around 80 percent of the cell filling. All free holes in the textolite plate (except for the one from which hydrogen will come out) are filled with epoxy glue.
Generator cells
Most often, when creating a hydrogen generator, cylindrical modules are used. The electrodes in this design are made according to a slightly different pattern.
The hole from which hydrogen comes out must be additionally equipped with a special fitting. It is fixed with a fastener or glued in. The finished hydrogen generation cell is built into the body of the heating device and sealed from the top (in this case, epoxy resin can also be used).
About the Meyer hydrogen cell
If you have made and tested the design described above, then you probably noticed from the burning of the flame at the end of the needle that the performance of the installation is extremely low. To get more detonating gas, you need to make a more serious device, called the Stanley Meyer cell in honor of the inventor.
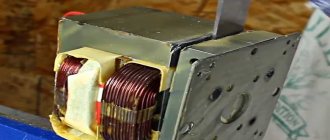
The principle of operation of the cell is also based on electrolysis, only the anode and cathode are made in the form of tubes inserted into one another. Voltage is supplied from the pulse generator through two resonant coils, which reduces current consumption and increases the productivity of the hydrogen generator. The electronic circuit of the device is shown in the figure:
Note. The operation of the circuit is described in detail on the resource https://www.meanders.ru/meiers8.shtml.
To make a Meyer cell you will need:
- a cylindrical body made of plastic or plexiglass; craftsmen often use a water filter with a lid and pipes;
- stainless steel tubes with a diameter of 15 and 20 mm, a length of 97 mm;
- wires, insulators.
Stainless steel tubes are attached to a dielectric base, and wires connected to the generator are soldered to them. The cell consists of 9 or 11 tubes placed in a plastic or plexiglass case, as shown in the photo.
A ready-made plastic housing from a conventional water filter can be adapted for the Meyer cell
The elements are connected according to a scheme well known on the Internet, which includes an electronic unit, a Meyer cell and a water seal (technical name - bubbler). For safety reasons, the system is equipped with critical pressure and water level sensors. According to reviews from home craftsmen, such a hydrogen installation consumes a current of about 1 ampere at a voltage of 12 V and has sufficient performance, although exact figures are not available.
Schematic diagram of switching on the electrolyzer
Device body
The housing of a hydrogen generator for home use is quite simple. But it will not be possible to use such a design for high-power stations, since it simply will not withstand the applied load.
Before installing the finished cell inside, the housing should be well prepared. To do this you need:
- create a liquid supply in the lower part of the housing;
- make a top cover equipped with convenient and reliable fasteners;
- choose a good sealing material;
- install the electrical terminal block on the cover;
- equip the lid with a hydrogen collector.
The essence of hydrogen welding
Hydrogen welding is based on the ability of H2 to burn with high heat release. The flame requires a gas mixture with a high hydrogen content. Oxygen is bound by flammable organic liquids; only a small amount is required. The hydrogen flame is not visible during the daytime; the devices use special sensors that control the gas supply.
Electrolyzers are used to generate the hydrogen mixture. Water breaks down into its constituent molecules under the influence of electric current. The result is a flammable gas mixture with the required ratio of hydrogen and oxygen.
Among industrial equipment, domestic welding machines of the “League” series deserve attention. They operate from a standard 220 V network, are filled with distilled water, which is used as a medium for electrolysis. Under the influence of current, the molecules break down into oxygen and hydrogen. The mixture of gases enters the cooler-enricher, where excess moisture condenses. Flammable liquids are added from the gas mixture:
- benzene;
- alcohol;
- petrol;
- toluene;
- other hydrocarbon compositions.
As with other hot work, safety precautions must be observed when welding with an electrolyzer.
Final stage
At the end of the work, the master will be able to obtain a high-quality and reliable hydrogen generator for the heating system of a private home. Next, only the final touches remain:
- install the finished fuel cell into the main body of the device;
- connect the electrodes to the terminal block of the device cover;
- the fitting installed at the hydrogen outlet should be connected to the hydrogen manifold;
- The cover is placed on top of the device body and secured through a seal.
The hydrogen generator is now completely ready for operation. The owner of a private house can safely connect water and additional modules for comfortable heating of a private house.
Application of hydrogen welding machine
Using atomic-hydrogen welding machines, we produce:
- metal soldering;
- welding of steel blanks of any size;
- protective powder coating;
- oxygen cutting of rolled products;
- surfacing of parts.
Hydrogen welding is used not only in construction work; due to its compactness, the devices are used:
- repair specialists for refrigeration equipment and radiators;
- dentists;
- jewelers;
- radio amateurs;
- workshops engaged in auto body repairs.
The range of use of the devices is extensive. Using the capabilities of atomic hydrogen welding, cast iron products are repaired (the metal is characterized by high fluidity). The only limitation to the use of electrolyzers is high exothermia. This is an increased risk factor; cooling systems are used when welding with hydrogen.
Rules for using the device
A hydrogen jewelry burner for home must have additional built-in modules. Particularly important is the water supply module, which is combined with a water level sensor built into the hydrogen generator itself. The simplest models are a water pump and a control controller. The pump is controlled by the controller through a sensor signal depending on the amount of liquid in the fuel cell.
Auxiliary elements are very important for any heating design. Without automatic control and protection modules, using a hydrogen-based generator is prohibited and even dangerous.
Experts advise purchasing a special system that regulates the frequency of the supplied electrical current and voltage level. This is important for the normal functioning of the working electrodes inside the fuel cell. The module must also contain a voltage stabilizer and overcurrent protection.
The hydrogen manifold is a tube into which a special valve, pressure gauge and check valve are built. From the collector, hydrogen is supplied to the room through a special check valve.
The pressure gauge and hydrogen manifold are very important parts in a hydrogen generator, with the help of which the gas is evenly distributed throughout the room and the overall pressure level is controlled.
Any consumer should remember that hydrogen remains an explosive gas with a high combustion temperature. It is for this reason that it is prohibited to simply fill the heating device structure with hydrogen.
Brief theoretical part
Hydrogen, also known as hydrogen, the first element of the periodic table, is the lightest gaseous substance with high chemical activity. During oxidation (that is, combustion), it releases a huge amount of heat, forming ordinary water. Let us characterize the properties of the element, formatting them in the form of theses:
- The combustion of hydrogen is an environmentally friendly process; no harmful substances are released.
- Due to chemical activity, the gas does not occur in free form on Earth. But its reserves in water are inexhaustible.
- The element is extracted in industrial production by a chemical method, for example, in the process of gasification (pyrolysis) of coal. Often a by-product.
- Another way to produce hydrogen gas is by electrolysis of water in the presence of catalysts - platinum and other expensive alloys.
- A simple mixture of hydrogen + oxygen gases explodes from the slightest spark, instantly releasing a large amount of energy.
For reference. Scientists who first separated the water molecule into hydrogen and oxygen called the mixture an explosive gas due to its tendency to explode. Subsequently, it received the name Brown's gas (after the name of the inventor) and began to be designated by the hypothetical formula NHO.
Previously, airship cylinders were filled with hydrogen, which often exploded.
From the above, the following conclusion suggests itself: 2 hydrogen atoms easily combine with 1 oxygen atom, but part very reluctantly. The chemical oxidation reaction proceeds with the direct release of thermal energy in accordance with the formula:
2H2 + O2 → 2H2O + Q (energy)
Here lies an important point that will be useful to us in further debriefing: hydrogen reacts spontaneously from combustion, and heat is released directly. To split a water molecule, energy will have to be expended:
2H2O → 2H2 + O2 – Q
This is the formula for an electrolytic reaction that characterizes the process of splitting water by supplying electricity. How to implement this in practice and make a hydrogen generator with your own hands, we will consider further.
How to determine the quality of an installation?
Creating a high-quality and safe heating installation for your home yourself is a difficult task that not everyone can cope with. For example, even when considering the metal from which the device pipes and electrode plates are made, one can already encounter a large number of difficulties.
The service life of the built-in electrodes directly depends on the type of metal and its basic properties. Of course, you can use the same stainless steel, but the operation of such parts will not be long. The temperature of the hydrogen burner should be around 5000 K.
Measurements are also of particular importance. All calculations should be carried out as accurately as possible, taking into account the required power, the quality of the incoming water and other criteria. If the size of the hole between the electrodes does not coincide with the calculations, then the hydrogen generator may not start at all.
Application of the method
Gas flame welding is carried out due to the combustion of a gaseous mixture. The most commonly used is acetylene welding. It is based on the oxidation of carbide in water.
If low temperatures are required, for example when working with small parts or thin metal, propane is used. It is fed from the cylinder into the mixing chamber and then into the burner.
Oxygen is supplied to the same chamber to support gas combustion. By adjusting the oxygen pressure, it is possible to achieve a combustion temperature of up to 3000 degrees, which allows not only welding, but also metal cutting.
The disadvantage of this technology is the need to use a gas cylinder. This places restrictions on the use of welding in many difficult conditions.
Unit for hydrogen welding.
The operating principle of hydrogen welding is based on the process of separating water into hydrogen and oxygen. As a result of the subsequent recombination of monatomic hydrogen into diatomic hydrogen, energy is released, which accelerates welding.
The welding area is protected from oxygen by hydrogen, which eliminates surface oxidation and ensures smooth seams.
Using hydrogen cylinders for rafting is dangerous. Leakage in confined spaces may cause suffocation or dizziness. It is also explosive.
The production of hydrogen necessary for the operation of the welding machine is carried out directly at the welding site in the electrolysis chamber. This eliminates these risks if the equipment is used correctly and safety precautions are followed.
Hydrogen welding is widely used in difficult conditions: tunnels, mines, sewers. It is impossible to use propylene-acetylene cylinders for such tasks due to the high risk of mixture leakage and explosion.
Electrolysis equipment does not have these disadvantages and is widely used in these areas.
Using hydrogen welding machines is quite simple. They do not require frequent recharging and quickly reach operating temperatures.
In addition, they can operate from a household network, which makes them very attractive for the average user. Especially considering that hydrogen welding can be done with your own hands using one of the many electrolyzer circuits for welding available on the Internet.