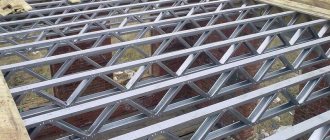
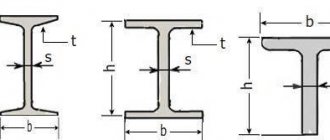
What a strange material
The technology for assembling I-beams is quite simple. Imagine a board with conventional dimensions of 25x80, having one or more longitudinal grooves. Two such boards are oriented parallel with grooves facing each other. Rectangular OSB plates are inserted into the grooves, the product is glued and possibly filled with polyurethane. Here is an example of an interesting and bold technological solution, aimed mainly at insulating roofs and ceilings without cold bridges.
It would seem, why complicate everything and abandon the natural strength of solid and laminated timber? Because the use of beams has a number of advantages: faster installation, ease of use, fairly high-quality insulation of structural and airborne noise. When used correctly, these advantages cover the relatively high cost of the material; moreover, due to the orientation of the fibers of the central flange, a wooden I-beam is comparable in reliability to solid wood.
Practical application of beams
The extensive use of wooden I-beams is obvious from the variety of their types and sizes. After treatment with fire retardant or water repellent compounds, beams acquire additional properties and become suitable for most “dry repair” projects. On them, in particular, you can build a good and very warm floor, walls, partitions or rafter system.
Almost immediately after installation, the structure is ready for plasterboard covering. In addition to gypsum plasterboard, it is not forbidden to use gypsum plaster, shingles and cement plaster or any type of siding.
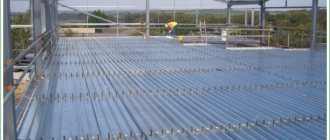
As an example, consider the process of assembling a simple interfloor floor with a high-density mineral wool filler (120–140 kg/m3) 250 mm thick with a permissible load of 400 kg/m2 and a span length of 8 meters.
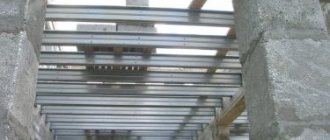
Interfloor ceiling on metal beams
The task of floors in a building is to perform load-bearing and enclosing functions, to ensure the spatial rigidity of the structure and its stability, to separate floors, to connect walls to each other, transferring the load to them. In low-rise construction there are several options for arranging interfloor floors. One of them is flooring using metal beams. They can also be used for attic and basement floors.
Advantages of metal floors
Metal structures, unlike wooden beams, are more reliable in terms of fire safety and resistance to biological hazards (mold, mildew). They:
- much stronger than wooden beams, with a smaller thickness they can withstand heavy loads. Their use allows you to save space and provide more usable space;
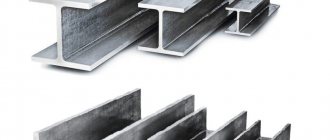
- can be laid on spans up to 24 meters. The I-beam (channel) section of rolled metal remains static, is resistant to changes in the amplitude of the floors, and is not subject to deflection.
The disadvantages of metal floors include low thermal insulation and sound insulation parameters, as well as the likelihood of corrosion. The latter can be prevented by thorough anti-corrosion treatment of the metal before installation. To eliminate shortcomings in sound insulation, the ends of the I-beams are wrapped in felt, tightly sealed into brick walls with cement mortar, and fixed with anchor bolts.
The large weight of the metal may require the use of a crane when installing the structure. It will be very difficult to change the size of beams, cut or extend them using a welding machine. As a result, it is necessary to very accurately measure the dimensions of the spans before ordering rolled metal from the enterprise.
The only restrictions in the use of floors on metal beams are the financial side, as well as the size and type of structure. The load-bearing part of the building, the walls of the building, must withstand the weight of rolled metal, so before purchasing materials, you need to calculate the loads on the beam floors.
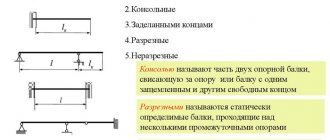
Selecting beams and supporting them correctly
When using wooden beams on such projects, you have to constantly balance between providing the required load-bearing capacity and the low weight of the floor. When working with pine beams, a span length of up to 6 meters is allowed, however, beams of 300x1500 mm would be needed, and the maximum deflection would be more than 10 mm.
The I-beams used have a height of 400 mm with flanges of 40x90 mm and a post thickness of 10 mm. The free space between the shelves is almost 320 mm, which is enough to lay 250 mm of insulation and 15 mm of boards for hemming. The center distance of the beams is selected according to the width of the insulation, but not less than the recommended one, that is, 40 cm.
When installing beams on load-bearing walls, the laying depth is at least half the height of the beam, in the case under consideration - 200 mm. Although manufacturers often indicate a shallower laying depth, it is better to ignore such recommendations and play it safe. You should also not overdo it - if the beams are spaced frequently, this will negatively affect the strength of the walls. In addition, it is better to leave a load-bearing layer for such an overlap.
The ends of the beams are coated with bitumen mastic to the filling depth; installation is carried out only after complete drying. It is better to immediately align the beams perfectly; to do this, they are laid on small tubercles of set cement mortar as permanent beacons, and then the position of each I-beam is adjusted in a common plane. After drying, you need to cover the beams with a crown row and fill the niches with cement mortar.
Installation of beams on frame walls or self-supporting insulated wires must be accompanied by mechanical fastening. To do this, you can use triangular gussets made of 20 mm plywood or buy metal brackets. The edges of the beams should be recessed from the outer plane of the walls by at least 50 mm and sheathed on the outside with moisture-resistant plywood.
Floors based on I-beams
Every person wants everything in his home to be done conscientiously, but not everyone knows how to achieve this.
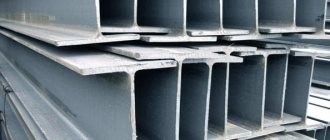
Thus, many materials are used to create partitions, but only one of them has an increased strength coefficient - this is the overlap of metal beams.
Metal beams are more reliable and durable, have no restrictions and allow you to cover large spans (4-6 m or more) than wooden beams. This design is not subject to fire. However, when using metal beams, significant financial costs arise.
Most people believe that an ordinary monolithic floor can provide unsurpassed strength that will not lose its qualities over the years. But at the same time, they do not even try to calculate how much money and time it takes to create it, whereas it is quite possible to organize an alternative option that will be cheaper, it will require less material, and its properties will not be worse. These are floors on reinforced concrete beams, which are practically the same monolith, only much thinner and stronger.
In order for the monolith to be strong, it is necessary to clearly and clearly define the area of work, but taking into account this correction for the beams, this will be much easier than usual. First, you will need to collect a number of tools, which are found in almost every home, and only then you can begin to carry out each step step by step. Here you shouldn’t even be afraid of covering large spans, because... the structure is much more durable.
After the calculation is completed, it is necessary to take into account the weather forecast data, because... There should be no precipitation in the next 1-2 weeks under any circumstances. All wooden structures will immediately lose their properties for a fairly long period. The beam system will sag, the plywood formwork will get wet, and pouring concrete in a damp place will simply be useless.
Connection and docking
There are quite complex floor configurations in which beams can be joined to increase the length or connected at right angles to form lintels. The beams of the main span should not be joined outside the load-bearing walls or columns, but in some cases this may be necessary, for example, when the ceiling extends into a bay window niche.
To connect beams to one of them, it is necessary to cut the shelves at least 4 times the height of the beam. The central post is cut to the same distance and the groove on the other side is cleaned. The beam is spliced and, if possible, glued with casein glue with the obligatory installation of a pressure of 2–2.5 kgf/cm2. After drying, the joint on both sides is strengthened with butt plates - one or more 25 mm boards, well fitted between the shelves. The overlays are tightened together with self-tapping screws and screwed to the outer shelves in increments of 20 cm.
For rectangular connections, special steel brackets should be used. The flanges of the adjacent beam must be cut to the depth of entry, while the beam to which the connection is made must remain intact. As for consumables for fastening, you will find them in abundance from manufacturers and distributors of beams, as well as methods for calculating floors, rafter systems and walls, as well as more specific connection methods.
Preparation for monolithic interfloor construction
Scheme of flooring on metal beams.
- sheet A3;
- pencil with eraser;
- roulette;
- level;
- welding machine;
- beams;
- perforator;
- laminated plywood from 20 mm and thicker;
- hammer with nails;
- supporting system (beam supports 100 * 100 and more, or metal struts with a steel thickness of 2 mm - you should not rely on one system, it is better to alternate);
- roofing felt or another waterproofing agent.
Here you will need to create an accurate drawing of the surface, which will provide a detailed idea of the future work that remains to be done. It is worth taking the outer side of the wall as the perimeter in the drawing, because It is she who will be the support.
Beams (I-beams) are being installed - this should be done at a level so that there are no problems with the formwork. Here it should be taken into account that at times it is necessary to splice them together using a welding machine. If the ceiling is installed above a separate room, which is part of the whole, then the beams should be joined to the finished wall using a hammer drill and the same welder. The step size between the I-beams is from 1 to 2.5 m, depending on the project budget, because the more beams and the closer they are, the more reliable the floors on reinforced concrete beams will be.
Scheme of strengthening metal beams A, B - with overlays. B - concrete coating. G - sprengel. D, E - sealing on supports. F, Z - pairing of beams on supports.
Plywood is mounted parallel to the top line of the I-beam, which will serve as formwork. The fastening should be as strong as possible. However, it should not stop being removable. When installing the formwork, it is important not to forget that in this case it is not a standard 0.3 m monolith, but a reinforced one, which can be reduced by 2 times without any losses, so the sides can be made only 0.15-0.2 m.
Next, the support system is installed. There are 2 options here - wooden beams and metal spacers. Beams are placed in the ratio of 1 pc. per 1 m², while spacers are 1 pc. per 2 m². After installation, each one should be checked individually for stability, because the calculation for falling cement is on average 500 kg, and it is necessary to withstand it so that the beam does not even move. For beam supports, calculations are done much more often, because the metal may undergo deformation, but the wood will stand until the last.
Once the beam systems have been checked, you can climb onto the formwork and walk on it. While walking, you should walk as hard as possible and try to catch the slightest vibration under you. Next, you can lay roofing felt, the calculation should be done for the entire perimeter, and if possible, in reserve.
Hemming the ceiling
The next stage is extremely simple: a hemming board of arbitrary thickness is placed on the lower shelves of the wooden I-beam, which is fixed in any way. Boards can also be laid with a gap, using the rough backing as a support for thermal insulation, especially when it comes to dense materials like stone wool or EPS. This will slightly reduce the dead weight of the ceiling.
The boards should not be fitted too tightly; leave a gap of 3–5 mm for deformation during drying. If you want to immediately lay the lining under varnish, leaving the beams open, take the trouble to insulate the insulation from spillage and weathering, leave a gap at the ends of the slats of at least 2-3 mm.
You can also refuse to lay boards like this and hem the ceiling with, say, chipboard. However, the described approach allows you to avoid downtime: after all, the finished ceiling is not installed quickly, and the ceiling must be used.
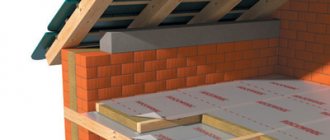
Ceilings between the floor and the basement or attic
Scheme of ceiling with metal beams between the floor and the basement.
- beams (I-beams);
- laminated plywood 20 mm or thicker;
- support system;
- hammer with nails;
- concrete mixer;
- mortar (1 cement, 3 sand, as much water as required);
- roofing felt;
- reinforcing rod (can be thinner than average);
- welding machine with electrodes;
- clay solution (Clay and horse manure 2 to 1, water);
- shovel;
- putty knife;
- Master OK.
Such monolithic floors on metal beams are made in a similar way and from the same materials as the calculation. It is created using almost the same formulas, but the manufacturing technology itself differs significantly:
- The formwork is mounted not under the top line of the beam, but under the bottom line, so that the filling is carried out exactly in the space between them.
- The reinforcement is attached to the beams using a welding machine or placed manually during pouring.
- There is no need to order an automixer, because... for such volumes (each space between the beams is poured separately, but the installation of the reinforcement with a welder should be done in advance) you can make the solution yourself in a concrete mixer.
- In this way, monolithic fixed panels are obtained that will have considerable strength indicators and at the same time not lose their thermal insulation properties (it is still better to lay a screed on the floor or raise the floor level above the beams themselves, since the metal will still be cool). Some attic floors and basement ceilings are coated with a clay mortar, better than which no modern material can retain heat.