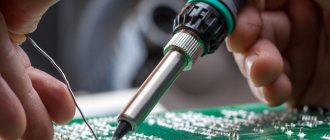
Anyone who has at least once tried to unsolder a microcircuit with a soldering iron has probably experienced certain difficulties. This is explained by the fact that in order to desolder a large number of legs, it is necessary to either warm them all up at the same time, or free them from solder one by one.
Only in this case is it possible to keep the contacts on the board in good condition, which allows you to subsequently solder in a new chip. If you are not completely sure that an expensive part is faulty, it is natural to want to keep it in working order without overheating during dismantling.
Features of dismantling
There are many known technical techniques that allow you to solder a microcircuit with a soldering iron, each of which has its own advantages and disadvantages.
You can remove electronic parts from boards without damaging the contacts in the following ways:
- by heating the soldering areas with just a soldering iron (with the addition of flux);
- through a special suction that removes molten solder from the contact pads;
- using a metal braid from a coaxial cable applied to the soldered leg;
- using heat-conducting metal plates (blades) or copper attachments that have slots for the contact patches of microcircuits.
The first three methods are suitable if you have a soldering iron whose power exceeds 25 watts.
The option of using special attachments involves replacing the working tip and is only suitable in combination with “powerful” soldering stations (more than 40 watts), capable of heating it together with the contacts soldered into the board.
In addition, this method of desoldering a part is only suitable for microcircuits with a suitable arrangement of legs for the configuration of the nozzle. The approach that has become more widespread is when a regular razor blade is used as a heater.
How to unscrew a broken thread?
As a plumber, we often have to change bathtub or shower faucets. Often mixers are mounted on old metal pipes and the mixer eccentrics are screwed into cast iron elbows. But when you try to unscrew it, such an eccentric often breaks and part of the thread remains in the cast iron outlet. Consequently, the thought just as often arises, how to unscrew a broken thread?
At the same time, you can panic and swear at everyone, or you can not miss such a moment and prepare for it in advance. For example, we decided to change the mixer, this is plan A.
To implement it, we prepare the necessary material and tools. But suppose that our plan was interfered with and the threads broke off and remained inside.
But picking out part of the thread will be plan B. Thus, in order not to waste your nerves, you need to also prepare for plan B. And if this plan is ripe, then you will easily implement it, and then implement plan A. And everyone will be happy.
In order to unscrew part of the thread from almost any fitting, there are two main methods. Rather, the use of one method or another depends on the quality of the broken part of the fitting thread.
If the fitting is of good quality, but is stuck tightly and breaks off when unscrewing, then you can unscrew it by selecting a chisel or a wide screwdriver, slightly larger than the internal size of the fitting. With a light blow of a hammer, we hammer the chisel, for example, into the fitting and try to unscrew it, alternatively, with a gas wrench. But this method is suitable for threads that are not strongly stuck or freshly twisted.
Otherwise, you must proceed as follows. Using a hacksaw blade for metal, we saw the broken thread from the inside out to the thread of the fitting in which the thread is stuck. At the same time, we make four cuts with a cross. Now we try to unscrew it if the thread is fresh.
If it’s stuck, then take a flat-head screwdriver that you can hit with a hammer and break off the sawed pieces, trying not to damage the thread of the fitting from which we remove the broken piece.
But before this, you can insert a piece of material inside the fitting for insurance, but with the possibility of its further removal. This must be done so that broken pieces do not get into your pipeline and subsequently clog the mixer or other device.
This is a universal method and is suitable for most threads, including cast iron plugs. This method is also used to remove German sewerage from a fitting when carrying out dismantling or cutting-in work. .
This is not something they teach you in plumbing school. Many will reach it themselves or have already reached it. I decided to describe this technique because I think it is one of the most annoying things in plumbing. And I was terribly angry about this situation that happened to me at the beginning of my career.
Fortunately, you all have a head on your shoulders. All that remains is to sharpen your hands correctly and always have a good stock of tools with you to solve almost any problem. After all, as they say in the East: Perfection consists of little things, but perfection is not a little thing!
We can summarize. To unscrew part of the stuck external thread in an internal fitting, you must:
Cover the hole with a cloth to prevent thread fragments from entering the pipe.
Cross-saw the threads to the threads of the internal fitting.
Break off the cut parts using a hammer and a flat-head screwdriver.
Clean the threads with sandpaper.
Screw in the new fitting.
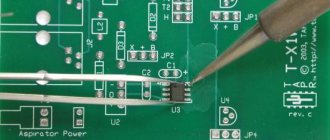
One soldering iron
You can unsolder parts from the board with a regular soldering iron if you grab the solder with a tip dipped in flux.
The essence of this well-known method is that after removing the next portion of molten tin, it is shaken off or wiped on a damp cloth. With each approach, the tip tip is re-wetted with a brush with fresh flux, after which the next portion of the melt is captured. Before wetting, it is recommended to warm the tip well in regular soldering rosin.
To smoothly remove parts with a large number of contacts (excluding planar microcircuits), this operation must be repeated several times. When performing this, you need to ensure that the contact patches do not overheat and subsequently come off along with the legs.
After the bulk of the solder has been removed from the connecting pads, it will be possible, with a little effort, to pry the microcircuit from the side of the board and separate it, desoldering it completely.
The thread on the fastener is damaged
A fairly popular problem that probably every second person has encountered. In this case, the bolt simply scrolls and does not come out. In this case, you need to use a screwdriver to pick up and lift the bolt.
It will be necessary to make an effort, since everything is not so simple and the bolt will rest.
Using a razor blade
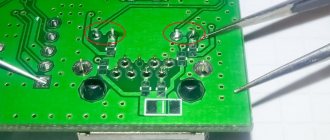
The main problem with soldering microcircuits is that they have several legs, which is why when one of them heats up, the others have time to cool down. This inconvenience can be overcome by using a heat-conducting device that contacts several legs at once.
In this case, the thermal power of the tip is distributed evenly between them and ensures that the solder melts in several contact areas at once. A simple razor blade can be used as such a device; to heat it up, you will need a soldering iron of suitable power or a hot air gun.
When heating the steel blade, it is recommended to slightly rock the chip on the soldered side, after which you can forcefully pull it out of the board. In the same way, the second row of legs is freed from solder.
Manufacturing instructions
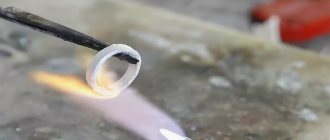
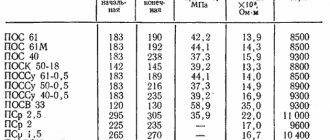
We prepare solder for soldering silver with our own hands. Since a burner is used to melt refractory elements, we do this in a garage or workshop. Silver solder consists of 2 elements:
- silver in the amount of 3 grams;
- brass (copper + zinc) 1 gr.
Silver must be as pure as possible - 925. As brass, you can use broken brass products and coins. Or take a ratio of 70% copper and 30% zinc. The two-component alloy should be in exactly this ratio, since when the zinc content increases to 40%, brittleness increases.
It is necessary to melt the elements first of all that have a high melting point and add the rest as they decrease. The melting point of copper is 1080° C, silver – 930° C, zinc – 420° C.
To produce homemade solder, we will need a small mold and a bowl in which we will melt. It's best if it's cast iron. Warm up the mold and add a little wax to it, heat the bowl. If we use ready-made brass, then melting begins with silver. If these are 3 separate elements, then we start melting with copper. If the melting is not complete, add silver; when mixing, the process begins to happen faster. Finally add zinc. Without ceasing to heat the bowl of metal, we pour the resulting melt into the mold. Cooling of the melt occurs very quickly, in a matter of seconds. After crystallization, the resulting workpiece can be cooled.
How can I replace tin solder for soldering? This category is characterized by high ductility and adhesion to metal surfaces. Low refractoriness allows the use of solder for non-ferrous metals and thin parts. A mixture is obtained by mixing tin and lead in their pure form. The elements themselves can be obtained chemically by extracting tin from cans and lids. We do it step by step:
- Pour water into a jar, put it on fire and boil. Mine.
- We connect 3 batteries and a 9-2 volt battery. We connect the positive pole to the jar, the negative pole to metal of any shape (let it be an electrode).
- Fill the jar with sodium hydroxide or soda solution.
- We lower the electrode into the jar, but so that it does not touch its walls.
- Over time, a deposit of pure tin will appear on the anode (electrode).
Using a special braid
Removing microcircuits with a soldering iron is based on the ability of its tip to attract solder. This is explained by the fact that a high-quality tinned and flux-treated tip is characterized by increased wettability (that is, it grips solder well when soldering).
This effect can be enhanced by using the braid removed from the coaxial cable. Its role can be played by the screen from the antenna wire, removed from it and generously moistened with flux.
If you press the unbraided “braid” of the screen to the contact patch, and then “walk” over this place with a soldering iron, you can observe an interesting effect. Due to the porosity and high hygroscopicity of the braided structure, it absorbs solder well, gradually freeing the chip body with legs.
Safety regulations
In fact, unscrewing a broken thread is quite a dangerous activity. Since the hole can be not only through, but also difficult to access.
Let's study the basic rules that need to be followed:
- Protect the skin of your hands and face - substances such as solvents, for example, contain many chemical elements. When mixed, they release substances that, upon close contact, can settle on the mucous membrane. In case of contact with human skin, there is a risk of burns. Be careful if you use this method, as the drops may get into your face or eyes.
- Use a respirator - the smell emanating from caustic substances can also enter the respiratory tract, which can also cause irrevocable harm to a person. But a respirator can trap the smell.
- Wear glasses - if dust and grains of chemical elements get on the mucous membrane of your eyes, they can cause burns or damage your eyes. Moreover, at the preparatory stage this will help you a lot.
If dust or paint does get in somewhere, follow these instructions:
- Rinse the area where the pollen has landed. If you find deep damage, immediately seek medical help from specialists.
- If you swallow dust, you should immediately leave the room for fresh air and try to cough. Be sure to rinse your nose. If you start to feel unwell or experience pain in your lungs, immediately call an ambulance and seek help from specialists.
Before you begin such manipulations, carefully consider your workplace and escape routes. This is necessary in case something happens. You will immediately know what exactly to do and what to get from where.
Dismantling by suction
This method of soldering microcircuits and other small parts is based on the principle of liquid suction by creating a vacuum in the contact area.
Vacuum, in turn, can be created using the following tools:
- a special device that operates on the principle of a bicycle pump (it is called a destin pump);
- suction in the form of an enema, which can be combined with a soldering iron and used simultaneously with heating the contact pad.
Suction structures can have a variety of designs (in the form of a piston with a rod, for example), but their essence does not change. They have been and remain the most effective means of removing liquid solder.
The edge of the fastener is damaged
It's time to look at the reasons that lead to the fact that you need to put effort into unscrewing the fasteners. Remember that how quickly you unscrew a bolt is influenced by many factors, from its location to the material from which the bolt is made.
Let's look at the tools that can be used to unscrew such a bolt:
- A sharp chisel is best used if a large bolt breaks. You need to apply a chisel to the place where the bolt head is located, always tangentially, and hit the structure with a hammer.
- Adjustment key - with this key you can tightly clamp the mestizo and move it out of place, thereby unscrewing it. It is better if the key is new, so it can fit more tightly to the head.
- A ring wrench is capable of performing the same functions as an adjustable wrench. To implement this method you will need a hammer.
- Hacksaw – Using this method, you can create a cut in the head so that it can be easily unscrewed with a screwdriver. You can create either a cross cut or a cross cut.
Use of medical needles
In the absence of a special suction device, a novice master can use a medical needle to remove the microcircuit. It must be thin enough to fit into the hole being vacated. At the same time, the needle must have a thickness that allows it to be put on the soldered leg.
Before starting operations, you need to file the tip so that the oblique cut turns out straight, and then flare it a little.
Soldering the part with the resulting device is not difficult at all. To do this, you first need to put the needle all the way onto the pin of the microcircuit, and then use a soldering iron to heat it together with the contact.
While the solder is in the liquid phase, slightly turning the needle, you should push it into the mounting hole (it is advisable to continue rotating until the melt sets).
Upon completion of this procedure, the end of the needle along with the leg will be isolated from the board. Do the same with the remaining legs, after which the microcircuit is unsoldered and removed without any difficulty.
Useful tips
There are many points that necessarily affect the operation of the unit.
- There is no need to purchase, for example, a large compressor. But 2-2.5 atmospheres may not be enough for a large amount of work. The way out is to install a receiver on the compressor. It works like an accumulator that accumulates pressure in compressed air. For this purpose, you can use, for example, bolts from the brake systems of heavy vehicles. The option is actually simple. The volume of the cylinder is large, and it should be enough for a long period of time.
- In order for the air pressure to be stable and uniform, a reducer must be installed at the receiver outlet.
- Of course, the optimal solution is to purchase a compressor complete with a receiver. It costs more than usual, but if this unit is used for other things, for example, for painting, then you can increase its functionality and thereby cover the costs.
- To make a mobile version of the machine, you can make a small trolley. After all, all the elements of a plasma cutter are small devices. Of course, you will have to forget about mobility if the machine is made on the basis of a welding transformer. It's too big and heavy.
- If you can’t buy a ready-made hose-cable kit, you can make it yourself. You need to combine the welding cable and high-pressure hose into one sleeve and place them in a single sheath. For example, into a regular hose of larger diameter. A set made in this way simply will not get in the way, which is very important when cutting metals.
Making your own plasma cutter is not difficult at all. Of course, you will need to obtain the necessary information and study it; it is definitely recommended to watch the training video. And after that, correctly select all the elements exactly to the required parameters. By the way, the assembled plasma cutter based on a serial inverter makes it possible not only to carry out plasma cutting of metals, but also plasma welding, which increases the functionality of the unit.
Use of Rose alloy
You can also unsolder and remove the microcircuit from the board using special compounds called “Rose” or “Wood” alloys. Their distinctive feature is their low melting point (no more than 100 degrees).
Before soldering the microcircuits using this method, several granules of the selected composition are poured directly onto their contacts. After this, using a well-heated soldering iron, a bath of solder is made, spreading evenly over all the legs.
Thanks to the action of the granules, the overall melting temperature in the melt bath will also decrease, which will lead to uniform spreading of liquid solder over the entire plane of the contact pads. In such a heated state, you need to try to pull the microcircuit out of the socket by grabbing it with tweezers.
Analyzing the methods of dismantling microcircuits, it can be noted that all of them can be implemented at home (watch the video). To do this, you only need appropriate preparation, which consists of making the necessary tools with your own hands and purchasing the necessary compounds.
Extractor
This tool is specially designed for unscrewing a spinning bolt, removing the remains of broken fasteners or any parts remaining inside the holes.
The principle of its operation is to drill a hole in the center and then jam the hole with an extractor. How deep it is placed depends on how worn the head and shank are, and how corrosion affects the threads.
There are several types of this tool:
- Blade;
- Kernel;
- In the form of a spiral;
- In the form of a screw.
All methods and instructions for use can be found in the instructions for the extractors.
Comparative characteristics of electric and gas soldering irons
Mobility and convenience:
- Electric – tied to the network , limited by the length of the cord;
- Gas – full mobility ; can be used in hard-to-reach places; does not require electricity; Having a gas cylinder on hand makes it easy to refill at any time.
"Combat readiness":
- Electric – the average tip heating time is 3-5 minutes ;
- Gas – ready for use in 10-30 seconds ;
Operating modes:
- Electric - only expensive models ;
- Gas - any model has the ability to adjust the flame and several modes: using a replaceable tip, you can solder with a gas soldering iron using a thin stream of heated air, burner.
Temperature:
- Electric - virtually all models have an operating temperature of 450°C ;
- Gas - depending on the tasks, the temperature can be adjusted from 500 to 2000 °C .
What it is?
A person who has at least once seen the operation of a gas welding machine can well imagine the design of a gas soldering iron . This tool consists of three parts:
- Gas filling tank;
- Flame adjustment button;
- Connector.
In fact, the design is a little more complicated, but if you do not plan to change the nozzle or air intake, and this is not worth doing, then you will not have to disassemble the soldering iron. The main advantage is the ability to use stings of different shapes and purposes. You can replace the working tip within a few seconds if it has cooled to an acceptable temperature.