On the building materials market today you can find a wide range of universal and specialized drill attachments for drilling. Let's look at how to drill glass using ready-made equipment, taking into account the characteristics of the material. Let's get acquainted with ways to make drills at home. Read to the end and you will learn how to make a hole without using a drill using a glass cutter or a gas torch with a small amount of metal.
Equipment for working with tiles and glass Source kovolt.ru
Preparing for work
- Before you drill glass at home, you need to prepare it for work: use turpentine or alcohol to degrease the entire surface, and then wipe it with a dry soft cloth;
- Do not allow the glass sheet to slide during operation.
- The sheet must be completely positioned on the base.
- The place where you decide to drill a hole should be marked with a marker or construction tape.
- If you do not have the skills to drill holes, we advise you to practice on small pieces so as not to spoil the main sheet.
- Drilling glass at home is not fast. The process will take quite a long time. While working, do not press too hard to speed up the work.
- The drill should be positioned at right angles to the plane. One hole should not be made at a time. From time to time you need to stop and let it cool a little.
- When you are in the final stage, i.e. When the hole is almost ready, you need to turn the glass sheet over and drill a hole on the other side. This operation allows you to avoid cracks or chips, and you will also get a hole of the correct shape.
- In order to get rid of small irregularities or roughness on the glass surface, take fine sandpaper and sand the sheet.
How to glue an arched plastic corner?
What glue should I use to glue plastic corners?
How to glue a plastic corner
- Most often, plastic corners are glued with polyurethane glue. ...
- In areas with light loads, silicone sealant can be used. ...
- You can also use “liquid nails” to secure plastic corners.
How to glue plastic corners to wallpaper?
When considering how to glue a plastic corner to the wallpaper, liquid nails are perhaps the most popular option. Liquid nails are divided: According to their purpose; According to the composition of the included components.
How to finish the finished arch?
Review of finishing materials
- Decorative rock;
- Wallpaper (a classic solution that has been proven for more than one decade);
- Mirrors - used for decoration not so long ago;
- Mosaic;
- Textile;
- Cork;
- Decorative plaster;
- Ceramic or tiles;
What is the best way to glue plastic corners to plastic panels?
If you are wondering how to glue a plastic corner to the wallpaper, then liquid nails will be the optimal answer to this question. When working with liquid nails, it is important to consider the color of the composition itself. If the corners for wallpaper or arches are white, then it is best to use colorless glue.
What types of plastic corners are there?
Types of plastic corners and sizes
As a rule, the angle between the corner shelves is 90 degrees, and they have dimensions: 10*10, 15*15, 20*20, 25*25, 30*30, 40*40, 50*50 millimeters. Such corners are most often used to design window and door slopes.
What glue should I use to glue plastic slopes?
The plastic corner can be glued to glue from the “liquid nails” series, for example “Moment Installation” glue, or to “Moment” contact glue for gluing plastic boats and other PVC products; this is a waterproof glue, relevant when it comes to slopes in wet rooms .
How to glue a plastic corner to slopes?
How to glue a plastic corner
- Polyurethane glue. Durable, elastic, tightly glues PVC and MDF. ...
- Silicone sealant. Recommended for fixing profiles to wallpaper, plastic panels, as well as ceramic tiles in the bathroom and kitchen. ...
- Liquid plastic. The purpose of the composition is to glue exclusively PVC parts.
What kind of glue can be used to glue plastic to wood?
There is a situation when there are no identifying marks on the plastic, in which case you can buy universal glue. By universal I mean epoxy glue, it is capable of gluing any type of plastic if processed correctly.
How to glue corners to windows?
How to glue a plastic corner
- Polyurethane glue. Durable, elastic, tightly glues PVC and MDF. ...
- Silicone sealant. Recommended for fixing profiles to wallpaper, plastic panels, as well as ceramic tiles in the bathroom and kitchen. ...
- Liquid plastic. The purpose of the composition is to glue exclusively PVC parts.
How to glue wallpaper onto plastic?
You can paste wallpaper on a PVC panel, but first wash it from dirt, dust, grease, and in your case, remove the old wallpaper, clean off the remnants of the old wallpaper glue + PVA. Sand the surface well using an abrasive pad (Scotch Brite) or fine sandpaper.
How to glue MDF corners?
The best way to stick to an MDF panel is with the Liquid Nails adhesive; it is universal for this type of connection. The main thing is to comply with two conditions - the glue must be fresh, it is best to look at the production date and shelf life so that it does not exceed 1/3 of the entire shelf life.
How to decorate an arch in a doorway?
Suitable for decoration: wallpaper, cork, tiles with imitation stone, decorative putty, stucco, plastic curly moldings, artificial or live climbing plants, wooden logs, paint, mosaic, tiles. Let's take a closer look at how to finish an arch in a doorway.
How can you edge an arch?
At the moment, a common option for making an arch is plasterboard. For this purpose they use a special type of it - arched GLK. It has a perforated surface. … Advice.
- Wallpaper.
- Artificial stone (see: Decorating the arch with wood, classic interior).
- Decorative plaster.
- Simple coloring.
Drill glass with a regular drill
To drill holes in glass you will need the following:
- Drills designed for drilling ceramic or metal materials;
- Low-speed drill or screwdriver;
- Turpentine;
- Plasticine;
- Alcohol.
The sheet must be placed on a completely flat surface. There are some nuances here: the edges should not hang down, and it should not wobble.
The drill or screwdriver must be set to the lowest rotation speed. Clamp the required drill bit into the chuck. After this you need to check the drilling. If there is increased runout, then it is advisable to change it. The lowest speed for drilling is 250 rpm, and the highest is 1000 rpm.
The surface should be degreased with an alcohol solution, and then make a recess made of plasticine in place of the upcoming hole. Pour a little turpentine into this recess and start working. To avoid cracks, do not press too hard on the tool. Without any effort, lightly hold the screwdriver or drill over the glass and drill holes in the glass.
Drilling tempered glass
Drilling tempered glass yourself using improvised means is not the best way to obtain the proper result.
It is recommended to carry out the procedure in a different sequence. Let’s assume the option of initially performing drilling and then hardening the material. It is known that it will not work with tempered glass, because if you put pressure on it, it will simply break into small pieces.
Tempered glass drilling process steps
In order to begin the procedure of forming holes in glass, you must:
- Prepare the stencil. A small piece of fiberboard or plywood will do. It requires making holes with a diameter that needs to be transferred to the glass workpiece in the future.
- Next, the prepared stencil is applied to the area of glass where drilling needs to be done. This ensures that no sliding on the glass occurs during the work.
- To avoid deformation and cracks, the surface should be regularly moistened with water. Some people prepare a circular border of plasticine for this and pour liquid into it. Others lay a tourniquet formed from wet material around it, then water gradually accumulates in the hole. The simplest method is to periodically wet the drill itself with which the work is performed.
Useful tips for drilling tempered glass
Drilling tempered glass is a complex procedure, but by performing it in the correct sequence, you can achieve the desired result. In order for the process to proceed correctly, some rules must be followed, one of which is the need to adjust the speed mode of the drill. The number of revolutions made by an electric drill may determine the final result: whether it will be positive or the material will become unsuitable for further use. The permissible number of rotations is 400-700 revolutions per minute. This indicates a low rotation speed of the drill.
It is unacceptable to press on the glass sheet during the process. As it is drilled, the number of revolutions should decrease. You need to approach the stage when the bur goes through with the utmost caution. Only uniform drilling guarantees a high-quality result - clear holes.
In conditions where the task is to make holes with a large diameter, and the work is carried out with a crown, it is necessary to fix the drill in your hands so that the nozzle is parallel to the glass surface. Cases of sudden movements are excluded. Trimming should occur evenly around the entire circumference.
It will be useful to know that before starting the process, the glass needs to be degreased. Turpentine or alcohol is suitable for this. Afterwards you need to dry the material.
Drilling and tempering glass at the same time is an unacceptable process, and the possibility of cutting is also excluded. Drilling or cutting processes are performed first. After this, the glass sheet should be subjected to the tempering process.
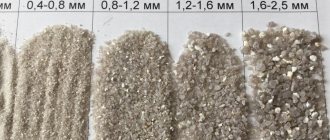
How to drill glass using sand
At a time when there were no drills and screwdrivers, glass drilling was done using this method. In order to make a hole using sand you will need the following things:
- Naturally sand.
- Petrol.
- Lead or tin.
- Gas-burner.
- A metal mug or other similar vessel.
The surface must be degreased with gasoline , and after that a pile of wet sand must be poured onto the future drilling site. Then, using some sharp object, you need to make a funnel of exactly the same diameter as the future hole should be.
A pre-molten mixture of lead or tin must be poured into this resulting form. After a few minutes, you need to remove the sand and remove the frozen part of the glass. It should come off the surface easily. The resulting hole will be perfectly smooth and will not require any additional processing.
To heat tin or lead, use a metal mug or other container and a gas burner. If you don’t have a burner, then a regular household gas stove will do.
Marking and preparation
The usual method of marking the center of the hole with a cross will not work for marking. To drill glass, you need to draw a square that will describe the hole. Remember that a tubular drill cannot be centered, so you will need a stand that will allow you to guide the tool in a strict vertical line. If there is no such frame, then distortions may occur.
In addition, starting the drilling itself will be quite problematic. It is possible that the drill will slip and scratch the surface of the glass. In this case, you can use a piece of plastic or wood. They are pre-drilled and attached to the surface of the glass with tape, and then using the same drill, a hole is made in the glass itself. If you have enough experience, you can do without plastic. Then you need to make an approach with only one side of the drill, gradually bringing it to the normal.
Adviсe
- In order to prevent the appearance of splits and cracks on the surface, it is necessary to apply a little turpentine or honey to the place that needs to be drilled.
- The drill or screwdriver should not be pressed too hard from above.
- It is necessary to take breaks during the drilling process. Intervals should be between 5 and 10 seconds. Also, during a break, it is advisable to lower the drill into a container of water to cool it down. This is necessary in order to avoid melting.
- Do not rock the screwdriver or drill from side to side.
- If possible, it is better to use a screwdriver, because... it will work in a more gentle mode with its low speed.
- In order to treat the surface, you can use not only alcohol, but also acetone.
- When working with a drill, you should take care of safety precautions: use gloves and goggles.
- The drilling point for fragile glass should be no less than 1.5 mm from the edge of the sheet, and for ordinary glass no less than 2.5 cm.
- It is best to work with the material on a wooden surface.
Steps
Method 1 of 2:
Preparation for drilling
1
Buy a set of glass drills. Typically, two types of drills are suitable for drilling glass: diamond and tungsten carbide. Diamond drill bits are traditionally used for drilling glass; a single diamond bit can drill many holes and rarely breaks glass when used properly. Carbide drill bits have a spade-like tip that can withstand the friction generated when drilling into glass or tile.
2
Choose glass that is not tempered or safety glass. These types of glass can only be drilled using special equipment that is not available to the average craftsman. Make sure the glass you choose is the right size and thickness for you.
3
Cut the required piece of glass yourself or use this service when purchasing glass and sand its edges
4
Mark the location of your holes on the glass, being careful to place them as far from the edge of the glass as possible. Never drill closer than 2 cm to the edge
5
Place the glass on a completely flat surface, where it will rest on its entire plane. If you have the opportunity, place a rubber mat or other fairly hard, elastic material under it, but the glass must lie absolutely flat.
6
If possible, immerse the glass in water or constantly spray it with water to remove the smallest glass particles flying while drilling. If you choose to use oil to cut glass instead, use a small amount.
Method 2 of 2:
Drilling a hole
- 1
Insert a small drill bit into a variable speed drill.
Make sure it is securely fastened. It is best to start working with a 2-3 mm drill.
- 2
Center the drill on your intended drilling point and start drilling.
Use constant pressure while pressing down on the drill while drilling, and try to maintain a constant, slow drilling speed.
- 3
When you get close to the other side of the glass, flip it over.
Often, when drilling through, the drill breaks off a piece of glass on its back side, so it is better to turn the glass over in advance and finish drilling by drilling a counter hole on the other side.
- 4
Replace the small drill bit with a larger drill bit to make the hole larger.
The first hole is only a basting hole. It will guide larger drills as the hole is enlarged to the desired size.
- 5
Drill the hole to the desired size using each subsequent drill bit in sequence.
When using larger drills, less pressure on the drill and a lower rotation speed are required.
Adviсe
- Use a set of drill bits, starting with the smallest one, and work through each other drill size in order to minimize pressure on the glass as you reach the desired hole diameter.
- The glass must lie absolutely flat, otherwise it will break.
- Keep the glass cool while drilling. This will prevent the drill bits and glass from breaking.
- Using a drill press can help regulate the pressure applied to the drill bit.
- No need to drill at fast speed. Glass is a very hard and abrasive material, and you can quickly ruin your drill bits.
- While it's best to use water, glass cutting oil can also help when drilling holes in glass, just don't use too much of it.
Warnings
Glass is a fragile and sharp material
Handle it with care and wear gloves, a guard and safety glasses when drilling. Glass shards can seriously damage your eyes, so you should wear safety glasses that properly protect your eyes.
- Variable Speed Drill
- Glass drills
- Durable, flat work surface
- Water container or spray bottle
- Safety glasses, gloves, respirator.
Working with a glass cutter
To fully cover the topic, it is worth learning how to drill glass at home using a glass cutter. It is perfect for creating unusual shapes or large sizes. In this case, the sequence of actions will be as follows.
1. Using a marker or felt-tip pen, create the necessary contours along which the processing will take place.
2. When working with a glass cutter, you should not make sudden movements. Pressure on the instrument should be uniform and smooth.
3. To make the cut part fall off, use the handle of a glass cutter to lightly tap the surface.
4. Use special tongs to remove excess.
5. Before starting work, you need to check the condition of the tool. The roller should be in the middle and rotate evenly and smoothly.
Unusual ways to drill a hole in glass
1. In order to drill through tempered glass, it is necessary to prepare a cooling liquid. It will be prepared as follows: aluminum alum must be dissolved in acetic acid. If you don’t have them, you can mix turpentine with camphor in a 1:1 ratio. Treat the glass with the resulting solution and then begin work.
2. If you do not have a drill, you can use copper wire, which must be clamped into the drill. In this case, the process will take place using a special solution: 2 parts turpentine and 1 part camphor, to which coarse sandpaper powder should be added. The mixture must be placed in the place where you need to drill a hole and get to work.
3. There is another method of using a similar solution. It is possible to work with a metal piece of pipe, which can also be inserted into the drill chuck. Make a plasticine ring 10 mm high and 50 mm in diameter on the glass surface. Pour a solution of camphor, turpentine and emery powder into the recess of the ring and drill.
You can try to do this chemically rather than mechanically.
The problem with tempered glass is high stress in the surface layer of the glass. As soon as during the drilling process the stresses, mechanical stresses, in this layer exceed the threshold, the entire sheet immediately crumbles into small pieces. But glass can be dissolved in hydrofluoric acid - such removal of material does not cause the appearance of additional mechanical stresses, although the shape and size of the hole can no longer be guaranteed with the same accuracy as with mechanical drilling.
Glass characteristics and production features
Before drilling a hole in glass, you should understand the characteristics of this material. Its production process is quite complicated, as it involves the use of special tools:
- The main stage of production involves the creation of a melt, which includes certain components. This requires exposure to temperatures of about 2,500 degrees Celsius.
- To create a strong structure, the molten composition is sharply cooled. Due to this, the hardened alloy crystallizes.
It is the chemical composition of the alloy used that determines the basic performance qualities, as well as the likelihood that the structure will not crack during machining.
Depending on the chemical composition, the following glasses are distinguished:
Different glass products must have different performance qualities.
- Optical. There are various optical instruments, the main part of which can be called a combination of prisms and lenses. Special glass is used for their manufacture.
- Quartz. By melting quartzite, glass can be obtained, which is used in the manufacture of various dishes and decorative elements.
- With high protection against chemical attack. Some types of glass can withstand exposure to petroleum products and other chemicals. They are used in the manufacture of containers and protective structures.
- Industrial purpose. This group is widespread in industry and everyday life.
- Hardened material with higher strength. Glass can be tempered in various ways.
By area of application, the following materials are distinguished:
- For the manufacture of containers.
- For glazing window frames.
- Reducing radiation levels.
- In the production of fiberglass.
- Screen protection for mobile and other devices.
- For making dishes.
- For the manufacture of medical products.
- Protecting the surface of ovens and fireplace screens.
- For the manufacture of various light sources.
- For the manufacture of various optical devices.
It is worth considering that some glasses cannot be machined. This is due to the fact that their structure has a high fragility index. You can cut a round hole in a jar, on a glass plate and many other products.
We understand the features of the material
Before asking yourself the question of how to drill glass at home, you should at least get acquainted in general terms with the characteristics and features of this material.
The glass production process is quite complex. It is performed at industrial enterprises equipped with special equipment. The main stage of this process is the preparation of a melt, which includes several components. Such a melt for glass is subjected to sudden supercooling, and the crystallization process is not completely completed.
To prepare the melt, the mixture of components that make up the future glass is subjected to significant heating - up to 2500°. Depending on the chemical basis of the melt, glasses are distinguished:
- oxide category;
- sulfide;
- fluoride type.
Oxide glass (aka silicate) is used to make bottles.
Glass, which can also be opaque, is divided into various types depending on the main characteristics of the material. So, glass is distinguished:
- quartz, which is obtained by melting quartzite, also known as “rock crystal” (this material can be of natural origin and is found mainly in places where quartz deposits have been exposed to lightning);
- optical type, used for the manufacture of basic elements of optical instruments (lenses, prisms, etc.);
- highly resistant to aggressive chemicals and elevated temperatures;
- industrial use (the most extensive category of glass, also used in everyday life).
The question of how to drill a hole in glass most often arises when using the latter type of product. Industrial products, in turn, are also divided into several categories:
- potassium-sodium type (such glasses, characterized by a clean and light internal structure, have a relatively low melting point, so they are often used for the manufacture of glass products of complex shapes);
- potassium-calcium type (glass of this type has a surface without a pronounced shine, is highly hard and difficult to melt);
- lead type (such glasses have a pronounced shine, which makes them very similar to crystal, high fragility with a fairly high plasticity of the internal structure, significant specific gravity and a higher price when compared with the cost of products of other types);
- borosilicate (they are highly resistant to temperature changes and mechanical stress and are quite expensive).
In most cases, drilling of window or display glass is required
There is also a classification of glass according to purpose. Thus, various types of glass are used for:
- glazing of windows and other translucent structures;
- manufacturing of containers;
- reducing radiation levels;
- fiberglass production;
- protecting smartphone screens;
- making dishes;
- production of thermometers capable of measuring temperature in the range from –200° to +650°;
- manufacturing laboratory glassware (such glasses are characterized by high thermal stability);
- production of medical products (ampoules, tubes, containers for medicines);
- fireplace screens and ovens (in such cases, heat-resistant glass is used);
- manufacturing of electric lamps (in this case, so-called electric bulb glasses are used);
- production of incandescent lamps, X-ray tubes, ignitrons (this requires vacuum glass);
- creation of elements of optical instruments - cameras, microscopes, telescopes, etc.;
- manufacturing thin-walled chemical containers and other products that require high resistance to chemical and thermal effects (for this, quartzoid glasses, also known as Vicor, are used).
Drilling thick glass is best done on a machine
What tools are needed
To drill a hole in glass, you can use various tools. Correct selection of tools eliminates the possibility of damage to the material during processing. The most common varieties are:
- A drill for glass, the cutting part of which is made of hard alloy. The working part can resemble the shape of a feather or spear; when using this tool, you can get a hole with a diameter of 3 to 12 mm. Using the tool requires certain skills. During processing, small chips may form. The metal used in the manufacture of the drill can last quite a long time.
- To make a large hole in the glass, drills in the form of a tube are used. Manufacturers harden the surface to extend the life of the cutting edge.
- The highest quality is achieved when using a diamond drill - its working part has the shape of a spear. Due to diamond coating, drilling is smoother. However, the use of special powder significantly increases the cost of the product.
- In the manufacture of cutting tools, brass and lead can be used for the base; diamond coating is applied to the surface, which can significantly increase the service life of the tool. When using this tool, care must be taken to keep the cutting area cool, as too high a temperature can accelerate wear. As a rule, it is enough to leave the treatment for a few minutes.
- Tubular glass crowns have also become widespread. Diamond dust is used in their production. This tool is suitable for making large holes. When using the crown, you need to monitor cooling.
- Tools that have plates on the cutting edge. Welding allows you to ensure a reliable and high-quality connection.
The diameter of the cutting tool must correspond to the diameter of the hole that needs to be made in the product.
Preparing a glass blank
It is possible to make a correct hole in the material provided that the workpiece is carefully prepared. The instructions look like this:
- Surface treatment with alcohol or turpentine. Then you should clean the surface with a clean cloth.
- The workpiece must be positioned on the base so that it does not change its position during processing.
- The base on which the workpiece will be laid must be larger. The edges of the glass should not be allowed to extend beyond the base, as carelessness can lead to damage.
- Painting tape is glued to the surface where the hole is drilled. This will prevent the tool from slipping at the beginning of processing.
- The center of the hole can be marked with a marker.
- If the work is being carried out for the first time, you can make a test hole on unnecessary glass.
- When performing drilling work, you should be as careful as possible. Haste can cause serious defects.
- When working with glass or ceramics, you need to ensure that the drill is positioned strictly perpendicular to the surface - this will ensure a high-quality hole.
- It is not recommended to carry out processing in one pass. This is due to the fact that glass is considered difficult to process; during prolonged drilling, the cutting edge can heat up. When the tool is heated, some of the heat is transferred to the material, deteriorating its performance.
- When a through hole is almost obtained, you should stop the process, then turn the product over and continue drilling from the other side. This way you can get a high-quality hole.
- You can sand the edges using sandpaper. It is recommended to choose paper that has a fine fraction.
Drilling glass at home
You cannot drill in weight without a stop. The glass should be placed on a flat horizontal surface so that it fits snugly against it. It would be a good idea to use a backing made of thin soft fabric.
It is convenient to mark the center of the hole with a marker, felt-tip pen or gel pen. It is advisable to retreat at least six thicknesses from the edge of the glass. Otherwise, there is a high probability of crack formation.
During operation, the drill and hole should be constantly moistened with coolant, ensuring heat removal. For this purpose, water, kerosene or turpentine are usually used. You can protect the drilling site with a ring of plasticine and pour liquid into the resulting tray.
Using a pad in the form of a wooden plank or plywood with a hole of the required diameter, the drill is kept from slipping. Another option is to stick adhesive tape on the glass.
The pressure applied to the drill should be light. Otherwise, the likelihood of glass cracking increases significantly. As you progress, the pressure should decrease. This will help avoid significant chips at the exit from the hole. The resulting sharp edges must be cleaned using fine sandpaper.
Tempered glass cannot be drilled
This will lead to it breaking into many small fragments, despite the fact that it has increased strength. Tempered glass is widely used in the automotive industry, furniture industry, and housing construction. It is distinguished by its marking in the form of the letter “ Z ” or the inscription “ Tempered ”. If there are no signs, you should pay attention to other characteristic features. These can be iridescent spots that are visible on the surface from a certain angle, as well as through polarized glasses and filters.
According to GOST R 54162-2010, edges and holes are processed before hardening. Sharp edges indicate that the glass is not tempered.
Using a conventional drill
If glass processing does not involve mass production, then there is no need to purchase special tools. Its cost is quite high; with prolonged use, the surface of the cutting edge wears out. Here's how to drill a hole in glass using a regular drill press. You will need:
- Drill for working with metal or ceramics. In their manufacture, a hard alloy is used that can withstand long-term use.
- Drill with low speed and drilling machine with adjustable speed.
- Ordinary plasticine.
- Turpentine.
- Alcohol solution.
Drilling instructions:
- The glass is placed on a flat surface. The edges should not extend beyond its limits.
- The area of glass to be treated is degreased.
- After fixing the tool in the chuck, set the minimum speed. Excessively high drill speed may result in deformation of the workpiece. In addition, the degree of tool runout should be low, since variable loads can lead to cracks.
- Plasticine is placed on the surface to be treated, which will eliminate the possibility of the tool slipping. A small hole is created in the central part.
- To reduce the likelihood of cracks, work should be carried out carefully. Too much force causes various defects to appear. The minimum rotation speed should be 250 rpm. If the material is highly resistant to mechanical stress, the value is set to 1000 rpm.
During machining, fine chips are formed; safety glasses should be used when working.
High-tech processing methods
This category of methods for creating holes is more likely to be industrial, although private craftsmen also acquire appropriate equipment for their needs. We are talking about lathes and units that provide sandblasting abrasive cutting. It is water jets that give the highest quality results - how can you make a hole in glass using such equipment? First, the installation is fixed in machine clamps - there are practically no restrictions on size, including thickness. Next, consumables are refilled. They are made up of sand and water. The hole is created as a result of circular cutting with a water-sand jet along a pre-designated line. The automation itself will position the cutting direction, ensuring an almost perfectly even cutting.
Benefits of using sand
When using a cutting tool, there is a high probability of surface damage. Using sand will help avoid this. You will need:
- Fine sand.
- Petrol.
- Gas-burner.
- A small amount of tin.
- A vessel made of metal.
- The surface is degreased. To do this, you can use an alcohol solution.
- In the area where you need to get the required hole, a pile of sand is poured. It is slightly moistened.
- Using a sharp object, a small depression is created.
- Molten tin is poured into the created recess, after which you need to wait a little.
- A pile of sand is removed from the surface. After this, the tin is melted with a gas burner.
It is worth considering that it is quite difficult to obtain a high-quality hole in this way, so mechanical processing of the hole with a drill is additionally necessary.
Tips and tricks
Even minor errors can lead to serious defects in the processed material. Here are tips on how to make a hole in glass without damaging it:
- The pressure exerted on the tool from above should be minimal.
- To reduce the likelihood of cracks and chips, the surface is treated with honey and turpentine.
- All work can be divided into several approaches. Each approach takes about 5-10 seconds, after which the cutting edge should cool.
- Do not place the tool at an angle relative to the surface being processed.
- There should be at least 1.5 cm from the center of the hole to the edge. Otherwise, cracks and chips may appear.
The same methods are also suitable for those who are going to drill a mirror at home. To obtain large holes, you should use a special tool called a glass cutter. Design features allow you to obtain high-quality holes in the shortest possible time.