The process of making grinder rollers
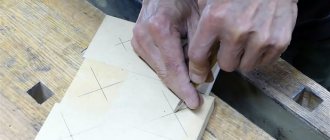
Using a circular saw, we cut the multilayer plywood into six rectangular fragments, the long side of which is exactly twice as large as the shorter side.
We mark with a pencil using a device for centering square blanks the middle of the halves of rectangular fragments and mark the found centers with a center punch.
We make blind holes for ball bearings on a drilling machine using a Forstner drill.
Then, using a core drill of a larger diameter, we obtain two round disks from each rectangular fragment.
Using a hammer and a piece of multi-layer plywood, we press sealed ball bearings flush into the blind holes.
We make through holes in all disks in the center with a drill with a diameter corresponding to the size of the inner ring of the bearings.
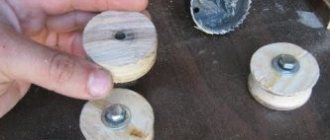
We thread three round disks onto the bolt and washer using glue. We place a wide washer on top and tighten the block with wrenches and leave it until the glue hardens.
Next, unscrew the nut and remove the tightening bolt. Now we have at our disposal three monoblocks with bearings pressed into the outer disks.
Using a pendulum saw, we cut three pieces from a plastic pipe of the required diameter, equal in length to the height of monoblocks of three disks made of multi-layer plywood.
Which is better: heated floors or radiators?
Warm floorBatteries
We grind the side surfaces of the monoblocks, securing them in the chuck of a drilling machine, first with a roughing file, then with sandpaper, to the inner diameter of the pieces of plastic pipe, controlling the turning with a caliper.
Expert opinion
Strebizh Viktor Fedorovich, leading construction foreman
We mark with a pencil using a device for centering square blanks the middle of the halves of rectangular fragments and mark the found centers with a center punch. If you want to clarify something, please contact me!
Features of the DIY grinder design: photo
It is recommended to take into account all the design nuances of factory devices. This will allow us to produce the most efficient tabletop grinding machine. The standard equipment of this type of device includes a support table. In addition to its main purpose, this surface performs another auxiliary function: it is used to fix the workpiece being processed.
In factory devices, such a table can be rotated about one axis. The rotation angle is usually 90°. This makes it possible to grind two planes of the workpiece (located perpendicularly) without changing the position of the part fixed on the rotating surface. When assembling a simple grinder with your own hands, you can make a static table. This will greatly simplify assembly, but the finished unit will have less functionality.
There are other, equally important parts that are included in the design of such machines. Let's consider what other structural elements any grinder used for grinding workpieces made of different materials must have:
- skating rinks;
- base;
The main task in making a grinder is to find a powerful motor that will need to be equipped with a drive
- ribbon;
- tension mechanism;
- protective wall.
All these parts are quite easy to make with your own hands. The belt sander may produce dust or sparks during operation. This depends on the material of the part processed on such a machine. Because of this, experienced professionals strongly recommend using special glasses. In addition, it is recommended to organize a protective wall, for the manufacture of which acrylic glass is used.
Portable units are equipped with a housing made of steel. The grinder stand must have holes that are necessary to fix the machine on a wooden surface (using bolts). When choosing a tape, it is worth considering that its length depends on the power of the unit (and vice versa). The higher this indicator, the correspondingly more powerful the drive should be.
Collecting videos
The drive roller for the engine is made of plywood. Cut out 10 circles with a diameter of 85 mm. Mark the center and drill a hole with an 8 mm drill. We coat each disc with PVA glue. We collect it in a bag on an M8 stud and compress it from both ends through washers with nuts.
Let it dry overnight for further finishing. Next, drill a hole 24 mm deep. If you don't have a finger cutter, you can use any drill. In our case, the cone from the drill is not a hindrance.
Your motor shaft may be different from the drawing, but this is not a problem. The principle of fastening remains the same, only the dimensions will change, which can be measured with a special tool. Read how to use a caliper here.
After preparing the roller and shaft, you can begin finishing the drive pulley. Attach the motor to the platform, put on the drive pulley, turn on the motor and carefully sand the roller with a flap abrasive wheel.
After cleaning, the edges need to be beveled a little to get a barrel look.
Expert opinion
Strebizh Viktor Fedorovich, leading construction foreman
Often something breaks in it, the body or the anchor, or maybe a new, more powerful and convenient model just comes out, so the old one gathers dust somewhere in a box in the garage. If you want to clarify something, please contact me!
Rollers, pulleys and other grinder accessories
We make pulleys and rollers from caprolon (polyamide-6) for the grinder. Caprolon has high impact strength, almost as good as aluminum. Tel./WhatsApp - 89377721731
1. You tell us (whatsap/tel.) what product you need and its sizes. You will also need your full name and delivery address; 2. We inform you of the bank card number and the total amount of the transfer; 3. After the funds have been credited, we will send you the parcel by Russian Post.
Delivery to the regions - from 350 rubles. up to 500r. (depending on distance). Russian Post.
Grinder rollers play an important role in the operation of the machine. They differ in purpose, design and size, and can be industrial or home-made.
A grinder, or tabletop belt sander, is designed for processing and finishing small flat parts, sharp edges, removing rust and old paint. In everyday life, it will help you sharpen a knife or scissors, straighten the blades of a meat grinder, or polish a part of a complex shape without disturbing the profile. You can also edit cutters and drills on it. Allows you to process wood, plastic, metal, stone and ceramics.
Do-it-yourself grinder: drawings with dimensions and diagrams
- Square pipe 30x30x2 - 250 mm.
- Square pipe 25x25x1.5 - 1250 mm. Taking into account the cut.
- Channel No. 21 – 350 mm.
- Steel strip 50x8 – 700 mm. (With reserve). Or the eyes from the Gazelle spring earrings.
- Old door hinge.
- Sheet 170x190x4 for making a stop.
- Plywood sheet 500x200x8 mm.
- Bearings 201 – 9 pcs.
- Polypropylene couplings for 32 – 6 pcs.
- Polypropylene pipe PN20 – 250 mm.
- M8 hairpin – 1 pc.
- M12 hairpin – 1 pc.
- M8 nuts.
- Spring for tension arm.
- Angle No. 5.0 for mounting the engine to the frame.
- Motor from a washing machine.
Tensioner pulley lever
Making the lever is not difficult, just look at the photo and the assembly drawing, everything immediately becomes clear.
Pay attention to the possibility of adjustment. It will help compensate for possible inaccuracies in the process of welding the lever to the base of the grinder.
Expert opinion
Strebizh Viktor Fedorovich, leading construction foreman
To glue the tape yourself, you will need glue, sandpaper of two adjacent types in terms of grit level, and a piece of fabric. If you want to clarify something, please contact me!
Grinder from a grinder
One of the simplest options for a belt sander is to fix the sander in a wooden or metal structure. For this, an angular base is made. A hole is cut from below for the cable, and the sander is firmly fixed to the vertical wall of the base. All that remains is to make a work table and that’s it, you can start sharpening.
To glue the tape yourself, you will need glue, sandpaper of two “adjacent” types in terms of grit level, and a piece of fabric.
It is necessary to cut coarser sandpaper into strips of the required length and width. Then peel off the abrasive layer on both sides by 2-3 cm. Glue a piece of fabric to the cleaned edges with glue and let it dry. We cut out a “patch” from finer sandpaper and glue it to the fabric.
How to make rollers for a grinder – Manual Workshop
Pay attention to the possibility of adjustment. It will help compensate for possible inaccuracies in the process of welding the lever to the base of the grinder.
Expert opinion
Strebizh Viktor Fedorovich, leading construction foreman
When assembling the grinder yourself, it is important to position the rollers strictly perpendicular to each other to avoid distortions of the belt, which can lead to its breaks. If you want to clarify something, please contact me!
Design features
The design of the grinder rollers is of great importance for work productivity.
For a homemade device, an electric motor with a nominal speed of 1500 per minute is most often used. With a slip rate of 9%, the actual rotation speed will be 1380–1400 rpm. Based on this, the dimensions of the parts are calculated. The drive roller deserves special attention. It is made massive in order to smoothly accelerate the belt to a given peripheral speed due to a significant moment of inertia. If you make the drive pulley from solid steel, it will turn with difficulty when starting. Therefore, it is made hollow or from duralumin grade D16 and higher. It is recommended to machine driven and tension rollers from light and hard duralumin, then there will be no need to make cavities.
The larger the diameter of the drive roller, the deeper the cavity should be.
Pulley drawing
The standard diameter of the drive pulley is 150 mm. The tension one is made with a size of 100 mm, and the other two are 70 mm each. Dimensions may vary slightly depending on the dimensions of the machine. The width of the parts corresponds to the size of the sanding belt with a small margin.
The generatrix of the drive pulley must be straight, otherwise the belt will bend along its entire length when rotating. It is reliably kept from sliding by the remaining rollers.
The speed of movement of the belt will depend on the diameter of the pulley. If the belt runs slowly, it will tear the material being processed. And from rapid sliding it will soon wear out. A simple rule to keep in mind is that hard parts and fine abrasive grains require high belt speeds.
Compact grinder with working pulley and tensioner
To avoid slipping of the sanding belt when the planes of the rollers do not coincide, a groove is made on the generating surface, corresponding in width and depth to the section of the belt. However, this design has a drawback: under heavy load, the tape slides onto the flange. A proven and reliable option is to use barrel rollers. In some cases, the products are covered with rubber material.
During installation on the grinder, you need to ensure that all the rollers are located in the same plane.
VIEW GRINDER from AliExpress →
When processing, it is necessary to ensure the roughness of the forming surface in the range of 1.25–2.5 Ra. Large values will lead to wear of the belt, and on a surface that is too smooth it will turn. The “barrels” are installed on the shafts using bearing supports. The bearing assemblies are sealed to protect them from debris and abrasive dust. Bearings will be required to be self-aligning, not lower than 6th accuracy class. Their load-bearing capacity must correspond to the drive speed and planned loads. The prefabricated structure is fixed to the axis through cotter pins or through a collar and a fastening kit. For the drive pulley, you need to make a keyway in the mounting hole for installation on the engine shaft key or hole for the goujon.
The tensioner roller is made movable. It has a support spring to tension the belt, compensate for runout on the pulley and rollers and sagging when the part is pressed. This way the tape will last longer and will not break.
The rollers must have a barrel-shaped profile to securely hold the rotating belt. The central part is made 2 mm higher than the edges.
Based on the connecting dimensions, a working drawing is drawn up, according to which the turner can produce parts.
Typical drawing of a roller
VIEW RUBBER ROLLER from AliExpress →
Do-it-yourself grinder at home: how to make it
- Think over the design of the device and make drawings. Based on the design features of your model, it will become clear what is required for assembly. I am working on the design; it is advisable to provide for the possibility of grinding parts in both vertical and horizontal directions.
- Prepare hand-held power tools: jigsaw, shmu, drill.
- Arrange with a turner to turn individual parts. Or the lathe itself.
How to glue grinder tape with your own hands and special requirements for it
When developing a homemade grinder with your own hands, it is better to use a standard size sandpaper belt. Standard sizes are lengths of 1830, 1600, 1230, 915 and 610 mm and widths of 100 and 50 mm. Then you won’t have to rack your brains on how to make a grinder ribbon with your own hands. The tape, homemade or factory-made, must meet the following requirements:
- elastic fabric base;
- high ability to withstand angular speeds;
- abrasive resistance;
- possibility of extension without breaking the integrity by 10-15%;
- minimal heating during long-term operation.
Advice! Do not use tapes longer than 1230 mm for your homemade tool; for them you will have to increase the dimensions of the structure, and this puts forward additional requirements for its placement.
When making the tape yourself, try not to make more than one joint. All gluing points are stretched during the grinding process and the tape weakens
- Cut a strip of sandpaper to the desired length and width. Cut the edges of the tape diagonally.
- Connect the edges and pre-glue them on the abrasive side with masking tape.
- Secure the cut with a few drops of superglue.
- Apply glue to the cut area and a piece of silk ribbon, press the surfaces together.
- Wrap the glued area with paper and secure it with a press overnight.
Before using the belt on the belt sander, let it hang slightly under a light load.
Expert opinion
Strebizh Viktor Fedorovich, leading construction foreman
We mark with a pencil using a device for centering square blanks the middle of the halves of rectangular fragments and mark the found centers with a center punch. If you want to clarify something, please contact me!
Do-it-yourself belt sander: operating principle
A distinctive feature of this device is that it has a simple design that anyone can replicate at home. This grinding unit includes an electric motor, rollers and the working tool itself – a belt with an abrasive coating. The strip may have different grain sizes. This indicator is selected in accordance with the purpose of the instrument.
The grinder, unlike the usual stationary machine, is a more versatile tool
When assembling a grinder with your own hands at home, you should prepare and study the principle of its operation. When the unit is turned on, the engine starts. It has a shaft that connects to the main (drive) roller. The roller begins to rotate around its axis, acting through the abrasive belt on the secondary (driven) rollers.
Sanding is quite simple when the device is turned on. To do this, you need to attach the workpiece to a moving abrasive belt. During work, you need to focus on the position of the working strip.
A self-made grinding machine will allow you to process workpieces made of different materials. Such a unit has the ability to eliminate defects on the surface of metal, wood, and glass. Using grinders, rollers are often adjusted, which makes it possible to process defects of different depths.
It is worth remembering that with prolonged use, the sanding strip wears out, which leads to its stretching. In such units this problem is solved very simply. One of the device's rollers contains a special mechanism that allows you to tension the tape. Most often, such a device is installed on a roller located between the main and secondary roller of the device.
A grinder can be used to easily remove rust from the surface and sharpen a knife.
The process of making grinder rollers
Using a circular saw, we cut the multilayer plywood into six rectangular fragments, the long side of which is exactly twice as large as the shorter side.
We mark with a pencil using a device for centering square blanks the middle of the halves of rectangular fragments and mark the found centers with a center punch.
We make blind holes for ball bearings on a drilling machine using a Forstner drill.
Then, using a core drill of a larger diameter, we obtain two round disks from each rectangular fragment.
Using a hammer and a piece of multi-layer plywood, we press sealed ball bearings flush into the blind holes.
We make through holes in all disks in the center with a drill with a diameter corresponding to the size of the inner ring of the bearings.
We thread three round disks onto the bolt and washer using glue. We place a wide washer on top and tighten the block with wrenches and leave it until the glue hardens.
Next, unscrew the nut and remove the tightening bolt. Now we have at our disposal three monoblocks with bearings pressed into the outer disks.
Using a pendulum saw, we cut three pieces from a plastic pipe of the required diameter, equal in length to the height of monoblocks of three disks made of multi-layer plywood.
We grind the side surfaces of the monoblocks, securing them in the chuck of a drilling machine, first with a roughing file, then with sandpaper, to the inner diameter of the pieces of plastic pipe, controlling the turning with a caliper.
Expert opinion
Strebizh Viktor Fedorovich, leading construction foreman
We will carry out the work using the following tools and devices: a circular, circular and jigsaw, a drilling and lathe, a file and sandpaper, a hammer and wrenches, a device for centering squares, etc. If you want to clarify something, please contact me !