This operation can be performed either with or without welding. But in any case, such work must be carried out by qualified specialists if they have special permission and a formalized permit to carry out the connection.
Coordination of work on tapping into the water supply system
Only with the permission of the relevant authorities can work begin on inserting an additional pipeline into the centralized water supply system. It is important to complete all documentation before starting work. If all this is not done, then you may incur administrative and financial liability for the illegality of your actions.
So, you need to start the insertion procedure in order to obtain a plan of a specific site to determine the presence of various utilities laid underground. With this document, you can go to the water utility and make a statement about your desire to connect to the central water supply system. You must also have with you documents indicating ownership of a specific house or plot.
Technical parameters that you need to know about when connecting:
- strictly defined insertion point;
- diameter of the connected pipeline;
- other information required in accordance with the purpose of the work performed.
Then you need to obtain permission from the sanitary and epidemiological service. With all the above documents, you can begin to develop and sign the project and estimate for the work being carried out. Independently tapping into a pipe without turning off the water supply is strictly prohibited, as is installing metering equipment. For these purposes, there are specialists who can be called from the appropriate government or certified private organization.
It is also prohibited to insert into the following types of pipeline:
- large diameter trunk networks;
- pipelines that are subsequently not connected to the sewer drain;
- other types.
Documentation
The owner of the site, the one who has a power of attorney from him or the service with which he has entered into an agreement can submit an application to draw up an agreement to carry out work, connect water or change supplies. To obtain permission to connect to a neighbor’s water supply (the document sample is similar to the usual one) or the general supply network, you need:
- For individuals, it is necessary to collect details in the form of a postal address of place of registration or residence, full name, identity confirmation document and data for further communication with the applicant.
- Legal entities and private businesses must provide their number in the State Register and the date it was entered, TIN, current residential address with place of registration and postal code, as well as confirmation from the bank, which gives permission that the applicant can sign the contract.
- The application must indicate the name and location of the site or facility that needs to be connected to the network.
- Attach to the package of documents information about additional sources of water supply (volume and owner).
An example of an application with a list of attached documents Source gorodkusa.ru
See also: Catalog of companies that specialize in water supply and sewerage, as well as auditing construction work.
- If there are no additional septic tanks (cesspools, treatment plants) on the site, and standards have been established for waste disposal through the sewer system, then it is necessary to indicate the properties of these restrictions and the number of changes in the volume of network use per year.
- You must provide a copy of the site plan, which contains a sewerage laying diagram, a display of all constructed objects and their characteristics, as well as a list of residents.
- Information should be provided about what type of activity is taking place on the site. This is necessary for carrying out standardized spillways.
You also need to attach to the list of documents for filing the application:
- Copies of all concluded contracts for connection to the public network.
- Copies of documents that are drawn up when connecting, flushing, and cleaning the line and equipment in the designated area or indoors.
- A copy of the papers for measuring instruments (meters) to check these devices for compliance with state standards, their installation diagram and readings at the time of filing the application. If water consumption is less than 0.1 m3/hour, then installing a meter is not necessary, and, therefore, copies of the described documents are not needed.
Example of a meter approval certificate Source ekosf.ru
- A diagram of the location from which samples will be taken.
- Copies of papers that confirm that the applicant owns this site.
- A document on the maximum load on the water supply network, which indicates for what purpose the water will be used (everyday needs, fire system, swimming pool, irrigation).
- Expert decision from federal or private SES, if required.
Before starting the application, it is recommended to make a topographic plan of the site with the help of surveyors, if you do not have one or it was drawn up more than 1 year ago.
Topographic plan of the site Source pro-gkn.ru
Basics of tie-in
The determining factor when choosing the method by which the insertion will be made is the material used in the production of the central pipeline. Usually it is plastic, metal, metal-plastic, or less commonly found cast iron. Naturally, insertion is impossible without making a hole of the appropriate diameter, which means that when it is created, water will flow out of the pipeline. Only with the help of special clamp systems can everything be done with high quality.
A couple of basic rules for doing a sidebar:
- The internal diameter of the pipe that will connect to the larger pipeline must be equal to the diameter of the drill used.
- The outer diameter of the pipe should be slightly smaller than the hole into which it will be inserted.
The type of water supply affects how the insertion will be made. Most often we are talking about the use of welding and special clamps that allow work without draining water in the system. Clamps are also needed in cases where cutting the line is not at all possible. When working with polyethylene pipes, welding machines cannot be used.
When using welding, the water from the system will definitely have to be drained, and the inserted pipe must end with a coupling or thread for installing a root tap.
Briefly about the main thing
Before submitting an application that will allow the signing of an agreement with a company supplying water supply services, it is required to make a project of the site listing all equipment that consumes water and a topographic map.
Independent connection and installation of water supply must be officially authorized by the relevant services, otherwise administrative punishment will be received.
A connection to the general water supply network may not be necessary if it is possible to install a personal well, borehole and septic tank.
Sequence of insertion
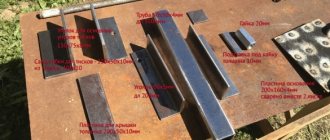
The main device for carrying out the work will be a specialized drill, which allows you to drill a hole of the required diameter in a pipeline filled with water. By following safety precautions and rules for working with the tool, you can achieve increased productivity of this device.
Initially, you need to remove the insulating materials and clean the pipe in the place where the tap will be made. Then you need to install a flange with an outlet to the main pipeline. It is fixed with a clamp. It is necessary to install our tool on the valve that closes the flange. If you are cutting into a steel pipe, you should not use a clamp, but a pre-welded pipe.
When work with the welding machine is completed, it is necessary to check the resulting seam for defects. If there are any, then you can go over the contour of the seam again to make it as reliable as possible.
When the coupling (pipe) is ready, you need to insert a cutter of a certain diameter and cut a hole for inserting the pipe. The equipment is then removed and the valve blocks the flow of water in the coupling. Once the embedded pipe is welded, the insulation and anti-corrosion coating can be restored. In this sequence you can work with cast iron and metal pipes.
Existing types of clamps
Today, the construction market offers several types of clamps that can be used for insertion:
- clip - cannot be used when it comes to embedding a valve into a pipe under pressure, but for a cleaned system it is ideal due to its simplicity of design and low cost. It can be found in both metal and plastic versions;
- saddle - when working under pressure on asbestos-cement, metal or plastic pipelines, you need to use this type of clamp. The flow of water will be blocked by a special locking plate;
- drilling - as one of the structural elements of this product, a rotating bolt mechanism is used, which remains on the pipe as a shut-off or control valve;
- Electric welded saddle clamp is suitable for working with plastic pipes. It is initially supplied with a milling cutter of the required diameter. To install it you will have to use additional tools.
The polyethylene pipe is inserted into the water supply using the last two types of clamps.
If you liked the article, please share it
Previously on the topic:
Share
Connection to the main pipeline
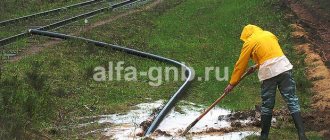
When working with a main pipeline in which it is not possible to drain water, you must proceed as follows:
- First, get to the insertion site by digging out a significant layer of soil.
- Make a cut.
- Completely install the water supply circuit from the embedded element to plumbing fixtures or other objects.
Excavation work usually involves digging a pit of 150x150 centimeters. It is important to ensure that the bottom of the pit is slightly lower than the pipe (about 50 centimeters). Work can be carried out using an excavator, but no more than to a depth of 30-50 centimeters from the pipe itself, and then shovels are used. The location of the insertion point in the well greatly simplifies the work.
When using a “saddle” or a collapsible clamp, you need to puncture the reinforcement. This technology is similar to a tee on a water pipe, more familiar to inexperienced plumbers. A shut-off valve is screwed onto the side outlet, acting as a plug after a hole appears in the line. Read also: “Types of saddles for HDPE pipes, mounting and installation options.”
When working with plastic pipelines, it is permissible to use single saddle clamps or a combination such as a saddle-clip.
Polymer materials are best processed using an electric-welded collapsible clamp. Two parts of this design are mounted clearly at the insertion site, then soldered to the pipe. Such a connection has increased strength and absolute tightness.
The process is completed by diverting the side pipe from the clamp valve to the flow meter installed in the house.
Inspection well above the insertion point
Naturally, the location of the tie-in must be under the control of the owner of the house/site, because there is a risk of deformation of the connection, which will require prompt intervention. For these purposes, a special well (caisson) is created above the treated area. Work begins with the pit being deepened by 50-70 centimeters. The created depression is filled with gravel to a depth of about 20 centimeters, then roofing material is rolled out onto it and a concrete screed is poured into a layer of 10 centimeters. It is imperative to reinforce this layer using a reinforcement grid.
Concrete gains optimal strength (about 70%) in 3-4 days. Then a block shaft is installed above the concrete slab. Usually we are talking about a round or square shape.
A cast plate is placed on top of the shaft on the neck part, in which a round hole is made. Subsequently, a hatch will be installed in this place. The outer part of the shaft is coated with an insulating compound and filled with soil that was selected from the pit earlier.
Construction work involving the installation of a well requires significantly more time, effort and money than when inserting a water supply through a caisson. Getting to the underground part of the main canal is much more difficult.
Metal pipes and connections to them
If it comes to how to cut into a metal water pipe, then a saddle clamp with drilling comes to the aid of the worker. There are several structural varieties of this element. Before installing it on the pipe, you need to clean the selected area from corrosion damage and various contaminants. In addition to the standard semicircle, which is present in each clamp, there is a shut-off valve at the top of the structure. There is a hole made in it through which drilling will be done. A suitable drill bit is also provided. The two parts of the structure are placed on the pipe by fastening them together using conventional bolts.
The tightest contact between the clamp and the pipeline is ensured by inserting sealing rubber bands. Once the clamp is secured, you can start drilling the hole and closing it with a special screw as a plug. Subsequently, the clamp remains in place and is used as a shut-off valve. There are clamps into which the valve is initially screwed. The drill is removed from the hole made and the valve is closed.
How to repair a fistula in a pipe
How to repair a fistula in a pipe. Sometimes a situation occurs that a fistula appears in an iron pipe of a water supply or heating riser. This is especially common in hot water risers. The first signs that a pipe will soon burst is when a red growth appears on it, but it may not appear.
In scientific terms it is called pitting corrosion, but in simple terms it is “Pipe” to a pipe. Fistulas appear on the pipe, either due to wear or due to stray currents.
In principle, when you get a fistula, you won’t care why it appeared, you will have a question: how to fix it quickly? I'll try to describe a couple of options on how to do this.
Working with cast iron pipelines
A cast iron pipe can be drilled under pressure using special clamps with bimetallic crowns.
It is important to know the following features of this process:
- cast iron is an extremely brittle material, which requires caution from the worker;
- before drilling a pipe, you need to clean it from the anti-corrosion coating;
- it is unacceptable to overheat the crown on the clamp;
- the equipment should operate at low speeds.
After the stripping is completed, it is necessary to install a collapsible type saddle in place of the insertion. This place must be sealed with rubber pads. The pipe itself is drilled with a carbide crown, which simply cannot be replaced during the procedure.
The insertion sequence is as follows:
- The pipe is excavated and cleaned in the right place.
- The top layer of hot cast iron is cut using a grinder.
- A removable saddle is mounted. The joint between the reinforcement and the clamp is sealed using a rubber seal.
- The shut-off valve is then attached to the flange elbow required for insertion of the crown.
- The pipe is drilled with constant cooling of the cutting site.
- The crown is removed, and the water is shut off with a valve.
We must not forget about maintaining a constant slope of the embedded pipe towards the house. We are talking about a value of 2 degrees.
Plastic pipelines and features of insertion into them
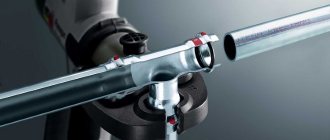
It is very important to talk about how to properly cut into a plastic water pipe. You can work with such a pipeline without reducing pressure if you use an electric-welded saddle clamp. This clamp is made of heat-resistant plastic and is also equipped with a special heating coil and drill. Thus, the optimal temperature required for working with polymers is achieved (read: “How best to make an insert into a HDPE pipe - time-tested materials and methods”). We are talking about pipelines whose pressure does not exceed 15.7 atmospheres. In terms of strength and other characteristics, the clamp used is in many ways not inferior to the polymer pipes themselves. The product is resistant to corrosion and its service life can reach 50 years.
Cut-in sequence:
- The pipe is cleaned.
- The clamp is secured with bolts. This element has terminals through which the welding machine will be connected.
- The welding machine heats the spiral with which the outlet will be welded.
Often a clamp is used, which initially has a cutter and shut-off valve built into it. The job is to attach a coupling to the pipeline, and then, after cooling, drill a hole, closing it with a shut-off valve.
Bottom line
From all of the above, several conclusions can be drawn. Only a professional can weld a pipe to a steel water pipe. The saddle can be installed on cast iron or polymer products with your own hands, but only when the water in the system is completely drained. When working under pressure, you must take into account all the rules and recommendations given in this article. It is best to entrust any of the methods to a specialist to eliminate possible risks.
No pressure
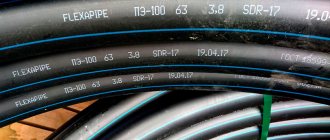
To insert a pipe into a HDPE pipe without pressure, it is necessary to use saddle bends without a cutter.
To insert into a HDPE water pipe, it is recommended to use a compression saddle, which is secured with bolts. The compression saddle pipe has an internal thread into which a ball valve or coupling is screwed to connect to a HDPE pipe. The seal is achieved using a standard rubber ring, which is firmly pressed when tightening the bolts. A hole in the support pipe is drilled using a drill.
Let's move on to step-by-step instructions:
- clean the surface;
- insert the o-ring (gasket);
- we put two half-clamps on the pipe;
- secure them with mounting bolts;
- we stretch the fastening connections so that the clamps close together;
- we drill a hole that goes into the tee of the clamp using a drill;
- install the saddle using the seal.
Electric welded saddle
Electric-welded HDPE pipe saddles are installed using a built-in heating element, which melts the plastic base. The molten base becomes liquid, and when solidified, it forms a reliable monolithic connection with the supporting pipe. Rotation 360 degrees around its axis makes it possible to accurately install the part, and indicators built into modern electric welding saddles facilitate the process of electrodiffusion welding of the structure.
When installing, you need to find a flat section of a water supply or other HDPE pipe, thoroughly clean it of possible contaminants and degrease it.
The electric welded saddle must similarly be prepared for work. After completing the preparatory work, you can carry out welding, and after it, cut in using the screwing method from the side of the main part of the milling element. After welding is completed, the cutter is returned to its original position, and a cover is installed in the hole.
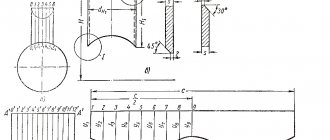
Electric welding deal drawing
Crimp clamp
A lightweight analogue of an electric welded saddle is a crimp clamp. There are the following types of clamps (linings) for inserting into HDPE pipes:
- with shut-off valve;
- with a built-in cutter, with a safety valve for inserting HDPE pipes;
- with a flanged or threaded metal end;
- with a plastic end.
In order to insert into a HDPE pipe, the clamp must be put on the pipe and secured to it with bolts. After this, drilling is done through the outlet pipe and the outlet itself is attached.
You should not drill holes without first installing a clamp or saddle on it, as you can make a mistake with the diameter of the drill. It is optimal to drill through the branch pipe of a fitting already installed for the branch. So the diameter of the drill will be slightly smaller than the internal cross-section of the embedded outlet and you will install it in the required place.