| Place | Name | Characteristics in the rating |
| The best carpentry workbenches |
| 1 | Black&Decker WM825 | Allows you to hold the workpiece with one hand |
| 2 | Bison Master | Best price |
| 3 | Keter Folding Work Table | The lightest workbench |
| 4 | Wolfcraft master cut 2500 | German perfection in detail |
| The best locksmith workbenches |
| 1 | Verstakoff PROFFI-E 218 | The best workbench for a garage or workshop |
| 2 | Practitioner W120.WS1/F2.010 | Compact and functional |
| 3 | Hephaestus-VS-001 | Mobile design. High ergonomics |
| The best universal workbenches |
| 1 | Berger BG 1298 | The best versatility. Convenient vice control |
| 2 | Bosch PWB 600 | Maximum ease of use |
| 3 | UNIPRO 16900U | The most affordable workbench |
A workbench is an integral part of any workshop and many garages. It performs various operations on processing wood, plastic, metal, and also dismantles and installs components. Thanks to stability and convenience, labor safety is increased and worker fatigue is reduced. On the workbench you can install additional tools and devices to make work easier. Our review included the best workbenches. When compiling the rating, the opinions of experts and reviews of domestic consumers were taken into account.
Materials and tools
As previously noted, if you wish, you can make a workbench with your own hands. The workbench can be made from a corner or from a profile pipe, it all depends on the specific drawing.
Necessary tools for assembly and processing of materials used:
- Level. In order for the work carried out to be accurate, the device must be positioned horizontally.
- Metal processing is performed with a standard grinder. This tool will also be needed for grinding the surface, for which it is enough to replace the disk.
- The connection of all elements is carried out using a welding machine. The welding seam is characterized by high rigidity and reliability. Today, welding is used extremely often, since many people can purchase a compact welding machine.
- A tape measure or rigid ruler can be used for measurement.
- It is important to observe all dimensions, since its stability and other performance qualities depend on the accuracy of the design.
- Some elements can be connected using a screwdriver. Metal screws are used for connections.
- In some cases, several sheets of plywood are required to create a workbench
- You can change the shape by using an electric jigsaw.
- A drill is also required to work with materials. It allows you to obtain the required holes in metal and wood.
The required materials are as follows:
The main material used is steel angle. The wall thickness should be 4 mm, due to which the structure is highly resistant to mechanical stress.
- Square pipe 60 mm by 40 mm. The thickness of the metal used is 2 mm.
- A corner that measures 40 mm by 40 mm.
- Steel strip with a thickness of 4 mm and the required size to create a tabletop.
- A steel sheet of small thickness, which is required to create the sides of the structure.
- Wooden boards to create a shelving unit.
- Plywood, which is used to create boxes.
- Screws for fixing detachable elements.
- High strength guides for drawers.
- Paint that is used to protect wood and metal.
After finding everything you need, you can begin the actual work. It is worth considering that the materials in question are suitable for creating a structure that is quite impressive in size.
Due to its large dimensions, a vice can be placed on one side of the bench and tools on the other.
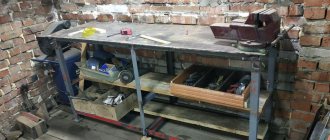
Assembling a workbench for the garage with your own hands
You can make a garage table with your own hands if you follow the basic recommendations. The whole process can be divided into just a few steps:
- The existing material is being cut. A pipe and a steel angle can be used to form a supporting structure. A garage workbench with a metal frame can withstand significant impact.
- In order for the mechanic’s workbench to have the required dimensions, it is necessary to change the dimensions according to the drawings.
- You can start work by making a power frame. To begin with, a load-bearing element is created, on which another load-bearing element is installed on top, onto which a steel sheet is fixed. You can weld a workbench yourself using a welding preparation.
- The load-bearing element is additionally reinforced with steel pipes. They act as stiffeners.
- The table for metalwork is installed on legs. This structural element is also welded to the base. The recommended length of the elements used is about 900 mm. Power jumpers are welded between the legs. They can significantly increase the rigidity and stability of the mechanism.
- After creating the supporting element, you can begin to create boxes in which tools and parts will be stored. A DIY garage table is made for specific tasks. The number of boxes and their sizes may vary significantly. To create this element, a steel pipe is used. The frame of the boxes is reinforced with a metal channel, which becomes stiffening ribs.
- The next step is to make a supporting frame that is suitable for creating a tabletop. The frame must be very strong, since it will bear a high load. Due to the use of a thick metal pipe, the workbench is durable and reliable.
- After creating the supporting structure, it is further strengthened. To do this, the brackets are welded to the sides. Holes are drilled in the middle of each bracket, which are used to attach the back and other walls.
- Boxes may have plywood walls. Due to this, the workbench becomes lighter. The sides are secured using self-tapping screws. It is recommended to create boxes of various sizes, thereby significantly expanding the functionality of the device. There are various options for the location of drawers on the Internet; the most suitable option is selected depending on your preferences.
- Holes are created on the inside of the structure to fix the guides along which the boxes will move.
- In this case, a board is used to make the table. It is placed on a previously prepared frame, where it is then fixed. Often a metal plate is placed on top of the wood planks to protect the wood from the elements.
- All seams should be thoroughly cleaned. A grinding machine and a file can be used for this. If there are untreated seams, there is a high risk of injury. When processing seams, problems may arise associated with the appearance of cracks and other defects.
- The surface of the wood used must be well sanded. This creates a flat surface that is ideal for placing the steel sheet. Wooden sheets must be fastened securely, otherwise, when a load is applied, the sheet will move or sag.
- Fastening the metal sheet should be done using hidden screws. This is due to the fact that welding work can cause the previously used wood to ignite. The sheet used must be painted on both sides, due to which the service life of the workbench is significantly increased.
- Recently, schemes that allow you to change the height of a certain part of the structure have become very popular. The height of the workbench in the garage is selected taking into account what kind of work will be carried out.
Tool cabinet in the garage
This bedside table will serve both for performing a variety of tasks and for storing tools. It will take up very little space in the garage, and if you try, its pleasing appearance will decorate the room.
- First you need to draw up a plan diagram of such a bedside table. You can choose the proposed option, or based on it you can design your own, taking into account all your personal wishes for the arrangement of the workplace.
- For a novice carpenter, it will be useful to build a bedside table for storing working tools. This will allow you to acquire the necessary experience in carpentry and build the mini-workshop necessary for full-fledged work, which will fit in a small wooden box.
- The proposed tool cabinet in this case is a small floor cabinet. Inside it is equipped with nests for storing various tools, and outside it has a workbench board. It is made from plywood boards or boards 20 mm thick. The bench board must be carefully trimmed and trimmed.
The tool cabinet is equipped with two drawers: one hinged on the door, the other pull-out - the number of drawers and their functionality can be any depending on your needs. The top of the bedside table is equipped with a hinged lid in the form of a drawer. The lid is attached to the frame with hinges. In the working position, it can be folded back and leaned against the wall, or it can be equipped with holders so that it independently remains in a given position. When not in use, the lid will simply lower and close the bedside table.
To make the frame of the bedside table, you need to use either bars or boards with a cross section of 1.5 X 2 cm. The product can be lined with plywood or wood board.
The device for keeping tools in the cabinet is made at your own discretion.
- As you can see in the photo, this garage furniture is either painted or covered with film. You can use a transparent finish, but this will require more painstaking carpentry preparation of the product.
- The interior decoration can be simple; it will be enough just to carefully and repeatedly sand the parts from the inside or paint them with varnish or light-colored paint.
- Materials for assembling a workbench. Total cost of the workbench.
- To assemble a workbench you will not need a lot of materials with a total cost of 3 to 3.5 thousand rubles, depending on the place of purchase. For reference, prices from the Leroy Merlin store in the Moscow region will be indicated.
Lumber
- Planed block 30x40x2000 needles - 1 pc. (68 rub.)
- Planed board 40x96x3000 needles - 5 pcs. (1610 rub.)
- Planed board 20x96x3000 needles - 4 pcs. (620 rub.)
- Layout 14x14x2100 needles - 1 pc. (70 rub.)
Fasteners
- Bolt with nut and two washers M8x100 - 16 pcs. (416 rub.)
- Drywall-wood screws 3.5x45 200 pcs. — 1 box (147 rub.)
- Drywall-wood screws 4.2x90 6 pcs. — 3 packs (42 RUR)
- Furniture dowel 10x50, wood, beige, 30 pcs. — 1 package (47 rub.)
- Reinforced mounting angle 40x40x40x1.5 - 4 pcs. (52 rub.)
- Waterproof PVA glue D3 Tytan 200 g - 1 bottle (151 RUR)
Preparatory work
The work being done is quite simple to perform. You can make a workbench for a garage with your own hands if you have basic plumbing skills. The preparatory work is as follows:
- All required materials are being purchased.
- Metal elements are cleaned of rust. It should be borne in mind that in many cases welding work on rusty metal is not permissible.
- A garage workbench requires quite a lot of free space.
- Welding work must be carried out in compliance with safety regulations.
You can make a table for your garage within a day if you have everything you need. Following some recommendations allows you to avoid quite a lot of problems.
How and from what to make
The most affordable and practical material is wood and its derivatives. Plywood, chipboard, fibreboard, OSB, countertops from already unnecessary tables, etc. will be a completely reasonable choice.
It is important to consider:
- if work is carried out in a damp room, it is necessary to choose a material that is protected from moisture - laminated, impregnated, followed by varnish/paint treatment;
- the working surface should be as flat and smooth as possible. Using boards of different thickness/texture/treatment will not allow you to obtain such a surface, so for the tabletop it is better to use a solid slab of plywood or wood board;
- guides and racks should be made of the same type and size of material, except in cases where the load is distributed unevenly and some of the racks require reinforcement;
- connections of wood materials are made using fasteners (screws, bolts, screws, confirmations) and glue, as well as a tongue-and-groove or tongue-and-groove system. The adhesive type of connection requires waiting for the glue to dry completely; in critical places, it is better to duplicate the gluing with metal fasteners.
It is necessary to assemble a workbench in a wooden garage with your own hands in a fairly dry and well-ventilated room - dust from sawing and sanding materials, fumes from varnish/paint must be removed quickly.
Important: since the load on the tabletop is often very large and uneven - for example, only on one corner - it must be reinforced by a frame or supports located under the main plane.
What to look for when choosing a workbench
Workbench view
They can be designed for plumbing or carpentry work, have a folding or one-piece design.
Dimensions
Considering the limited size of the garage and the dimensions of the car located in it, when choosing, you should pay attention to the compactness of the product. It should not interfere with the vehicle’s entry into the interior space, and should also allow various repair operations to be carried out comfortably.
Workbench design
If the owner of the garage often deals with various types of repairs, not just the car, he is a jack of all trades, then he needs to select a multifunctional device. The industry produces two-, three-, four-pedestal versions of such tables.
The workbench should have many drawers; on the back there may be a screen on which a large number of shelves or hooks for tools and other necessary things can be placed.
For a car enthusiast who does repairs once in a while, an inexpensive single-pedestal model with a minimum of auxiliary cells will be suitable.
When choosing such products, its future owner should pay attention to the stability and strength of the product, taking into account the significant weight of the tool placed in it, as well as the expected loads on the surface.