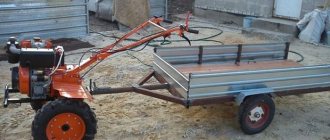
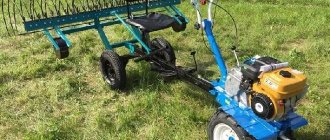
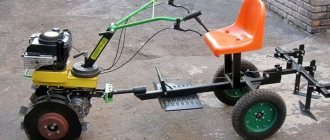
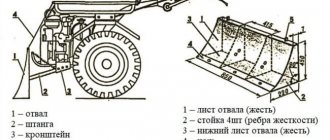
A trolley for a walk-behind tractor is a towed equipment for universal agricultural motor vehicles for transporting goods on personal plots and land plots. With the help of such a mechanism, garbage, animal feed, building materials, fertilizer, grain, and equipment are transported.
The trailer and adapter for the walk-behind tractor are types of homemade products made by skilled mechanics. The adapter is a longitudinal beam with its own chassis, driver's seat and footrest. This module makes it possible to cultivate the soil in a sitting position, as well as attach 2 equipment at once - in front and behind.
A trolley is a type of adapter with a difference in the design of the chassis.
A purchased cart for a walk-behind tractor is expensive. To save money, craftsmen make it themselves, design design drawings, and select the necessary materials. The process of creating such a useful vehicle does not take much time and is not difficult. Even a beginner with at least a little knowledge of technology can handle it.
A brief overview will help you understand the question of how to make a trolley for a walk-behind tractor yourself with good performance characteristics.
Basic information
Before carrying out work on the manufacture of a trailer, it is necessary to develop a detailed action plan and adhere to it.
The work plan for the manufacture of a trailer for a walk-behind tractor looks like this:
- At the preparatory stage, it is necessary to familiarize yourself with the structure of the mechanism and analyze its functionality depending on the power of the walk-behind tractor.
- Make a design sketch. A trailer diagram drawn up yourself will greatly simplify the work.
- Calculate the dimensions of the cart for the walk-behind tractor.
- Design a drawing of the trolley, which includes the main components, parameters and dimensions of the parts.
- Plan the operating principle of the main and additional mechanisms, think through ways to connect all the components and parts, and their functioning.
- Prepare a list of necessary materials and tools.
- Start the assembly and finishing process.
Depending on the ability to transport cargo, trailers are divided into 3 types:
- A simple 1-axle attachment for walk-behind tractors with a lifting capacity of up to 70 kg. Its design is simple and inexpensive.
- Universal cart with a carrying capacity of up to 110-120 kg. Often used in households.
- Carts for walk-behind tractors with a carrying capacity of over 120 kg. Such mechanisms are designed to move heavy loads, so they have a more complex design, which increases the cost of materials for the frame and cladding. The functionality of this technology is expanding.
Based on these parameters, a material is selected based on strength for the frame and finishing of the mechanism.
Frame
It is made from a square pipe, which is cut into separate sections. The pipe sections are welded together, forming a frame with cross members. Each angle is carefully measured. After the frame is ready, it is boiled around the perimeter again. The finished product is primed and painted with paint and varnish material.
The trailer should not be overloaded, otherwise it will quickly become unusable. The service life of the entire structure depends on the quality of the frame element. Therefore, before starting work, you should determine what maximum load the tow hitch will carry and for what purposes it will be used.
There are three main trailer models:
- Easy. Designed for a load of no more than 70 kg. Typically this is a lightweight cart with one axle on which the driver's seat is mounted. A trailer for transporting goods is welded to the axle.
- Universal. It can transport small loads up to 120 kg over rough terrain. For greater strength, an I-beam is used as a material for making the frame.
- Heavy. These examples use a metal profile and elements of an automobile chassis with rubber running. Heavy trailer options are more reliable and durable, although a little more expensive than other designs.
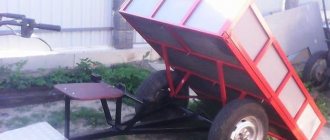
Some craftsmen make a dump trailer for a walk-behind tractor. In operation, it resembles the body of a dump truck, but to make such a structure with your own hands, you need to strictly adhere to all the dimensions of the drawing. There are no standard sizes for a trailer; the main thing is that it is not too wide and that it is convenient to maneuver while moving behind the walk-behind tractor.
Trolley device
Motoblocks and motor-cultivators on trailers consist of the following basic elements:
- frame;
- body;
- hitch or drawbar;
- driver's seat;
- steering gear;
- chassis.
To withstand heavy loads, a homemade cart for a walk-behind tractor is reinforced with special stiffeners.
For a 1-axle trailer, a manual type device is sufficient. A 2-axle dump truck with a large load capacity must be equipped with a hydraulic drive to prevent it from tipping over.
With a load capacity of over 350 kg, for safety, the self-propelled cart is equipped with braking parts. You can make mechanical brakes yourself. If these details are not taken into account, then if overloaded while descending from a hill, the walk-behind tractor trolley will not be able to stop with its own hands and will tip over. To ensure that it remains in the working position after being disconnected from the walk-behind tractor, stops are installed.
Brakes
To ensure that the trailer does not accidentally roll on a slope and stands firmly on the road, a simple braking system is provided for it. How to make brakes on a trailer for a walk-behind tractor? It is best to use a parking structure from a car or motorcycle and secure the mechanism near the driver's seat with bolts.
As in any vehicle, the braking system is one of the factors of road safety. You can make your own brakes using a cable, rod and drum:
- A drum is attached to the hub of one of the wheels.
- Take a brake disc and weld a small piece of pipe to it.
- Place the mechanism on the axle.
- The brake pads with a cable are secured to the axle, the cable is pulled to the lever near the driver’s seat.
Brakes are usually not installed on two wheels. One parking brake for a trailer attached to a walk-behind tractor is also sufficient.
Materials and tools
To work you need the following tools:
- grinder for cutting parts;
- welding machine;
- welding electrodes;
- jigsaw;
- screwdriver;
- a regular construction square for measuring angles.
When making a trailer structure, you will need the following materials and parts:
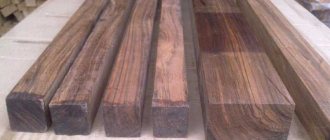
- metal profile pipes of square or rectangular section;
- wheels and springs;
- duralumin sheets 2 mm thick;
- steel sheets;
- channel No. 5;
- metal corners;
- metal rod;
- fasteners.
All parts, especially if they are remnants of old metal products, are carefully inspected for damage, cracks, cleaned of rust, and trimmed.
Installing a hitch on a walk-behind tractor
To the walk-behind tractor brackets, the hitch brackets are installed using pins. For more reliable fastening, it is recommended to fix the bracket using M14 bolts.
Installation of equipment on the hitch
To install additional equipment, the hitch axle must be mounted to the equipment bracket; by the way, it is removable. Next, the axle is inserted into the outer hole of the hitch. It is necessary to tighten the bolt, aligning the holes on the housing and the equipment rack. Next, all that remains is to secure the contact with an M12 bolt and a corresponding nut.
Why does a walk-behind tractor need a hitch? no need to explain, the same adapter, an irreplaceable thing, but without a hitch you can’t go anywhere.
Making a trolley
In order to understand how to make a cart for a walk-behind tractor with your own hands, you need to perform the following algorithm of operations:
- To make a load-bearing welded rigid frame, take 5 pipe blanks and trim the ends with a grinder.
- Press the chipboard sheet with clamps and weld the junction of 3 longitudinal pieces with 2 perpendicular ones so that they create a lattice frame.
- Check the geometry of the structure using a regular construction square. The angles of the connected ribs must be 90°.
- Install spacers between the tacked workpieces in the corners of the bottom and in the center, and tack them by welding.
- Use a welding electrode to tack 4 vertical posts in the corners to the longitudinal pipes of the bottom.
- Check the perpendicularity of the corners, check the dimensions of the sides of the structure with the dimensions on the drawing of the cart for the walk-behind tractor.
- Finally weld all the workpieces to each other, grind the welding seams, clean them of sagging and formations.
- The body can be made of plywood or wooden boards, and the corner joints are secured with steel corners.
- The boards are installed on the frame and attached using bolted connections.
- The craftsman makes stronger sides from steel sheets. The sides can be folding or fixed. Folding sides of the body are considered more rational, because Unloading large volumes of cargo is easier. The sides are also made from metal pipes of square or rectangular cross-section. They are made in the same way as the frame, they are tacked, the geometry is checked for strength and to avoid braces and deviations, they are finally welded, and rigidly attached to the frame. The tailgate is secured with ordinary door hinges and equipped with latches.
- Take a metal rod with a diameter of 30 mm and a length of about 1050 mm to make an axle for the wheels, connect it to the longitudinal hinge and corner supports. The length should be chosen so that the axle does not extend beyond the wheels. Sharpen it to the required diameters of the bearings in the hubs.
- As a running gear, you can take the wheelbase from a scooter, stroller, wheelbarrow or other agricultural machinery. Heavy wheels from a car trailer with hubs are not recommended for installation.
- To make the drawbar, take 2 profile pipes with a diameter of 25x50 mm and a length of about 1.85 m, weld them to the frame beam so that a triangular structure is obtained. For reinforcement, metal gussets 4 mm thick are attached by welding at the corners, and a plate 8 mm thick is attached to the front of the trolley.
- Tipper technology involves the installation of door hinges attached to the bottom of the beam and to the bottom struts.
- The frame of the constructed structure is covered with wooden boards, plastic or metal.
- The driver's seat is installed on a walk-behind tractor with a trolley ready-made or in the form of homemade boxes made from a piece of chipboard and foam rubber covered with dermantine. Such boxes are necessary for covering equipment and materials.
- The parking brake drive of the unit can be used as a brake. Fix the brake pedal, made of a 6 mm thick plate, on the footrest under the seat, weld 2 corners. Install a pedal in the front part, and a plate with 2 holes for fastening brake cables in the rear part, the ends of which are connected to a T-shaped plate with a rod.
In this way, you can make a trolley for a walk-behind tractor with your own hands.
Chassis
The design of the trailed part of the walk-behind tractor itself is not particularly difficult, but the chassis is a completely different matter. It is based on a beam, at the ends of which hubs are placed. The channel is welded together to form a square. The welding seam is continuous for structural strength. Hubs are welded to the bottom of the square (beam), trailer wheels are put on the walk-behind tractor and their parallelism is checked. If the condition is met, then the structure is welded correctly.
The beam and the trailer frame are connected using springs installed in special brackets on the frame, pre-provided in the diagram. The entire assembly of the towed part is checked for stability; it should not tip over.
Advice. In order for the vehicle to last a long time and not break down, it should be periodically maintained, which consists of daily cleaning after work and lubrication of connections.
Don't forget about the trailer chassis
Do-it-yourself trolley for a motorized towing vehicle
A motorized towing vehicle (motorized dog) is a device for transporting goods and traveling through snow and wetlands. The towing vehicle itself has a caterpillar track and is complemented by a sleigh. A trailer in the form of a sleigh is convenient in winter, provided there is a large snow cover, but in summer or in snowless winters, using such a trailer is problematic.
Manufacturers of agricultural equipment offer a wide selection of trailers, adapters and carts, including those for motorized towing vehicles. Some owners of such equipment create a cart with their own hands. Its device is practically no different from a trolley for a walk-behind tractor.
The main difference between a motorized towing vehicle, which dictates the design features of trailers, is the caterpillar track. Such vehicles are ideal for off-road use, so the trailer must meet the same requirements.
Two types of trailers are recommended for motorized dogs: a cargo platform and a skidder. Both options are difficult to implement, so it is better to adapt a ready-made trolley for a walk-behind tractor. The drawings and dimensions for the motorized towing vehicle and the walk-behind tractor will be almost the same, so you can use any.
The main feature of a trailer for this type of equipment is low-pressure wheels. They have a high shock-absorbing effect and are excellent for off-road use. A cart with such wheels can be used at any time of the year. This modification requires the trolley to strengthen the axle, as well as fasten the wheels. All other parts of the cart may remain unchanged.
Varieties
When selecting a hitch for a unit, you should take as a basis the most relevant type of element.
There are several varieties.
- Single and double – used when there are different models of attachments. It all depends on which ones are practiced and in what numbers.
- Reinforced – ideal for heavy motorcycles. Its distinctive feature is that it is more impressive - it is longer and thicker, which allows the auxiliary equipment to sink deeper into the soil.
- Customizable – with the option to change the angle of the shaft, through which you can adjust the level of fixation of attachments and thereby increase work productivity.
- Universal coupling device - involves aggregation with many modifications.
If a coupling device for a motorcycle of the required modification is not commercially available or there are individual requirements for it, creating it on your own will not be difficult, since we are talking about a rather simple mechanism.
Craftsmen, who make most of the “accessories” for motorcycles with their own hands, construct the “pipe-in-pipe” trailer coupling device from a crosspiece, from a cardan and other improvised elements preserved from various devices. The owners of such devices claim that it is possible to create such a unit without any problems by sharing personal experience and drawings of the coupling device on the Internet.
DIY wheelbarrow for walk-behind tractor
A wheelbarrow for a walk-behind tractor is an indispensable assistant in the household. This device allows you to transport cargo (harvest, garbage, building materials, etc.). You can make a cart for a walk-behind tractor with your own hands from auto parts or from individual materials. In both cases, welding and certain design skills will be required. The wheelbarrow assumes the simplest design; any drawing of a trailer for walk-behind tractors will do to create it.
For the Neva MB-2 walk-behind tractor, a mounted wheelbarrow with an H-shaped hitch is suitable. This type of connection is universal and easy to make. The coupling point between the wheelbarrow and the walk-behind tractor is one of the most important components that receives a large load, so the materials for its creation must be durable, and checking for defects (cracks, rust) is mandatory.
A wheelbarrow for a walk-behind tractor consists of a frame, sides and wheels. If you add a seat and a steering column to it, you get an analogue of a mini-tractor. Any of the wheelbarrow options for a walk-behind tractor can be made from available materials; there are many photos and videos on the Internet with the process of assembling devices.
Do you use trailers, adapters and wheelbarrows for walk-behind tractors?
Other details
In addition to the main driver's seat, a simple folding bench is installed, which is mounted on the front side of the body and rests on the side ones. Some trailers for walk-behind tractors are additionally equipped with a spare wheel. It can be placed on the side or bottom of the trailer on the metal bottom using special fasteners.
Near the driver’s seat, for the convenience of storing small tools that may be needed on the road and during repairs, small homemade metal boxes or special bags are secured.
Assembly Tips
It’s worth starting with analytics of examples of drawings that can be seen in different sources. Next, based on what you have viewed and the elements that are available, you need to create your own sketch.
The more detailed all fasteners are described in it, the fewer difficulties will arise in practice. The optimal dimensions of the trailer for the walk-behind tractor must be worked out. To assemble the structure, it is important to know how to use a welding machine.
It is worth noting that it is one of the key factors for obtaining a high-quality output result. A trailer can have either two wheels or 4. What number will be on a particular model is determined by the expected loads on it. But still, the basis that carries the entire structure is the frame.
It is most reliable for use if it is a cast structure, where space for wheels is already allocated.
Sources
- https://stroy-podskazka.ru/navesnoe-oborudovanie/pricepnye-ustrojstva/
- https://vsesvoimirykami.ru/pricep-dlya-motobloka-svoimi-rukami/
- https://lizing-spectehniki.ru/motobloki/kak-sdelat-pricep-k-motobloku-svoimi-rukami.html
- https://www.mihali4.ru/obsluzhivanie/pritsep-dlya-motobloka-svoimi-rukami
- https://jamaster.ru/pricep-dlya-motobloka-svoimi-rukami/
- https://SpecMahina.ru/motoblok/pritsep.html
- https://MoyMotoblok.ru/navesnoe-oborudovanie/samodelnyj-pricep-dlya-motobloka-svoimi-rukami/
- https://mtz-80.ru/bez-rubriki/pricep-dlya-motobloka-svoimi-rukami-chertezhi-samodelnyh-teleg
- https://motoblok-kultivator.com/pricep-k-motobloku-svoimi-rukami/
- https://ludacha.ru/priczep-dlya-motobloka/
[collapse]
What it is?
A towbar refers to a towbar or towing equipment. They are necessary to ensure reliable fastening between the walk-behind tractor and the trailer.
The towbar must guarantee the user safety and reliability; accordingly, its design is carefully thought out, and special requirements are imposed on the material.
Making a drawing
Before you start making a trailer, you need to draw up the correct drawing and decide on the dimensions. The main material for the body is galvanized, steel or painted sheet. Sometimes such raw materials are replaced with high-quality plastic with high strength indicators. And although metal products have a longer service life, plastic analogues are much cheaper.
If you have chosen a suitable material, begin to carefully draw up a drawing or technical diagram for the following parts of the future structure:
- connecting frame;
- carrier carrier;
- working body;
It is not necessary to have any complex design skills in this matter. It is enough to sketch a sketch of the future cart.
Why is the drawing phase so important? Everything is very simple. In the created drawing you will be able to see complex areas, dimensions and connecting nodes. With the help of the correct drawing, you can see the adhesion features of the load-bearing running elements. The carrier is fixed to the walk-behind tractor module using a rotation unit and a cantilever element, and the second edge is attached to the frame using a central metal pipe.
The connection to the walk-behind tractor is carried out through consoles and dumbbells. When manufacturing the axle rod, the size of the motor-cultivator's coupling mechanism is taken into account. As for the upper axial end, it acts as a support, and the carrier's rotating assembly promotes rotation around it. Existing ball bearings are covered with an anti-dust cover, and a special lubricant is placed in the voids.
Kinds
It is extremely important to choose a suitable hitch for the walk-behind tractor, since a lot depends on its quality.
It happens:
- single or double;
- with reinforced structure;
- adjustable;
- universal option.
If various hitches are used during operation, then it is better to purchase a single or double hitch. When the additional equipment is large or a large load needs to be transported, then it’s time to use a reinforced one.
Its difference from the previous one is greater thickness and length. Thanks to the design, the plow or cutter can sink deeper into the ground.
Adjustable allows the user to set the desired shaft angle. As a result, the attachments are installed at the required level, and work efficiency increases accordingly.
The universal hitch is used everywhere, it can be rearranged for different models. Due to this, the user has the opportunity to adjust the angle at which the attachment is installed. The main role is played by the bolt mechanism.
Precisely for the reason that such a hitch is used when hanging hillers and plows, it can be either double or triple, which means it is not prohibited to connect several working elements at the same time.
Most often, a U-shaped unit is used, which can be made either independently or purchased ready-made. There is also a hitch for sale for the APM adapter, which is necessary when working with a hiller or plow.
It is used on walk-behind tractors:
- "Neva";
- "Oka";
- "Centaur 1080D";
- "MTZ";
- "MB";
- "Cascade".
The product is attached to the rear or front adapter, and then additional equipment such as a plow or potato digger is attached. The design of the product is thought out in such a way that reliable fastening can be ensured through the use of three bolts. When the walk-behind tractor tilts during operation, the plow remains perpendicular to the ground.
When using some hitches, the user has the opportunity to adjust the height and change the angle of inclination in the desired plane.
For example, in the horizontal plane, the maximum permissible angle is +-20 degrees, in the vertical plane it is 7 degrees more. There is also a coupling option for walk-behind tractors on the market - MK, used for the Krot series plow and the ON-2 hiller. It is used exclusively in this version and in no other way, that is, it is not suitable for other attachments.
Additional drawings of a homemade trailer
Additional materials with detailed descriptions and diagrams of individual components of the trailer hitch for a walk-behind tractor will help you decide on the design and give an idea of the assembly stages.
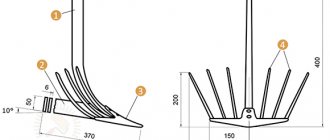
General view drawing
1 — hinge body; 2 – drawbar (pipe 43x43x5); 3 — footrest (corrugated sheet (steel) s5); 4 — frame (pipe 43x26x5); 5 — trunk (seat lid is not shown); 6 — side (steel sheet s1.5); 7 — handrail (pipe 21×1.5); 8 — stand (pipe 18×1.5, 8 pcs.); 9 — bottom (steel sheet s1.5); 10 — axle shaft housing (2 pcs.); 11 — scarf (sheet (steel) s5, 6 pcs.); 12 — bead liner (wire 3mm in diameter); 13 — back wall of the box (sheet (steel) s1.5).
Trailer swivel
1 - body; 2 — bearing 180205E (2 pcs.); 3 - axis; 4 — trailer drawbar; 5 — washers; 6 — nut M20x1.5; 7 - cotter pin; 8 — spacer sleeve; 9 — fork of the walk-behind tractor articulated unit.
Seat cover and trunk
1 — upholstery (artificial leather); 2 - foam rubber; 3 — hinge loop (2 pcs.); 4 — base (plywood/fibreboard s12); 5 edging (aluminum profile); 6 — trunk box (sheet (steel) s1.5); 7 bead liner (wire 3mm in diameter); 8 — back wall of the box (sheet (steel) sl, 5).
Running unit
1 - axle shaft; 2 — bearing 206 (2 pcs.); 3 — oil seal (felt ring); 4 — axle shaft housing; 5 — spacer sleeve; 6 — stopper (M8 screw, 2 pcs.); 7 — spring ring, thrust; 8 — trailer axle (pipe 49×4.5); 9 - frame.
Brake pedal
1 - axis; 2 — footrest; 3 - pedal; 4 — shock absorber (rubber ring); 5 - drawbar; 6 — return spring; 7 — pedal lever; 8 — bracket for mounting the main brake cylinder.
Hydraulic brake drive device: 1 - brake pedal; 2 — brake cylinder, main; 3 — connecting fitting; 4 - pipeline; 5 - tee; 6 — bracket (strip 60×14, s2); 7 — rubber bushing.