Peculiarities
Industrial vices - especially carpentry ones - are close in their power (pressure force applied to parts) to a vertical press. The most common replacement for industrial bench vices is a vice based on a T-bar or a simple angle profile, made from a piece of channel bar.
They can be made by anyone in a garage - the mechanism is quite simple, and if necessary, they can be converted into a mechanical jack.
The basis of the vice is a frame permanently mounted on a workbench with an anvil, along which the moving part moves. It is controlled by a bolt axis driven by a gate - a crossbar inserted into the end of the lead screw facing the working master.
Inexpensive vices for DIYers: a DIY master class.
When doing plumbing and carpentry work, a home-made craftsman cannot do without a powerful vice. Larger, newer vises are expensive. The solution is to either look for a used vice on the secondary market, or roll up your sleeves and, if you have a welding machine and an angle grinder, make an inexpensive vice with your own hands. Let's look at an example of a portal user with the nickname Korkus and tell you:
- How to make a metal bench vise yourself.
- What parts are needed to make a homemade vice.
- What tools will be required?
Purpose and general design of bench vices
The function of this bench tool is to secure a workpiece made of hard material for subsequent processing. Its basis is a screw pair consisting of a screw and a nut. The screw is usually fixed in the movable part of the body, the nut is fixed to the stationary part of the body or a special stand that serves to ensure the stationary position of the vice. Included with the purchased tool, it is recommended to purchase pads for clamping products and semi-finished products made of soft materials.
The clamping tool is often equipped with an anvil located on the back of the stationary jaw.
To work with large parts with the ability to apply significant force, including impact, use large purchased tools made of steel with additives of elements that increase its wear resistance. With the help of such a tool, semi-finished products are bending, forging, and riveting. Cast iron is also used to make vices. However, it should be remembered that this is a brittle metal and does not withstand shock loads well.
When working with small parts without the use of brute physical force, you can use a homemade lightweight vice made of rolled steel of various sections and assortments - channel, angle, sheet, rod. Such a small tool usually serves as an additional one.
Essential elements
What should be in the vice? Required elements:
- clamping jaws with a mechanism that sets them in motion, moving or pushing them apart. Typically a screw mechanism is used;
- base. The more force the clamping jaws must withstand, the more massive and durable the base must be. Most often this is a cast or welded part made of high-quality metal.
As a rule, you also need a device for attaching the vice to the workbench/table/machine. It can be screw-type (standard factory vices use a pressure screw), permanent, or with suction cups. If the model is quite massive, you don’t have to attach it to the table, but in this case there is always a risk of untimely movement.
When figuring out how to make a vice, it is necessary to outline the range of tasks. If this is a universal product used for fastening different parts, it is worth taking care of the large stroke of the clamping jaws and the large distance from the axis of the jaws to the base. When performing precision work, it is worth choosing a lead screw with a small thread pitch - this will allow you to secure the part properly, without clamping it too tightly. The same goes for vices for working with brittle/soft materials. In this case, it is worth supplementing the clamping jaws for the vice with elastic pads.
How to make a vice from a profile pipe, angles and channel?
To make such a locksmith tool you will need:
- steel corner;
- channel section;
- rod with a diameter of 20 mm;
- rods for guides;
- fasteners – bolts, nuts, washers;
- tools - welding machine, electric drill, grinder.
Stages of work
- A lead screw is made from a rod with a diameter of 20 mm; this activity is usually entrusted to specialists, since it is difficult to achieve the required parameters in a home workshop.
- A frame is made from angle sections. Two segments are placed in the longitudinal direction, two in the transverse direction.
- Plates with drilled holes are welded to the longitudinal corners. Using these holes, the tool is attached to the base.
- The fixed jaw is a piece of angle welded on top of the longitudinal corners of the base. In the second section of the transverse angle, a hole is made for the lead screw, to which a nut is welded.
- A piece of corner also serves as a movable jaw. A channel is welded to the angle flange, and a hole for the lead screw is made on it. A nut is welded to the hole.
- Using a grinder, the welds are cleaned, the product is painted, and secured to the base with fasteners.
Stages of work
- Using a grinder, blanks are cut from a channel and a square; pieces are cut from an old file that will serve as vise jaws.
- The flange of the smaller channel is welded to the wall of the larger profile.
- The squares are welded: one in the middle of the wall of the smaller channel, two at the edges of the wall of the large profile.
- Using a grinder with a grinding wheel, weld seams are processed.
- On the free flange of channel number 6.5, a hole is made for an M12 bolt. The hardware should fit freely into the hole.
- A hole is made in the wall of a large channel for an M16 pin.
- The stud is secured with two nuts, one of which is welded to the body.
- The manufacture of the fastening part is carried out by temporarily clamping a sheet of metal.
- On the parts of the file that will serve as the jaws of the vice, cuts are made to prevent slipping of the clamped part. The jaws are welded to a piece of sheet metal 10 mm thick.
- A hole for the clamping pin is made on the movable jaw.
The structure is cleaned and painted with metal enamel.
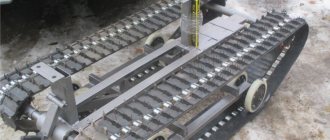
Pipe vices: necessary materials
In this case, two pipes of different diameters are used as external fixed and mobile internal elements. For this purpose, water and gas pipes are usually used - new or used.
To make this product you will need:
- Two sections of pipes of different diameters. One of them is the outer fixed casing, the second is the mobile inner part. This example considers a product made from round pipes, but square or rectangular pipes can be used for this purpose.
- Lead screw and nut M16.
- A driver designed to impart movement to the lead screw. For its manufacture, a bar with a smooth surface or periodic profile reinforcement is used.
- Front and rear supports, with the help of which the fixed outer casing is fixed to the base.
- Two pieces of rectangular pipe, which will serve as clamping jaws in the finished product.
- Lock nuts M16 and M18.
Stages of manufacturing a bench vice from round pipes
- A flange is welded to the end of a larger diameter pipe, into the central hole of which an M16 nut is welded.
- A flange with a hole intended for the movement of the lead screw is also welded to the end of the pipe of a smaller cross-section.
- An M18 nut is welded at a short distance from the edge of the lead screw.
- The end of the lead screw with the welded nut is passed through a smaller cross-section pipe and then through a flange. The lock nut is pressed against the inside of the flange. A washer is installed between the inner nut and the flange.
- A washer is put on the end of the lead screw protruding outside the flange and an M16 nut is screwed on, which is subsequently welded to the lead screw.
- The mounted mobile unit is inserted into a pipe of larger diameter, and the second end of the lead screw is screwed into the nut of the second flange.
- To connect the lead screw with the knob, a nut is welded to its end protruding from the side of the moving unit, into which the knob is passed.
- Pieces of profile pipes that will serve as jaws are welded - one to the movable pipe, the other to the stationary one.
The welds in the finished structure are cleaned, the product is painted with a special enamel, which increases the corrosion resistance of the steel used for manufacturing.
Do-it-yourself vice for a mechanic: step-by-step instructions
On the Internet you can find many options for homemade vices made by yourself. I also decided to make a bench vise from the metal I had, so as not to buy factory ones. And this is what came of it.
To make a homemade vice you need the following parts:
- The base of the vice is a metal plate 4 mm thick;
- The guide prism is a profile pipe with a cross-section of 5x5 cm, wall thickness 4 mm;
- The base of the sponges is a corner with a shelf 7.5 cm, wall thickness 8 mm;
- The lead screw is a pin with a diameter of 20 mm;
- Also required was a metal strip 5 cm wide and 1 cm thick, a reinforced nut for the stud and an angle with a shelf 60 mm and a wall thickness of 5 mm.
The work on manufacturing bench vices was divided into a number of stages:
1. The base for the Korkus vice was welded from two metal plates measuring 20x16 cm.
Then the welding areas were cleaned.
2. In the center of the base, the user drew a line to mark the space for the lead screw - the pin. The nut for the lead screw is welded to a spacer 10 mm thick.
3. The vice guide is made of a square profile pipe, in which a longitudinal groove is made with a grinder slightly wider than the welded stand with a nut.
4. To attach the guide, a 60th corner (2 pieces) 20 cm long was used.
The corners wrap around the profile pipe, and a lid made of a strip 1 cm thick and 5 cm wide is welded on top of them. The result is a box.
In order for the profile pipe to move freely in the box and create a gap, spacers were used - 2 blades from a metal saw.
Because the gap between the plate and the corners turned out to be quite large, then, after welding the plate on top, I cut off the tacks and welded the same plate from the inside.
5. The base of the bench vice jaws is made of a durable angle with a 75 mm flange and an 8 mm wall.
The vise jaws are made of 1 cm thick strip.
Through holes with a diameter of 4.2 mm are drilled in the corners and jaws.
Then the user cut M5 threads in the corners, drilled holes in the jaws with a 5.1 mm drill and countersunk the holes for countersunk.
Bolts are screwed into the jaws, and nuts are screwed on the back side, which are then scalded.
Drawing of jaws for a bench vice.
6. Two corners are welded at the end of the profile pipe.
The jaws are reinforced with triangular stiffeners and welded with a metal plate 4 mm thick.
Source: www.forumhouse.ru
What to expect from homemade
The described device is, of course, temporary - all its parts get wet quite quickly, even if the tree is crushing the tree. Therefore, let’s first address the question: what homemade vices should be made?
- An innumerable variety of clamping devices of various kinds are used in technology; patents for them number in the thousands and tens of thousands. It makes sense to make a vice yourself, firstly, the most commonly used ones.
- Secondly, they do not require special materials, production equipment or complex technologies for production.
An ordinary bench vice (item 1 in the figure) will have to be made non-rotating. Otherwise, you will have to look for either a ready-made neck-skirt pair (see below), which can also be taken away during assembly by welding, or the opportunity to use a shaping machine (simply - shaping). Of which there are very few left in operation, labor- and energy-intensive shaping processing is increasingly being replaced by precision casting, stamping and robots.
Types of vices
Note: in a shaping machine, the workpiece is clamped motionless, and the cutter, rotating, moves along the longitudinal and transverse axes. In screw-cutting lathes and rotary lathes, the workpiece is clamped in a rotating spindle (on a rotary table in a rotary machine) and the cutter moves in the longitudinal-transverse (in a lathe) or in the vertical-transverse plane.
It never occurred to you to think about how the flanges/necks of curved cast pipes, casings of centrifugal “snail” pumps, etc. are turned. parts of complex configuration? On shaping.
- Adjustable (mobile) mini-vises, pos. 2 seem to be simpler, but their production requires particularly high-quality and, accordingly, difficult-to-process materials. The fact is that the clamping force of a hand vice is determined by the muscular strength of the worker. And the cross section of the vice parts decreases according to a quadratic law as their sizes decrease, i.e. fast. The paws most often break off just at the mini-vise. However, it is not difficult to expand their functionality on your own, see below.
- Conventional carpenter's vice, pos. 3, are part of the carpentry workbench and are inoperative without it. But next we will look at how to make a Moxon vise for woodworking, which turns any workbench (including even a desk) into an almost full-fledged carpentry workbench.
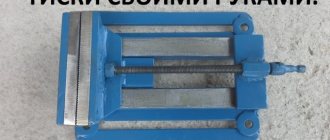
- What a home craftsman should really do on his own is a single-axis machine vice (a simple fixed table) for a drilling machine, pos. 4. They can also be used independently (separately from the machine) for a wide variety of jobs. The material for machine tools is the usual one that is widely available; Literally nothing is required to produce a machine vice that is not inferior to a branded one.
- Jewelry vices, manual (item 5) and tabletop (item 6) are the most convenient things for small precision work. But alas, their production requires special materials and equipment, which is available at every general machine-building plant. At home, you can make good substitutes for “frog” vices, pos. 7, which, by the way, are often included in the set of desktop jewelry vices, pos. 8.
- But with an angular vice (item 9) for clamping parts connected at an angle, the matter, as they say, is deaf. It is possible to make something similar with your own hands (item 10), but, firstly, it turns out that it is very difficult to ensure clamping at a fixed angle of exactly 90 degrees, and if you succeed, then the angle then quickly “floats”. It’s not worth talking about a homemade corner vise with an adjustable clamping angle. The same applies to 2-3 coordinate manual machine vices (pos. 11-14) and, for example, devices for tying fishing flies (pos. 15), which are no longer a vice, but a highly specialized machine.
Locksmith
The design of a hand bench vice is shown in Fig. The shaped screw nut is fixedly fixed in the frame tunnel; it also includes the shank of the clamp, called the slider. The sections of the tunnel and the slide are also shaped (of complex configuration) and correspond to each other.
As has already been said, you will have to abandon the rotation of the vice in the horizontal plane: for this you need to machine a neck on the base plate, and a skirt on the bottom of the bed. This does not require ultra-precision, but special equipment is required, see above.
The second problem is paws with sponges. The paws must be very rigid so that the clamped part does not react, and at the same time viscous so that they do not break.
Therefore, the cheapest material for the legs of a good vice, together with the clamp and frame, is structural cast iron, but it is poorly processed, and the clamp and frame are cast. You can’t set a cupola furnace or electric furnace at 1700-1800 degrees at home, so we forget about casting ferrous metals.
However, cast iron is also very hard and quite fragile, and therefore paws without jaws can either damage the part or crumble on it themselves. Jaws made of hard, wear-resistant and at the same time very elastic special steel solve the problem. It would be possible to make all the vices from it, but their price then... You haven’t come across a tabletop vice at a price of... $1 for also 1 mm jaw width?
These are all-steel ones, but we need to think about how to make a frame and a vice clamp, suitable for at least occasional use, from ordinary structural steel.
Running pair
But what problems arise with that seem insurmountable is with the running pair of vices. It seems nothing complicated: a screw with a nut or a threaded hole in the frame. There is a groove machined in the neck of the screw; It seems that you can select it with a file by clamping a screw wrapped in thin aluminum by the thread into the chuck of a drilling machine or a drill mounted on a table. In the clamp (or in the slider of a vice assembled from individual parts), the screw is fixed with a fork grip, see fig. on right.
The thing is that all these parts have to take on huge workloads. If you lean on the knob with a force of approx. 20 kgf (nonsense for a normal adult man), then the thread with the neck of the screw and the counter parts will require more than 120-130 kgf/sq.m. mm. In total, so that the vice does not wear out very quickly, the screw, nut and fork must be made of steel with a yield strength of more than 150 kgf/sq. mm; for a conventional structural thread it is less than 100. And a regular metric thread of a triangular profile will quickly wrinkle or stick together.
Drawings of the lead screw of a bench vice with a jaw width of up to 180 mm are given in the figure:
One critical point is bypassed here: instead of a groove on the neck, there are a pair of bushings made of ordinary steel. In this case, the fork grip can also be made from it. The screw retainer parts will have to be changed periodically, but that's all right. But how to cut a D20 trapezoidal thread? Looking for a running pair from an old vice? So, with a 99.0% probability, it is the “stroke” that is worn out in them, and the cast-iron frame, clamp and plate are still quite suitable for use.
It's not all bad
A lead screw and a nut for it for irregularly used vices with a jaw width of up to 150 mm can be found in almost any hardware, tool or construction store or at an iron market. New, the fly was not sitting. Where? From fastening units designed for a load of at least 450-460 kgf. These units are very important, and the steel used for them is just right, even better - a running pair of vices, which are not used intensively, will be quite durable and have a regular metric thread.
The cheapest option is a ring anchor for hanging heavy chandeliers or multifunctional exercise equipment from the ceiling and walls, shown above in Fig. below.
Just make sure that the screw is either cast or the joint between the ring and the neck is welded (shown by the red arrow). Anchor rings are available up to M22 with a length of up to 450 mm - make the vice you want. The anchor ring M12x150 holds a load of 480 kgf, and M16x220 for a 150 mm vice is also suitable with a margin.
The second option, “the class of the fly did not sit” will cost more, but perhaps at the price of scrap metal - if it is broken. This is a hook-ring lanyard, shown below in Fig. Of course, the ring part comes into play (shown by the green arrow). The advantage is that you will immediately have an excellent wear-resistant nut. The disadvantage is the shorter length and, accordingly, the stroke of the vice jaws: the lanyard screws for 200 have a length of threaded parts that is slightly more than 100 mm.
Note: there are some disadvantages of both - the vice knob will have to be turned for a long time each time, because... standard metric thread pitch approx. three times smaller than a special trapezoidal one. The running pair will need to be periodically lubricated with grease or other grease - a “dry” vice with such a running pair rotates tightly, but does not press well.
Sponges
How a bench vice, well known to readers of the RuNet, works is shown in Fig. below. There is, however, a mistake - the locking nuts are also M16. The rear one, along the screw, is screwed on first and welded to the stud. Then the pin with the rear washer on is inserted into the clamp, which in this case is also the slider (“moving part” in the figure); the front washer is put on, the M16 front nut is screwed on and welded, and the eye for the knob is welded; this is already an M18 nut. Bed (“moving part”) – square corrugated pipe 120x120x4; the slider is also a square corrugated pipe 100x100x3.
So far so good, but the sponges are also made from professional pipe. Their working surfaces are smooth, but they need corrugated ones, but that’s not so bad. But the trouble is that even with just a little pressure the lips will irreversibly separate (added to the picture). The jibs inside or outside will not help - the metal itself is unsuitable. The reader may have already guessed - since the problem is described, there is a way out. Even two, see below and next. chapter.
Note: the advantage of bench vices made from sections of corrugated pipes is their low cost.
The first one is also from RuNet: paws and jaws from the shanks of metal turning tools. On the paws there are thicker incisors; for sponges - less. But this, in general, is not a solution. Tool steel is very difficult to process. Almost all that can be done with it in a home workshop is to saw off the shanks with a grinder, weld jaws to the legs and weld the whole thing to the frame and clamp. Tool steel has almost no resistance to welding. But it is also poorly cooked: the finished legs with jaws, when welded to the corrugated pipes, will have to be heated so that the frame/clamp will move unacceptably. And the times are not the same now when worn-out cutters could be collected from a factory dump, and defective ones could be bought for pennies at the Young Technician store. With the spread of electric arc melting of metals in the world, tool steel has become a valuable secondary raw material, and at enterprises, used turning tools are counted individually. Therefore, we move on to the second exit.
Machine tools
As stated above, it is most profitable to make a machine vice with your own hands.
Do-it-yourself vice at home
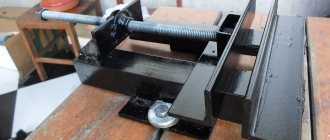
So, as an example, we chose a do-it-yourself bench vise made from a channel, an angle, and a plate. The material is steel of an unidentified grade (theoretically St5). Used products from an old plumbing valve were used as a lead screw and nuts.
Fastening is welding, we will cut the metal with a grinder.
How to make a homemade vice:
- cut a piece of channel to the required length, select two plates of thick sheet steel for attaching the lead screw. One is placed at the end of the site, the other approximately in the middle;
- a base part is cut out from a plate with a thickness of at least 3 mm (preferably 5...8 mm). Additionally, three parts are made from the corners and the plate (for the welded holder);
- The holder can be connected to the base plate using welding or bolts. Below is an option with holes for bolts. A running nut is attached to the support plate
- The clamping jaws are made from the angle and the plate. The parts can be fastened by welding or bolts. If you plan to use a homemade vice for a drilling machine, including for work with shock loads, it is better to refuse welding - with such an impact the weld may come apart;
- All that remains is to mount the clamping jaws on a vice made of a channel (the drawings show exactly where it is best to secure the parts) and install the metal rod into the hole at the end of the lead screw. It will act as a lever to turn the screw and, accordingly, move the movable jaw. To prevent the rod from flying out of the hole, it is secured with a nut at the end.
If desired, you can strengthen the design of the jaws by welding additional elements to them - gussets.
If the steel is susceptible to corrosion, it is better to paint the homemade vice for the drilling machine after finishing all the work. You can do this with your own hands using a brush, since a spray gun or roller is inconvenient in this case. The vice is painted in disassembled form.
You can additionally attach linings made of aluminum corrugated corners to the jaws on the inner, working side - this will improve the adhesion between the surfaces.
The video describes in more detail how to make a vice at home with your own hands.
Improving the mini
Modern mini-vises cannot be improved much, but if you come across or already have old Soviet ones (for example, pos. A in the figure on the right):
Their functionality can be significantly expanded as follows:
- Drill out (carefully, not all the way!) the flared shank of the set screw, which holds the set clamp plate. You need to drill with a drill with short “poke” diagonally from different sides.
- The plate is removed and the mounting clamp screw is unscrewed (do not lose either it or the plate).
- A hole is drilled in a section of the channel for a bolt with the same thread as on the clamp screw.
- The vice is mounted on the resulting stand and secured with a lock nut (pos. B).
- In the clamp screw, through the remainder of the shank, a blind axial hole is drilled for the M2-M3 thread. This is not difficult to do, because... There is a conical depression left in the peg from the shank.
- A thread is cut in the axial hole.
- The plate is put back in place and is kept from falling out by a screw with a conical head (shown by an arrow in position B).
- The clamp screw is stored in the stash, sorry, stash.
- Thus, we get, neither more nor less, a rotary table for small drilling work. True, without an angular divider, but instead of it, a protractor can be attached to the channel base, and a pointer arrow can be attached to the vice bracket. The resulting accuracy of 1 degree is sufficient for amateur home work. And if you remove the vice from the base and return the clamping screw to its place, they can be used for their original purpose.
Making a frog
Jewelry vices in amateur work, as mentioned above, in most cases are replaceable with a frog vice; They can also be clamped in a regular vice. The best homemade option is if your pliers or other pliers have a broken handle, at the top in Fig. To drill the jaws of the pliers, you need to purchase a carbide twist drill - a regular one for metal will not take them.
A simple replacement, if the pliers still don’t break, a frog vice made of oak or beech bars, a steel bracket, overhead jaws made of steel angle and fasteners, bottom left in Fig. A stronger option is a frog from a door or small barn hinge, bottom right. But you will have to work on it using a regular vice. The workpiece may need to be tempered by heating until red hot and then cooling slowly.
Carpentry
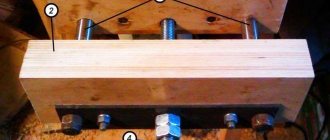
The Moxon Carpenter's Vise is designed for the traveling joiner and carpenter. In Europe, the USA and Canada, this is a rather in-demand specialty: given the prices for lumber there, many customers demand that the master work with them locally and leave the slightest scraps, even sawdust and shavings, to the owner. A pair of Moxon vices, which makes it possible to work with long materials, can be carried in the trunk of a car, on a bicycle, on a scooter or in a bag.
The find was immediately appreciated by amateurs - Moxon's vice allows you to quickly and reversibly turn any more or less durable table into a carpentry workbench.
The appearance and method of fastening the Moxon mobile carpenter's vice are shown on the left and in the center in Fig. On the right is a device for their amateur version for fastening tightly to the table.
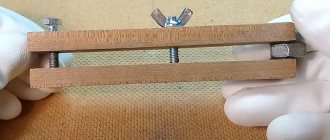
The Moxon vice has spawned many modifications. Drawings of one of them, a very simple and convenient carpenter's vice made of just 3 boards and a pair of clamps, are shown in Fig. Further. True, you will actually need 2 more short clamps to attach the vice to the table. An extra 4 clamps (also not a very cheap pleasure these days) can be expensive for an amateur.
But for an individual carpenter who works on call, such a vice is a godsend; disassembled, you can carry it with you in a regular duffel bag.