I understand that I’m not the first and I’m not the last to create my own vacuum forming machine, but I still want to share with you an article about it.
The design for do-it-yourself vacuum forming is standard: a wooden frame to hold the material that is being shaped, and a wooden box with holes in the lid on top to act as a vacuum chamber. The most inexpensive option.
You can start vacuum forming
Since we will heat the plastic in the oven, we will work in the kitchen closer to the oven.
We connect the vacuum cleaner to the vacuum chamber. We place our form on the working surface of the vacuum chamber, in the center. Just don’t forget to place 1mm thick pads (coins) under the mold. This is done so that the plastic completely fits the bottom of the mold.
Cut a sheet of plastic around the perimeter of the frame. Any plastic intended for thermoforming (PET, PVC, etc.) is suitable for this purpose. Since the “vacuum” will be created by a vacuum cleaner, we cannot use thick plastics. The thickness of the plastic depends on the suction power of the vacuum cleaner; therefore, it is possible to use plastic with a thickness of 0.1-0.4 mm. We nail the plastic with staples every 2 cm. Do not spare the staples, since during molding the soft plastic will try to break out of the fastening.
Place the frame in the oven and set the temperature to approximately 190 degrees (each type of plastic has its own softening temperature, so check with the seller for more accurate figures).
We wait until the plastic softens and begins to sag freely. We take out the frame. Don't forget to wear gloves, as the frame will be very hot.
Immediately, so that the plastic does not cool down, move the frame onto the vacuum chamber, press it and turn on the vacuum cleaner.
When the vacuum cleaner has pulled out all the air from under the mold, you must wait another 20 seconds, after which you can turn off the vacuum cleaner. If during molding the plastic does not tightly wrap around the mold in some places, you can use a hair dryer to soften the plastic. Just don't overdo it so you don't burn a hole.
When the plastic has cooled, you can take out the mold.
The excess is cut off with scissors or a knife; for more precise work, you can use a Dremel.
Basic equipment for the production of acrylic bathtubs
The main unit for the production of acrylic bathtubs is considered to be a machine for molding the finished product from flat sheets of acrylic, which is heated and, under the influence of vacuum, takes the required shape, excess material is cut off. In other words, it is a vacuum forming machine, a thermoforming machine.
On the Russian market there are offers of vacuum forming machines costing from 2.7 million rubles, with a molding area of up to 1000×700 mm. They look like this:
Equipment for the production of acrylic bathtubs will cost a businessman more than 2.5 million rubles. Some manufacturers provide the cheapest options, but such machines are small in size for creating shapes. For successful production, vacuum forming units with a sufficient molding area should be used.
Development of production of acrylic bathtubs
- Industrial;
- Technical.
Technical acrylic is created by combining watery acrylic with special components, the task of which is to prevent the proliferation of microbes and keep the surface of the bathtub hygienic for use. Acrylic or acrylan (scientific methacrylic) is a lightweight and durable material. Due to its chemical properties, it is considered suitable for giving any shape to finished products. Akrilan has amazing technical features. It is this property that ensures long-term operation and a constant appearance of the material.
Injection molding production development
Molding production development provides finished products with reliability, strength and the highest high-quality properties. Before creating the mold, the acrylic sheet is melted evenly and later placed in a thermoforming machine. Using a vacuum, the acrylic sheet is given the desired shape. Then the acrylic surface must be covered with several layers of fiberglass. It should be noted that the number of layers of fiberglass determines the strength and longevity of operation. This method of producing acrylic bathtubs has the highest functionality in terms of the technical characteristics of the finished product. Strong material ensures that the appearance of the bath remains unchanged under different conditions of everyday use. This eliminates problems for owners for the entire period of their service.
The production process is captured on video:
ABS acrylic bathtubs
ABS bathtubs made of acrylic - this type of acrylic bathtub is made by the method of composition of acrylonetrile butadiene styrene and polymethyl methacrylate, where the surface of acrylonetrile butadiene styrene is coated with polymethyl methacrylate heated to a plastic state in one layer. The name “acrylic” for these types of bathtubs can be used conditionally. Such plumbing equipment is short-lived, which is justified by the creation of a narrow base layer that is sensitive to mechanical action. An ABS bathtub will last up to 4 years. After this period, the plumbing product should be replaced with a new one.
Now let's start making the mold
Any materials can be used as a form: wood, plaster, etc.
If high smoothness of the form is not required, then polyurethane foam can be used, since it can be easily processed with a stationery knife.
If there are concave places on the form, then it is necessary to drill a hole in each recess with a thin drill d = 0.1-0.5 mm.
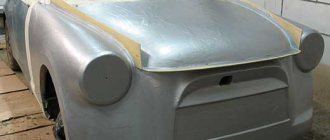
Painting the product
All that remains is to paint the product.
Using PET (polyethylene terephthalate - what bottles are made of) for molding, you can make blister packs or extraordinary holiday jelly molds.
As you can see, making a vacuum machine with your own hands is not at all difficult and not very expensive.
As I said earlier, vacuum forming technology can be used in modeling, etc.
Main formed materials
We chose a 4mm thick ABS sheet due to availability, this gives 2mm side walls when stretched, which is quite suitable for us.
In general, there is a huge amount of materials. Information from Wikipedia
| Polymer material | ISO designation |
| Standard polystyrene | PS |
| Impact resistant polystyrene | SB, HIPS |
| Styrene-butadiene-styrene block copolymer | SBS |
| Oriented Polystyrene Sheet | OPS, BOPS |
| Foamed polystyrene sheet | EPS, XPS |
| Copolymer of styrene and acrylonitrile | SAN |
| Copolymer of acrylonitrile, polybutadiene and styrene (ABS plastic) | ABS |
| Copolymer of acrylic ester, styrene and acrylonitrile | A.S.A. |
| Unplasticized polyvinyl chloride | PVC-U |
| Plasticized polyvinyl chloride | PVC-P |
| Polyvinyl chloride foam sheet | EPVC |
| High Density Polyethylene | HDPE |
| Low density polyethylene | LDPE |
| Polyethylene foam sheet | EPE |
| Polypropylene | PP |
| Polypropylene foam sheet | EPP |
| Polymethyl methacrylate | PMMA |
| Polyoxymethylene, polyacetal | P.O.M. |
| Polycarbonate | PC |
| Polycarbonate Foam Sheet | EPC |
| Polyestercarbonate | PEC |
| Polyphenylene ether | PPE |
| Polyamide | PA |
| Polyethylene terephthalate | PET |
| PET, practically non-crystalline | |
| PET, amorphous | |
| PET, partially crystalline (nucleated) oriented polyethylene terephthalate sheet | (OPET) |
| Polyethylene terephthalate foam sheet | EPET |
| Polysulfone | PSU |
| Polyethersulfone | PES |
| Polyphenylene sulfide | P.P.S. |
| Acrylonitrile/methacrylate/butadiene copolymer | A/MMA/B |
| Cellulose acetate | C.A. |
| Cellulose acetobutyrate | CAB |
| Cellulose diacetate | (CdA) |
| Polyetherimide | P.E.I. |
| Thermoplastic elastomers (thermoplastic elastomers) | TPE |
| Thermoplastic polyolefin elastomer | TPO |
Matrix milling. Second mistake
The first step, when you have a model, is to prepare a matrix.
On forums I read about using chipboard, but in practice MDF is most often used. Molds that require greater precision and are designed to produce a larger number of copies are made of aluminum. Our second mistake was choosing a contractor to mill the model. Since our model is 1000mm x 800mm x 250mm, it was necessary to immediately look for a contractor with the appropriate working field of a CNC machine. We believed that it was possible to assemble a matrix of 12 parts without any problems.
Having lost time and money, we found another contractor who made the matrix in two parts.
After milling the MDF, the resulting parts must be glued together, sanded and coated with a layer of epoxy resin to create a protective layer.
Repair, homemade, do it yourself
The approach to bathroom design is always painstaking. Small aspects in the interior are taken into account, sometimes extraordinary design decisions are made - all this is aimed at creating convenience, aesthetic advantage of the bathroom, and comfort. The choice of plumbing fixtures is decisive in determining the interior, because it is the main component of the bathroom. Plumbing must be comfortable, well-designed, and multifunctional.
The creation of acrylic bathtubs is becoming a popular trend in the sanitary equipment market. Due to their affordable cost, strength of the material, long-term use and variety of design, acrylic bathtubs are loved by Russian users. Prices for acrylic bathtubs vary, but in this particular case it is impossible to correlate the cost with high-quality indicators.
Acrylic bathtubs are very beautiful and relatively cheap
Low cost does not mean a bad product, because in the production of bathtubs the principle of setting prices for finished products has other grounds. Popular manufacturers of acrylic bathtubs try to make them accessible to the user, but strength and durability do not depend on this. There is no need to hesitate - acrylic bathtubs of any price group will last a long time and maintain a decent appearance.
Making a vacuum table is the most critical stage in constructing a thermal vacuum press with your own hands. At the design stage, it is necessary to determine the dimensions of the table, select the material for its manufacture, and think over ways to fix and seal detachable elements to maintain internal negative pressure (vacuum). The vacuum table is made with the same basic set of tools as the press bed.
Further in the text, we will call a vacuum bath a part of a vacuum table - a steel container, inside of which the workpieces to be coated are located, and from which air is pumped out. By working dimensions (dimensions) of a vacuum bath we mean its useful volume, measured by internal dimensions. We will agree to call the vacuum table the entire structure as a whole, consisting of a vacuum bath, an upper (movable) pressure frame, clamps and other smaller elements.
Illustration of external and internal (working) dimensions of a vacuum bath.
External and working dimensions of the vacuum bath.
Let's consider the general principles for choosing the size of a vacuum bath, and outline specific numbers for our press.
The longer the vacuum bath, the more workpieces can be placed in it, or a larger workpiece can be veneered. On the other hand, the longer the bath, the more film has to be consumed in one working cycle, the larger the dimensions of the machine, which entails a greater consumption of room space. You need to find the optimal size. As experience has shown, the optimal working length of a vacuum bath intended for the manufacture of standard furniture facades and decorative door trims can be considered a value from 2.4 to 2.6 m. We will make a vacuum bath 2500 mm long, the working length of which will be 2500 - 40 x 2 = 2420 mm (40 mm is the width of the short wall of the profile pipe).
The width of the bath is directly related to the width of the PVC film used. Depending on the film manufacturer, there may be different widths, the most common is 1.4 m, which is what we will focus on. Let's choose the width of the bath equal to 1400 mm, the working width will be 1400 - 40 x 2 = 1320 mm. When facing tall workpieces, for example, for curved (radius) facades, the width of the bathtub must be reduced (made smaller than the width of the film), but to work with such workpieces a press of a different design is needed, so these issues will not be considered.
The working height of the bathtub should be calculated based on the requirement that there is a small free space between the upper surface of the facades and the covering film. In other words, the film stretched over the workpieces should not touch them before air is pumped out. The calculation is as follows. Firstly, the vacuum (breathable) tabletop, which will be the first to be placed on the vacuum table, will be made of 10 mm thick MDF board. Secondly, the linings for the facade blanks will be small pieces of MDF board 16 mm thick (this is the simplest, most common and optimal option for linings). Thirdly, the thickness of the veneered blanks will range from 8-10 mm (door linings) to 16-32 mm (facades and other furniture elements). Fourthly, the sealing rubber will add about 2 mm to the depth of the bath. As a result, the maximum height of the entire “pie” inside the bathtub will be: 10 + 16 + 32 = 58 mm. To make a vacuum bath, we will use a profile pipe with a cross-section of 60×40 mm, placing it on the short side. At the same time, the height of the free space will be no less than: 60 + 2 – 58 = 4 mm, which is quite enough.
Elements of a vacuum table.
Making a vacuum table.
Vacuum bath.
The bottom of the vacuum bath will be a sheet of steel 2 mm thick. To minimize the deflection of the sheet under the influence of negative internal pressure, and to give the table surface an even shape (close to an ideal plane), it is necessary to make a rigid frame. To make the frame we will use the same profile pipe 60x40x2. The pre-cut pipe, in accordance with the design, is laid on the slipway, rigidly fixed with clamps, and all connections are welded. After making the stiffening frame, a steel sheet is welded on top of it. This is the most critical stage of welding work; it requires a continuous weld to be hermetically sealed (it is recommended to perform double penetration).
To avoid warping of the sheet under the influence of prolonged high temperatures, you can use the following alternative method of welding the sheet to the stiffener frame. Before laying the steel sheet on the stiffening frame, it is necessary to apply a sealing compound that can withstand high temperatures along its perimeter (for example, high-temperature silicone sealant), and welding should be carried out not with a continuous seam, but with small regular fixing tacks with a pitch of about 50 mm. This method is designed to ensure that short-term, local welding effects will not damage (burn out) the entire sealant, but only a small part of it in the immediate vicinity of the tacks, while most of the sealant, after curing, will perform its direct function.
Vacuum table dimensions.
Detailing of the stiffening frame and the procedure for assembling the vacuum bath: the stiffening frame is welded, a steel sheet is welded to it, a stationary (lower) frame with a part of the hinge joint for attaching the lifting (upper) frame is hermetically welded around the perimeter of the steel sheet.
Photo of the vacuum table from below. The stiffening frame is made partly from an angle profile.
Lifting (clamping, upper) frame.
Frame material - profile pipe 60x40x2 mm. The dimensions of the pressure frame must be exactly the same as those of the vacuum bath. If it was not possible to find a sufficiently even (not bent, not twisted) profile, then it is necessary to pre-select in pairs several of the smoothest rods from which the parts of the vacuum table will be made tightly adjacent to each other. The clamp frame will rise thanks to adjustable hinge joints. The adjustment of the hinges is carried out after gluing the seal - strips of sheet rubber of medium hardness, about 2 mm thick.
Pressure frame hinge. Welded washers are needed to increase the friction area. The hinge pin is a D12 steel rod with threaded ends.
Photo of the clamping frame hinges.
To hold the clamping frame in a raised state, gas lifts can be used. For safety reasons, it is recommended to install four gas lifts (two per side) and ensure that any three of them can support the frame. If the opening angle of the frame (45°) turns out to be insufficient, the frame will cause significant inconvenience in operation; it can be raised as high as possible at an angle of slightly more than 90°, using the thermal module parked behind as a support (gas lifts are not used).
The lifting frame rests on the thermal module.
Clamps.
To securely and tightly hold the film during vacuum pressing, it is necessary to firmly and evenly press the upper frame to the perimeter of the vacuum bath, ensuring that the rubber seal fits everywhere. For these purposes, you can use various ready-made clamps, or make them yourself. To make homemade clamps operating on the eccentric principle, you will need the following rolled steel: half a meter of DN50 pipe (external diameter about 60 mm), two meters of rod with a diameter of 10 mm, and approximately the same amount of profile pipe with a cross-section of 20x20x2 mm.
Firstly, the DN50 pipe is cut into 8 equal 60 mm sections. Each pipe section is finished with a semicircular central cutout having a width of 10-11 mm and an arc length equal to 3/4 of the length of the outer circumference of the pipe. We get 8 pieces of eccentric rotary cylinders, to which we need to weld a handle 220 mm long from a square profile 20x20 mm.
Secondly, the steel rod is cut into 16 pieces: 8 pieces 190 mm long (for studs) and 8 pieces 55 mm long (for kingpins). An M12 nut (or M10 with a drilled thread) must be welded to one end of the stud so that it can rotate freely on the pivot, and an M10×50 thread must be cut at the other end.
Thirdly, to complete the manufacture of the clamp, we weld the ends of the kingpin (with a nut with a welded pin pre-installed on it) to the inner surface of the eccentric rotary cylinders.
To install the clamps on the vacuum table of the press, at eight points of the table, according to the design, through holes with a diameter of 10 mm are drilled. After which, the upper holes are enlarged, giving them an oblong shape. The clamps are adjusted by installing combination nuts in the desired location on the stud thread, followed by fixing them with locknuts. This operation is performed at the last stage of manufacturing the vacuum table, after gluing the rubber seal.
Operation of the eccentric clamp.
Elements and dimensions of the hinge clamp.
Eccentric clamp in the table. The hooks for the clamps are made from 50x50x3 angle steel.
If it was not possible to achieve a flat table surface.
If during the welding process the sheet has undergone significant deformations that go beyond the permissible values, then there is no need to pick up a grinder and cut off the welds and redo everything again. You can ensure a perfectly flat plane of the vacuum table by additional measures, namely by using epoxy leveling compounds, which are used in the manufacture of poured floors. To do this, the vacuum table is set strictly according to the level, the required volume of the filling mass is determined (for example, by test filling with water), the bottom of the vacuum bath is cleaned of rust, and it is primed. Fill with the prepared epoxy mixture according to the manufacturer's instructions. For reasons of economy, the mixture can be diluted with some cheap filler, for example, quartz sand. To speed up the curing of the mixture after pouring, the table can be controlled from above with heat from the thermal module. It makes sense to carry out this filling leveling operation after the vacuum press is fully ready, test samples of products have been manufactured, and a decision has been made about the need to improve the geometry of the working surface.
Estimate for material for a vacuum table.
| Name | Length, mm | Quantity, pcs. | Purpose |
| Profile 60×40 | 2500 | 6 | Rigidity frame. Bath. Lifting frame. |
| Profile 60×40 | 1380 | 4 | Rigidity frame. |
| Profile 60×40 | 1320 | 4 | Bath. Lifting frame. |
| Profile 60×40 | 1001 | 6 | Rigidity frame (diagonals). |
| Profile 60×40 | 753 | 3 | Rigidity frame. |
| Profile 60×40 | 250 | 4 | Hinge. |
| Profile 60×40 | 180 | 2 | Hinge. |
| Profile 60×40 | 150 | 2 | Clamp support. |
| Profile 60×40 | 140 | 2 | Hinge. |
| Corner 50x50x3 | 50 | 8 | Lifting frame (clamp hook). |
| Profile 20×20 | 220 | 8 | Clamp. |
| Pipe DN50 | 60 | 8 | Clamp. |
| Rod D10 | 190 | 8 | Clamp. |
| Rod D10 | 55 | 8 | Clamp. |
| Rod D12 | 150 | 2 | Hinge. |
| Nut M10 combi | 8 | Clamp. | |
| Nut M10 | 12 | Clamp Table mount. | |
| Nut M12 | 16 | Clamp Hinge. | |
| Washer d12 | 12 | Hinge. | |
| Bolt M10×60 | 4 | Table mount. | |
| Sheet 2500x1500x2 | 1 | Table (bottom of the bath). | |
| Gas elevator | 2 | Lifting frame. |
Upon completion of the main scope of work, the vacuum table is installed on the frame (on specially provided supports) and fixed in the corners with four bolts, as shown in the figure, after which they move on to minor work: installing and adjusting the clamps, adjusting the lifting frame hinge, gluing the seal.
Mounting the vacuum table on the frame.
Vacuum table in operation.
The metal structure is beginning to take on the shape of a future thermal vacuum press, but it still lacks many elements: a vacuum system, a thermal module, an electrical control unit, which will be discussed in the following articles.
Similar articles:
- Connection strip for film
- DIY vacuum press. Part VI. Electrical control cabinet
- DIY vacuum press. Part V. Thermal module
- DIY vacuum press. Part IV. Vacuum system
- DIY vacuum press. Part II. bed
- DIY vacuum press. Part I. Introduction
- Gluing glass into MDF facades