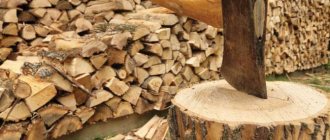
Owners of country cottages, who heat their homes using a solid fuel boiler or stove, annually prepare up to 12 cubic meters of firewood, depending on needs. It will take several days to prepare such a volume. To speed up the process, you can make your own cleaver - a special device for mechanized chopping of wood.
A mechanized cleaver will speed up the time of chopping wood and also save your energy
Classification of devices for chopping wood
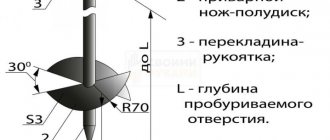
The cleaver has an extended handle (maximum 1 m). The angle is obtuse, reaching 70 degrees. It usually weighs from 2 to 3 kg. Its purpose is to split wood along the grain. There are several varieties of cleaver.
Spring cleaver
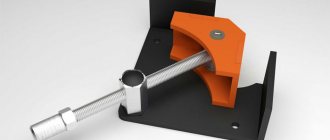
A spring model with a lever enhances the blow. A stand is placed under the blade. All materials are laid out on it. This tool is quite simple to use. Place a log under the blade with one hand and split it with the other.
The device consists of:
- frames based on a profile or round pipe with a horizontal elongated support;
- a lever that connects the support to the cutting element;
- lever spring fixed to the frame. With its help, the blow is strengthened;
- weight attached to the other side of the lever.
Mechanical spring cleaver.
Cleaver with electric motor
Tools with an electric motor have a higher cost. There is a need to purchase an electric drive with all the necessary components. These models can be:
- screw - the cutting element is made in the form of a metal cone with a blade. The thread is cut in the opposite direction from the movement of the shaft. The cone gets deep with the help of a screw and can split in half;
- having rack and pinion transmission. The design and operation of such devices is much more complex than the previous version. The blade is installed horizontally on the surface. A log is placed on one side, the gear rotates, compresses the blade and the block. A split occurs.
Hydraulic cleaver
The hydraulic model is the most expensive. The base frame is taken as a basis. The structure consists of:
- electric motor - hydraulic cylinder having high pressure;
- oil pump;
- oil tank with filter;
- cross-shaped blade;
- iron pusher.
Diagram of a hydraulic splitter.
Subtleties you should know when making a hand cleaver
It is worth considering the following nuances:
- the angle located at the handle should be sharper, and on the reverse side – obtuse;
- The sharpening angle is often combined.
Thus, the splitting becomes effective.
The sharp zone enters the wood. The thicker side penetrates deeply and increases the sliding impact.
By making a small number of blows, a large number of splits occur.
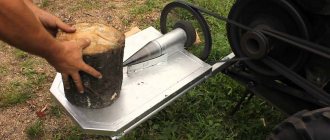
Screw electric firewood cleaver - operating principle
If city dwellers have to put up with problems arising in the central heating system, then in rural areas whether the house will be warm in winter depends only on the advance preparation of fuel. However, not everyone enjoys swinging an ax, having purchased logs costing from 1,000 to 1,700 rubles per cubic meter. Many people prefer coal, which leaves a greasy soot, or chopped firewood with delivery, which costs 3,500 rubles per cubic meter. Is it really necessary to pay double the price every winter if the wood fuel procurement process can be automated?
Materials
For the production of chopping parts it is appropriate to use:
- old ax (cracks are not allowed);
- spring element.
Hard wood is suitable for the handle.
The materials are prepared in advance. It is best to wait until the tree's sap flow stops. This will prevent tearing when drying.
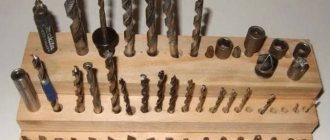
The following tools are used in the work:
- grinder;
- sandpaper or file;
- hacksaw;
- hammer;
- knife;
- sometimes the inverter is welding.
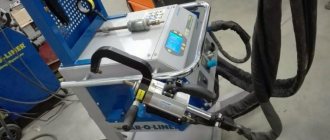
Electromechanical press for chopping wood
Another machine option is somewhat reminiscent of human work, that is, the preparation of wood fuel is carried out by impact, followed by wedging of logs. However, the difference is that the blow is applied in a horizontal direction to the log laid in the tray, which in turn collides with a wedge rigidly fixed at the end of the chute. Here, the source of impulse is an electric motor connected to a hydraulic cylinder, the piston of which creates a load of about 5 tons.
The advantage of such a splitting cleaver is that it is quite compact, since it is a frame mounted on two wheels with additional supports that ensure stability. Having moved the frame to the woodpile and given it a horizontal position, you connect the electric motor to the power source and lay the first log. Then all that remains is to press the large start button and turn the lever that holds the hydraulic mechanism in the starting position. As a rule, such units are made in such a way that you have both hands on the controls, in order to avoid attempts to hold the log in the chute, which will certainly lead to injury.
The process of making a cleaver from an ax
Many people wonder how to make a cleaver from an axe. In preparation:
- The old ax is reflected on paper, maintaining all dimensions.
- All additions are applied.
- Draw out a suitable handle shape.
A piercing instrument is made using various methods:
- To split soft wood (for example, small-diameter logs), it is enough to change only the sharpening angle. They make him stupid. This makes it possible to move the block apart;
- cutting hard rocks involves increasing the weight of the metal part of the device. It is mandatory to weld the metal thickenings - “special ears”.
Welding can be made from:
- springs;
- metal blanks;
- fittings.
Suitable fittings must have a diameter greater than 15 mm. Two pieces of reinforcement are welded thoroughly to each other, and then to the base. Next they grind, narrowing. There are 2 wedges on the sides.
The spring is also welded. Sometimes it is given a shape identical to an axe. The edges that protrude should not interfere with the process. The sharpening is made conical. When sharpening, the weld and the edge become one.
The ax handle is mounted in two ways:
- pass it through the handle. It will not fall off thanks to the thickening at the end of the handle. This is similar to the pick-axe mounting system;
- put the ax handle into the device. The item is pre-sharpened for secure placement. The device is fixed using spacer wedges. To use them, you need a cut in the thickened part with a depth of 1 - 1.5 cm less than the width of the butt.
Homemade cleaver idea
Rating 5 out of 5
You probably already sensed my enthusiasm for this instrument. Yes this is true. I liked the idea of a firewood column shown by the author, and it seems very sensible at first glance.
We recommend: Do-it-yourself electric bike inexpensively
I can easily imagine that such a cleaver will stand in my dacha
. I can imagine how I’ll put a small log in it and hit it from above, and I’ll easily and simply get firewood for the sauna.
Nevertheless, I give the author 5 points for the idea, let's now look at the design.
Recommendations for making your own cleaver
The design and type of device are influenced by:
- working conditions;
- availability of materials;
- financial resources.
Some tips for economical manufacturing:
- they prefer a simple budget model with a manual drive (relevant in case of power outages);
- for the option with an electric drive, a motor with a power of up to 3 kW is suitable;
- For people without physical training, a hydraulic tool is suitable (the only drawback is the expensive components).
Design
Rating 2 out of 5
Anyone who has been reading us for a long time probably knows that the author of the invention, Mr. SunY. rarely paints his handmade instruments
, But not at this time.
Despite the fact that the reinforcement itself looks quite stylish, and it could have been left without painting, it will rust after 2-3 months on the street, so the author made the right decision by painting the structure black.
- If I were the author, I would cover the firewood column made by myself
with ordinary transparent varnish.
We recommend: How to assemble a CNC machine with your own hands
For the appearance of the product now, I give it 4 out of 5 points.
Design and operating principle
Firewood will not lose its relevance for a long time, remaining a convenient, economical and environmentally friendly type of fuel. There are several reasons for this:
- in the outback, in many houses to this day there is no alternative to stove heating;
- saunas and bathhouses, when offering their services to attract clients, almost always indicate that they use firewood to produce heat, and it is environmentally friendly and of a certain type;
- no picnic would be complete without a good old fire - both for cooking and for creating warmth and a cozy atmosphere.
Initially, to facilitate the process of splitting firewood, various types of hand axes and wedges were used. But during operation, such primitive devices proved to be ineffective, since they were traumatic, and often simply got stuck in the log. Therefore, they were replaced by a wood splitter. This simple mechanism saves not only energy, but also a lot of time. But the craftsmen did not stop there either, deciding to completely minimize the effort and time spent on the process of collecting firewood, improving the technology of wood splitters. This is how mechanical wood splitters appeared.
Depending on the type of design, the wood splitter consists of a simple support-arm to increase the applied force or a number of side mechanisms that serve to facilitate the process of collecting firewood. Side mechanisms include the shoulder to which the cleaver is attached, and the frame - the bed on which the cleaver is supported. In general, a complex of such simple devices forms a mechanism that can facilitate the work of collecting firewood.
Nuances of the work
If you decide to make a hydraulic splitter, then first you should find all the parts and take care of making the mold. It is made of metal, and the base is a cruciform shape. Its sizes can be selected individually, because there are no clear restrictions. The main condition for this is that the power of the cylinder is sufficient to split firewood when its size is too large.
The form must be fixed on the frame, its transverse axis must coincide with the shaft of the hydraulic cylinder. It is installed along the frame and connected to the pump, using the pipes. Such a mechanical cleaver can be mobile; for this, wheels should be attached to the frame.
Lastly about hand axes
If you do not have the opportunity to make a mechanized wood splitter yourself, you will have to chop firewood in the traditional way
It is important to choose a convenient tool that will make the job as easy as possible.
How to choose axes for chopping wood:
- Stores sell cleavers with different handle lengths and blade weights (2-5 kg). Buy a tool that suits your physical form, because you need to swing an ax often and for a long time. You should not immediately take the heaviest specimens.
- The wooden ax handle of quality products is planed from elm, maple or birch. These rocks do not crumble into chips or split.
- Do not buy an ax with a handle that is too short, which reduces the power of striking. An overly long ax handle can be easily cut to the required size.
- Make sure that the “head” sits tightly on the handle.
If your budget allows, you should pay attention to more practical imported cleavers with a durable plastic handle and various blade profiles made of high-quality steel. Popular options are straight axes from the Fiskars brand and wood splitters with a shifted center of gravity from the manufacturer Vipukirves
Expert advice
A homemade firewood cleaver can be made much easier if you can find a low-speed, powerful electric motor that can produce 500 rpm. In this case, a belt drive will not be required, and the cone can be put on its shaft.
The engine speed, in principle, can be any, but the belt drive pulleys must be calculated in such a way that the speed is equal to 500 rpm. On the market you can buy a ready-made shaft with bearings for an electric cleaver, but pulleys and a threaded cone can be made by turning to a turner.
How to choose the right tool
Before purchasing a cleaver ax, it is important not to make the wrong choice. Next, we will consider several important factors that will help you determine the most suitable parameters for you personally:
Do not overestimate your physical capabilities; the correct cleaver should not be too heavy, as you will need to perform many swings while working. But a tool that is too miniature will not give the desired effect; such models are only capable of splitting small lumps. Think about what kind of logs you are going to cut with it and select the dimensions and weight of the ax based on this.
Execution of the wood splitter handle. The most suitable material is elm or maple wood. If there are none, a birch handle will do. The type of wood affects the service life of the cleaver and wear resistance.
Now on the market there are cleavers with metal or plastic handles that arrived from abroad. However, practice has shown that they are much less suitable for our conditions and simply get stuck in large logs. The length of the handle is also important, because... too short or unreasonably long will simply be inconvenient.
If you have to systematically deal with firewood, it is better to have several axes for different sizes of logs. Larger and smaller.
Now let's look at the types of wood splitters based on their operating technique.
Example of a foot splitter
Now let’s look at an example when you don’t want to pay for electricity and for gasoline or other fuel, but you want some simple hydraulic splitter. How to make everything work using human power? It's actually simple.
Materials and tools for assembly:
- hydraulic jack;
- profile pipe 40x50;
- corners;
- steel plates 6-8 mm thick;
- rubber band;
- a piece of metal at least 30 mm thick (to create a wedge that will split the wood);
- M12 bolts;
- welding, grinder, measuring tool, drill, etc.
Manufacturing process
Step 1. Making the frame.
The base is a profile pipe with a diameter of 40x50 mm. But she can’t cope alone and may bend. There is option 2. Either we take a thicker pipe, or we strengthen the existing one. Everything is clear with the first option, but how to do the second can be seen in the photo. A simple farm is being made.
To make a slider you need to use a corner. We cut into the required lengths and weld. The main task is to make it slide freely along the guide, but make sure that there are no strong backlashes. To strengthen the place where the hydraulic jack rod will subsequently rest, the bevel of the plate is welded.
Step 2. Making the base for the jack.
A hydraulic jack with a lifting power of 10 tons is required. But you can choose a lower power, for example, 6 tons also copes quite well. But it is necessary to prepare a good support. To do this, take strips of metal 6–8 mm thick and weld them under the heel of the jack.
Step 3. Handle.
As planned, the jack is powered by the foot, so the handle has to be modernized. To do this, we simply weld the parts to obtain the necessary bend that is comfortable for the leg. You can also weld a special pedal to prevent your foot from slipping. To return the handle to its original position, you can use a spring. But the author took a more complicated route and welded the roller and tied a tourniquet to the handle.
Step 4. Knife.
The cutting part is made of steel of at least 3 mm. We sharpen it in the form of a wedge. For fastening to the guide we use M12 screws. Screws require periodic inspection.
At this point, the foot press for chopping wood is ready. Its main advantage is that it does not require many resources; all suitable material can be found in the garage.
Assembling a frame for a hydraulic machine
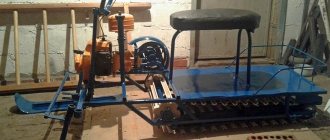
The motor for this design is most often taken to be a gasoline-type engine removed from a passenger car or motorcycle. It is worth adding that the assembly of such a model will cost much more than all previous options. In addition, the process itself is much more complicated. However, the result will be the most comfortable device for chopping wood.
The assembly of the frame takes place in several stages with a strict sequence of actions.
- At the first stage, you need to take a 50 mm pipe and weld a 30 x 30 mm corner to it - the hub. The end result should be two stable triangles.
- Angles 60 x 60 mm are used for the front axle. It is also necessary to weld another pair of corners to them, but with dimensions of 30 x 30 mm. They will act as spacers.
- Wheels are attached to the axles.
- A base is welded to the rear, on which the engine will be located in the future.
- The next stage is the manufacture of a durable frame from channels using welding.
- It is necessary to assemble a movable structure from an 80 mm channel.
- From the same material it is necessary to weld a structure that will push the wood blank onto the knife. Usually it is also made in the form of a triangle.
- To prevent wood from falling during operation, it is necessary to secure stops on the sides.
After this, you can proceed to the stage of making a knife.
It is important to understand here that a good cutting element is the basis of not only comfortable, but also safe work. As this element, you can use a piece from a Kamaz spring.
Here we can also add that making a cleaver is the simplest activity. All you need is equipment that will allow you to sharpen the workpiece at an angle of 60-70 degrees. After this, the knife is welded to the frame.
The work does not end there; you will also need to make an oil tank and a motor. An empty propane cylinder can be used as a tank. You need to do the following:
- The balloon is filled with water.
- Next, you need to cut off the valve of the cylinder without pouring water out of it.
- After this, you need to create a sump. To do this, a quarter of the volume of the cylinder is separated and a steel partition with a minimum height of 10 cm is installed.
- The next step is to install a filter mesh, which is also equipped with a magnet. It must be located at a distance of 5 cm from the bottom of the tank. This filter will retain chips, thereby extending the life of the engine.
- Next, you need to weld the pipe through which the oil will flow into the pump. The fence should not be at the very bottom, as in this case it will catch debris.
- Using a level, you need to install the tank just above the pump.