Even the simplest repair of an angle grinder in a service workshop can cost from a third to half of its cost. Therefore, before turning to professionals, you should always try to fix it yourself. Moreover, the passports of Bulgarian women often contain tables of the most common faults and the reasons for their occurrence. For home repairs, in most cases, you can get by with a set of the most common tools: screwdrivers, pliers, wrenches and a multimeter. The only time mandrels, pullers, or similar devices may be required is when removing and installing bearings. And spare parts for repairing an angle grinder can be purchased without any problems in well-known online stores.
Grouping of faults on the mechanical part of the EWM
- The occurrence of extraneous noise in the crusher gearbox, heating of the gearbox. The malfunction is associated with the destruction of the bearing, wear of the gear teeth of the gearbox, and drying out of the lubricant. Eliminates the replacement of gears with high tooth wear. If there is slight wear on the gear teeth, you can try to fix it. The tooth profile is adjusted manually by sawing using a round nail file and drill. Every time the gearbox is replaced, the lubricant is replaced with a new one. New lubricant is applied to thoroughly washed parts.
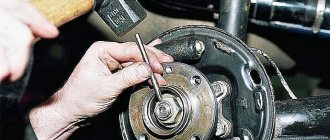
- Bearing replacement is required when it is damaged or a large gap appears. Some models place the bearing on the spindle with interference. Replacement requires special equipment, in particular a press. Parts need to be cooled or heated.
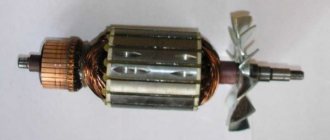
- Replacing the bearings on the rotor is required when the runout is large. The presence of an increased heartbeat is easily visible on the rotary commutator and the wear rate of the carbon brushes.
Repair Ushma Fiolenta
Recently, Bulgarians Fiolent have become very popular. This attracts not only the affordable price, but also the reliability of the tool.
It is recommended to start repairing the Bulgarian Fiolent with your own hands by studying the malfunctions that arise. If you need to disassemble the Bulgarian Fiolent, then in order to remove the driven gear, pos. 11, it must be squeezed out of the spindle shaft, pos. 8.
To remove the spindle shaft bearing, you first need to remove the large helical gear. This is a minor inconvenience.
Replacing rotor bearings involves the need to dismantle a small screw gear, pos. 22.
Main malfunctions, their causes and diagnostics
Main breakdowns and causes:
- It burns, sparks and twitches. Reasons: violation of armature winding insulation, wear of brushes, commutator, clogging of brush holders. Even after replacing the brushes, the angle grinder sparks and jerks if the brush holders are clogged.
- Popping sound. Brushes or interturn short circuit of any of the windings.
- Crunchy sound. The reason is the bearings.
- Mechanical hum and strong tapping. Gearbox malfunction.
- The grinder stopped working and won't turn on. If the disc spins manually is difficult or does not spin, the reason is in the gearbox. If it turns easily, check the electrical circuits. If the chains work, check the motor and brushes.
- The spindle lock button is broken. The reason is pressing it while the disk is rotating or the disk is jammed.
- The angle grinder works in fits and starts. Check the motor for interturn short circuit.
- Vibrates. The reason is mechanical. Check bearings, rotor shaft and gearbox.
- It's getting warm. If it heats up in the engine area, then the reason is worn brushes or a short circuit in the winding turns. If the gearbox housing heats up, the lubricant has dried out or the gears have worn out.
- Does not pick up speed or loses power. The reason is the electronics or the motor. Check the soft start control board and speed controller, brushes and commutator.
- Smokes. The reason is the tool overheating. Check the motor windings for insulation melting.
- It hums and doesn't rotate. Check motor bearings and gearbox.
Reading an Electronic Circuit
Unfortunately, there is not much to know about the purpose of the main parts of the electrical circuit of the instrument; you also need to be able to read this circuit. Although the electronic circuit of an angle grinder is not the most complicated thing you can come across among electronic circuits, even here it can be difficult for a person far from electricity to figure it out without outside help.
The main reasons for the malfunction of the angle grinder
First, it is important to understand why the tool stopped working. Perhaps the grinder does not want to turn on due to a fall? Is she stuck in the metal cutting period? Did the sanding disc suddenly stop rotating? Some common reasons why an angle grinder breaks down are:
- Incorrect operation (at high and too low temperatures, prolonged use, overheating of the grinder, etc.).
- Late maintenance or poor repairs.
- Very strong force when working with a tool with concrete, brick, metal.
- Breakage of internal wires, dirt getting inside the instrument, oxidation of contacts.
- Chafing the electrical cord.
Repairing an angle grinder gearbox
The level of wear of the gears of the gearbox can be checked by the contact patch. The gearbox is cleaned of old lubricant in advance. You need to apply a special blue to the smallest gear of the part, and then turn it. Next, you need to remove the large gear with oblique teeth and look with a magnifying glass at the contact patch, which ideally should be at least fifty percent of the tooth surface. Otherwise, the gear will need to be replaced or the tooth profile changed. However, this breakdown can only be repaired by a specialist with extensive experience. Often cut, licked or deformed gears must be completely replaced.
Is it possible to do without it?
The locking button is a convenient attribute of the grinder for removing and replacing the working tool. It will serve faithfully for a long time if you follow some recommendations.
Insert the working tool correctly. For example, the cutting wheel should be placed on the side facing the pressure washer that is made of the working material of the wheel. The side with the metal ring of the circle should be adjacent to the base surface of the angle grinder. A metal clamping nut will not have a strong grip on the material from which the circle is made; with a metal ring, the grip is much stronger (more theory on proper installation of discs is below in the video).
Jamming will be greatly reduced by using paper or cardboard spacers under the pressure washer. Usually cardboard ones are supplied complete with an angle grinder. When destroying stocks, there is the option of using thin nylon gaskets. In case of jamming, in order to maintain the integrity of the locking button, it can be easily melted using a blowtorch and the pressure washer can be easily unscrewed.
If an accident does occur and the locking button on the angle grinder breaks, there are ways to remove the work tool without it.
On the working shaft of the angle grinder behind the base washer there are ground shaft surfaces for fixing the washer. Access to them is limited due to the narrow gap. If you grind down the jaws of a wrench (size 17 is usually suitable), you can get to the flat surfaces of the shaft and prevent it from turning. In some cases, it is recommended to remove the shaft and increase the width of the key planes so as not to damage the key by grinding off the jaws.
- You can use a vice in a locksmith shop. To do this, the worn or broken circle is broken off flush to the surfaces of the clamping washers. This gives access to the gearbox cover bolts. They are easily unscrewed, the gear is removed from the gearbox and clamped in a vice with soft jaws. In this position, the clamping washer can be unscrewed with standard plumbing tools.
- Use a thin steel sheet (the thickness should be slightly less than that of the working tool). Remains of working tools are removed to the maximum extent possible. The sheet is clamped in the device and the remaining material is removed against its edge using a switched-on grinder. Thus, the load on the clamping nut is relieved and it can be unscrewed freely.
- The clamping washer can be heated, for example, with a gas torch or blowtorch. When heated, it becomes more pliable during the unscrewing process. However, strong heating of the entire mechanism negatively affects the lubrication of the gears of the gearbox - it becomes very liquefied and loses its properties.
- The method of unscrewing the nut by hitting it with a sharp object or with a hammer drill set to chiseling mode into the hole for the key pin looks less aesthetically pleasing, but allows you to achieve the desired result.
There are quite a lot of other methods that are not listed here, because grinders are used by craftsmen whose creativity knows no bounds.
Specifications
The model is suitable for the role of a “workhorse” within the framework of standard construction and repair activities or, even more so, in the household sector. Another question is how durable and versatile the power filling of the Makita 9069 is - the 230 mm disk and mains power indicate a good start in terms of the possibilities of using the tool, but this is not all the advantages of the device. More detailed characteristics of the angle grinder 9069 are presented below:
- Power – 2,000 W.
- Torque – 6,600 rpm.
- The diameter of the working circle is 230 mm.
- Spindle thread size – M14.
- Weight – 4.2 kg.
It is worth emphasizing that for the effective use of the model, many additions are already included in its basic equipment. For example, full operation of a grinder is impossible without a clamping nut, support washer and socket wrench. The manufacturer supplies a protective cover and the aforementioned side handle as optional but still useful accessories.
Checking and repairing the collector
To inspect the collector, it is necessary to remove the rotor, disassembling the housing and gearbox. When grooves are identified on the commutator, it is turned on a lathe, and minor damage is removed by grinding. To grind the surface of the commutator, the rotor shaft is fixed in a drill chuck, and grinding is done with glass paper. When carrying out grinding and turning work, beating and displacement of the center of the workpiece are not allowed, and before work it is necessary to remove the bearings from the rotor shaft.
After carrying out the work, you need to clean the surface with a soft cloth and remove burrs on the lamellas.
Useful instructions - how to replace the brushes and cord of an angle grinder
Often an angle grinder from the Interskol company stops working due to failure of the cord, that is, wear of the brushes, due to which they almost reach the stator and the device does not work at full power.
You already understand how to remove the cord from the previous instructions on removing the angle grinder button (from points 1 to points 3). All that remains is to figure out how to get to the brushes and change them for new ones.
- If you have a Phillips screwdriver, unscrew the fastening screws of the handle on both sides;
- Using the above diagram, we find brush holders in which the parts we need are located;
- We disconnect the brushes from the single electronic circuit of the angle grinder by prying the tips with a flat screwdriver and simply pulling them out with your hands;
- At this point we insert new brushes. If there are no original brushes in stores, you can take them in a slightly smaller size - there is an option to grind them down to a suitable size with a ratfile. It won’t be difficult if the new brushes have different tips - we cut off the lead from the worn brushes and screw it onto the new ones;
- Insert and screw the handle cover back.
After disassembling the angle grinder, it is recommended to blow off dust using a compressor.
Also check the armature commutator, which may be scratched from worn brushes. Of course, clean the scratches with zero-grade sandpaper.
Checking the serviceability of the angle grinder motor stator
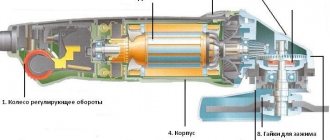
It should immediately be noted that similar manipulations to check the serviceability of the two main parts of the electric motors of electric tools can be carried out for drills, rotary hammers, jigsaws and other units. Battery-type grinders also have motors, but only DC. The difference between alternating and direct electric motors on power tools is stators.
If on variable motors the stator consists of a winding, and the current flowing through it creates polarity, then on “constant” motors this function is performed by a pair of magnets, which push the rotor, setting it in motion.
The algorithm for checking the stator of an electric motor for angle grinders is as follows:
- The presence of resistance between the stator winding and the core is measured. The presence of resistance indicates that the insulation of the copper wire is broken, and therefore a breakdown occurs. To change the presence of a breakdown on the housing, you need to touch the winding terminal with one probe, and the core with the second. There should be no resistance, since in normal mode the copper wire is not connected to the core
- Now we check for the presence of resistance in the winding. To do this, we touch the output contacts with probes. The resistance value in both windings should be approximately the same. If the device does not show anything during measurement, it means that the copper winding is damaged. If the resistance is high, it means that insulation failure is appropriate.
- Carry out a visual inspection of the stator. The presence of carbon deposits on the wire is the main sign that the device needs repair. The stator, like the rotor, can be rewound, but provided that the integrity of the steel plates is not compromised. Rewinding the stator is cheaper than the rotor, however, in any case, if the motor already has a long service life, then it is better to replace it or the component parts that have failed - the armature or the stator
If you decide to replace the engine, then instead of the old motor you need to install a new one with similar power parameters and torque. After replacement, you can begin further use of the tool.
The power button does not lock
Frequently pressing the button with force leads to wear on the contacting surfaces, and the button no longer locks. This defect is one of the most common that occurs during the operation of grinders.
In the following video, the Makita model angle grinder does not have the button locked in the required position. After disassembly, the worn surfaces on the button and the fixing groove on the body of the angle grinder are clearly visible. Repairs are made in two ways.
Replacing the worn button with a new one
Here you should remove the radius of curvature on the fixing groove and align the landing plane under the button. In this case, the processing is carried out very carefully with minimal removal of plastic material. The properties of plastic, as a fragile soft material, make it possible to select a machining mode with low tool speeds, which allows you to regulate its optimal feed when eliminating surface defects.
With worn button fix
The author is right that it is not always possible to find a new button to replace a worn one. The button restoration method is relevant, especially for craftsmen working outside the scope of specialized retail outlets
Important: clean the seating surface of the button with a file no more than a few tenths of a millimeter, and just level the contact surface of the “tendril” of the button without removing excess material
These methods are one-time in nature; the next such breakdown may lead to the replacement of parts with new ones.
The main malfunctions during the operation of the angle grinder
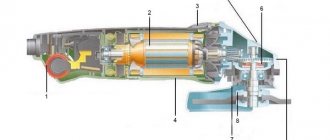
In order not to be scattered in such a matter as identifying the main malfunctions during the operation of an angle grinder, let’s immediately exclude those elements that a priori cannot fail, well, except through special sabotage. Therefore, such parts as the angle grinder body, gear housing, power cable, protective casing, handles, and planetary gear locking button can not be considered. We still have faults that arise in the electric motor, gearbox and, oddly enough, in the nut securing the working disk.
Malfunctions that arise in the operation of the electric motor of an angle grinder
It is clear that all these malfunctions lead either to a complete stop of the electric motor or to its unsatisfactory functionality. So what could it be?
Grinder rotor
There is a resistor in front of the electric motor, which can simply burn out for one reason or another. Therefore, this fact should not be overlooked.
Natural wear of brushes. Visually, this can be determined by the intense sparking that can be observed in the slot in the angle grinder body, as well as when the electric motor stops when the load on the working disk increases. It can be eliminated by simply replacing them, but it must be taken into account that the armature collector itself can also be subject to restoration. The fact is that when the brushes wear out, a coating forms on the surface of the commutator, preventing contact of the brushes with the commutator plates
Therefore, before installing new brushes, pay attention to the condition of the commutator. The problem can be solved with fine sandpaper or, even better, by contacting specialists who will remove this deposit using special equipment.
Failure of bearings or seats for them
Signs of this malfunction may include obvious vibration of the grinder body, increased noise, as well as excessive heating of the grinder body. In this case, the bearings, as well as the housing, of the gearbox must be replaced.
There is one more detail that affects the operation of the electric motor and which we forgot to mention - this is the direct cooling impeller. If it breaks down, the electric motor may overheat, which can ultimately lead to failure of both brushes and bearings.
Grinder gearbox malfunctions
After repairing the gearbox, it is better to replace the old lubricant
- The most “sore” point in the gearbox design is the breakage of the teeth of the sun and planetary gears. The signs of this “grief” are so obvious that they are not worth talking about, but nevertheless: increased noise and noticeable vibration indicate that the integrity of the gears needs to be checked.
- Noise and vibration, although of lesser intensity, can also occur due to wear of the bearings on which the gearbox axis rotates. In both the first and second cases, parts that have failed must be replaced.
- The possibility of wearing out the bearing seats cannot be ruled out. Here you can't do without replacing the case. Some “traditional craftsmen” solve the problem by making notches on the surface of the seats. This can have a positive effect within an hour of operation of the angle grinder, and then we still come to the need to replace the case.
Jamming of the nut securing the working disk of the angle grinder
Nut with washer
The nut itself can fail when, for some reason, its thread is damaged. However, often owners of angle grinders are faced with such a problem as the nut being clamped to such an extent that it is simply impossible to unscrew it with a special wrench. Everyone eliminates this problem as best they can: they destroy the working disk to the ground, sawing it off with a hacksaw, try to knock off the nut in every possible way, after which they throw the entire tool in the trash. To prevent this from happening to you, purchase a special nut in a store or market, made as one piece with a rotating washer, and the problem will go away by itself.
Even the highest quality tool can break after some time, not to mention cheap consumer goods. Bulgarian is also no exception. This tool has gained popularity due to its versatility and ease of use. There are a large number of models of grinders, the design and principle of operation of which do not differ significantly from each other. The tool may break during use. Repairs in the workshop will cost a tidy sum, so many craftsmen repair the grinder with their own hands.
Is it possible to do without it?
The latch is located in the front part of the body of the Hammer USM 850A angle grinder. Photo 220Volt
The locking button is a convenient attribute of the grinder for removing and replacing the working tool. It will serve faithfully for a long time if you follow some recommendations.
Jamming will be greatly reduced by using paper or cardboard spacers under the pressure washer. Usually cardboard ones are supplied complete with an angle grinder. When destroying stocks, there is the option of using thin nylon gaskets. In case of jamming, in order to maintain the integrity of the locking button, it can be easily melted using a blowtorch and the pressure washer can be easily unscrewed.
If an accident does occur and the locking button on the angle grinder breaks, there are ways to remove the work tool without it.
On the working shaft of the angle grinder behind the base washer there are ground shaft surfaces for fixing the washer. Access to them is limited due to the narrow gap. If you grind down the jaws of a wrench (size 17 is usually suitable), you can get to the flat surfaces of the shaft and prevent it from turning. In some cases, it is recommended to remove the shaft and increase the width of the key planes so as not to damage the key by grinding off the jaws.
Grinder Metabo W 750-125 with black stop button. Photo 220Volt
- You can use a vice in a locksmith shop. To do this, the worn or broken circle is broken off flush to the surfaces of the clamping washers. This gives access to the gearbox cover bolts. They are easily unscrewed, the gear is removed from the gearbox and clamped in a vice with soft jaws. In this position, the clamping washer can be unscrewed with standard plumbing tools.
- Use a thin steel sheet (the thickness should be slightly less than that of the working tool). Remains of working tools are removed to the maximum extent possible. The sheet is clamped in the device and the remaining material is removed against its edge using a switched-on grinder. Thus, the load on the clamping nut is relieved and it can be unscrewed freely.
- The clamping washer can be heated, for example, with a gas torch or blowtorch. When heated, it becomes more pliable during the unscrewing process. However, strong heating of the entire mechanism negatively affects the lubrication of the gears of the gearbox - it becomes very liquefied and loses its properties.
- The method of unscrewing the nut by hitting it with a sharp object or with a hammer drill set to chiseling mode into the hole for the key pin looks less aesthetically pleasing, but allows you to achieve the desired result.
There are quite a lot of other methods that are not listed here, because grinders are used by craftsmen whose creativity knows no bounds.
Repair, preparation for work, necessary tools
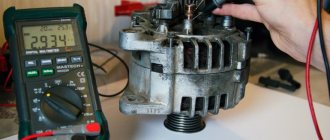
Multimeter Zubr. Photo 220Volt
Before carrying out repair work, diagnostics are carried out in order to identify parts and assemblies due to which the angle grinder cannot function normally. The electrical part of the angle grinder is inspected visually to find traces of surface burning in places of short circuit. If, after inspection, there are no obvious signs of malfunction, the electrical part is checked by ringing using special instruments (multimeter, short circuit indicator, and others). After finding and analyzing the damage, a method for eliminating it is adopted.
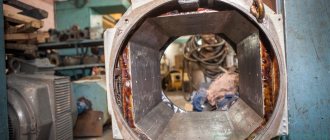
There are two main ways to repair a stator yourself:
- The burnt stator is removed from the angle grinder body. An identical device to the failed one is purchased from a specialized store and used in an angle grinder instead.
- The burnt winding is removed from the core body and a new one is wound, corresponding to the old one in the number of turns and wire diameter.
Calling and rewinding
If the cause of the breakdown of the angle grinder is a burnt out stator, a test will determine in more detail which part of it is involved. If there are defects in the coil windings, some users rewind new ones themselves. For a detailed description of the production of such work, follow the links “How to ring the stator of an angle grinder” and “Rewinding the stator of an angle grinder with your own hands.”
Replacement
For the angle grinder model DWT in the next video, a new stator was purchased to replace the burnt one. The new stator was positioned as a unit from a grinder of this model. The process of disassembling an angle grinder before removing the faulty stator from the housing is described in detail. When examining the appearance of the purchased new and old stators, some differences were observed. However, after assembly and testing for functionality, it turned out that they have practically no effect on the operation of the angle grinder.
Burnt out, rewind
The author of the following video from a state neighboring Russia, having difficulty purchasing a new stator instead of the Russian-made Interskol model that was burnt out by an angle grinder, decided to rewind it himself
Here it is important to pay attention to the experience that the author gained in the process of rewinding the wire. Do not loosen its tension, otherwise the coil will not be able to fit into the recesses of the stator. The second time the winding was successful
The second time the winding was successful.
The varnish impregnation described during the repair should not be copied one to one. Because ordinary wood varnish does not have the necessary electrical insulating properties. If it is difficult to choose an impregnating agent, it is better to use a material based on epoxy resin, which is easy to find. The quality of impregnation will improve if the stator is heated, rather than waiting until the varnish stops penetrating into the winding.
Bosch, replacement
In the next video, the author repairs a Bosch model angle grinder. Working in a heavily dusty atmosphere, of course, can cause severe wear on the commutator lamellas, but this should not be taken as a definite cause of failure of the stator windings. Here you should also consider other operating conditions (overload, operating time, etc.).
The author's diagnosis is in the nature of fortune telling on coffee grounds. A sharp change from a burnt-out rotor, which turned out to be still fully operational, to burnt insulation on a stator that was truly out of order, indicates a lack of a systematic approach to repair work.
During disassembly of the angle grinder, the stator is released from the housing under the influence of strong hammer blows. Although it is made of wood, strong enough impacts can cause damage to the protruding parts of the body.
Why not immediately make the stator output ends of normal length remains a mystery. The author does the same, very labor-intensive job twice without really explaining the reasons.
How to connect, connecting windings
The author of the following video reviews various stator coil winding schemes . Here, in addition to the classic one, there are other options in which there are transitions inside the windings. The author gives an algorithm for finding the input (attached to the switch on the grinder) and output (connected to the brush assembly). The output part of the coil is visually determined - the wire is located on the outer peripheral side of the winding. Unwinding this end, we determine the winding pattern and the number of turns.
The author gives recommendations on choosing brands of impregnating varnishes that will best perform insulating functions.
What most often breaks on angle grinders of different brands?
It makes virtually no difference whether your tool is DeWalt or Intertool. Sooner or later there will be a need to start repairing the angle grinder, which can be done easily and quickly if the breakdown is correctly identified. The main reason why angle grinders break down is not the quality of this tool, but the fact that most craftsmen use them incorrectly. How can you use an angle grinder incorrectly?
According to their purpose, there are two types of angle grinders:
- Household - a category of power tools, the main purpose of which is to use them around the house. They are not suitable for constant and prolonged loads, since the parts are made of low-strength materials. You can operate household angle grinders for no more than 10 minutes continuously, after which you need to pause for a similar period of time to allow the engine and other components to cool. Naturally, no one records the time how long he works with the unit. When the need arises, we pick up a tool and carry out the task to the end. The duration of operation of the unit can range from 10 minutes to 1 hour, which results in breakdowns of the angle grinder. Household grinders can last much longer than professional ones, provided they are used correctly. If you need to repair a household grinder yourself, then experts recommend it’s better to immediately buy a new tool
- Professional - a special type of power tool, the main purpose of which is the duration of operation of the device. Their components are made from durable and high-quality materials, so they are durable and resistant to prolonged loads. You can work with professional angle grinders continuously for 40-50 minutes, and not worry about the engine overheating. They are designed for this, so if you are faced with a situation where your household unit often breaks down, then you need to switch to professional models. This is especially true for craftsmen who, in order to save money, buy household models, but at the same time work with them on construction sites, using them for 8-10 hours a day
Knowing the difference between household and professional models makes it easier to choose a power tool. The choice of power tool and its use determines how often you will need to repair grinders yourself.
Let’s look at the question of what most often breaks on grinders. The most common symptoms of malfunctions are:
- The device does not turn on - the next time you need to use an angle grinder, it turns out that it does not work. The causes of such a malfunction may be the following factors: lack of power in the outlet, damaged power cord, loose contacts, broken button or worn out brushes. Often, as practice shows, on angle grinders the place where the power cable enters the housing structure wears out. This is where you need to look for the place where the contact is damaged
- Current flows into the device, but the motor does not work - this means that the button is most likely faulty. The buttons on grinders cannot be repaired, so after a short check, you should simply replace them
- Sparking of the unit during operation and the appearance of a burning smell means that it is time to replace the graphite brushes. They have an appropriate resource, so signs of sparking in the area where the brushes are located means that they are worn out and the quality of contact is low
- The appearance of extraneous sounds after starting the engine - crackling and ringing sounds are signs of wear on the bearings or gears. To find out the exact cause of the instrument's hum, you will need to disassemble it and inspect the mechanical parts.
These are the main types of faults that even a beginner can identify. Bearings and brushes belong to the category of consumable parts, so do not be surprised if after six months of operation of the unit there is a need to replace them. With simple types of breakdowns on angle grinders, everything is clear, but it often happens that everything seems to be checked, but the tool does not work. What to do in such a difficult situation? To do this, you need to delve into the topic of repairing angle grinders and try to understand what is the reason. Often in such cases the “poke method” helps, but we will not rely on it so as not to get hurt. Let's consider all types of defects and breakdowns on grinders, as well as the features of their identification and elimination.
Electrical diagram
Knowing the purpose of the main parts will not give a 100% positive result during repairs. It is also necessary to understand and understand how the electrical circuit of the angle grinder works and how the electric motor works. The circuit involves two windings, which are connected in series through a power wire to a network with a voltage of 220 V and are not interconnected in the electrical circuit. A mechanically installed switch is connected to the on/off button of the sander. Each of the windings is connected through contacts with graphite brushes. Through brushes, the windings are connected to the rotor commutator.
It is also very important that the armature has many windings, but only two windings are connected to graphite brushes, and failure most often occurs due to a break in the electrical circuit. Diagnostics of the electrical circuit of the device is carried out using a special device - a tester.
A portable measuring device is used not only in repairing angle grinders, but also for testing other electrical tools and devices.
Proper testing should be done from the input power cable to the elements connected in series. When checking conductivity, the multimeter switch is set to the minimum voltage.
Assembly of an angle grinder Makita 9565
Before assembling the Makita angle grinder, check the integrity of all parts and their cleanliness. Assembly begins by installing the bearing and driven gear on the spindle.
Spindle assembly
The spindle, pos. 50, is fitted with a boot, pos. 51, a housing cover, pos. 53, and a bearing housing, pos. 54. Insert a pre-lubricated 6201LLB bearing into the bearing housing. Press in the driven gear pos.56. on the spindle. The spindle is assembled.