When repairing a car or doing construction work, there is often a need for a resistance welding machine, which one would like to have, but its high price does not allow such a purchase. We will tell you how to make such a unit from an inverter-type welding machine on your own. A contact type connection is based on pressure and heating of the metal using welding current with a short-term effect on the parts being welded. Industrial devices of this kind have been widely used for a long time; we will tell you how to assemble such a device from an inverter at home.
Scope of use of resistance welding
Many types of resistance welding equipment are due to their high efficiency, cost-effectiveness and speed of operation. Some of them have high-tech control over the quality of work, can evaluate the thickness and parameters of the metal and regulate the current process . The resistance welding machine of the Car-o-Liner CTR 41977 line performs all types of high-precision metal work and is a source of powerful welding current. Swedish Car-o-liner units allow you to weld sheet metal, and are built on an inverter technological basis. Car-o-Liner devices allow welding of metal under point pressure, and are designed, among other things, for car body repairs.
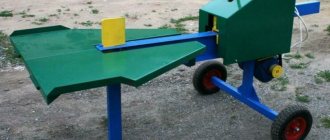
Besides? There are other, much simpler, equipment for joining in the contact zone of sheets, such an example is the TOP resistance welding machine, which has the following parameters:
- low weight (8 kg) and power (2 kW);
- welds sheet metal up to 2 mm thick;
- it is possible to weld rods up to 4 mm;
- carries out heating of the metal for the purpose of subsequent processing;
- there is a function of soldering with solder with a high melting point;
- The set includes carbide shaped and straight electrodes;
- there are specialized pliers with a hose of more than 2 m;
The use of such resistance welding machines with an affordable price and high mobility allows you to carry out minor home and body repairs, as well as weld reinforcing mesh during construction work.
It is important to note that the low voltage at the terminals allows work to be carried out in compliance with safety regulations.
The metal-friendly properties of resistance welding machines allow them to be used in bodywork and other sheet metal repairs as a spotter. It should be discussed in more detail because most people experience damage to the car body. We're talking about dents that need to be pulled out and straightened out.
In this case, special copper electrodes are used, which, after cleaning the body parts, are spot welded to the dent. Then, with their help, the irregularities are pulled out by additional heating and cooling of the metal. This very effective repair method allows you to pull out bumps even in hard-to-reach places.
Spotter, its application and design
This tool is used to level out car dents when repairs from the outside are not possible. It can heat up part of the metal, and the damage to the body will be minor.
In particular, it is used for the following purposes:
- body straightening;
- leveling the surface of the body without the need to disassemble it.
The enormous and irreplaceable benefit of this device lies in its use for leveling body parts when access to certain parts is limited due to the specific structure of the car. When straightening damaged parts of the body, a special device fastener is welded to the deformed surface and then pulls it out. It should also be noted that the spotter is capable of heating the metal during operation, and this facilitates rapid leveling, obtaining rigidity and the desired shape.
There are several schemes by which the device can be assembled. For such purposes, not only a welding machine can be used, but also an old battery, microwave oven, inverter or transformer. It is not difficult to make a welding machine from a battery with your own hands.
The work of this design consists of point-by-point pulling of the damaged part according to the principle of a hammer.
It looks like this:
- the return hammer of the device is fixed to the body using a welding pulse;
- The handbrake of the device must be pulled along the guide towards you, while the support washer remains in place.
The simplest spotter has 2 modes:
- temporary, when a ring is fixed to the surface;
- welding - light welding of the electrode to the surface is used when the device is attached to the car.
Required equipment for resistance welding
To assemble a resistance welding machine with your own hands, you need to determine in advance how you want to use it. The light weight of the inverter unit, which we will take as the basis of the kit, allows us to assemble both a mobile and stationary version. The fact is that the pliers, which provide the necessary pressure at the welding point, can be mounted on a stationary platform or on a flexible hose.
Rigidly fixed electrodes are more suitable for in-line welding of sheet metal, while the mobile version is more versatile.
Separately, it is necessary to consider the criteria for choosing a welding inverter as a current source for the contact method of operation. It must have a wide range of current and voltage adjustments, and since the output waveform is pulsed, this parameter must also be adjustable. Thus, the AKS resistance welding machine must be equipped with refractory electrodes, which can be mounted in the following options, namely:
- stationary option, in which the sheets to be welded are placed on a stationary negative electrode and are pinpoint pressed with the positive electrode;
- mobile version using pliers that allow squeezing the parts to be joined at the welding point;
- option using a welding gun as a positive electrode, where the minus is the body part.
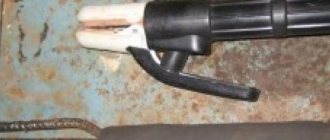
The use of a gun is typical for the work of a spotter during body repair, and in this case, replaceable copper tips are used, which make it possible to straighten defective areas. To save money, you can make a welding gun or pliers with your own hands, both in a stationary and mobile version. To do this you will need the following materials and tools:
- textolite for a gun or pliers;
- start button;
- fastening bolts with nuts;
- copper or bronze tip as an electrode;
- connecting cables and wires;
- mini-socket with a light bulb for illumination;
- jigsaw, grinder and electric drill;
- powerful electric soldering iron;
- marking devices;
- set of screwdrivers and wrenches.
It is important to ensure reliable contact of the welding cable with the tip holder or replacement tips to avoid overheating and power loss.
It is necessary to consider quickly changing bronze or copper electrodes or tips, since operating conditions may change, and when repairing sheet metal of a car body, replacement is part of the technological process.
Spot Welding Options
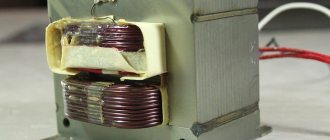
The main elements when creating a spot welding machine are usually a fairly high power transformer (at least 1 kW) and a homemade clamping device, consisting of two levers with electrodes.
For example, a transformer from a microwave oven or a welding transformer can be selected as the first element. Both of these types of transformer require rewinding of the secondary winding.
In a welding inverter, a 50 Hz power transformer that converts a 220 V mains voltage is usually absent. In such a device, the mains voltage is rectified and supplied to a high-frequency generator (50-80 kHz), the circuit of which has a step-down transformer designed to operate at higher frequencies. Working with this frequency allows you to dramatically reduce the weight and dimensions of the welding inverter. At the output of the step-down transformer, the voltage is reduced to 60-70 V, and the output current can reach 130 A.
To carry out spot welding, it is necessary to obtain a current of 1000-2000 A at a voltage of 1-2 V.
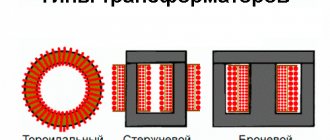
It is impossible to use a high-frequency transformer from an inverter separately in a 50 Hz network (as is done in other cases). In principle, to obtain the required mode, you can rewind the secondary winding of the transformer. But this transformer is small in size and is often wound on a toroidal core, which makes such a conversion difficult. It is possible to connect an additional step-down transformer. It will also operate at high frequencies and have small dimensions. Another option is to use an inverter as a device for charging capacitors in an additional capacitor bank.
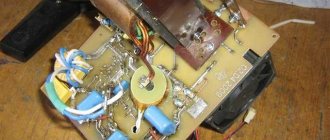
Assembly of the contact welding kit and sequence of work
When carrying out resistance welding with your own hands, you need to understand that the whole process takes from 0.5 to 1.5 seconds, so the start button must be placed in an open circuit of the primary winding of the inverter. It is important to prevent burning through the metal, and for this it is necessary to adjust the high-frequency output voltage of the inverter in an optimal way and experimentally select the welding duration. When joining sheets with an overlap, it is necessary to ensure that they remain motionless relative to each other, and also to press the electrode to the welding point with constant force.
Final assembly involves connecting all components and checking for reliable, safe contact in the welding current circuit and the control button. Checking the functionality of the device and adjusting the output parameters consists of the following actions:
- setting the inverter to the minimum welding current;
- checking the reliability of the connection of the cable, gun or pliers, as well as the start button;
- short-term spot welding is carried out on test parts and, if necessary, the settings of the inverter output parameters are adjusted;
- welding is stopped and the result is evaluated; in the case of burning through the workpieces, the current and welding time at the point of contact are reduced;
- welding is considered correct when the workpieces are separated from each other along the metal, and not at the welding point;
- If the device is used as a spotter, it is necessary to ensure reliable welding of the tips to the surface of the area being repaired.
It is very important to ensure the safety of the worker in order to avoid possible electric shock and to carry out welding in special clothing that protects against burns.
How to work as a spotter with metal
There is a technology for working with such a device, which has been used by craftsmen for a long time. It is used for car body work, eliminating deformed parts in hard-to-reach places. As a rule, such work is carried out on car doors and fenders in order not to completely remove such parts. The technology can be used wherever there is inward deformation of the surface.
Sometimes novice craftsmen are interested in how to make a homemade battery and spotter. Spot welding from a battery is performed by applying current to an electrode, welding it to the surface, leveling the surface with a gun, and tapping a perimeter around the damaged area with a hammer to fix it in place. Thanks to this method, the deformed part can be quickly aligned and returned to its original position. You need to pull it in carefully.
After leveling, the deformed surface is ground until the welding points from the fastening are removed and the surface becomes smooth. Do not forget about the mandatory grounding of the device. The negative terminal must also be removed from the battery.
The technology for working with a spotter looks like this:
- the damaged surface must be cleaned until the first appearance of “bare” metal;
- a negative contact is attached to the deformed surface;
- the electrode is welded to the working surface;
- pulling the damaged surface to the desired location;
- the welded electrode is removed from the surface with rotational movements;
- cleaning the surface from welding work and preparing it for putty.
To work with such a device, regardless of whether it is factory-made or home-made, you must have minimal experience with welding. It is important to follow the rules for working with such a device. This will allow you to straighten the damaged surface quickly, efficiently and, most importantly, safely. A spotter is an indispensable tool for deformed car surfaces that require spot repairs. You can assemble such a device yourself and not spend money on expensive factory models.
Using an inverter device
First, you need to properly provide protection, especially at home. This means following the basics of resistance welding. Gloves should be strictly thick, but this means that rubber material should not be used.
It is mandatory according to the rules to use a welding mask with sufficient darkness. The best option is “chameleon”. Clothing for welding should be fireproof and cover parts of the body that will be exposed to danger, made from different materials and natural ingredients.
Last but not least is the safety of the place where welding will take place:
- the space should be free, without unnecessary objects;
- maintain adequate lighting;
- When performing work, it is necessary for the welder to stand on a wooden floor and see all the parts being welded.
After thorough preparation, you can proceed directly to welding work.
The welding current is adjusted according to the parameters of the thickness of the metal and metal structures. The electrode is selected with a size of 2-5 mm, focusing on the material being welded. The next step is to connect the ground to the structure being welded.
To obtain a good result, the starting material is cleaned and prepared. Here are the main secrets:
- remove rust stains;
- clean the material from grease, varnishes, paints and other foreign coatings.
If the welder has little experience, it is recommended that he treat the surface with a bead weld. Spot work is not available at first. In this case, it is better to start cooking with thick sheets. Thin sheets are easy to damage. It is better to place the material to be processed on a flat surface. Apply chalk to the future seam, which should then be used as a guide when welding.
Immediately before you start cooking, you need to light the arc. There are two ways to do this:
- by striking the electrode on the surface to be welded;
- tapping.
Metal that boils up during the welding process must be removed with a small hammer and light tapping. In order to get a beautiful-looking seam, it is important to pay attention to the following secrets:
- Electrode tilt parameters.
- Diagram of transverse and longitudinal movements of the burner.
- The speed of movements carried out by the electrode.
With experience, novice welders master the skill to the fullest and each time the seams become more and more aesthetically attractive.
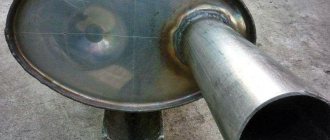
Contactor from a welding transformer
Such equipment can be turned into a full-fledged resistance welding tool. The only drawback is the inability to control the current strength.
Drawing development
The correct choice of circuit helps to produce a working welding machine. Preference is given to simple drawings that include a minimum number of parts and blocks. Such options do not allow you to create an overly powerful device, but the device is sufficient to perform minor repairs on a car, garden equipment, and fences.
We recommend reading: How to make a welding machine from a microwave
List of parts and consumables
To convert a welding transformer into resistance welding equipment, you will need the following elements and materials:
- a transformer that converts electrical energy;
- thick cable;
- copper electrodes;
- bolts;
- tips;
- breaker;
- wooden blocks, plywood to create the body.
The process of creating a device
The homemade device is assembled as follows:
- The welding transformer is installed in a housing made of metal sheets. The electrical board is assembled on a textolite sheet more than 1 cm thick. The part is fixed in the body of the welding machine.
- A welding wire is bolted to the busbar and secondary winding. The remaining end of the cable is connected to the electrode.
- The power wire is connected to the contact block located on the electrical board.
Spot Welding Operation
A master using a contact transformer apparatus must stand on a rubber mat and use protective gloves and goggles. The grounding cable is connected to the part to which another workpiece will be welded. After this, press the power key, compare the elements to be connected, and clamp with the electrode of the welding gun.
5 seconds after the start of the impact, the rod is transferred to the next point.
Inverter welding technology
What inverter welding is can be understood by considering its technology.
The whole process is carried out in stages:
- At the initial stage, the arc is ignited. This can be done in several ways - by scratching, tapping or touching;
- then we begin to melt the metal, a weld pool should form;
- the electrode can be carried out at a right angle of 900 or obliquely at an angle of 30-600;
- When carrying out the welding process, it is imperative to hold the welding arc. During this process, it is necessary to maintain a uniform distance between the metal and the electrode. The most suitable level should be 2-3 mm.
It is worth noting! Some inverter models have an automatic arc hold function. If you cannot do this manually, then it is advisable to use this option.
If you look at the detailed instructions, you can understand what inverter welding means. This is a unique process that allows you to join different metal workpieces. Convenient welding machines provide maximum convenience when working in difficult production conditions, which often require welding at heights.
Rules for preparing for work
We almost already understand what a welding inverter is and how it works. Now you can start using it in practice, but first you need to prepare for the welding process. To do this, you must follow the following recommendations:
- Protection. It includes all the important features that must be used for safety purposes. You need to wear gloves made of thick fabric on your hands; they can protect the skin from sparks. Glasses and a mask are used for the face. A robe made of material that can withstand fire is suitable for the entire body.
- Preparation of the workplace. Cooking should be done on a durable iron table; it should not be covered with varnishes or paints. The welder must stand on a wooden base when welding.
- Preparation of the necessary consumables, namely electrodes. They should be selected depending on the thickness and type of metal.
- Cleaning metal from dirt and various coatings.