As the owner of a summer house or private house, there is a need to remove large amounts of snow in winter. It is difficult to cope with such a volume with an ordinary shovel, and not every person can physically cope with it. It takes a lot of effort and time.
A good option is to buy a snow blower. The only problem is that a factory snow blower is expensive, and people only use it a few times a season at most. The rest of the time the equipment sits idle.
Therefore, an alternative solution appeared. These are homemade snow blowers that can be assembled from scrap materials. For example, it could be an old unnecessary chainsaw. The efficiency is high, the motor is quite powerful and productive. And the assembly itself is not difficult if you understand some of the nuances and strictly follow safety precautions.
The order of work when manufacturing a snow blower
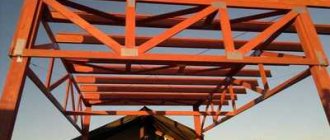
To construct a snow blower from a chainsaw with your own hands, you need to prepare drawings. There is nothing complicated here. The general diagram of the machine can be seen in the photo. The most difficult part will be the process of creating the auger, but this still needs to be achieved. When making a snowplow from a chainsaw, the dimensions of the bucket and auger are calculated so that they capture snow cover 50 cm wide and 40 cm high. If the power of the motor from Druzhba or the Urals allows, the dimensions of the structure can be increased.
So, let's get acquainted with how to make a snow blower from an old but working chainsaw:
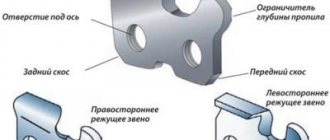
The first step when making a snow blower from a Ural or Druzhba chainsaw is to check the motor itself for functionality. If the engine starts easily and runs stably, it must be freed from the tire, handle and other mechanisms unnecessary for the snow blower. The ladle is welded from a metal sheet. First, a strip 50 cm wide is bent in a semicircle, and then the side shelves are welded. The inside diameter of the bucket should be 2 cm larger than the dimensions of the auger. The optimal dimensions are: the diameter of the rotor disc blades is 28 cm, the diameter of the bucket is 30 cm. A hole with a diameter of 150 mm is cut in the top center of the bucket. A pipe for the ejection hose is welded here. If the screw design is improved with a fan, then another hole is cut into the back of the housing. The rotor casing with the impeller will be secured here. The auger shaft for a snow blower can be made with your own hands from a piece of round metal pipe with a diameter of 20 mm. The blades are welded in the center. They will throw out snow. I weld trunnions to the pipe on both sides. Bearings No. 305 are mounted on them. On the drive side, the trunnion is made longer. An asterisk is placed on it. In a combined auger-rotor design, a gearbox is installed instead of blades, as shown in the photo. It transmits torque from the screw to the fan. To avoid jamming of the bearings on the auger, they should only be installed in a closed type. The plugs will prevent sand and dirt from entering. Disc knives are cut from steel sheet. First, the rings are cut out, cut on the side anywhere, and then stretched to the sides. The resulting spiral half-rings are welded onto the shaft in turns towards the blades. It’s easier to leave the edge of the knife even, but such an auger is unlikely to overcome the ice build-up. Here you can try to cut a jagged edge that can easily cope with compacted snow, and also cut through a thin ice crust.
You can equip homemade snow blowers with an auger with rubber blades. They are often cut out of car tires with a jigsaw. But this design can only cope with loose snow. To install the auger inside the bucket, bearing hubs are bolted to the side shelves
It is important to find the center exactly, otherwise the drum will wobble and the knives will cling to the bucket body. When the previously made bucket design is equipped with an auger, the time comes to think about attaching a chainsaw engine to the snow blower. Here you will need to weld the frame on which all the elements of the snow blower will be attached.
The photo shows a diagram of a simple frame
It is welded from a metal corner. The optimal size of the structure is 48x70 cm. A jumper is placed in the middle, and two longitudinal elements are attached to it, fitting them to the fastening elements of the chainsaw motor. Any pair of wheels is suitable for driving a snow blower. It can be connected by a drive to a chainsaw motor to create a self-propelled machine. The disadvantage of this design is poor maneuverability in deep snow. It's easier to use wooden runners instead of wheels. The skis move easily on snow and do not fall through. When the assembly of the frame with the chassis is completed, a bucket with an auger is attached to it. Behind it they install the engine, removed with their own hands from a chainsaw. The pulleys of the working shaft of the motor and the auger are connected by a belt. If sprockets are selected, then put on the chain.
Read also: How to choose a gas heat gun
The entire assembled mechanism of the snow blower must be turned by hand. The auger should rotate easily, and the knives and drive parts should not cling to the frame and bucket elements. After receiving a positive result, the assembly of the snow blower is completed. All that remains is to attach the fuel tank to the frame, make control handles, and cover all the working mechanisms with a galvanized casing.
The video shows a snow blower powered by a Ural chainsaw motor:
At the end comes the most exciting moment - starting the engine. If no mistakes were made during assembly, the auger will begin to rotate as soon as the motor starts running. The operator just has to put a sleeve with a guide visor on the outlet of the bucket and can try to clear the snow.
Schematic and assembly of the screw unit
An auger is an essential element of any snow removal equipment.
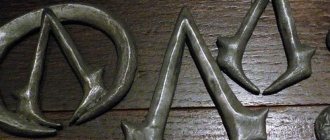
Structurally, it is a drum with twisted legs rotating in a spiral. At the base of the spiral there are metal blades, which, when rotating, rake snow from the sides to the center, after which they push the mass through the nozzle. In order to make an auger with your own hands, you will need a shaft - it is made of a metal pipe with a diameter. The length is determined by the planned capture area. On average, this is from half a meter to 80 cm. Less is ineffective, more - the equipment will be difficult to move.
Two rectangular steel plates are welded to the center of the pipe - these are the future blades of the structure. The legs can be made from steel, the sidewalls of used tires or conveyor belt. Next, cut out 4 disks with a diameter of 28 cm from the metal sheet and cut a circle in the center along the diameter of the shaft. The rings are sawn on one side and carefully stretched to the sides - these are spiral turns, which, as indicated in the diagram, are welded to the shaft towards the blades.
Screw machine drawing
Trunnions are welded along the edges of the shaft, onto which closed type bearings No. 305 are placed. This is necessary so that during cleaning the drum does not become jammed with a stone.
For the ladle you will need a 2 mm sheet of the same length as the auger + 2-3 cm at the edges. Bend it in a spiral so that the radius is 2 cm larger than the diameter of the knives. It is better to make the side walls also metal, but thick plywood will also work. The hubs are inserted in the center and the made auger is placed. First, a belt drive pulley is placed on the axle. On the top of the bucket you need to make something like a sleeve with a visor to direct the thrown snow in the right direction.
Screw base
Now it’s time to connect the electric motor, for which a frame measuring 48x70 cm and 50 cm wide with jumpers for installing the engine is prepared.
The runners are screwed along the lower edge of the frame (pre-cut 2 corners and bend the edges). Now all that remains is to install the motor, make a pulley and connect the cable.
Before the first start, turn the auger by hand and check that it moves freely. If there are no obstacles, you can start cleaning.
VIDEO: Converting a trimmer into a snow blower
Making a snow blower - algorithm of actions
The manufacture of the unit should begin by creating or studying existing drawings. This will allow you to prevent possible errors in advance and complete the work as quickly as possible.
The correct procedure is as follows:
First of all, you need to prepare the frame. The reliability of the machine depends on its quality, so you should choose reliable materials for its manufacture. First you need to take several identical pipes and weld them to each other
In this case, pay special attention to two longitudinal pipes, which not only serve as part of the frame, but also act as skids of the unit; The front parts of the pipes must be cut at an angle, and then the resulting holes must be welded to prevent snow from getting into them. If this is not done, melted snow inside the pipes will lead to corrosion.
At the same time, you won’t even notice it; Weld two transverse pipes to two longitudinal pipes. In this case, the latter should be located in the rear part of the structure, since the unit’s motor will be supported on them. The distance between the transverse pipes should be about 20 cm; Next, you need to remove the engine from the chainsaw. Instead of the standard motor drive sprocket, which serves to tension the chain, you need to install an ordinary small sprocket. It can be taken from an old Voskhod or Minsk motorcycle. The sprocket must be fixed motionless by welding it. However, before this the part will need to be centered; After manufacturing the frame, you need to move on to creating a working element - the auger of the unit. To do this, take a small diameter pipe or shaft, 80–85 cm long. These dimensions are needed for mounting the drive in front of the main part of the structure. Particular care should be taken in selecting suitable bearings; Next, take a metal sheet 2 mm thick and cut out 4 identical circles with a diameter of 30 cm in it. You need to cut holes in each circle with a diameter of 22–23 cm. Then each of the circles will need to be trimmed to make turns out of them; Then you need to determine the central part of the shaft and weld 2 metal plates, 13 cm long and 15 cm wide, to it. Place the sheets strictly parallel to each other. They will serve to throw snow to the sides when operating the snow blower; Weld screw strips to one side of the blades. Next, install the spacers on the shaft and weld the other ends of the screw bands to them. In this case, all 4 screw plates should be directed towards the center of the auger. The entire manufactured structure must fit into a 70-centimeter section of the shaft, since the drive will be installed on the rest of it; The next step is to move on to manufacturing the body. To do this, you need to take 2 round sides, the size of which should be 7 cm larger than the auger. After this, you will need to weld a metal sheet no more than 1 mm thick to the circumference of the sidewalls. As a result, you should end up with a semicircle of metal plates. Make holes in the central parts of the sidewalls and install the auger in them; Before attaching the auger, you need to install bearings on the shaft and press them securely. Remember that the auger must be centered. Use cages to secure the bearings; Next you need to assemble a snow disposal. For this you will need an aluminum pipe with a diameter of 15 and a length of 10 cm. You will also need a metal sheet from which you need to form a box. To install the snow drain, you need to make a hole in the back of the auger blades. A pipe is inserted into it and secured with ordinary bolts. Place and secure the box on top of the pipe; Then put a sprocket from a domestic motorcycle on the drive section of the shaft; At the last stage of manufacturing, you need to assemble the entire existing structure. To do this, the housing and auger must be installed and welded to the longitudinal pipes of the frames. Install the chainsaw engine on the transverse pipes so that the drive and driven sprockets are located strictly in the same plane; Install a chain on the drive and make a handle from leftover metal pipes. Don't forget to move the throttle control lever to the handle.
Drive system
A small diameter drive sprocket is installed on the engine output shaft. From it, torque is transmitted through a chain to the driven shaft, located under the engine seat. On the driven shaft there are:
- Large diameter driven sprocket.
- Gear wheels that drive the tracks.
- Guides for tracks.
The driven shaft is mounted on the frame using bearings. Gear wheels push the tracks, causing the tracks to move. The chain and sprockets are removed from one device. Old motorcycles and snowmobiles (Buran) are suitable donors. Gear wheels for tracks can only be removed from other tracked vehicles.
The guide rollers rotate with the shaft, are attached next to the gears and serve to tension the belt. They are made of wood or plastic and have a layer of soft rubber at the ends. Rubber prevents damage to the track. It is easy to make such rollers yourself by securing the edging with a furniture stapler.
Theoretical aspect
Proceed to work only after preliminary development of the plan and complete readiness to make a snow blower. Planning is the main stage at which all the necessary parts and drawings are prepared according to which the assembly will be carried out. With the help of a correctly drawn up drawing, it is almost impossible to spoil the design or fail to make a working unit. It is the diagram that will allow you not to miss an important node and secure everything in the right place.
The design of the snow blower consists of:
- Gas tank;
- Engine;
- Wheelbase;
- Cardan shaft;
- Bearings;
- Leading star.
Features of the walk-behind tractor
Structurally, a homemade walk-behind tractor is a two-wheeled unit on a frame, producing up to 4 liters. s at an average speed of 2.5-2.7 km/h. Features, as well as operational tasks, are largely determined by the choice of power plant. If we are talking about a conversion from “Friendship”, the following parameters will distinguish it from a purchased walk-behind tractor:
- small size, lightness;
- savings on fuel and lubricants;
- the ability to assemble a unit tailored for specific work (required frame size, mounting unit).
A homemade walk-behind tractor can plow, hill up crops, harrow, mow or remove tops, and apply fertilizer. Due to its small size, it can be used in hard-to-reach places (for rocky, poor soil, the power of a homemade product may not be enough). It will be especially useful for those in whose area the strength and power of a large purchased walk-behind tractor will be excessive.
A chainsaw can be used as the basis for a homemade walk-behind tractor
Electric power generator with internal combustion engine from a chainsaw
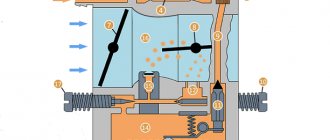
Most modern devices are powered by electrical energy. Away from power lines, it is obtained mainly from electric generators. Such portable equipment, together with batteries, is also used in field conditions. To save money, you can make your own generator from a chainsaw. Its design is shown schematically below.
In the photo above, the numbers correspond to the following structural elements of a portable electric generator:
- gasoline saw;
- transmission gearbox;
- drive belt;
- tension bar;
- electric generator;
- control Panel;
- clamps;
- saw stop;
- fastening nut (designed for attachment to the gearbox frame);
- drive pulley
Homemade mini-power plants are equipped with alternating or direct current electric generators (for example, from a car at 12-14 V). The value of the output voltage and its other current characteristics depend on this.
DIY chainsaw snow blower
A snowplow with a factory-made chainsaw engine is a budget option for assembling high-quality, passable and fairly maneuverable equipment. A chainsaw snow blower has much smaller dimensions than store-bought equipment, so it can cope with snow removal in the most difficult to reach places.
Before you begin, you will need to select drawings. The diagram used must accurately indicate the dimensions of all components, and must also be capable of installing them into a common device.
To assemble the homemade product, you will also need to prepare parts. Their list includes:
- pipes of different diameters made of steel and aluminum;
- forged metal shaft;
- several bearings;
- Sheet steel;
- welding machine;
- hand tools: wrenches, screwdrivers.
Assembling a homemade household snow blower from a chainsaw consists of several stages. Their list includes:
- Frame assembly and engine installation. A homemade snow blower must be equipped with a durable and impact-resistant frame. The stability of the snowplow when moving off-road, as well as the protection of its internal parts from mechanical damage, largely depends on its quality and balancing.
It is best to weld a durable frame from solid steel and aluminum pipes. The base of the frame should be assembled from pipes of the same diameter. Next, pipes of smaller thickness will be welded to them.
During assembly, you need to pay attention to the 2 installed longitudinal pipes, which in the device will not only play the role of one of the parts of the frame, but also perform the function of snowplow skids. When connecting, all their holes will need to be welded so that snow does not clog in them, causing corrosion.
2. Assembling the housing of the working auger and the drive mechanism of the snow blower. To create a working auger, a pipe of small diameter, 80–85 cm long, is best suited. On an auger of shorter length, it will be difficult to install a reliable drive located in front of the main part of the later-made bucket. One of the main roles when making an auger yourself is played by correctly selected bearings for the shaft.
3. Making a snow blower bucket. To assemble the bucket yourself, you will need 2 round metal sides, the initial size of which should initially exceed the immediate dimensions of the auger by about 7 cm.
Before you finally secure the auger for the snow blower, you will need to put bearings on the shaft;
4. Assembling the ejection chute. To make this part of a snow blower from a household chainsaw, you will need an aluminum pipe, at least 10 cm long and about 15 cm in diameter. To install the aluminum pipe, you will need to make several holes in a homemade auger. Next, a solid metal pipe is inserted into them and secured with bolts.
5. Final assembly of a snow blower with an internal combustion engine from a chainsaw. To assemble a homemade product, first of all, you need to weld a bucket and auger to the longitudinal parts of the manufactured frame. Next, you will need to install a chain on the manufactured drive. To make this easier, you need to use a tension sprocket, which will be attached to the auger with bolts.
Next you will need to make a handle using several metal pipes. You will need to display the controls on it: the throttle position adjustment lever, the ignition on and off button, as well as other switches.
A snow blower assembled in this way from a household chainsaw will be able to clear areas ranging from 5 to 25 acres. The homemade product will be quite easy to maintain and suitable for independent repair.
Design and operating principle
By deciding to start assembling a snow blower from a chainsaw, you gain additional experience, skills, and also the opportunity to get an excellent device for clearing snow in winter with minimal investment.
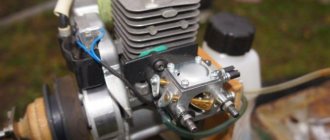
Structurally, the snow blower will include several basic elements.
- Moving part. This is the engine. Here you can take an internal combustion engine running on gasoline from almost any chainsaw. Be it Druzhba, Ural, Husqvarna or Stihl. The main thing is that the motor is working, and the chainsaw itself is not required to perform direct duties. Still, sacrificing a chainsaw for a snow blower is not always worth it.
- Ladle. It will be located on the front side of the equipment. To make a bucket, you can take sheets of metal or durable plastic. But metal is more reliable and durable.
- Screw. This is a module for collecting snow, which is located in the cavity of the bucket. Needed for collecting, crushing, and moving snow along the outlet chute. The screw rotates due to the operation of the engine.
- Outlet chute. For its manufacture, the same materials are used as for the ladle. Necessary for redirecting snow masses to the thrower. That is, it moves the snow towards the outlet.
- Chassis. This is what will allow the snow blower to move. Here you can use regular wheels or tracks. Start with what you have at your disposal;
- Handles. Responsible for managing and changing operating modes.
Having decided on the main nuances, you can begin work on assembling a snow blower based on an internal combustion engine from a chainsaw.
Why is the Ural chainsaw used?
In terms of their reliability, level of performance and ease of maintenance, Ural chainsaws can give a head start to almost any modern chainsaw. The main components of this saw include a drive with a motor and the cutting bar itself, which were made quite well.
The key factors that allowed craftsmen to make miracles of design ideas from old and temporarily unnecessary Ural chainsaws include:
- quite powerful and high-torque engine;
- low weight and relative compactness of the engine;
- the ability to work for long periods of time under high loads and in a variety of conditions;
- a well-thought-out and high-quality design of the saw itself, for example, a clutch that prevents overload, as well as preventing breakage of the main components.
All this, combined with the versatility of the drive and ingenuity, allows craftsmen to independently create functional devices of various types.
Features of designs with different motors
Chainsaws of various manufacturers and models are equipped with motors with different characteristics. For the most efficient operation, when assembling a homemade snow blower, these features must be taken into account. For example, the Druzhba and Ural chainsaws stand out among other models due to their high engine power, which causes vibration and noise during operation.
Vibration can be avoided by installing a thick piece of rubber gasket between the engine and the frame.
In addition to installing a gasket on the housing, you can equip the engine with a muffler. To do this, the cavity inside a solid metal pipe must be filled with a rubber gasket, and the entire resulting structure must be attached to the motor with bolts or by welding. This will reduce the noise level during constant operation of the device. In addition, high operating power comes with high structural loads. To prevent the early failure of a snow blower based on the Druzhba and Ural chainsaws, you will need to equip it with a high-strength chain.
The increased reserve of torque and thrust of the engines of devices of the Ural and Druzhba brands allows, if desired, to increase the volume of the bucket and the power of the auger, thereby increasing the overall productivity of the unit. The motor from a Stihl brand household chainsaw is not very powerful. Thanks to this, a snow blower based on it will have a relatively small size and increased maneuverability. The dimensions of the bucket for such a device should not exceed 50 cm in height and 60 cm in width. A device assembled in this way can remove snowdrifts up to half a meter high from both dry and sticky snow.
What will you need?
To assemble a snow blower, the following materials and tools are required:
- engine removed from a chainsaw,
- metal pipes,
- forged shaft,
- bearings,
- sheet metal,
- rubber,
- welding machine,
- screwdrivers,
- pliers,
- metal scissors,
- hammer,
- nuts, bolts and other consumables.
It is better to remove the motor from a Ural, Druzhba or Stihl chainsaw.
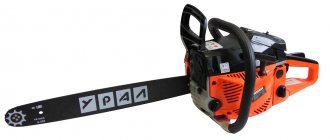
Choosing a chainsaw for a homemade snow blower
The power and performance of a snow blower directly depends on the engine you choose. This main element is removed from the chainsaw. The higher the power of the saw, the better. The engines in household models are two-stroke, power varies from 2 to 10 horsepower. For a homemade snow blower, 5 horsepower will be quite enough. Below we will look at the most popular brands of chainsaws that are often used for homemade snow blowers.
Chainsaw “Friendship”
This chainsaw was developed during the USSR, in 1950, after which it began to be produced en masse in the Soviet Union. Since then, the technical indicators and characteristics of the saw have become significantly outdated. The weight of the unit is 12 kg, in addition, the saw has large dimensions. Experienced owners say that the first saws, which were assembled in the first decade of the plant’s existence, still work properly.
Chainsaw Friendship
Gasoline saw “Ural”
Another representative of the domestic production of chainsaws. “Ural” tools can be called a kind of improvement on “Druzhba” saws. With the same weight, the Ural has more power from a two-stroke gasoline engine (5.5 horsepower) and smaller dimensions. In this regard, the performance of these devices is much higher.
Chainsaw UralGerman chainsaw “Stihl”
Imported sawing equipment is often much better in quality and performance. Foreign factories, such as the German concern Stihl, always try to produce technological innovations. Of course, this also affects the cost of the equipment. Shtil is one of the most popular companies among the Russian population because it has high power, excellent quality, long service life and a relatively low price.
Chainsaw Shtil
Video reviews and lessons on how to make a snow blower
Reviews from owners of homemade snow blowers Any man who has assembled a snow blower with his own hands will name many advantages of this design. The main advantage is accessibility, low cost, and the ability to work with common materials and tools that everyone has in their garage. For inexperienced craftsmen, this activity may seem complicated, but you can quickly figure it out, thanks to the many training videos, diagrams and drawings on how to assemble a snow blower from a chainsaw with your own hands.
Valentin, 44 years old, Nikolaev
Rotary snow blower made from a chainsaw
This device works as follows:
- A moving auger, which has two input turns, moves the snow mass to the blade.
- During operation, this part throws snow to the side through a pipe.
Such a device is capable of capturing layers to be removed over an area of 50 x 40 cm. If you need to increase the productivity of the unit, you can slightly increase the size of the rotor (by 30%) and make corresponding changes to other parts. The assembly technology is as follows:
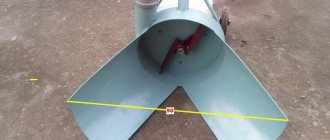
- A box of the required size must be welded from a sheet of iron or steel. They should be chosen so that the box is larger than the calm. If this is not done, then during operation the machine will rumble due to friction of parts.
- A hole 16 cm in diameter is made in the box. It is needed to remove the pipe. If you make a lead of a smaller caliber, it may become clogged during operation.
- For the auger shaft, you can use a ready-made steel pipe, which is purchased on the construction market. Tubes of the front pillars from a passenger car, for example, a VAZ 2210, are also suitable. You need to weld two blades (metal) measuring 14 x 10 cm onto it. On both sides, next to them, screw 2 blades, which are made in the form of a spiral with two links. They can be purchased on the construction market or made from a sheet of steel 2-3 mm thick.
- The shaft must be made composite, of two halves. It can also be made from corners that are welded along the fold line. but using cut pipe gives better results.
- The finished auger must be installed on bearings of the appropriate diameter.
- All moving parts should be located under removable elements, which will make it easier to clean the mechanisms after finishing work.
- The main, driving auger and motor are electric, so to protect them, the rotor must rotate in sealed bearings.
- The blades must be installed in the pipe hole, and the auger in the box. Now they are connected by an asterisk, which can be removed from the bicycle
- Now you need to connect the resulting device to a gasoline saw. When carrying out this operation, you cannot rush - you need to correctly calculate the gaps.
- The main frame is being welded. An electric motor is installed on it using channels and bolts and connected by a chain to the auger sprocket. Then attach a gasoline saw to the base. The terminals of its generator are connected to the electric motor. You can also make a direct output from the chainsaw - then its sprocket must be connected by a chain to the gearbox, which, in turn, is connected by a chain drive to the auger shaft. The choice depends on the person working on the device and the ability to purchase or obtain the necessary parts.
- Sidewalls made of thick plywood cover all the main mechanisms of the device. A chipboard sheet 1-1.5 cm thick is suitable for this.
- Align the auger, check with your hand that the shaft and blades rotate easily in the pipe hole.
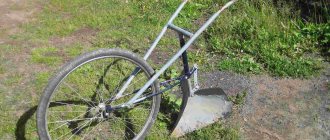
- You can install a homemade snow blower on wheels, but they can get stuck in deep snow. Therefore, it is best to install the unit on skis. They are made from two pieces of wood and secured to the sides of the apparatus. To make them slide better, you need to put thick plastic pads on the boards. They are made from electrical wiring boxes.
- Now we need to take care of the appearance of the completed unit. It can be painted in any desired color.
- After this, you need to install the pipe in place and pour gasoline into the tank. The apparatus is activated and, slowly bringing it to the snowdrift, the auger is allowed to enter deep into the snow mass. Snow dust should fly out of the pipe to the side.
- If everything is in order, then you can start clearing the road from snow drifts.
Motoblocks, used in almost every farmstead, are seasonal mechanisms. In the spring there is plowing and sowing, in the summer there is crop processing, in the fall there is harvesting. In winter, these useful devices stand idle, losing economic efficiency.
- 1 Operating principle of the screw mechanism
- 2 DIY snow blower - types of designs
- 3 How to make an auger snow blower with your own hands?
- 4 Power plant for auger snow blower
- 5 Chainsaw snow blower
- 6 DIY electric snow blower
But it’s enough to make one more device for the walk-behind tractor, and you will get a homemade snow blower.
Almost throughout Russia, snow removal is becoming a mandatory procedure outside of large cities. To mechanize this process at low financial cost, we will tell you how to build a snow blower with your own hands.
Useful tips
To prevent the snowplow from crashing into the ground, the edge of the blade is sheathed with metal. This will also strengthen the strength of the manufactured product. If the dimensions of the blade are 45x25 cm, then it will have the shape of a bucket. To extend the life of the snow blower, during the first check, you need to inspect all fastenings of the elements every 20 minutes, and then continue working. You should also check the condition of the V-belt and other important elements and systems of the manufactured structure.
Regularly tighten screw connections. To avoid metal corrosion, you need to treat metal surfaces with special solutions to protect against rust. If these conditions are met, your snow blower will operate efficiently for many years. People who have made their own snow blower leave positive reviews about its performance.
If you make snow blowers with your own hands, following all the above rules, the tool will be durable and reliable. Always before starting to assemble the device, make drawings with precise indications of the dimensions of the parts and components of the future unit. If you do not have welding skills, then you need to invite a professional to join the parts.
Procedure
Once a suitable drawing (component layout diagram) has been selected, the necessary tools have been found and the Druzhba saw has been dismantled, you can begin assembly. You should start with the frame, since all the elements of the motor unit will be attached to it. The process is completed by assembling the chassis, as well as additional blocks: if desired, headlights, gearbox and clutch, if the drawing is more complex and requires them. For the first time, it is best to choose a simpler drawing.
Frame assembly
The first stage involves the following actions:
- bend the pipe so that it takes the shape of 2 spars with edges pointing upward;
- the steering wheel is welded at the back (the easiest way is to weld two handles, but if available, you can use a ready-made steering wheel from a motorcycle);
- It is recommended to strengthen the structure with cross members from the same pipe;
- We cut out a “shelf” from a metal sheet for the battery, which we weld to the rear bends of the side members.
It turns out to be a vague resemblance to a sleigh. For heavier structures with more powerful power units, the frame can be made in the shape of a cube or similar to a tractor for 4-wheeled homemade products.
Assembly of the motor block
The most difficult stage is assembling the components. Before you begin, you need to mark on the frame the places to which the parts will be attached. The principle is as follows:
- a motor with a gearbox is mounted on top of the crossbars;
- a fuel tank is installed under the engine (a separate support should be welded under it), the battery is mounted on a special platform;
- To prevent exhaust gases from entering the control unit, you can make an exhaust pipe from a 7 cm metal tube with a diameter of up to 25 cm.
This is the basic version without a gearbox, which can be installed upon request. The drawings will help you understand the assembly in more detail. By and large, the details of “Friendship” are simply rearranged. The hitch is connected to the output shaft of the chainsaw.
Chassis assembly
There are at least two options: you can use a ready-made axle shaft from a car, or you can make a homemade walk-behind tractor driven by physical force (the “chassis” of an old cart or wheelbarrow will come in handy, which will significantly reduce the weight and dimensions, because a car axle shaft will require the use of tires). In the first case, you will have to organize the drive from the motor to the axle shaft, which is not easy, so welding the “running” wheelbarrow to the frame is a more understandable option.
It is not difficult to figure out how to make a walk-behind tractor from a chainsaw if you understand the general operating principle of both units. In addition to “Friendship”, “Ural” and “Taiga” saws are also suitable for the walk-behind tractor. When deciding to experiment, you should understand that the homemade product will have limited functionality and low power, allowing you to process a maximum of 20 acres.
If you find an error, please select a piece of text and press Ctrl+Enter.
The walk-behind tractor is an effective assistant in the processes of cultivating the land, as well as further caring for the garden and garden. The easiest way to obtain this device is, of course, to purchase it. However, there is an option for making it using a chainsaw engine, in particular from the Soviet “Druzhba”. Its powerful engine, simple design and overall unpretentiousness make it well suited for this role.
Preparation
Before you begin assembling the equipment, you must complete the following preparatory activities:
- Clear space for upcoming work.
- Remove the engine from the chainsaw.
- Prepare drawings. If there is relevant knowledge, they compile it independently. In other cases, you can use ready-made diagrams from the Internet.
How does a snow removal unit work and what does it consist of?
The design and operation of a homemade snow blower is no different from its factory counterparts. The driving force is provided by the motor, so it is desirable that it be powerful. It is better to take an engine for a snow blower from a Druzhba or Ural chainsaw. Motors of these brands are characterized by endurance, power and long service life.
In addition to the chainsaw engine itself, you will need to weld a frame for snow removal equipment. In order for the machine to move itself, it can be equipped with a drive and a set of wheels or tracks can be installed. It's easier to attach runners from below. Then the car will have to be pushed so that it goes like on skis. The snow blower body itself is bent and welded from sheet metal. The working mechanism is a screw. It scoops up snow with disk dosses, grinds it, and two rotating blades push the loose mass through the outlet sleeve.
Improved homemade snow blowers are additionally equipped with a rotary attachment. The design resembles a vacuum cleaner and consists of an impeller with welded blades. The snow blower rotor is placed in a round housing, after which it is attached to the back of the auger mechanism bucket. During rotation, the fan sucks in loose snow coming from the auger. Inside the housing, the snow mass is additionally ground and thrown out through a discharge sleeve with a strong air flow.
How to use?
Rules for using a homemade snow blower:
- Before starting work, you need to check the reliability of all fasteners.
- To start the engine, close the air damper and pump fuel into the carburetor using a primer.
Perform several movements with the starter, open the damper and pull the starter cord again.To normalize the speed, press the control lever all the way and immediately release it.
- When clearing snow, you need to remember that the chainsaw motor may not withstand high loads. Therefore, it is necessary to move slowly, partially covering the already cleared strip.
- The area should be cleared in advance of stones and branches that could damage the device.
- After each cleaning, the car is cleared of snow and dirt.
- Store the snow blower in a warm, dry room.