If the microwave oven makes a loud noise, emits a sweetish smell of burnt windings, and does not heat. All these signs indicate that the high-voltage (step-up) transformer may be faulty. In this case, it must be checked and, if necessary, the microwave oven repaired.
In this article we will diagnose the high-voltage transformer of a microwave oven and also consider the reasons for the failure of this component.
Attention! A microwave oven can give you an electric shock (voltage up to 5 kilovolts) even if it is unplugged
We strongly recommend that you seek help from specialists if you are not confident in your knowledge regarding safety precautions when working with electrical appliances. Transformers in microwave ovens may differ in: mounting configuration to the chassis, size, power, class, output voltage and winding resistance.
Failure of this component can be caused by voltage surges in the 220V network, heavy load, short circuit of the magnetron pass-through capacitor, or manufacturing defects.
Circuit diagram of a high-voltage microwave oven transformer
So let's get started.
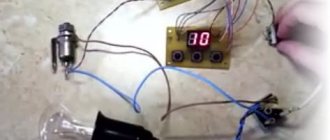
We take a microwave oven with a suspected transformer malfunction (the oven makes a loud noise, smokes, and does not heat food).
Unscrew the screws and remove the casing.
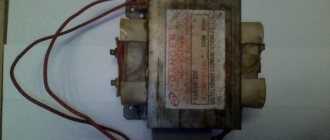
We detect a high-voltage transformer.
It is important to remember that a high-voltage capacitor in a microwave oven can hold about 4000 Volts for several minutes, and if the 10 MΩ resistor in it is broken (which serves for discharging), then a dangerous charge can remain for quite a long time. Therefore, before starting the test, it is advisable to discharge the capacitor, for example, with a screwdriver on the housing or by closing the contacts together with pliers.
We got to the transformer, we will check it, for this we will need a multimeter and pliers.
So, let's check the primary winding. Carefully remove the terminals from the terminals of the primary winding of the transformer.
We set the measurement limit on the multimeter to 200 Ohms.
We make measurements. The winding resistance usually varies from 2 Ohms to 4.5 Ohms (depending on the class of the transformer and the cross-section of the winding wire). If less than two or more than four and a half ohms, most likely the problem is in the primary winding. Also, when taking measurements, do not forget about the error of the multimeter. In order to find out the error, close the multimeter probes for a few seconds at a limit of 200 Ohms.
In our case, everything is in order with the primary winding.
We move on to the next phase of measurements. We measure the secondary winding, the device limit is 2 kOhm
We remove the terminals from one terminal of the secondary winding, the second terminal is the transformer housing (since the housing is bolted to the microwave chassis, you can call the oven housing). The resistance of the secondary winding can vary from 140 Ohms to 350 Ohms (again, as mentioned earlier, it depends on the class and cross-section of the winding) if the readings exceed 350 Ohms or less than 140 Ohms, this indicates that there is most likely an interturn short circuit of the secondary winding.
Now let's check the filament winding, the measurement limit is 200 Ohms. We disconnect the terminals from the magnetron and measure the terminals with the device. The resistance of the filament winding ranges from 3.5 to 8 Ohms.
It happens that the device shows the resistance of all windings within normal limits, but the transformer still does not work well, this happens when the winding is only slightly burnt and only shows itself under load, in this case it is best to throw in a known-good high-voltage transformer.
You should also check whether the transformer is receiving 220 volts. To do this, you need to connect a multimeter to the terminals that fit the primary winding of the high-voltage transformer, turn on the microwave in a 220V network and start the microwave heating program.
Good luck with the renovation!
If you are not confident in your knowledge in the field of electrical engineering, you can contact us to call a microwave oven repairman in Kyiv. We guarantee reasonable prices and quality.
There is a microwave oven in almost every kitchen today. Manufacturers are improving devices, equipping them with additional functions, giving them new capabilities. An old stove model is sometimes simply thrown away. But you shouldn't do this! After all, its components will still serve in capable hands.
Ideas for using microwave parts
Copper wire on a reel, decorated with several rows of windings and metal plates, often remains operational even after the microwave has failed. Therefore, it is too early to get rid of it.
We offer options for using a microwave transformer.
How to turn a former transformer into a power supply
- Remove the part from the microwave.
- Remove metal plates. To do this you will need tools (screwdriver, chisel).
Advice
. If you use a grinder, the job will be easier to complete. When doing this, care must be taken not to damage the windings.
- Carefully remove the 3 windings.
- For the power supply you will need one of the larger ones, rated for 220 V. It is thicker than the other, but less wire is used.
- Wind the desired winding onto the bobbin.
- Place the coil on a core shaped like the letter W.
- Perform calculations for the second layer of the winding. This is done experimentally. Start with 10 turns on the core. Then voltage is applied through both windings and data is measured on the one that consists of 10 turns. If the indicator is 10, you can continue working. The final number of turns depends on how much power is needed.
- The core is secured.
The power supply base is ready. For its final production, you will need to arrange it in a special case and retrofit it with a diode bridge and a capacitor.
This way of working can hardly be called simple. However, as a result of the labor-intensive process, you will receive a powerful power supply, the acquisition of which would require significant funds.
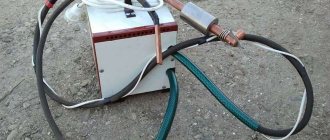
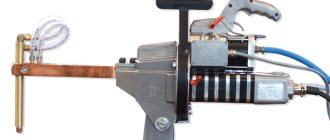
Welding machine
Even minor repairs in a house or garden often require welding work.
If you have an unnecessary microwave, you can make your own convenient and reliable spot welding machine.
- The transformer is removed from the microwave.
- Remove the existing secondary winding.
- Make a new winding using a wire with a diameter of at least 10 mm.
Important
. If you don't have a thick wire, you can replace it with several thinner wires. The main thing is that the sum of their diameters is 10 mm or more.
- When working with a thick wire, you can remove its thick insulating layer and replace it with electrical tape, one side of which has a fabric backing. In this case, the winding will be easier to make.
- If you are working on a welding machine, keep in mind that it will be suitable for joining thin sheets of metal.
- To weld thick plates and increase power, you will need a second transformer.
Many home craftsmen want to own a personal welding machine. But this does not always have to be bulky equipment, since household operations involve the use of a more popular option - spot welding. The modern market offers a lot of options - from the most budgetary to the most expensive. However, purchasing is not always advisable due to the possibility of self-production. Next, we will look at how spot welding is created from a microwave, its features and sequence of actions. Naturally, it will not be possible to weld serious structures, but for minor repairs it is quite a suitable option.
Capacitor check
Osm transformer characteristics, osm 220/220 designation
If you have a need to check the serviceability of this element in a microwave oven, you need to approach this matter responsibly. This will prevent damage to other electronics located in the microwave.
Typically, testing is carried out when a malfunction is identified or when there are other failures in the correct operation of the microwave.
Below are instructions on how to perform the test correctly and which device is best to do it with.
How to find a capacitor in a microwave
- When working with a capacitor there is a possibility of interaction with high voltage and this can be very dangerous. In order to protect yourself from the possible negative effects of current, you must first turn off the microwave oven from the network.
- After unscrewing the back cover on the device, you need to remove the closing panel. Depending on the design of the furnace, it will not be difficult to find the capacitor; it is enough to know approximately what it looks like. Usually the part is located near the transformer.
- Regardless of how long the device has been without power, it is imperative to discharge the part.
Only after the above operation can you start working with it.
Using a Multimeter to Test
For diagnostics you will need a special device - a multimeter. Its functions include testing various electrical devices or individual parts.
To check using a multimeter, the device is set to ohmmeter mode. The multimeter prepared for use is connected to the capacitor.
The limit depends on the type of device, so it is different for everyone.
After the first reading of the readings, it is necessary to rearrange the probes and monitor the dynamics of changes in the result displayed on the device.
However, verification by this method occurs at a low rate. Usually, at this voltage, in high-voltage capacitors, if they have a leak or are broken by a short circuit, the breakdown is not detected.
In order to avoid such inaccuracies, you can use a megohmmeter with an external high voltage source equal to the operating value of the capacitor.
Among the main megohmmeter models suitable for such a test are the following:
- PU182.1 (500 V);
- PU186 (2500 V);
- KEW-3125 (5000 V).
How does a spot welder work?
To melt metal, a large amount of current is required. The voltage level is not important in this case. Levels up to 3 volts are often used.
There is no point in experimenting with different current levels. Each considered option for a welding machine made from a microwave transformer has undergone repeated testing. The power of the transformer used must be selected from the planned thickness of the workpieces to be connected. For example:
- Thickness up to 1 mm – enough power of 1000 W;
- Up to 2 mm – 2000 W is enough;
- Up to 3 mm – level 5000 W.
The primary winding is selected based on the total power of the assembled device. Since creating a transformer on your own is very problematic, it is better to use a ready-made option, using a transformer from a microwave. This option works great with the following features:
- The radiating elements of the furnace require a voltage of several thousand volts. However, the current level does not play any role;
- The power on the windings is the same. By increasing the number of turns on the secondary winding, the voltage will also increase, losing current;
- Transforming elements in microwave ovens have a power of up to 3000 W. This is enough to create resistance welding with your own hands.
The required parts can be easily found on radio markets or removed from your old furnace. The failure of old microwave ovens is characterized by burnout of the secondary winding, since it has a smaller diameter.
The generated current level of 1 kA will allow you to easily melt the metal at the contact points, ensuring reliable welding. This can be achieved from a 3 kW transformer.
The principle of welding can be clearly explained in a video lesson.
Where can I get high voltage?
Food in microwave ovens is heated by the operation of ultra-high-frequency waves. Microwaves are generated by a special emitter - a magnetron. To operate within the specified characteristics, it needs a high voltage - 2,000 V. This is almost an order of magnitude higher than what a household electrical network provides (220 V).
Where do kilovolts come from? They are created at the output of the secondary winding of the high-voltage converter.
Important! A microwave oven, even disconnected from the power supply, can cause an electric shock (U up to 5,000 V).
Removing and assembling a transformer from a microwave oven
Every microwave oven has a magnetron. He, as was said, needs increased tension. The built-in transformer has fewer turns in the primary winding and more in the secondary winding, which induces voltage up to 2000 Volts. If there is a doubler, this value increases by 2 times. This property is used when creating do-it-yourself spot welding from the microwave.
Removing the transformer must be done with care. To avoid damaging the device, do not use heavy tools. First, remove the housing and all fasteners. The transforming element is removed from the fixation point. This device will require a magnetic core and a primary winding with a thicker wire and fewer turns.
The secondary winding is not needed in the design and must be removed. This can be done with a hammer and chisel. It’s definitely not worth learning how to cut down. However, this must be done carefully so as not to damage the primary winding. As you work, you may find bypass devices that are used in some types of furnaces. They also need to be removed.
If there is a magnetic core not based on adhesive, but based on welding, then it will be more convenient to remove the winding from it with a chisel or a hacksaw. The winding can be placed quite tightly in the magnetic circuit. In this case, drilling or removal with improvised means will be required. It must also be done carefully to avoid damage to the magnetic circuit.
Next, assembling resistance welding from a microwave with your own hands involves creating a new secondary winding. To create it, you will need to have a whole wire with a diameter of no less than 100 mm2, which corresponds to 1 cm. It is even possible to use a bundle of wires that provide a suitable diameter. When you create a new winding in your transformer, you can create a current of up to 1 kA.
If you want to assemble an arc welding machine from a more powerful microwave, then one transforming element may not be enough. In this case, you will need to combine two elements from two microwaves.
It will be enough to create two or three turns. If the insulation is too thick, you can remove it and replace it with a thinner one, for example, fabric. When using two transformers at once, the secondary winding must be made common. However, in this case it is necessary to correctly connect the outputs to the primary ones.
Procedure for safe inspection
When starting an independent test, you need to stock up on a multimeter (in extreme cases, a two-pole indicator with a built-in power source), screwdrivers with various tips, an ohmmeter, and pliers.
The general scheme of safe work looks like this:
- disconnect the device from the power supply;
- unscrew the screws and remove the casing;
- discharge the capacitor;
- carefully remove the terminals from the transformer;
- check its windings: if the parameters are normal, replace them and look for other reasons;
- when a break or short circuit is found in them, the device is replaced;
- The oven is assembled and its functionality is checked.
If, after removing the transformer, traces of insulation melting are visible on its windings, and a strong burning smell emanates from it, then it is no longer suitable for use, and there is no point in checking it. In this case, only replacing the device
.
Before you begin examining the transforming device, you must make sure that it is receiving power. To do this, you should use a multimeter to check the presence (after turning on the device into the network and starting the heating program) at the connection points of the primary winding of an alternating voltage with a value of 220 V
This work must be performed with extreme caution to avoid electric shock.
The presence of a high-voltage capacitor capable of storing an electrical charge leads to the need to discharge it before carrying out testing work
. This is done by simply connecting its contacts to each other (with a screwdriver, pliers) or to the housing when the voltage is turned off.
How to connect two transformers
By creating a microwave welding with your own hands from two transformers, it is possible to achieve a significant increase in the power of the device. In this case, you can achieve an increase of up to two times.
The welding current will increase in a similar proportion. However, there will be significant losses, since the circuit resistance will also be high. In this case, the ends of the secondary winding must be connected to the electrodes.
If you have 2 transformers, but their voltage is not enough to make a welder, then you can connect their output windings in series. But an equal number of turns on each element is required. This is also done in cases where it is not possible to wind the required number of turns on the magnetic core.
Also, when assembling such an apparatus with your own hands, it is necessary to control the direction of the turns and their coordination with each other. Otherwise, it is possible to create an antiphase and obtain almost zero final voltage. As an experiment to determine the correctness of the connection, you can use small-section wires.
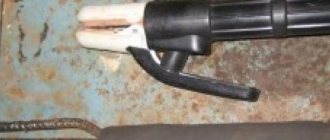
Creation of electrodes
When making spot welding from a microwave transformer, you need to create suitable electrodes. At the same time, their diameter must correspond to the diameter of the wires with which they will be connected. Copper rods are suitable for this, and at low power you can use a tip from a professional soldering iron.
While working, homemade spot welding actively wears out the electrodes. To adjust the geometric dimensions, they need constant sharpening. Accordingly, over time they will have to be replaced.
To connect the device to the electrodes, it is necessary to use wires as short as possible. Otherwise there will be significant power losses. They will also occur when there are a large number of connections.
To increase the efficiency of a device created on your own, you can create copper tips on the wires connecting the electrodes. This way you can avoid any resulting power losses at the contact points.
Wires need to be selected with a fairly large diameter. To make soldering easier, you can use tinned tips. Since the electrodes are of a removable type, soldering should not be done at the fixation points with the tip. Naturally, oxidation and subsequent power losses will occur at these points. However, they are much easier to clean than with crimped tips.
The tips are fixed to the electrodes with a simple bolt connection. It must be made reliable so that there is no increase in transient resistance, which contributes to the loss of power of the spotter. It is advisable to create holes of equal diameter in both parts.
It is better to select connecting elements made of copper or an alloy that has minimal electrical resistance.
Controls
Self-made resistance welding is not a complex apparatus. However, when creating a spot weld from a microwave with your own hands, you need to provide controls. The main ones are a switch and a lever element, with the help of which the necessary force will be created on the electrodes and the workpieces being welded.
The level of quality of the connections created will depend on the degree of pressure. That is why it is worthwhile to provide the longest possible lever. It is also necessary to take into account that microwave welding must be securely installed on the work surface. It may even be worth fixing it, for example, with a clamp.
It is possible to increase the applied forces with the help of levers or lever-screw mechanisms, which you can equip your design with. It is advisable to fix such a mechanism on a lever. In this case, it will not take much time when operating with it. In addition, there is freedom for the other hand, which can hold the elements being welded.
An important feature is that current can be supplied to the electrodes only in a closed position. If this is done before compression, sparking will occur during contact with the part. This also contributes to burnout of the electrodes and breakdown of the device.
The switch should be installed in the primary winding circuit. If you mount it in the secondary, it will create additional resistance, leading to welding of the electrode parts together. It should also be taken into account that a significant current flows in the secondary winding, which not every machine can withstand.
Also, welding from a microwave transformer must be equipped with a basic cooling system. It is possible to use an ordinary computer cooler. In this way, it is possible to cool the transformer itself, electrodes and current-carrying elements. Naturally, it will not be possible to effectively cool the device and you will have to take regular breaks in operation to cool all parts. The homemade machine welds parts no worse than factory models. Therefore, it is worth studying the assembly process in more detail on the video and trying to assemble it yourself.
Resistance welding is increasingly used not only in manufacturing plants, but also in home workshops and garages, where it can be successfully used for various metal-related work. Serial equipment for performing such a technological operation is quite expensive, but a device for resistance welding can be made with your own hands from an old microwave.
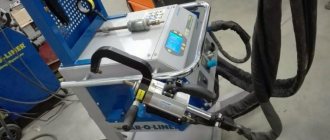
One of the options for a resistance welding machine from a microwave oven
To manufacture equipment for contact welding at home, you will need the following components, accessories and tools:
- a transformer that can be removed from an old microwave oven (if you need a high-power device, you will need two such transformers);
- thick copper wire or small diameter wiring harness;
- levers that will be used as clamps;
- lever of the required length;
- a reliable base on which the welding machine will be installed;
- clamping clamps;
- Screwdriver Set;
- cables and winding materials;
- electrodes made of copper, due to which welding will be performed.
Transformer assembly
The main element of any resistance welding machine is a transformer, which can be taken from an old but working microwave. In order for a homemade welding device to be able to connect steel sheets up to 1 mm thick, a transformer with a power of at least 1 kW is required. If you need a more powerful resistance welding machine, you will need two transformers.
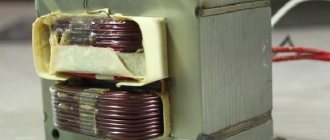
Step-up transformer from a microwave oven
To make equipment for contact welding with your own hands, you need to take not the entire transformer from the microwave, but only its magnetic circuit and primary winding. The secondary winding is carefully removed from the transformer, and the shunts that are located on both sides are removed from it.
We cut off the secondary winding with a chisel (chisel) or saw it off with a hacksaw.
Shunts are removed
The new winding for the microwave transformer is made from stranded wire with a cross-section of at least 100 mm 2 (or a diameter of more than 1 cm). It will be enough to make 2-3 turns. If the wire has too thick insulation, you can remove it and replace it with fabric insulating tape. If two transformers are used at once, then the secondary winding for them is made common, but it is very important to correctly connect the leads from their primary windings.
The next stages of making resistance welding from a microwave with your own hands are the installation of controls, the manufacture and connection of electrodes, the installation of the internal part of the equipment in a reliable case, which can also be taken from broken household appliances.
Another great video on the topic:
Disassembling a microwave oven yourself
If the above reasons are not confirmed, then you need to disassemble the device to troubleshoot. Before doing this, be sure to turn off the oven from the network and wait a couple of minutes.
What should you look for when looking for breakdowns? There are several main elements that often fail:
- Circuit breakers
- Capacitor
- Diode
- Transformer
- Magnetron
These elements are directly involved in the operation of the device and were mentioned earlier. First you need to check the serviceability of the fuses. Their breakdown is immediately visible, because when burned, the conductor inside is destroyed. If this does not happen, then you should look further. For further checking, you need to take a multimeter, because externally it is extremely difficult to find a breakdown on the remaining parts. To check the capacitor, you need to switch the device to ohmmeter mode and then connect it to the part. If there is no resistance, the part must be replaced. It is impossible to check a high-voltage diode with a tester. It is recommended to replace it if other parts break, because often it also gets hit. It can be checked using a slightly different method - by connecting it to the network on the way to the light bulb. If the light is dim or blinking, then the part is working properly. If it lights up brightly or does not turn on at all, then the diode must be replaced
It is important to follow safety precautions, because this element can hold a charge for a long time. It will take several minutes to discharge a working transformer, and much longer if the discharge resistor breaks down.
It is worth discharging it on the body or not touching it at all if you have no experience working with such equipment. Next, the transformer windings are checked.
How to check a microwave transformer:
You need to remove the terminals and check the device terminals one by one with an ohmmeter. First, the primary winding is checked, for which the norm varies from 2 to 4.5 Ohms. For the secondary winding, the limits are 140 and 350 Ohms. It is also worth checking the filament winding by connecting the terminals leading to the magnetron to a multimeter. The norm here varies from 3.5 to 8 ohms. All previous tests have failed, then the problem may lie in the magnetron. To test the magnetron, simply connect the tester to its power terminals. The tester switches to ohmmeter mode. If the resistance is 2-3 Ohms, then this means the device is broken. The same situation occurs if the tester shows infinity. In both cases, the device must be replaced.
https://youtube.com/watch?v=8N6_PDELdOs%3F
Selecting Electrodes
The electrodes of equipment for spot welding perform several functions simultaneously: compression of the sheets being joined, supply of current to the welding zone, and subsequent heat removal. Important parameters when choosing an electrode are its shape, dimensions, etc. It is these parameters that directly determine how high-quality the welded joint will be. The geometric shape of the electrodes can be straight or curly, but preference is given to straight models, as they provide better access to the welding area.
When choosing electrodes for a microwave welding machine, you can simply refer to the corresponding GOST (14111-90), which already specifies all possible diameters of these elements (10, 13, 16, 20, 25, 32, 40 mm).
The diameter of the copper rods that will be used as electrodes must be greater than or equal to the diameter of the working wires. To avoid active oxidation of the electrodes during operation, they are connected to the working wires by soldering. The electrodes of a resistance welding device (including one made from a microwave) actively wear out during operation, so they must be regularly sharpened, giving them the shape of a sharpened pencil using a file.
Bottom electrode installed
How to operate a homemade welding machine
Despite the fact that resistance welding is a fairly simple technological operation, it must be properly controlled to achieve the required quality of the joint. It is for these purposes that a homemade microwave oven should be equipped with appropriate controls. The main ones are a switch and a lever, with the help of which the required compression force of the electrodes and connected parts is ensured.
The quality of the resulting connection directly depends on the compression force, so it is advisable to make the lever for the welding machine longer. It is very important that the equipment for resistance welding from the microwave is securely fixed to the surface of the workbench. Clamps are used for these purposes.
You can increase the force transmitted by the electrodes not only using a lever, but also using a lever-screw mechanism, which can also be equipped with a home-made device. It is most convenient to attach such a mechanism directly to the lever so that manipulating it does not take additional time. In addition, this arrangement of controls will free up the operator’s second hand, which can be used to hold the parts being connected.
A special feature of working with a resistance welding machine is that current can be supplied to the electrodes only when they are in a compressed state. If you turn on the current before compressing them, they will spark the moment they come into contact with the parts, and this will lead to their burning and rapid failure.
The switch, also related to the controls for contact welding (including those made from a microwave), must be installed in the primary winding circuit. If you neglect this recommendation and install it in the secondary winding circuit, through which a significant current flows, the switch will create additional resistance, which will lead to welding of the electrodes together.
For a homemade welding machine with a microwave transformer, you need to provide a simple cooling system, also made by yourself. An ordinary fan can be used as such a system. Using this device it will be possible to cool the transformer itself, electrodes and other conductive elements. Of course, such cooling will not be very effective, and you will still have to take regular breaks in work necessary to independently cool all heating elements of the equipment.
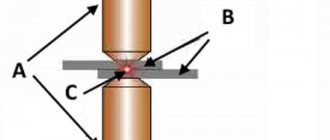
The welding process performed on a home-made machine is practically no different from a similar technological operation carried out on serial equipment. The first stage of this process is the compression of the parts, during which they undergo plastic deformation at the site of the future connection. In the second stage, current is supplied to the welding zone, passing through copper electrodes.
This stage is characterized by the formation of a liquid welding core, expansion of the weld pool and plastic deformation and sedimentation of the metal of the parts at the connection point. At this moment, molten metal begins to splash out of the weld pool. After the current supply to the connection zone is stopped, it begins to cool, which is accompanied by crystallization of the molten metal.
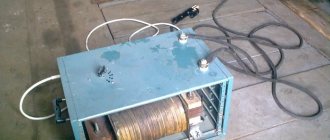
Finished welding machine (top view)
As a result of the processes described above, a cast core is formed in the joint zone, characterized by high strength. The resulting connection zone is characterized by significant residual stresses, which can be minimized if you do not immediately unclench the electrodes after stopping the current supply, but wait a while. You can even slightly increase the force on the connection area after stopping the current supply, which will also reduce residual stresses and allow you to achieve a forging effect.
By the way, using a transformer from an old microwave and simple components, you can independently assemble a welding machine for arc welding. Of course, such a device can hardly be called full-fledged, but for some types of small work it is quite suitable. An example of creating such a mini-welder can be seen in the video below.
Almost every car enthusiast or just a person who likes to spend time repairing or creating something wants to see a welding machine. There are a wide variety of types and models available in the market. “What to do if you don’t have enough money to purchase a welding machine?” is a question that always arises when thinking about purchasing. If you have a broken microwave oven at home, do not rush to throw it away. With a little effort and time, you can make a completely working welding machine out of a breakdown. Let's talk today about how to use a microwave transformer for welding.
An important part is the transformer
There is only one important part in a microwave oven that can be useful in creating the device - a transformer. The transformer in the microwave consists of the usual two coils of copper wire wound around a core. There are two windings - primary and secondary. Coils with windings have a different number of turns of wire: in order to connect voltage to the primary winding, a current with a lower voltage arises in the second coil due to induction, and the current strength increases.
Indicators of the condition of a high-voltage diode
Wire pv-3: technical characteristics, cross-sections, application
If you decide to take the measurement yourself, you need to know how it works correctly.
- If the element is in good condition, the multimeter's index arrow will show 0.25 volts. If you check the resistance in the opposite direction, it will not show anything.
- The failure of the part is indicated by the absence of indicators when measuring in all directions. If a fault occurs, the mechanism lamp will glow evenly or not light up at all.
Considering the above data, we can conclude that the high-voltage diode in the microwave is faulty and must be replaced with a new element. After replacing the element, the microwave oven will function like new.
When checking the resistance on both sides, it is important to know: the terminals differ in purpose and connection. The mechanism element with the + sign is marked on itself and ends with a bolt at the end - this is the anode
The mechanism element with the + sign is marked on itself and ends with a bolt at the end - this is the anode.
The terminal with the sign - has a connection to the capacitor, and it ends with a bracket - this is the cathode.
If the microwave strip is not a faulty high-voltage diode, it will be difficult to repair and check it yourself.
Extraction
To remove the transformer from the microwave oven, you must carefully disconnect the fasteners on the microwave body without damaging the transformer winding. If removed abruptly or very roughly, a break in the circuit may occur, and then unnecessary problems will arise in rewinding the coil with winding. Next, you need to clean the coils and core from small chips or debris that got in during disassembly. For cleaning, you can use a regular brush for painting, the main thing is that it is dry and clean, as in the photo.
Electrical circuit diagram
In addition to the converter, the electrical circuit of the microwave oven contains:
- diode;
- high voltage capacitor;
- magnetron;
- fuse;
- electric motor - one or two (for rotating the tray, if provided for in the design, and for the fan);
- Control block.
In expensive microwave ovens, instead of a converter, a pulse unit is used, which has a more complex structure, but weighs less.
Preparation
Every welder knows that if the welding machine produces low current, this can affect the quality of the weld. It is worth noting that when the amperage increases during the welding process, the electrode may burn through the metal. Simply, the parts will not be welded together, but cut. A voltage of 2 thousand volts appears on the secondary winding of the microwave transformer, which is quite a lot. This requires rewinding the secondary winding with a wire of larger cross-section. A PV-3 type lead with a cross-section of 4 squares is well suited for this; it has good flexibility and you don’t have to bend the wire around the coil for a long time. Rewinding must be done very carefully to avoid causing damage to the primary winding. First, you should cut the winding in several places and remove it from the coil. Then, carefully wind each turn of the new wire. The number of turns directly depends on the power of the transformer, since microwave ovens exist with different technical characteristics; accordingly, transformers are mounted according to the parameters of the microwave oven. When rewinding is completed, current-insulating varnish should be applied to the surface of the new winding.
Checking the device's functionality
It is necessary to check the high-voltage transformer if, for no apparent reason, the microwave oven ceases to perform heating functions. Or it heats, but unsatisfactorily. To do this, you will have to arm yourself with a multimeter and brush up on safety rules when working with electrical equipment.
Safety regulations
When planning to test such an unsafe device as a transformer, in addition to the tester, you should prepare a set of necessary tools. Additionally, you will need screwdrivers with different tips, pliers and an ohmmeter.
Important! All devices for working with a transformer must have handles with reliable insulation. The order of work is as follows:
The order of work is as follows:
- disconnect the oven from the network;
- disassemble the device, starting with removing the casing, for which you should unscrew all the screws on it;
- be sure to discharge the capacitor by simply closing its contacts, for which you can use pliers;
- remove the terminals from the transformer and check the coils;
- continue troubleshooting in other places if checking the coils does not reveal a problem;
- replace the transformer if breaks and short circuits are detected;
- perform reverse installation and check the functionality of the oven.
If after all the manipulations described above, the microwave oven still does not perform its functions, then it is necessary to do a test under voltage.
Verification methods
The possibility and feasibility of using one of the verification options is determined by the master independently, based on his qualifications in this field. In this case, you should use common sense. And if there is even the slightest doubt about your own abilities, then the work should be entrusted to a professional.
- Safe test: Examine the dismantled transformer with a pre-configured tester:
Readings corresponding to one indicate a break in the coil. And values that differ from the table ones indicate a possible short circuit.
Advice! By connecting the tester probes to each other, you can get an indication of the device’s own error. This value must be added to the table for more accurate results.
Test under voltage In this case, with the furnace casing removed, the readings of the secondary windings are checked. The microwave must be plugged in, and the normal readings must correspond to the passport readings, which are shown in the table below.
Important! This operation is classified as dangerous, so it is undesirable to carry it out unnecessarily. To diagnose using this method, you will need a multimeter capable of measuring alternating voltage of 2,000 volts or more
To diagnose using this method, you will need a multimeter capable of measuring alternating voltage of 2,000 volts or more.
Reverse methodYou can do the check in a safer way. If a voltage of 220 V is applied to the secondary winding, then when checking the primary winding, the device should show a value within 24 volts. This method is called the inverse transformation method, and its average coefficient is 9.1. You can use a 12 volt power supply by connecting it to the primary winding. And then on the secondary there should be a reading of 109 V.
An increase in the temperature of the transformer when connected passively to the network indicates a short circuit in the coils. But if heating occurs only when the emitter is operating, then the reason must be looked for elsewhere.
Mounting
We take into account that if the power of the transformer is 600–800 watts, then the future welding machine will be able to weld metal no more than one millimeter thick. If you plan to weld thicker metal, you can resort to connecting two transformers together, which will significantly increase the power of the welding machine. When the rewinding process is completed and the varnish has dried well on the new winding, we proceed to the connection, taking into account that we have two transformers - the primary windings should be connected in parallel, the secondary windings in series, respectively. It is necessary to correctly connect the terminals of the winding contacts to each other, otherwise a short circuit may occur.
Magnetron replacement
Repair of a broken magnetron is not carried out even in specially equipped workshops, so you will have to purchase a new part. Before removing the magnetron from the microwave oven, you should mark the connector contacts to avoid confusion in their connection when installing a new part. If the leads are connected incorrectly, the magnetron simply will not function.
In fact, you can replace the magnetron with a new one yourself. To do this, it is enough to be able to use a screwdriver and be able to ring diodes. Therefore, narrowly focused knowledge and skills are not required. If you cannot find a specific magnetron model for a specific microwave, you should use the most suitable analogue.
The magnetron device itself is the same for all manufacturers, but their design may vary, so it is important to pay attention to the fit of the analogue to the waveguide, which should be tight. If the thermal paste on the thermal fuse is dried out, it should be replaced with fresh one when replacing the magnetron
Electrodes for the device
A welding machine, like a spotter from a microwave oven, works under an electrode. For reliable operation, the rods should be carefully processed, slightly sharpened, otherwise they will easily lose their shape. The cable connecting to the electrodes should be as short as possible and have the least number of connections so that there is no power loss. Copper lugs should be attached to each end of the wire. During the welding process, oxidation of copper is possible; unsoldered areas will provide excess resistance, which will lead to loss of power.