Posted on December 15, 2022 Category: Mechanics |
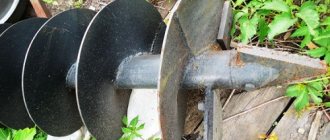
The surface of the screw turns made from sheet blanks is close to the surface of a straight annular helicoid (or, in other words, a screw conoid). Strictly mathematically, the surface of a helicoid cannot be turned into a plane. This also means the opposite -...
...theoretically, it is impossible to obtain a helicoid turn from a flat workpiece.
But in practice, everyone often makes the working surfaces of screws from metal sheets! When deformed into a coil, a sheet blank is subjected not only to bending, but also to stretching and compression (forming). In this case, the initial thickness of the workpiece sheet changes locally! The classical theory of surfaces, of course, does not imply deformation stretching or compression of objects of study.
Next, we consider the approximate calculation of the development of a screw turn in the form of a sector of a concentric ring, which is widely used in practice, with a simple derivation of all formulas of the algorithm. A small program implemented in Excel is designed to help you quickly and conveniently calculate the auger (more precisely, the development of the auger turn).
Preparatory stage
Before you begin assembling the auger structure, you need to prepare a working tool . This list includes:
- sheet steel;
- car springs;
- file;
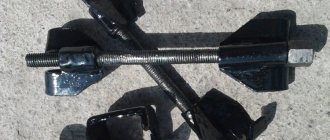
- special vice for fixing workpieces;
- hammer;
- cardboard and marker;
- grinder and wheels for it;
- fasteners; roulette;
- pipes of different lengths.
In addition, you will need a welding machine and safety glasses to reduce the risk of sparks getting into your eyes while working.
As for the pipe material, it is better to select steel elements that have increased corrosion resistance. If you take a cheap option, then after some time rust will appear on the surface.
If everything is prepared, then you can start working. To make a screw with your own hands, you must perform the following steps:
- first make a project, and then a template on thick cardboard;
- take a hollow steel pipe, this material must withstand severe mechanical stress;
- make coils from a flexible steel sheet and use a welding machine to weld the feathers to the pipe - you get a kind of spring.
If a screw is required to work with bulk material, then the turns must be arranged continuously. Otherwise, the desired effect will not be achieved. If everything is done correctly, you will get an effective tool that will have the following positive qualities:
- compact size;
- high performance;
- long service life;
- easy to use;
- rapid deepening and raising of the earth.
But all these characteristics can be obtained only if you strictly follow the installation instructions. Even a beginner can install some homemade devices.
Installation accessories
Drawing of a screw ring.
Having figured out the simplest drilling device, you can start making an auger drill with your own hands. The design consists of elements such as a rod, handle and auger. To make such a device, you will need the following tools and accessories:
- welding installation (all fastenings are made with its help);
- a lathe for the manufacture of certain elements;
- emery disc for grinding cutting elements;
- high-strength steel sheet for creating screws;
- pipe section;
- metal pin with a diameter of 1.6 cm.
Easy way
There is a very simple way to quickly assemble a homemade auger with two blades. These elements will fit perfectly into the ground. The only negative is that it can only be used at shallow depths, no more than 10 m.
The screw is manufactured using the following technology:
- We take a pipe with a length of 100 to 140 cm, it all depends on the height of the worker. In its upper part we weld an oblong nut that will correspond to the bolt. Can be replaced with two standard ones. If you take less, the structure will not hold securely.
- We weld a metal sleeve or thick reinforcement in the lower part - this element will act as an adapter to the drill. We buy a ready-made chisel or make it ourselves from a steel strip 30 cm long and 3 mm thick. First, we thoroughly calcinate it and then cool it in boiling lead or oil. We fix this spiral in the sleeve, and then carefully sharpen it.
- We take two discs from an angle grinder: one with a smooth edge of 150 mm, the other toothed - 180 mm. We saw these disks in half, in which case the central part expands and coincides with the main pipe. We install them one by one: first the smaller one, and 10 cm higher - the larger one. We place the parts strictly at an angle of 35 degrees to the ground. In this case, the efficiency increases with minimal effort.
- Next, we make tubular elements for extension. To do this, take a pipe with a similar diameter and length of 100-140 cm. Then insert a bolt from below and weld it. In the upper part we install and weld an oblong nut.
In this case, the drilling structure will make longer strokes, which means that working with the tool will be easier and faster. At this point the auger is ready.
Complex option
This method of manufacturing a screw will allow you to assemble a high-quality and accurate device that will serve for a long time. First, calculations and drawings are made, then measurements are made. It is also worth preparing tools and suitable material in advance, and only then start assembling a homemade drill.
Step-by-step instructions for installing a screw mixer are as follows:
- Take the prepared pipe, and it should be smooth, without any bends or deformations. Drill a perpendicular hole with a diameter of 8 mm at one end. This is where the top part will connect to the handle.
- Install the tip from below - this part will set the direction of movement of the earth. You can make it from an old car spring. You can cut the required square using a grinder.
- Make a longitudinal cut in the pipe, which should have a thickness equal to the tip. Next you should insert it with its sharp tip inside the pipe. The result should be a device that resembles a spear.
- Connect the parts using a welding machine, not forgetting about safety measures.
- Cut a cutter from the spring equal to ½ the diameter of the drill being made, and cut the teeth on it. It is these elements that will bite into the soil, loosen it, and only after that the soil will fall onto the spiral of a homemade auger.
- Position the cutters so that they are at an acute angle to the main surface. After this, the parts should be welded to the steel pipe.
- Cut a circle from a metal sheet, the same in diameter as the auger spiral. Make a hole in its center into which the pipe will be inserted. Attach the manufactured disk to the cutter welded to the tube. Mark their contact using a pencil or a special marker.
- Using the marks obtained, cut the circle from the edge to the center; it is best to do this with a grinder. Place the cut disk in a vice and twist the elements into a spiral with a hammer. Place the self-made auger onto the pipe and weld it. Finally, brush the surface with a wire brush and paint.
Actually, this is where the work is finished. All that remains is to make a handle and an extension cord. The first one can be made of plastic, it will be more convenient, but the last part can be made from any suitable pipe.
Homemade drilling devices
We also manufacture an auger in cases where a drilling rig is needed. The work carried out is characterized by the following features:
- The pipe is cut to the required length.
- At the lower end, a tip is created that directs the movement of the soil.
- The tip is made of springs and is responsible for loosening the soil.
- The cutters should be positioned at an acute angle.
All elements of the product in question are welded with a welding machine. In this case, attention should be paid to the quality of the seam, since even minor defects reduce the strength of the connection.
Some tips
Some recommendations will help you make a high-quality drilling device. When working, you should consider the following:
- It is necessary to correctly calculate the diameter of the screw. The fact is that during operation the hole will differ slightly from the size of the cutting part. For example, a 200 ml element will provide a well of 240-250 ml.
- You can replace the grinder discs with regular sheet steel, the thickness of which will be about 2 mm. But it will have to be further bent and sharpened to give it the ideal shape.
- When working with the disk, you must follow safety precautions. It should be carefully and securely secured in a special vice, and cut only with safety glasses.
- To calculate the auger feather, you can use the special program “Compass-3 D”. She will do everything necessary, just enter the initial data and wait for the finished drawing. All this will significantly save time.
To extend the service life of a homemade auger, you need to clean it after each job. Remove soil from metal parts, adjust blades and sharpen them if necessary. In addition, for storage, choose rooms with low humidity.
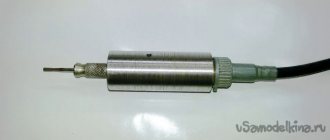
What you need
To make your own spring, prepare the following supplies and equipment:
- steel wire, the diameter of which should correspond to the cross-sectional size of the turns of your future spring product;
- a regular gas burner;
- a tool that every locksmith workshop must have;
- bench vice;
- a stove, which can also be used as a heating device for household purposes.
It is easier to wind a spiral using devices, the design of which depends on the size and stiffness of the spring
The wire, if its diameter does not exceed 2 mm, does not need to be subjected to preliminary heat treatment, since it is easy to bend without it. Before winding such wire onto a mandrel of the required diameter, it must be unbent and carefully aligned along the entire length of the winding.
When choosing the diameter of the mandrel, you should take into account the size of the spring that you are going to make at home. To compensate for the elastic deformation of the wire, the diameter of the mandrel is chosen slightly smaller than the required size of the internal cross-section of the future product.
Coil spring winding device
If the diameter of the wire from which you are going to make a spring with your own hands is more than 2 mm, it must first be annealed, since without such a procedure it will be difficult to align it and wind it onto the mandrel.
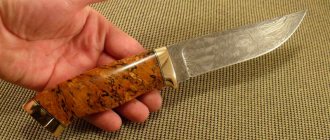
How to make a screw with your own hands - make a flexible one
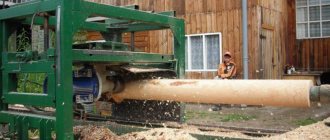
About two and a half thousand years ago, the ancient Greek mathematician, physicist and engineer Archimedes invented a water-lifting machine, which later became known as the Archimedes screw. It was this invention that served as the prototype of modern screw conveyors.
Augers, as they are otherwise called, have extensive applications in industry and beyond. Meat grinders, drills, drilling tools, all of this works with the help of augers.
Well, today we will talk in detail about the use of screw conveyors in snow blowers, consider the causes of malfunctions of its belts (read about them here), and learn how to replace worn-out machine elements with your own hands. Read more about DIY repairs here.
Belt application device
There are two types of belts used in snow removal equipment; they do different jobs, but the principles are the same. In both cases, their task is to transmit torque from the drive shaft to the driven shaft. The first belt transmits the moment of force to the auger, and the second distributes it to the wheels.
Due to their strength and similarity to the structure of chains, timing belts are used on snow blowers. They are more convenient and lighter than regular ones, transmit torque well, and are easier to secure in hard-to-reach places. Among other things, belts are divided into two types:
The first type is more likely to be found on the auger; it is more elastic and durable, and is more difficult to deform. The second type is suitable for transmitting high torques in both directions; it is more often used for wheels.
Now it is clear that belts are integral structural elements, without which work is not possible. It is for this reason that it is important that they remain intact during operation, because they are one of the most frequently broken parts in a snow blower and wear out very quickly at the most inopportune moment.
If, while clearing snow, you suddenly notice that the wheels or augers are not responding when you try to operate them, you can be sure that you will have to replace one or both belts.
You can carry out the replacement work yourself, this will save you some money, but first you need to understand what exactly caused the belt to fail.
Causes of malfunctions and repairs
There is no way to protect the belt from wearing out; at some point it will still have to be replaced, but there are some operating tips that will help the belts “live” longer:
- Take breaks from work; long-term non-stop operation of equipment leads to the fact that all structural elements become very hot. Such conditions will very quickly destroy the belt, and will not have the best effect on the car as a whole.
- At the same time, you should not turn the snow blower on and off too often. This also has a detrimental effect on the operation of all parts.
- You should never forget that any technique loves caress and lubrication. Regularly lubricate all parts, this will significantly increase their life.
These tips will help you delay the death of your belts, and your car will certainly thank you for it.
With the help of minitrator you can remove snow in your garden or in the city.
About
Instructions for replacing belts
When a belt fails, you should use these instructions for replacing it:
- First, decide which belt you are going to replace.
- Remove the cover covering the belts. It is located in front of the engine, under it you will find nuts. Usually there are six such nuts.
- Unscrew the nuts. If the drive cable prevents you from doing this, loosen it
- So, you got to the belts, remove the damaged parts.
- After installing new belts, you need to spend some time tensioning them. Find the optimal distance at which they will be well tensioned.
- Screw the nuts back and return the cover to its original position.
- The auger gears are available in 20- and 24-tooth types.
For more information about replacing belts on a snow blower, watch the video:
Step-by-step instruction
The first thing you need to do if you are going to make a spring with your own hands is to select the material for such a product. The optimal material in this case is another spring (the main thing is that the diameter of the wire from which it is made matches the cross-section of the coils of the spring that you need to make).
By selecting material from an old spring, you will be sure that the wire is made of hardened high carbon steel
Annealing the wire for the spring, as mentioned above, will allow you to make it more flexible, and you can easily align it and wind it on the mandrel. To perform this procedure, it is best to use a special stove, but if you do not have one at your disposal, then you can use any other device that heats wood.
In such a stove you need to light birch wood and, when it burns down to coals, put a spring in it, the wire from which you are going to use. After the spring is red-hot, the coals must be moved to the side and the heated product allowed to cool along with the stove. After cooling, the wire will become much more flexible, and you can easily work with it at home.
The wire that has become soft should be carefully aligned and begin to be wound onto a mandrel of the required diameter. When performing this procedure, it is important to ensure that the turns are located close to each other. If you have never winded springs before, you can first watch a training video, which is easy to find on the Internet.
You can use a screwdriver to wind a small spring.
In order for your new spring to have the required elasticity, it must be hardened. Heat treatment such as hardening will make the material harder and more durable. To perform hardening, the finished spring must be heated to a temperature of 830–870°, for which you can use a gas burner. You can determine that the required hardening temperature has been reached by the color of the hot spring: it should turn light red. To accurately determine this color, also rely on the video. After heating to the required temperature, the spring must be cooled in transformer or spindle oil.
Heated steel colors
After hardening, the spring should be kept in a compressed state for 20–40 hours, and then its ends should be processed on a sharpening machine to make a product of the required size.
After completing all the above procedures, you can begin to use the spring you made with your own hands for its intended purpose.
If you want to drill a well with your own hands, you need to be able to prepare everything necessary for this, and the work will be quite simple. There are many ways to make a homemade auger, which will then perfectly cope with the task at hand, and it can be in the form of a primitive hand drill for shallow recesses, or it can take the form of a full-fledged conveyor.
How to make a screw with your own hands
The manufacture of the screw is carried out in several successive stages:
- We make a frame from pipes. Typically, the drawings give dimensions of 50 x 70 cm. Based on the size of your motor and the size of the bucket 50 x 30 cm, you can choose the most suitable frame size yourself.
- The auger itself is made of a pipe; a 270 x 120 mm blade made of two or three mm steel is installed in its center. The screws can be made from conveyor belt, but it is preferable to use steel.
- Balance the screw by removing excess metal with a grinder. To do this, install the screw in the finished seat and turn it by hand, so you can find out where the metal needs to be removed.
- If you decide to use a conveyor belt, you will need about 1.5 meters one centimeter thick. Four rings with a diameter of 28 cm are cut from the tape.
- Use a rubber plug to cover the bearings in which the shaft will rotate. Otherwise, they will immediately jam.
- The bucket can be made from ten-millimeter plywood. For rigidity, the walls of the bucket should be attached to the frame.
- When making such structures, it should be remembered that if an electric motor is used (for electric snow blowers), it must be protected from snow. If you choose a walk-behind tractor, decide in advance on the adapters to connect it. Read the article about how to make a snow blower for a walk-behind tractor with your own hands.
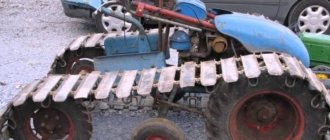
Homemade grain loader from the elevator chain of a Niva or Don combine
I want to make a grain loader. But I can’t decide which screw or conveyor. There is an idea to make a conveyor using an elevator chain from a Niva or Don combine. If you did something similar, please tell me. There are also two augers from SM-4 triremes, but together their length of 3.5 m seems to be not enough.
On our farm they were made in haste from a load from oats-25, they were also made from grain elevators in the fields, as for the augers, I can say that a powerful drive (motor) is required and the performance of the auger is weak.
Made from a chain from John Deere 6 m long. Four boards of thirty by 4.5 m were fastened with 70 mm screws. The 1.5 kW 1500 rpm engine turns easily. Productivity is 5 tons in 20 minutes. Manufacturing costs are mere pennies. Files: sdc11434.jpg
Made from a chain from John Deere 6 m long. Four boards of thirty by 4.5 m were fastened with 70 mm screws. The 1.5 kW 1500 rpm engine turns easily. Productivity is 5 tons in 20 minutes. Manufacturing costs are mere pennies.
The device is super. Thank you very much for the photo. Does the grain need to be thrown in or is it taken from the pile? If I understand correctly, the chain is held on two shafts and is tensioned under its own weight? Is the front of the chain lifted by a cable for moving? Is the edge of the chain raised during loading or lowered? If you can, take a more detailed photo of the components of this unit.
There is no need to throw the grain. For this purpose, the front part is used, which is raised or lowered by a winch. You pull the loader to the grain, turn it on and slowly lower the front part into the grain with a winch. When the bottom reaches, and this takes several minutes, I lift the winch, turn it off and use the door handle, which is screwed at the bottom, I move the loader half a meter to the right to the left and again lower it to the bottom. I scoop up the remains with a shovel. The loader is almost balanced in relation to the wheels, so the lifting force on the door handle does not exceed 10 kg. I roll it around the warehouse very easily alone. A drawback from operating experience is that both the inclined and the front parts need to be made longer. Inclined so that the grain the loader wheels did not fall asleep from the heap. And the front one so that there was less shoveling. Files: sdc11532.jpg sdc11522.jpg sdc11521.jpg sdc11530.jpg sdc11523.jpg sdc11524.jpg sdc11531.jpg
Making a screw with your own hands
In a country house, in the absence of a centralized water supply, they equip an autonomous one - a well or a well, and to drill a well, in order to save the budget, they do not rent a drilling rig, but drill with a homemade auger, which makes the process cheaper, although it makes it a little more time-consuming. You can make an auger with your own hands in one day: it is enough to have some tools and materials for this, which will be discussed, as well as the manufacture of an auger with your own hands is described in detail.
Drawing for making a screw spiral
Construction of a pyrolysis boiler
A design feature of pyrolysis boilers or long-burning boilers is the presence of two chambers - a loading chamber and a gas combustion chamber. The walls of the chambers are lined with heat-resistant materials or fireclay bricks.
The bottom of the loading chamber with a hole - a nozzle - is also laid out with fireclay bricks. Through it, pyrolysis gas enters the combustion chamber, where, when burned, it heats the heat exchanger, which is a connection of several pipes.
Screw manufacturing procedure
Materials and tools you will need:
- Thick-walled iron pipe Ø 40 mm and profile pipe;
- Grinder with metal disc, electric drill and welding;
- Steel sheet ≈ 2 mm thick;
- Tape measure, pencil, cardboard for making a template, paint;
- Chisel, rasp, sharpener and hardware (bolts with nuts);
Construction of a screw conveyor
First, you need to make the actual belt conveyor, which is offered in two versions:
- For self-production, a screw loader with dry soil unloading is more suitable, that is, the soil is not wetted with water, but is taken to the surface in the same condition as it was at depth. This method involves rapid wear of parts and is designed for drilling shallow wells, or preparing several augers for replacement during the drilling process;
- Excavation with water flushing is much faster, but the mechanism requires improvement in the bit area. Part wear is reduced by reducing friction and water cooling of the mechanism. Below we will consider just such an option, which can be used without water not only as a drilling tool, but also, for example, as a grain loader.
Hand drill with flushing the auger
Before making an auger with your own hands, prepare the material. A 120-centimeter piece of pipe is taken as the body, the ends of which are cut evenly with a grinder. Next, you need to cut a square with sides 200 x 200 mm from sheet steel, drill Ø 40 mm in the center of the square and make a slot with a grinder from the center in any direction to the edge. This will be one turn of the conveyor spiral, of which several will need to be made. To make it round, the square is cut by welding or a grinder to the shape of a circle with Ø180 mm, the spiral is bent so that the pitch between the turns of the spiral is within 80-100 mm.
Schematic diagram of the auger interturn feather
You should end up with a circle, the beginning and end of which do not coincide in the plane. This part will serve as a template: you will need to attach it to a sheet of steel, outline the outline with a pencil and cut out the next circle. It is better to paint these blanks immediately to protect them from corrosion, and after assembling the structure, paint them again.
With a pitch between spirals of 100 mm, 12 spirals (feathers) must be cut for each auger segment. The rings are secured to the auger axis by welding, and to each other too. After welding, the seams are hammered and cleaned of scale with a rasp.
A profile pipe is needed to make the auger mounting system. The pipe is left open at the top to allow water to flow into it. To produce an auger, water is simply not poured under the grain. The profile pipe is inserted 2/3 into the round one and welded, and the gaps between the pipes are closed with pieces of sheet steel. In a square pipe, step 2 cm away from the top and drill a through hole Ø 10 mm.
Auger drawing
The manufacture of the receiver, which is located on the back side of the auger, involves welding four steel sections that follow the contours of the profile pipe. Departing 2 cm from the lower end, a through hole Ø 10 mm is also drilled, through which the entire structure is fixed using a bolted connection. It is better not to use a threaded connection so that when the screw rotates in reverse, the structure does not become disconnected.
Next, a bit for the auger is made, which will be welded and placed in a separate lift. It is easier to purchase a ready-made chisel than to make it yourself, since it requires hard metal alloys, which are very difficult to process at home. In addition to carbide tips, you can use diamond ones. The chisel is a replaceable tool and is attached to the auger using a pin or a threaded connection. Most often, industrial bits are two- and three-bladed, reinforced with six- or octagonal cutters made of hard alloys. A homemade chisel is welded to the auger (see picture below):
Homemade and industrial chisel
At the end of the work, the auger blades are sharpened to make cutting the soil easier - this can be done on a grindstone or with a file. When using an auger for handling grain crops, sharpening is not required.
The finished auger is painted with anti-corrosion paint and the steel surfaces are pre-primed. During operation, most of the paint will be erased, but there is no need to restore it - it will be erased in those places that are constantly in contact with the ground, so rust will not appear there.
Practice has shown that making one auger will take no more than 5 hours if you do not have the skills to work with iron. But what is important here is quality, not speed of production, so it’s better not to rush.
Shutdown
At the very end, you need to sharpen all the blades so that during advancement they do not encounter any special difficulties. Sharpening is done on a machine or manually with a sharpening stone. In any case, micron precision is not required, but it is enough to be able to cut the roots or a broken piece of stone.
After you have managed to make a screw with your own hands, it is advisable to cover it with special anti-corrosion paint. Over time, some of the paint will peel off from work, but there is no need to rush to replace it, because... there will be no rust in this place.
Making one conveyor usually takes up to 3 hours, but if you're not used to it, it can take longer. The most important thing is not speed, but quality, because... Only a high-quality tool will last for years without breaking.
You should not be afraid of such work, because... it will allow you not only to master a new specialty, but also, possibly, to have additional income over time.
In order to carry out mechanical drilling of a water well, it is necessary to use a drilling auger. But, a factory-made auger is not always available. Therefore, you can use an auger for drilling a well, which you made with your own hands. In order to make a screw quickly and inexpensively, you need to have a full set of tools in your arsenal, as well as a little technical and design knowledge.
A drilling auger is used to drill water wells.
Manufacturing of the drilling auger structure
In order to make a drilling auger with your own hands for mechanical drilling of a well, you will need the following materials and tools:
- Thick-walled round pipe - cross-section 40 mm; Profile pipe; A set of tools (welding machine, grinder, drill, tape measure, T-shaped chisel, hammer, marker); Consumables (2 mm sheet steel, anti-corrosion paint, cardboard, nuts, bolts, rasp and whetstone).
When starting to make a screw with your own hands, you should first be able to make the conveyor itself, since this manufacturing process will be repeated on each subsequent segment. Several types of conveyor, let's look at them specifically:
Schematic diagram of a screw conveyor.
- Runs dry. As a rule, such a screw conveyor is most popular when manufactured manually. Since during manufacturing you do not need to worry much about the internal state. But there is still a minus and it lies in the fact that such structures are subject to rapid wear and also have lower efficiency. Works with flushing. During manufacturing, it is necessary to leave a cavity inside the pipe, but in this case it will be necessary to carry out additional operations at the bit. The work of drilling a well is done much faster; we also note that wear is reduced due to the fact that there is additional cooling with water or a clay mixture. This article will describe the manufacturing design of just such a screw version.
You must first prepare all the required tools for work and the materials from which the auger will be manufactured. The work begins by taking a pipe 120 cm long, using a grinder to make even cuts at the ends of the pipe. After which the work must be continued according to the following scenario.
Preparatory stage
Regardless of what kind of auger you have to make, the handle should be as comfortable and durable as possible, because it is she who will take on the load. It’s worth considering immediately 2 options for working for 1 and 2 people.
To begin with, pipe sections with a diameter of 40 mm and a wall thickness of 3.5-4 mm are prepared. The length depends on how much a person will work, and at the same time on the individual characteristics of body proportions, because for a person 2 m tall, longer blades can be used, and the work will proceed more quickly.
For the average person, a handle of 80-85 cm is used, while for working in pairs you can safely make blades of 100-130 cm in each direction (convenient when drilling to great depths). Another 1 cut is made, stable 40-50 cm, and this cut will be used as the main working trunk.
Figure 1. Schemes of roller bits.
To fix them together, a grinder makes an arc cut in the main trunk so that the pipe can be immersed into it at 13, after which it can be welded thoroughly. If you want to increase the strength characteristics, then you can insert a profile pipe inside the handles and weld it with sheet steel. This move will allow you to seriously increase the load without fear of damaging the tool.
The handles can be left in the form of a tube, but it is better to make rubberized linings on them, which will prevent your hands from slipping, and at the same time reduce the likelihood of calluses. There is no need to install any limiters, but using an angle grinder it is advisable to grind the ends of the pipe so as not to injure your hands while working.
At the end, a bolt is inserted into the pipe and welded tightly so that only the thread is lowered down. It is advisable to choose a bolt from the strongest grades of steel, so as not to have complications later.
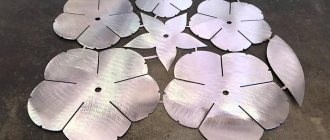
Independent actions
First of all, you need to cut the steel sheet into circles of the required size.
The size of the cutting elements is determined based on the width of the expected recess: the knives should be 0.5-1 cm larger in diameter.
The central part of the steel circles is drilled so that the opening is slightly larger than the main rod (about 1 mm). Steel bushings are turned on a lathe, with which the drill knives will be attached. The bushings are threaded for bolting.
Making a screw
A simple method will allow you to make an extremely simple system with 2 blades that cut perfectly into the ground, but they can only be used at shallow depths (up to 10 m), because Each time you will have to take out the working tool completely to extend it.
To begin with, select a pipe similar to that used above. The length of the pipe is 100-140 cm, depending on the height of the person who will be working. An elongated nut is welded into the upper part of the pipe, completely matching the bolt. If you can’t find an oblong one, then you can use 2 standard ones, but no less, so that the bolt holds securely.
Figure 2. Drawing of the auger ring.
A sleeve or thick reinforcing rod is welded into the lower part, which will serve as an adapter to the drill. The chisel itself can be purchased at a specialized store, but a primitive version can also be made. For a primitive version, it is enough to take a steel strip 3 mm thick and 30 cm long, twist it into a spiral into 3 turns, and then calcinate it (cooling in boiling oil or lead). Such a spiral is fixed in a sleeve, after which it is sharpened in the most careful way.
At this stage, you will need 2 grinder discs, the 1st 150 mm with a perfectly straight edge, and the 2nd 180 mm toothed (for wood). These 2 discs are sawed exactly in half and the central part is widened to match the work pipe. The disks will be positioned alternately on the working pipe, i.e. first 150 mm, and 10 cm higher than 180 mm. They are located at 35° to the ground to achieve maximum efficiency with minimal effort. When fixing, there is a possibility that you will have to adjust the central part with an angle grinder.
Tubular elements for extension are made quite simply:
- Take a pipe of the same diameter and length 100-140 cm.
- A bolt is inserted from below and welded, and an oblong nut is inserted from above and also welded tightly.
Thus, you can make very long strokes, but it is better to limit yourself to 10 nozzles, because It is difficult to remove them every time due to their high mass.
More complex option
Schemes of garden drills: a - drill, b - auger drill.
Here you will have to work much longer and harder for production, because... the screw conveyor will go from the bit to the very top.
The chisel can be used according to the technology described earlier, but it is better to purchase it in a store (Fig. 1). In any case, it will require regular care, and the difference depends solely on the skill of the worker, because... You can make it with your own hands as good as an analogue.
After the bit has been mounted on the working pipe, you need to begin forming a spiral (Fig. 2). The most convenient way to make it is to use the already familiar toothless discs under the grinder, but as a base one you will have to use a toothed one with a smaller diameter, which will immediately relegate the problem of the roots to the second plan.
Instead of grinder discs, you can take and bend 2 mm sheet steel, which will be much more economical, but more labor-intensive, because You still have to shape it into a perfect circle and sharpen it. In any case, the work ahead is astronomical, and this procedure is done for each subsequent auger.
Fastenings and working part
Now we need a mounting system. For its manufacture, a profile pipe is used, only in this case the pipe on top is not welded with anything, because liquid will circulate there.
Drilling auger drawing.
The pipe is immersed 2/3 into the round pipe, after which it is carefully welded, and for reliability you need to use pieces of sheet steel that will bridge the gaps between the profile and round pipes. Here the weld must be extremely reliable. A through hole must be made in the profile pipe at a distance of 2 cm from the top.
Now we need to work on the auger on the reverse side, where the receiver for the profile pipe is formed. Here you need to use 4 sheet steel plates, which will perfectly follow the outer contour of the square pipe. The seams are formed to the maximum available depth (usually 5 cm), and fixation is made from below, similar to that described above. At a distance of 2 cm from the bottom, a through hole is made through which fixation will be made.
The diameter of the hole is 10 mm; bolts and nuts with blades are selected for them, so that they can be removed quickly enough. Sometimes a threaded connection is found, but when rotating in the opposite direction there is a risk of the structure unscrewing, after which it may take half a working day to restore.
Now the auger only needs a chisel. A separate lift is allocated for it, and the bit itself is attached in the standard way described above. The only exception is the holes for supplying water and solution. They must necessarily have a diameter large enough to be able to work under pressure without problems. There is no need to make a chisel, because... here you need carbide metals or diamond tips, because other materials will not penetrate the rock.
Read also: The role of synthetic polymers in modern technology