When working on a lathe, very often there is a need for different speeds of rotation of the workpiece. This is explained by the fact that different operations require their own speed. As a result, lathes, and not only those, are equipped with entire groups of pulleys. These pulleys, in turn, allow you to change the speed of rotation of the workpieces, throwing the transmission belt to a certain point. There are some disadvantages to this, due to the fact that the machine must be stopped and so on. Therefore, as an option to solve the problem, we suggest you make a homemade variator for the machine.
This is not to say that this option does not have its problems and drawbacks. On the contrary, there are such disadvantages, and the main one is significant belt slippage, in comparison with a V-belt drive. But such slipping is a good protection for the motor from jamming of workpieces. In addition, even such a simple method will allow you to change the rotation speed of the workpieces without turning off the machine, and the rotation speed will be adjusted very smoothly.
Well, let's see how to make such a variator yourself. First of all, you need to make wooden cones, choosing a hard type of wood. Cones do not have to be made using a machine. They can be made from disks cut with a jigsaw. So, it is necessary to cut them at an angle that will be equal to the angle of inclination of the cone. Therefore, to perform such an operation it is far from necessary to use an electric jigsaw; a manual one will do just fine. When all the disks are cut out, they need to be assembled into one single cone. So, the discs can be placed on good glue, or knocked down with nails. In this case, use small nails and keep in mind that they need to be hammered in evenly so as not to subsequently disturb the center of gravity of the cone. Therefore, be extremely careful.
Sawing blanks with a jigsaw according to the angles described above
Now that the cones are ready, they need to be placed on metal rods. Moreover, you need to plant it as deeply and firmly as possible. Once you have placed the cone on the rod in its final position, be sure to secure them with screws.
This is how the cones are fixed
In order for the belt to move freely along the cones and lock into the position we need, it is necessary to make a guide on rollers. In the figure below, you can clearly see the design of the guides, and wooden spools can be used as rollers, on which threads are usually wound.
This is what the roller guide looks like
You can also use regular ball bearings as rollers. Even if they are not wide enough, you can install two, three or more bearings depending on their size and the size of the track along which they will move. And of course, you can use fluoroplastic rollers, as shown in the figure, but this option will cost more than others.
Once the guide is ready, it will need to move along the cones by moving the nut. In turn, this nut is screwed onto a rotating screw (and freely rotating), or a threaded rod. But, in order to prevent the screw from moving along our cones, two washers are screwed onto its end, which are tightened against themselves. If you are using a threaded rod, do this on both sides. You can glue the guide nut with glue or solder it.
Also, you need to make a handle that will rotate the screw. Here, you can do it as your experience tells you, but as an example we will give a picture of the execution of just such a handle.
In this case, the handle does not need to be soldered. It is enough to clamp it between the nuts, of course, if there is a hole in the center of this plate.
We remind you that stable and normal operation of the variator will be using a belt with a circular section. Therefore, do not miss important details, and start making a homemade variator with your imagination, experimenting with this or that solution.
CVT ON SNOWMOBILE
Creating a power transmission is the main difficulty that every motorcycle designer faces.
The traction properties of the machine depend on how rationally the torque is transferred from the engine crankshaft to the drive wheel (drum) of the track. The overall gear ratio: engine - driving wheel of the propulsion device, sufficient to ensure cross-country ability in the most difficult road conditions, as calculations have shown, should be 1 ÷ 10. The power transmission (Fig. 1) is divided into two independent sections. The first allows you to change the gear ratio between the engine and the intermediate shaft. This unit is usually either a motorcycle gearbox or the most practical design, a V-belt variator.
Rice. 1. Motonart power transmission diagram: 1 - caterpillar belt, 2 - snow hook, 3 - lining on the inside of the belt, 4 - driven sprocket of the final drive chain, 5 - parasitic sprocket, 6 - final drive chain, 7 - drive shaft, 8 - track drive wheel, 9 — final drive drive sprocket, 10 — variator driven shaft, 11 — driven pulley spring support, 12 — guide pin, 13 — driven pulley movable disk, 14 — variator fixed disk, 15 — V-belt, 16 — drive variator pulley, 17 — shoe brake drum, 18 — movable disk of the variator drive pulley, 19 — brake pedal, 20 — engine shaft, 21 — engine, 22 — carburetor, 23 — magneto, 24 — engine crankcase, 25 — engine exhaust pipe, 26 — automatic adjustment weights, 27 — spring for movable brackets of rollers, 28 — movable brackets, 29 — roller.
The second section of the power transmission has a constant gear ratio. It is almost the same for motorcycle art of all types. In these machines, which have significantly less inertia than a motorcycle, gearbox shifting is usually accompanied by jerks and is the main cause of chain breakage.
The variator (Fig. 2), which is a stepless gearbox, smoothly and automatically (without driver intervention) changes the gear ratio between the drive and driven shafts depending on the load acting on the track.
Rice. 2. Scheme of operation of a V-belt variator: A - idle position, B - maximum speed position.
1 - variator drive pulley, 2 - ball bearing, 3 - V-belt, 4 - variator driven pulley. The variator consists of a drive and driven pulleys connected by a V-belt that transmits force through friction. Each pulley includes fixed and axially movable disks. Depending on the number of engine revolutions, the disks, thanks to the presence of an automatic regulator, occupy a position relative to each other that corresponds to the required gear ratio for a given load.
As engine speed increases, the drive pulley disks are compressed, and the V-belt located between them moves to a larger diameter.
The variator drive pulley (Fig. 3) is installed at the output end of the engine crankshaft and is attached to its tapered shank using a key that transmits torque from the engine. The pulley is tightened onto the cone with a locking bolt. It also consists of two discs, as well as an idler bearing (see Fig. 2) and an automatic adjustment mechanism. The movable disk moves axially along the splines of the stationary disk shank.
Rice. 3. Design diagram of the operation of the variator drive pulley: A - idle position, B - maximum gear position.
1 - cup of the centrifugal regulator, 2 - bracket, 3 - weight axis, 4 - weight, 5 - thrust flange of the movable pulley, 6 - spring guide, 7 - spring, 8 - bolt, 9 - internal hexagon, 10 - cup stop, 11 — slotted shank, 12 — movable disk, 13 — fixed disk, 14 — V-belt, 15 — outer race of the ball bearing, 16 — inner race, 17 — engine crankshaft shank, 18 — spring guide, 19 — fixed disk fastening key, 20 - engine. Their relative position is regulated by weights hung on the axles of brackets welded to the casing. The cylindrical spring constantly strives to push the drive pulley disks apart and, when the mechanism rotates, balances the axial force arising from the centrifugal forces of the weights.
The driven pulley of the variator (Fig. 4) also consists of two disks. In this case, the stationary disk is seated on the splines of the output shaft (see Fig. 1) of the final drive drive sprocket. This disk has a hub and six guide pins along which the movable pulley disk moves in the axial direction. The guide pins transmit torque.
Rice. 4. Diagram of operation of the driven pulley of a V-belt variator: A - maximum speed position, B - idle position.
1 - movable pulley, 2 - guide pin, 3 - movable pulley bushing, 4 - spring, 5 - spring support, 6 - washer, 7 - fastening bolt, 8 - V-belt, 9 - fixed pulley disk, 10 - fixed pulley hub , 11 — drive shaft of the final drive drive gear. During operation, the variator pulleys rotate synchronously. As the engine speed increases, the drive shifts, and the belt rotates over a larger diameter, increasing the gear ratio and, accordingly, the speed of the engine. The driven pulley is moved apart by a belt that describes a smaller circle.
The presence of a V-belt variator allows you to regulate the speed of movement of the engine only by changing the engine crankshaft speed, that is, by changing the position of the carburetor throttle valve.
Source
CVT, its application, positive factors
Cars produced with a CVT are economical , since the engine operates almost constantly in optimal mode, less toxic gases are emitted into the air, and better acceleration of the car.
It is ensured by a smooth gear ratio and smooth acceleration of the car, no jerks. Transmission components last longer than in a manual transmission. When comparing a CVT with an automatic transmission, their design is simpler, which allows you to do repairs yourself.
Despite all the positive qualities, this device is not an ideal gearbox; the reason for this is its frictional operation . This is when the torque is transmitted by friction, and has limitations; if they are exceeded, the belt will begin to slip, with a high rate of wear.
It is not advisable to use a CVT on a car frequently at maximum loads; you should not use a “sports” driving mode on these cars, with frequent jerking and braking. Its ideal and long-term performance is when the car is driven quietly, smoothly.
What homemade products for a walk-behind tractor you can make with your own hands
Homemade products for walk-behind tractors are invented and made by almost all owners of this equipment. The purpose of these actions is to expand the functionality of the unit with minimal financial investment. In the basic configuration, the motor cultivator has extremely limited capabilities. Installing various options on it can turn a small machine into a full-fledged mini-tractor. Often, homemade devices are in no way inferior to factory-made analogues. In order to improve a walk-behind tractor with your own hands, a set of tools that are available in every workshop of a country house or cottage is sufficient. The materials you need can be found at a junkyard, shed, or scrap metal collection point.
Do-it-yourself variator repair
To better understand the issue, let’s consider what the practical design of a variator consists of:
- A smooth running device for starting a car from a parking spot.
- A device that allows a vehicle to reverse.
- Control system.
- Hydraulic pump.
From the above material, it is clear that a variator can be considered as a type of automatic transmission and it is not easy to repair it yourself ; for this you need to have skills and know its design:
- The clutch function on a car with a variator is performed by a clutch pack; a torque converter can be used instead. Clutches are easier to use, they are smaller in size, but the smooth switching of speeds is better with a torque converter, it lasts longer, and its parameters are better when accelerating the car.
- The planetary gear ensures that the vehicle moves backwards.
- The control system includes: a control unit, a hydraulic pulley interaction system, and sensors. It works on the principle of collecting data (engine speed, what speed of the car, in what position the gas pedal is) and determining the best gear ratio for them.
- The hydraulic pump provides the required pressure in the hydraulic system, as well as lubrication of the variator structural elements. The system maintains pressure proportional to the torque; when it is greater, the discs are compressed more strongly and the belts do not slip.
Using the example of an automatic transmission in a Nissan car , you can take a closer look at repairing a variator yourself. The problem occurs when the car moves at a speed of 50-60 km/h, the variator begins to make an unpleasant noise, this is a common disease for this brand of car.
Tools required to repair the variator:
- Impact screwdriver, non-electric, powerful.
- Clamps 6 pieces.
- Hammer.
- Set of keys 10-14.
- Prepare a container for small spare parts.
CVT repair
The normal functioning of the CVT box can be disrupted as a result of various malfunctions and failures. Bearing whine, creaking and extraneous noise often occur. As a rule, in such cases, disassembling the variator is required.
Among the tools needed to disassemble a continuously variable transmission are:
- - A set of keys;
- — Large desktop;
- - Screwdriver Set;
- — Containers in which the parts will be stored;
- — Regular hammer;
- — Clamps.
Improvement of the chassis
The first thing users of a walk-behind tractor think about is how to make a cart with a seat for it. Using equipment in normal mode using levers requires the application of great physical effort. However, the use of a trailer reduces the stability of the vehicle. This problem can be eliminated by extending the wheelbase. This is done using extensions that are attached to the axle shaft with pins or bolts. Having solved the stability problem, the operator is faced with another issue: the unit is poorly controlled. The differential for the walk-behind tractor helps to give it good maneuverability. This device is made by analogy with components of passenger cars. Homemade unlockers for walk-behind tractors are made using ordinary household tools - an angle grinder, welding and a sharpening machine.
The low weight of the walk-behind tractor causes poor traction between the wheels and the ground. Slipping is a common occurrence when lifting virgin soil, working on wet ground or driving in snow. To avoid slipping, weights are attached to walk-behind tractors.
These devices are divided into the following categories:
- Wheeled. They are discs that are mounted on wheels or hubs. Disks are made monolithic from metal, concrete or hollow, filled with sand. The weight of wheel weights can be 30-70 kg.
- External. Made from any heavy material (steel, lead, concrete). Attached to the body using hooks or bolts. Some craftsmen weld a frame from a corner to the body. Sandbags, bricks, scrap metal and other heavy objects are placed in it.
Russian Mechanics presented a new snowmobile (photo)
At the beginning of November, at the sports and entertainment complex for active and extreme recreation "X-Arena", a presentation of a modernized version of the most popular domestic snowmobile - "Taiga Varyag 550 V" from.
The Taiga Varyag 550 V snowmobile has a number of additional features and is equipped with modern components, thanks to which its driving and performance characteristics have been significantly improved. Its appearance is due to the needs of the residents of Central Russia. Their lifestyle places different demands on technology.
“If in remote regions - in Siberia, the Urals and the North - snowmobiles are used in the vast majority of cases for economic purposes, then in the middle zone - for active leisure. If in the first case a snowmobile is a equipment for work, then in the second it is for recreation. The “Taiga Varyag 550 V” snowmobile is specially designed for residents of Central Russia who prefer outdoor recreation, value comfort and know how to count money,” Innokenty Dick, chief manager of the marketing and advertising group, introduced the potential owner.
"Taiga Varyag 550 V" meets all the requirements for modern snowmobile equipment. It received a front telescopic suspension from the powerful and high-speed Rybinsk snowmobile “Taiga Bars 850”. The rod stroke increased to 143 mm increased smoothness of movement and reduced steering effort. The new rear suspension, the travel of which has been increased to 277 mm, has a horizontally located shock absorber, which gives greater energy consumption and smoothes out bumps. The 31-mm high lug on the Magnum track provides high cross-country ability in deep snow, improved dynamics during acceleration and braking, and stable cornering. The Canadian variator allows the snowmobile to operate smoothly in any mode, move off smoothly at lower speeds, and reach higher speeds without increasing fuel consumption. The mechanical brake has been replaced with a hydraulic one, which reduces the force on the lever, provides ease of control, and increases the reliability and safety of the equipment. A new tall leather-wrapped handlebar improves the ergonomics and appearance of the sled.
“Taiga Varyag 550 V” is a modern, comfortable off-road snowmobile with an optimal set of functions, easy to operate, easy to control, and affordable. At the same time, the manufacturer emphasizes that the updated model does not compete with the serial Varyag, since, in fact, it is its special configuration and is aimed at a local target group. In addition, the serial Varyag 550 meets the 2013 season in an updated form. Hydraulic brakes, an improved cooling system, and the latest insulating materials in the engine compartment appeared on snowmobiles. The new windshield is made of durable polycarbonate. In the event of an impact, the material does not prick, but only bends, maintaining its original shape. The lightweight trunk has become more spacious due to the relocation of the headlight, and the seat locks have become more convenient.
The fact that the serial “Varyag” is in service and is not afraid of snow, rain, or impassable slurry was proven by drag racing demonstrations. In one of the races, a domestic snowmobile and an imported ATV with the same engine capacity entered the starting line. By this time the track was a complete mud bath. Skeptics did not give the car any chance, but technically savvy spectators spoke about the larger contact area of the tracks with the surface, the ability to quickly start and accelerate. And they turned out to be right. On a straight section of the track, a snowmobile is faster than an ATV, but is inferior to it in maneuverability when turning, requiring a larger radius. The result of the two races was 1:1, the equipment proved its reliability and increased maneuverability, while maintaining the intrigue in the confrontation between different-season equipment.
Every year, competitors are increasingly striving to enter the budget snowmobile equipment segment, so it is becoming increasingly difficult for the domestic manufacturer to maintain its leading position. However, both the Taiga Varyag 550 and the Taiga Varyag 550 V have a significant price advantage over comparable foreign-made models. In addition, this year was decisive for Russian Mechanics in terms of the development of the motorcycle business.
ProVariator.RU
Major manufacturers of walk-behind tractors
Today the market offers its consumers a huge range of these devices. These are compact models, lightweight, and with powerful engines.
Honda, Agromotor, GreenField, Subaru, Forza, BRIGGS & STRATTON are the main manufacturers of components. We advise you to buy a motor for walk-behind tractors manufactured by them. The engines of these companies have excellent characteristics and quality, and most importantly, low cost.
You can find engines from domestic manufacturers on the market; the main differences are the speed of repair and price when compared with imported goods.
Engines for walk-behind tractors from China
In recent years, motors from China have been gaining popularity. The main reasons for ordering such engines are:
- Low cost.
- Nice design.
- High reliability.
- Availability.
These factors make Chinese engines universal for all types of garden equipment and homemade walk-behind tractors. When working in our climate, Lifan class walk-behind tractors are perfect. This series was developed based on engines from Honda, which licensed it.
It also makes sense to pay attention to Glinfield and Forza engines. Chinese companies offer a package that contains additional equipment.
For example, if you want an engine for a homemade walk-behind tractor with a variator, then it should come complete with a gearbox, as this will help facilitate its installation into the design of the unit itself.
Chinese manufacturers use the latest technologies in the manufacture of their geared engines, which undergo thorough preparation before sale, and only after that they reach consumers’ shelves, completely ready for use.
Buyers are provided with a 2-year warranty - this makes Chinese engines even more popular in our country.
How to choose the right motor with gearbox
Almost all modern engines designed for walk-behind tractors operate on a four-stroke cycle. They are used because they are more efficient and unpretentious, unlike two-stroke engines. One of the most popular types of fuel for them is diesel.
The gasoline engine for a walk-behind tractor with a CVT is not very popular, since its fuel consumption is much higher. An excellent representative of this class of engines is the KM186F. Main parameters: the engine has a displacement of 0.4 liters and can develop power up to 9 horsepower. The fact that the motor is cooled openly allows it to be used for a long time.
The Lifan company offers a similar engine with a gearbox - Lifan160F. The distinctive parameters of which are:
- power - 4.3 kW;
- small working volume - 0.118;
- torque - 7.4 N/n;
- rpm - 3600.
The main thing you need to know when choosing a walk-behind tractor with a variator is that the durability of its operation directly depends on its power. The higher the power of a geared motor, the longer it can last.
When working on the ground, a walk-behind tractor with a power of 3 to 5 horsepower will receive more load than a walk-behind tractor with a power of 9 horsepower. That is, its wear will be much greater than that of the second.
This can be explained very simply. Low-power engines have to operate at higher speeds, which means that the load on the gearbox increases significantly. This greatly affects its wear and tear, and it can last much less than its powerful brother.
In order to choose the right walk-behind tractor, you must clearly think about the conditions in which it will have to work, as well as the average duration of its operation.
The difference between a CVT and other gearboxes
The manual transmission (manual transmission) has five speeds, the automatic transmission (automatic transmission) has eight, and the variator has an unlimited number of gears. But this is not the main difference. To clarify the situation, let us briefly describe the principle of operation of the engine in order to understand why the CVT is convenient to use.
Mechanical transmission device
So, conventional step transmissions have a significant drawback - they have fixed gear ratios, which are sometimes not enough on the road. Even when driving on a completely flat surface, the engine must, while accelerating, overcome an external load - the force of inertia, and then, reaching the ideal ratio of revolutions and gear ratio, it picks up speed. And after that the transmission becomes low. To increase it, it is necessary to use a larger number of steps, and a certain number of them are built into gearboxes. Moreover, when moving to each of them there is a jerk. Therefore, the decision arose to remove the transmission steps. As a result, we got a variator. It represents an ideal option in which the speed change occurs smoothly without jumps.
This device gradually changes the torque on the driven and driving disk. It starts its movement smoothly, unlike other gearboxes. A car equipped with it behaves as if it had a powerful electric motor. The speed of the machine increases smoothly, without extraneous noise. Due to the fact that the CVT does not require gear shifting, a car with it picks up speed faster than with other gearboxes.
V-chain variator
In addition, a car with a CVT is much easier to drive. Even a novice car enthusiast can handle it, since this type of transmission does not react to the driver’s driving style and is not capable of stalling. Even with rapid acceleration, the engine is very quiet compared to other gearboxes. If you fully press the gas pedal, the car will accelerate at lightning speed without the characteristic “growl”.
How to drive a CVT
Some people don’t like that the engine doesn’t show itself at all when changing speed, but this is unusual for those who are used to driving automatics or sports cars, where the “roar” adds adrenaline to the driver.
This transmission has great capabilities, which is confirmed by the fact that until 1994 it could not be used in Formula 1 races.
Leading automobile manufacturers have launched the production of CVT models created at their enterprise, and in order to distinguish them from the main mass, each company gave a specific name to the invention. Lineartronic continuously variable transmission was developed by Subaru, Multimatic by Honda, Autotronic by Mercedes-Benz, Multitronic by Audi, and Multidrive by Toyota. Some companies have released two variants of the variator:
- "X-Tronic" and "Hyper" from Nissan;
- "Ecotronic" and "Durashift CVT" - creations from Ford
To make it immediately clear to car enthusiasts that the car has a variator, it was given the designation CVT. It contains three words: Continuously Variable Transmission.
Reducing noise from the unit
Even the most modern and expensive motor cultivators make a lot of noise during operation, especially at high speeds. This factor greatly tires the operator and can serve as a reason for deterioration of relations with neighbors. A homemade muffler will help solve the problem. This is a task that can be accomplished by any craftsman with basic skills in handling iron.
In order to make a muffler for a walk-behind tractor with your own hands, you will need the following tools and materials:
- roulette;
- welding machine;
- Bulgarian;
- electric drill;
- hammer;
- aluminum clamp;
- stainless steel 2 mm thick;
- metal shavings.
Having collected everything you need, you can begin to improve the exhaust system.
This is done in the following sequence:
- Make 2 oval pipes from stainless steel. The diameter of the pipes should differ by 1-1.5 cm. The pipe joints should be fastened using a welding machine.
- In a pipe of smaller diameter, make a maximum number of holes with a diameter of 8 mm. Wrap it with metal shavings. Wrap the shavings with steel wire.
- Insert the smaller pipe into the larger one. Fix them in the desired position using steel rods and welding.
- Attach the muffler to the exhaust pipe and secure with a clamp.
Hand-held circular saw from a grinder
A circular saw in the country is a very useful thing, few people know, but it can be made from a grinder. You only have 2 elements left to complete: the sliding stop and the axial handle. After this, you will be able to use your circular saw from an angle grinder at any time.
2 small pieces of metal angle are suitable as a sliding stop. The edges of the corner are rounded so that they do not catch the part during processing. The corners are connected to each other at the back and front using bolts or nuts. A clamp made of metal tape must be placed on the body of the above-mentioned power tool. A folded strip of sheet metal or galvanized steel with a hole for the rear bolt of the sliding stop is attached to the screw tie of the clamp, which will be located below.
In the grinder gearbox we make 4 small holes for M5 bolts. For convenience, the gearbox can first be disassembled to better see where the hole can be made. These 4 holes are needed to attach the handle. The handle can be made from an ordinary metal tube. This completes the manual version of the grinder saw; if you want to make a real stationary version of the circular saw, then you will need more work skills, tools and well-calculated drawings (image 3).
Blade for walk-behind tractor
The blade is a necessary device, which is needed at any time of the year. The front blade is used to clear snow, plan terrain, dig holes and move bulk materials. Such equipment for the Neva walk-behind tractor is of good quality, but not everyone can afford it. Do-it-yourself dumps require minimal financial investment. By installing the front blade on the Neva walk-behind tractor, you can solve many household problems. If there are levers and hydraulics, a homemade shovel can also be used as a loader.
To make a blade you will need the following tools:
- roulette;
- welding machine;
- electric drill;
- Bulgarian;
- spanners;
- acrylic paint;
- barrel 200 l;
- reinforced rubber;
- sheet steel 5 mm;
- profile pipe 40x20 mm;
- paint and brush;
- bolts and ties.
Before making a blade, it is necessary to calculate the compliance of the power of the walk-behind tractor with the dimensions of the bucket. Excessive load leads to rapid wear of parts and mechanisms of the unit. Depending on the weight and power of the machine, shovels are made 60-100 cm wide and 20-30 cm high.
Do-it-yourself snow removal for a walk-behind tractor is made in the following sequence:
- Applying markings to the barrel, sawing it into 3 equal parts vertically. Cutting 1 piece into strips 5 cm wide.
- Fastening 2 workpieces using bitumen and rivets. Aligning the edges of the product. Reinforcement of the bucket with transverse racks.
- Fastening strips of tin along the edges of the shovel. This is done by welding or bolts.
- Drilling holes for bolts. Attaching a strip of rubber to the bottom of the bucket.
- Making a hitch for a shovel. It is made by welding a piece of pipe and a semicircle of sheet metal to the blade. Holes are made on the sector to adjust the angle of attack. A homemade snow removal device is attached to the bracket of the walk-behind tractor with an adapter made of a profile pipe.
Posts 1 page 16 of 16
Share12011-10-11 14:25:18
- Author: Mr. Got'e
- Administrator
- From: Karaganda
- Registered: 2011-05-23
- Posts: 1710
- Gender: Male
- Age: 36 [1983-04-04]
- Skype: Assotov
- Time spent on the forum: 18 days 18 hours
- Last visit: 2016-07-01 16:23:00
- I ride: Suzuki Bandit 600s
Due to the fact that we sell only two types of weights for the 157QMJ engine, one is standard, as supplied from the manufacturer, the other is heavy, completely corroded with bronze. And I decided to make my own in different weights! In the next topic you have already seen how I turned ordinary standards into heavy loads, this is how factory ones were used. This is where the idea of loads made exactly the way I wanted came to me! With any weight, for better transmission tuning! Why was the fluoroplastic material taken?
From Wikipedia: Fluoroplastic is a polymer material produced chemically. Fluoroplastic contains fluorine atoms, due to which it has high chemical resistance. Poorly soluble or insoluble in many organic solvents, insoluble in water and not wetted by it.
Fluoroplastics are characterized by a wide range of mechanical properties, good dielectric properties, high electrical strength, low coefficient of friction, low wear values; resistant to various aggressive environments at room and elevated temperatures, weather-, corrosion- and radiation-resistant, weakly gas-permeable, non-flammable or self-extinguishing upon fire. Very high heat resistance (up to 300 °C). The material has cold fluidity.
So the material itself very much satisfied all the necessary characteristics; I had a piece lying around since Soviet times, so it came in handy. But as far as I know, you can buy it in hardware stores, and gaskets are often made from it to replace copper ones. Well, that's not the most important thing. So I took this piece of fluoroplastic to the operator, handed over the dimensions and in the end we got the following 12 weights, from which two sets of weights can be made:
Since the material is very light, they could not be used in this form. But the interest was great and for the sake of this the variator was quickly disassembled (by the way, this is all done within 20 minutes. Disassembly-replacement-assembly). The results were not so much unexpected as they were cool. He was tearing it out from under him! polished and burned rubber! The engine speed was simply unrealistically crazy! But the speed never rose above 30 km per hour! Well, it was interesting to experiment! And naturally, as often happens in my head, the idea did not take long to arrive! I note that this time there was not even “doping” and “idea generator” in the form of beer! Anyway! The main thing is the end result. What I did in 6 weights was to drill 10 holes and cut threads in them, and in the other 6 weights to 8 holes. The result is the following:
I’m still thinking about what to do with them next, either fill them with lead, or screw the bolts in there and cut off the caps. In general, once I decide and do it, I’ll post the overall result.
Source: www.scooter.forum.com.kz
Design of a sprinkler for a vegetable garden
Homemade agricultural equipment also includes sprinklers for the garden, which can be made practically from waste that is found in everyone’s home. To irrigate your garden you will need:
- spray;
- rubber hose 3-4 m long;
- plastic one and a half liter bottle;
- pump;
- a wooden or metal stick of any length, but the longer the better.
The sprayer is screwed to the stick with the top nozzle so that the lever is pressed using nylon threads. Wrap it tightly so that the sprayer does not move. After this, take a plastic bottle and use a hot nail to melt a hole in the neck. Then we push the bolt into the molten hole and secure it with a nut on the outside. Before inserting the bolt, drill a through hole in it with a simple 3 mm metal drill. The hose is put on the bolt and secured with a small clamp using a screwdriver. We attach the second end of the hose to the pump and again secure it with a clamp so that everything is sealed.
The bottle contains poison for spraying beetles or water for watering crops. Screw the container to the top of the spray bottle, which is attached to a stick. Next, with the nozzle closed, we pump up the pump a little, after that we unwind the nozzle, and the sprayer starts working. In this way, you can spray trees of any height and large beds; if necessary, you can simply place the device on the ground and pump up the pump from time to time.
You can even make small greenhouses out of film at your dacha; you only need to drive a metal rod or stick into the ground and secure the plastic film in the form of a cone to the base.
Video about a drip irrigation system using a plastic bottle:
From below, the film is secured around an old barrel or adjusted with stones.
Digging equipment
Potato diggers of various types are very popular among farmers. These devices save people from hard manual labor, speeding up the harvesting process several times. The walk-behind tractor has a very simple design. It can be made from metal that remains after the construction and renovation of a house.
To work you will need:
- Bulgarian;
- welding machine;
- electric drill;
- heavy hammer;
- anvil;
- profile steel pipe 20x40 mm;
- reinforcement 12 mm;
- tin (preferably stainless);
- bayonet shovel without handle.
The attachment to the walk-behind tractor is made in a suspended or trailed (modular) design. The hanging tool only digs up the tubers, leaving them lying on the surface for subsequent manual harvesting. A modular potato digger not only extracts the crop from the ground, but also collects it in a mobile container on a chassis.
The manufacture of a digger is carried out in the following sequence:
- Drawing up a drawing. The width of the digger should be within 25-30 cm. The angle of attack of the tip is taken perpendicular to the coulter so that the tool does not bury itself in the ground.
- The reinforcement is cut into fragments of a given length. Using a hammer and anvil, they are given the required bend.
- A container for tubers is assembled from a profile pipe and tin. The chassis or skids are welded to the container frame. The runners are made from pipes, and the chassis is taken from an old stroller, cart or lawn mower.
- The holder and reinforcement bars are welded to the shovel. A drawbar is welded to the holder, which is fixed to the assembly container. Connections are made movable using bolts or hinges.
- Rust and weld marks are removed. The finished product is treated with an anti-corrosion agent and coated with paint.
Adjustment and adjustment of the digger is carried out using racks and steel ties.
Making a field sprayer
A homemade sprayer for a walk-behind tractor is necessary in cases where the area of cultivated crops exceeds 20 acres. Doing this type of work manually is very difficult and can take a whole day. Mechanization of this process will save a lot of time and effort.
To make a sprayer you will need:
- welding machine;
- Bulgarian;
- level;
- electric drill;
- soldering iron for polypropylene pipes;
- profile or round water pipes;
- plastic or steel barrel with a capacity of 80-100 l;
- wide pneumatic wheels;
- plastic pipes;
- rubber hose;
- injectors or nipples from wheel tubes.
Assembling a homemade sprayer is carried out in the following sequence:
- Making the frame. Its dimensions are adjusted to the size of the container. The chassis is attached to the frame. For good cross-country ability you need at least 4 wheels. In the absence of wheels, wide skids are made of aluminum.
- The container is installed and secured on the frame. For this purpose, spacers and ties are used. Holes are made in the tank for supplying high-pressure hoses. The tank neck is sealed.
- A bracket for the pump is being manufactured. A model is selected that operates from a power take-off shaft (belt drive) or from electricity (motoblock generator).
- The irrigation system is being assembled. A durable holder is made from steel profiles. Plastic pipes are attached to it using clamps or plastic ties. A valve is being installed to bleed off excess pressure and injectors.
- All parts are connected together, the quality of the fastenings and the tightness of the joints are checked. The tank is filled with water, the unit is tested in various modes, and final adjustments and settings are performed.
A self-made sprayer will fully justify the efforts invested in the first season. Thanks to this device, spraying and watering the garden will be done quickly and efficiently.
Diagnostics of a CVT gearbox
If problems are detected regarding the electronic part, the message “Service required” will light up on the display located on the dashboard.
If the liquid temperature rises above normal, the “Slow down” light will light up.
In order to accurately determine the breakdown and fix it yourself, you need special diagnostics carried out using special equipment. For many breakdowns, a special code is provided, which is used to set:
- malfunctions of sensors (temperature, pulley speed, pressure, line, pressure in pulleys);
- ECU problems;
- problems with the stepper motor, valves, lines;
- decrease or increase in pressure in the pulley.
When performing diagnostics, do not forget that the probable cause of the problem may not only be the failure of some component. Often the wiring may be damaged or some connector may be defective. The problem may also be a malfunction of the gearbox control unit.
In some situations, if malfunctions are detected, the transmission control system can be automatically switched to a special mode. This mode differs from the usual one in a special fixed gear ratio.
Problems with the mechanical parts of the boxes cannot be identified only using electronic diagnostics. In this situation, there is a need for a whole range of measures:
- it is necessary to check the condition of the working fluid;
- identify all symptoms of a malfunction;
- analysis of all ECU data;
- road testing.
New CVTs
Every year, more and more car companies are installing CVT on their models. At the same time, constantly improving their characteristics and introducing new technologies into units. One of the latest inventions is the common brainchild of Nissan and JATCO - a lightweight and smaller variator. It is made in the form of a V-belt type device combined with a new gearbox. This type is distinguished by its serious characteristics:
- has the highest gear ratio. Its range is increased by twenty percent over a conventional CVT, so it is able to accelerate and brake faster. This number is 7.3:1. It is higher than on a seven-speed automatic transmission;
- the weight of the new invention is reduced by 13%;
- equipped with ASC. This system selects the best gear ratio while driving, accelerating and braking.
JATCO CVT
Now representatives confirm that they are developing developments to improve the variator. They improve ride comfort, acceleration and braking characteristics. Increase efficiency and reduce fuel consumption. They want to make a version of a continuously variable transmission in which the variator will become similar to an 8-speed automatic transmission.
The desire to improve the variator and the ongoing new developments of its types once again prove that it is the future. Perhaps soon it will completely replace the usual mechanized, robotic and automated gearboxes. Particular emphasis is placed on its hybrid types, in which the engine will operate in optimal mode, and the resulting energy will be stored in a storage device and then spent on driving the car.
Portal about construction
More and more gardeners today are asking the question: how to tune a walk-behind tractor with your own hands? After all, if you turn to specialists in this matter, this can entail large financial costs. Ultimately, remaking a walk-behind tractor can even cost much more than purchasing a new unit.
But there are several available options that allow you to tune a walk-behind tractor with your own hands with minimal investment of money and time.
ProVariator.RU
DIY drawings for a summer house and vegetable garden will be useful to everyone. A dacha is the ultimate dream of, if not every average person, then certainly every second person. Not everyone, of course, will be lucky enough to become the owner of a country plot in their lifetime, but those who are lucky will need to constantly monitor and improve it, which requires considerable expenses. Do-it-yourself homemade products for your dacha and garden help you keep your dacha in impeccable condition. Today we will tell you a few secrets on how to save money on buying the necessary things for your garden and make them at home. Of course, not everyone can make a grader with their own hands or self-propelled guns for a tractor, but most of the homemade products will definitely come in handy on the farm.
Improved engine performance
How to increase the speed of a walk-behind tractor? In this regard, nothing can be radically changed, since it’s all about the engine’s performance. To improve its performance, it is necessary to lubricate the main parts of the engine as often as possible. But the main thing is to change the oil in a timely manner. If you do not do this, the engine (and with it the walk-behind tractor) will quickly fail.
If you often have to work in frost or extreme heat, special attention should be paid to candles. The speed and overall efficiency of the engine largely depends on their quality. In order for the walk-behind tractor to plow more soil in an hour, you should replace the old spark plugs with new ones of better quality. This will make it possible to start the unit faster and protect the car from overheating or freezing.
Advantages and disadvantages of a variator
Any invention has some shortcomings, and the CVT was no exception. They are trying to eliminate its weaknesses, but while they exist, it’s worth knowing about them:
- Such gearboxes are not installed on powerful cars, although there are already several copies with them.
- CVT repair requires large material costs, and besides, it is not carried out at all service stations. It is very difficult to find a specialist who is well versed in this type of device.
- The operation of the variator depends on the readings of many sensors, and if at least one of them suddenly fails, this can lead to improper operation of the entire transmission system.
- Such a device requires filling its internal part with a special fluid, which is highly expensive compared to analogues intended for automatic transmissions. And its level must be constantly monitored.
- The transmission is under heavy load.
- With this gearbox, there are certain restrictions on towing cars, as well as when using trailers.
CVT malfunctions
But a car with a CVT has many significant advantages:
- Convenient travel in a car with a continuously variable transmission.
- Smooth movement of the car - rapid acceleration and braking does not cause jerks, as when using other gearboxes.
- Stability of indicators with sufficiently long movement.
- Due to the optimal load on the engine and the thoughtful operation of the machine, significant fuel savings occur.
- The level of harmful substances created by exhaust gases is lower than in cars with automatic transmission and manual transmission.
- Driving safety on icy roads, as the variator eliminates wheel slipping.
- Electronic control of engine operation increases its wear life and prevents frequent repairs.
- A car with a CVT drives much quieter than with conventional gearboxes.
CVT diagnostics
If a certain malfunction actually occurs with the electronic part, a notification “Service required” should appear on the monitor located on the dashboard. “Slow down” should appear on the same monitor if the liquid temperature exceeds the norm. For self-diagnosis, you can use the program from Google Play CVTz50
and adapter ELM327
To accurately identify problems and fix them yourself, special diagnostics are required, which is performed using special equipment. Many faults have their own code, through which they are detected:
- — Sensor malfunctions;
- — Reduced or increased pressure in the pulley;
- — ECU malfunctions;
- — Damage to the stepper motor, line and valves.
When performing diagnostics, you should remember that the cause of a variator malfunction is not only the breakdown of a specific component. Often the cause of a CVT failure is damage to the wiring or some connector. Or the cause may be a malfunction of the variator control unit.
There are also situations in which, if a malfunction is detected, the variator control system is automatically switched to a special mode. The difference between the special mode and the normal mode is the presence of a fixed gear ratio.
If the CVT malfunction is concentrated in the mechanical part, then to identify it you will need to take a number of measures:
- — Checking the condition of the oil;
- — Test while driving;
- — Identifying signs of a problem;
- — ECU data analysis.
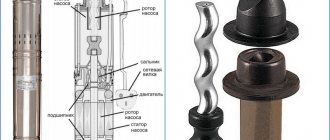
The principle of operation of the variator and its design
The continuously variable transmission smoothly changes the torque at specified control intervals. This is achieved due to its special design, which consists of the following components:
- variator;
- clutch mechanism;
- reverse transmission device;
- processor with actuator.
Different types of devices act as automatic clutches. Without them, the torque would be immediately transmitted to the wheels, and so the specified unit will be responsible for the smooth transmission of motion. The clutch can be:
- centrifugal - Transmatic technology;
- wet multi-disc – representatives of “Multimatic” and “Multitronic”;
- electromagnetic - “Hyper” variator;
- torque converter
The latter type is used on most cars. It ensures smooth engine operation without jerking and prolongs the life of the variator. At high speeds it enters the full engagement mode, which eliminates slippage. But part of its power may go into heating. And there are times when it overheats, this becomes known by the red light on the dashboard coming on.
CVT device
The variator operates using an electronic unit. It is responsible for the following functions:
- clutch control;
- changing the gear ratio between the variator shafts;
- monitoring the operation of the planetary gearbox;
- ensuring the operation of the reversing apparatus.
Information from many sensors is transmitted to the electronic unit. Therefore, its work is interconnected with indicators of engine speed, tire pressure, ABS, etc. The collection of information is filtered in the device, and it is automatically adjusted to the desired gear ratio.
But variators cannot independently reverse the car, so a planetary gearbox is provided for these purposes. The principle of operation is similar to that of an automatic transmission.
When driving a vehicle with a CVT, the driver performs almost the same actions as when using an automatic transmission. But they are simplified a little, he selects only the mode, and the rest is done for him by a convenient variator device. It also allows you to repeat some of the manipulations possible in conventional checkpoints. For example, you can fix a certain gear ratio. Some drivers do not feel the acceleration of the car, and therefore attribute the constant speed of the crankshaft to the shortcomings of the device, but you need to get used to this and over time the convenience of the continuously variable transmission will become obvious.
Equipment for removing snow and hay
In the walk-behind tractor, you can additionally make a device for collecting hay. This is especially convenient for large farms. After all, with limited funds, it is almost impossible to buy a special machine for this purpose.
To do this you will need old pipes and a plate. In general, everything will somewhat resemble a large rake. The parts are connected using a welding machine. It is necessary to secure the pins and pipes to a powerful thick plate so that it looks like a rake. It is best to use thin metal pipes. The lighter and stronger they are, the better.
Conversion into an all-terrain vehicle and trailer mount
If the region is characterized not only by severe winters, but also by wet clay soils and swampy terrain, then it would be more reasonable to upgrade the walk-behind tractor into an all-terrain vehicle. This will allow you to work with the unit in any weather and on any soil. In order for such a modernization to be carried out successfully, several important recommendations must be taken into account. The basis of this improvement is a special frame with not two, but four wheels. It is 4 powerful wheels that will allow the unit to move without much effort. Please note that the rotational motion to these wheels must be transmitted to the rear axle through the driveshaft. If the transmission goes to the front axle, then nothing good will come of such a modification.
The walk-behind tractor body itself is attached to such a wheel base by ordinary welding. Just weld the parts carefully and in several places so that nothing falls off during the work. Such a simple modification allows you to get a super walk-behind tractor, which in appearance will somewhat resemble a small ATV or even a mini-tractor.
The most common way to modernize old walk-behind tractors is to attach trailers to them. This is quite a convenient thing. After all, the trailer makes it possible to use the unit not only as a machine for removing snow, hay or for cultivating soil, but also as a separate vehicle for transporting medium and large loads.
This modernization of the walk-behind tractor involves attaching a trailer to it. This is done using a fairly rigid coupling method. It is extremely important to maintain the center of gravity during operation. After all, its minimal incorrect displacement will lead to the fact that it will simply be impossible to transport cargo in a trailer, since the unit will always turn over along with the trailer. The center of gravity must move back a little. It is also recommended to install a differential to increase the maneuverability of the mini-tractor and attach special bushings in front, which will slightly increase the width of the front axle.
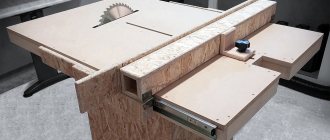
Do-it-yourself variator for a machine
When working on a lathe, very often there is a need for different speeds of rotation of the workpiece. This is explained by the fact that different operations require their own speed. As a result, lathes, and not only those, are equipped with entire groups of pulleys. These pulleys, in turn, allow you to change the speed of rotation of the workpieces, throwing the transmission belt to a certain point. There are some disadvantages to this, due to the fact that the machine must be stopped and so on. Therefore, as an option to solve the problem, we suggest you make a homemade variator for the machine.
This is not to say that this option does not have its problems and drawbacks. On the contrary, there are such disadvantages, and the main one is significant belt slippage, in comparison with a V-belt drive. But such slipping is a good protection for the motor from jamming of workpieces. In addition, even such a simple method will allow you to change the rotation speed of the workpieces without turning off the machine, and the rotation speed will be adjusted very smoothly.
Well, let's see how to make such a variator yourself. First of all, you need to make wooden cones, choosing a hard type of wood. Cones do not have to be made using a machine. They can be made from disks cut with a jigsaw. So, it is necessary to cut them at an angle that will be equal to the angle of inclination of the cone. Therefore, to perform such an operation it is far from necessary to use an electric jigsaw; a manual one will do just fine. When all the disks are cut out, they need to be assembled into one single cone. So, the discs can be placed on good glue, or knocked down with nails. In this case, use small nails and keep in mind that they need to be hammered in evenly so as not to subsequently disturb the center of gravity of the cone. Therefore, be extremely careful.
Sawing blanks with a jigsaw according to the angles described above
Now that the cones are ready, they need to be placed on metal rods. Moreover, you need to plant it as deeply and firmly as possible. Once you have placed the cone on the rod in its final position, be sure to secure them with screws.
This is how the cones are fixed
In order for the belt to move freely along the cones and lock into the position we need, it is necessary to make a guide on rollers. In the figure below, you can clearly see the design of the guides, and wooden spools can be used as rollers, on which threads are usually wound.
This is what the roller guide looks like
You can also use regular ball bearings as rollers. Even if they are not wide enough, you can install two, three or more bearings depending on their size and the size of the track along which they will move. And of course, you can use fluoroplastic rollers, as shown in the figure, but this option will cost more than others.