Installing a countertop in the kitchen is an important step in organizing the space. The convenience of the entire room depends on competent calculations and proper installation. Cook food quickly and with pleasure, clean up after cooking, dine comfortably - it all depends on the countertop. You can invite professionals to install it, or you can resolve the issue yourself. Having basic repair skills and following the instructions, a DIYer can easily handle the installation of a countertop.
Self-assembly is becoming increasingly popular because it allows you to accurately adjust furniture to the desired size. This is practical and costs much less than paying for the services of an invited furniture maker. Let's consider all the nuances of proper installation of a countertop with your own hands.
What tools and materials may be useful
To independently attach the countertop to the kitchen set, you will need certain materials:
- High strength construction adhesive for joining parts.
- Silicone for creating a smooth surface and finishing ends.
- Universal sealant for filling voids.
- Sealing tapes
- Connecting profile
- Aluminum connecting strips.
At the preparatory stage, the following tools will be useful:
- Jigsaw.
- Sander.
- Drills of different diameters.
At the second stage, when you need to join and secure the parts together, as well as for installing the canvas and installing the plinth, you will need:
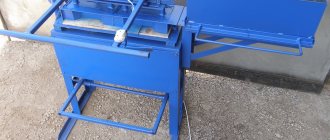
- Miter saw.
- Tool set with pliers, hammer, wire cutters, tape measure and screwdrivers.
- Marker.
Installation of tabletops using figure-eight holders
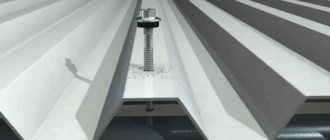
Steel figure-eight fasteners are another popular hardware option used to secure countertops. The bracket is installed in a small recess drilled with a Forstner drill or a square recess selected with a chisel so that it is flush with the upper edge of the drawer. The holder is fixed with two screws: one to the body, the second to the back side of the tabletop as shown in the photo. As the board swells or contracts, the bracket rotates slightly, preventing the wood cap from bending. The recommended distance between fasteners is 15-20 cm.
Figure-eight holders come in two types: with washers of the same and different sizes. In the latter case, a washer with a large diameter is attached to the drawer. When deciding to attach the tabletop to a kitchen or room set in this way, you need to make sure in advance that the thickness of the drawer matches the diameter of the washer.
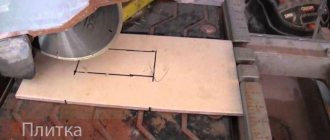
Slicing
For your product to fit perfectly, it must be the right size. This is quite difficult to achieve. Even if you took measurements accurately enough, there is always such a thing as error.
At home, you need to think about how to trim the excess or adjust it so that the new tabletop does not become deformed. There should be no chips or cracks during your work. Cutting can be done in the following ways:
Content
Pitfalls of self-installation
Installing countertops in the kitchen: important points
How to install a countertop in the kitchen with your own hands: step-by-step instructions
Step 1. Preparatory work
Step 2. Joining fragments
Step 3. Installation of the canvas
Self-assembly of kitchen furniture is becoming increasingly popular. This is beneficial and practical, since it becomes possible to adjust the parts as accurately as possible to the size of the room. You need to choose a ready-made project or create your own and order cutting of the necessary elements. The main difficulty lies in careful and correct assembly. Let's look at how to properly install a countertop in the kitchen with your own hands.
Basic rules for choosing skirting boards
Additionally, there are several important points for those who are just starting to furnish a room and purchase furniture:
The color and design should be the same as the entire kitchen and module. You can’t buy a baseboard that doesn’t match the tone; it will always catch your eye. When choosing decor, you need to start from the set
If handles and various small parts are made to resemble copper, it is necessary that the plinth have a small part of this direction. This can affect both the pattern and the painted border. Important attention should be paid to the material from which the fillet will be made. The plastic comes away from the sealant very quickly, and within six months the first problems will be visible.
The baseboard should not only be beautiful, but also easy to clean. A large number of textures can lead to contamination. It is almost impossible to wash such a baseboard without using strong chemicals.
How to attach the tabletop to drywall or window sill?
It happens that the basis for attaching the tabletop is not a hollow, but a cast structure. This could be a window sill or a specially created plasterboard ledge. It will not be possible to attach a tabletop or shelf from the inside to such a base. There is only one option left - glue it.
For this, the well-known liquid nails are used. Any leftover after renovation will do. Regardless of the composition, almost all options are suitable for gluing chipboard, MDF or solid wood to plasterboard or concrete (in the case of attaching a window sill).
For better adhesion, the base must be carefully leveled, dust-free and degreased. The glue itself is applied to the underside of the tabletop. After the recommended time, the tabletop is pressed to the base in the desired position. It is better to leave the press until it dries completely.
ADVICE! To avoid possible deformations, avoid circular motions when applying adhesive to the countertop. Longitudinal or transverse stripes, as well as spot application, work better.
Fastening the table legs
The legs of the table are attached to the sides of the supporting frame, and the tabletop is, in turn, attached to them. In order to ensure a tight connection between the drawers and the legs and to compensate for the shrinkage of the wood due to fluctuations in humidity, the following fastening methods are used.
Joiner joint tenon-socket
Advantages : high strength, lack of additional fittings and unnecessary fasteners, ease of manufacture.
Disadvantages : the connection is non-separable and does not compensate well for shrinkage.
Wooden corner ties
Advantages : proper connection strength, the ability to disassemble, good compensation for seasonal deformations of wood, an alternative to purchased fittings.
Disadvantages : difficult to manufacture, rarely used for mass production of furniture.
Connections on dowels
Advantages : reliable carpentry connection without visible fasteners, as simple as possible to manufacture.
Disadvantages : inseparability, poor compensation of deformations.
Metal corner ties
Advantages : they perfectly compensate for shrinkage, are easy to disassemble, provide a permanent tight connection, and strengthen the entire frame.
Disadvantages : relatively labor-intensive installation technology, the presence of protruding metal elements under the table cover.
Decor
There are many options for designing a kitchen countertop . However, without serious professional skills, you should not take on the installation of complex materials. Correct installation of an expensive countertop is difficult - it is better to entrust the installation of a stone slab to an experienced craftsman.
It is preferable for novice furniture makers to install countertops made of chipboard or MDF - less complex, although capricious materials. Let's consider all the difficulties that may arise when working with different materials.
Chipboard and MDF
Chipboard is lightweight and quite convenient to work with. It is recommended to install such a plate using corner brackets. In order to properly screw the plate to the base, it is necessary to press it with force. It is advisable to perform such work with an assistant. The most suitable option for your first experience in assembling a table yourself.
Tree
If handled inexperienced or carelessly, chips and cracks will form on the wooden slab. Mechanical damage can be eliminated, but such work requires professional skills. To prevent wood from rotting in a room with high humidity, it is recommended to fill all voids with sealant. Installation is carried out with self-tapping screws, the gap between the wall is closed with a plinth. Caps installed on the edges of the planks will protect the countertop and extend its service life.
Stone
Natural or artificial stone is the most difficult material to install. The large weight of the product, the special tools and skills required to work with stone - all this makes it difficult to independently install a stone countertop. It is advisable to entrust such work to a professional. It is very problematic to cut the necessary holes in a stone slab, and the seams must be carefully treated with silicone.
Glass
Spectacular and fashionable glass coating is increasingly being used to decorate kitchen worktops. However, the material is fragile and must be handled carefully. It is recommended to choose thick tempered glass due to its high strength. Vacuum suction cups and special glue are used for fixation. The holes are cut with a diamond glass cutter, and the glass slab is attached to the frame with special fittings.
Metal
Difficult material to process at home. It must be cut using special equipment and treated with a corrosion protective agent before installation. It is recommended to attach a metal tabletop with euroscrews and furniture ties.
This is interesting:
Postforming countertops for kitchen units - features, pros and cons.
About repairing a kitchen countertop: how to fix a hole with your own hands.
Manufacturing process: step-by-step instructions
Drawing of a wooden table with four legs
First, you must make a drawing. Decide which legs you will attach - purchased ones or make them yourself. The form can be any.
Curly balusters or legs for a homemade table
If the tabletop is 0.8 m wide, then the legs should be 1.2 m long. To ensure the tabletop is smooth, sand it with a sander. There should be no gaps between the joints. To prevent the tabletop from deforming due to high humidity, the boards must be laid with a counter texture.
Tabletop boards at least 30cm thick
At the ends of the boards to be joined, you need to drill holes 8 cm deep, keeping the gap between them at 10-15 cm. We go through the prepared areas with sandpaper and lubricate the edges, dowels and holes with glue. We insert the dowels into the holes, thus connecting the tabletop. Remove excess glue.
Option for attaching legs to a wooden table
Using glue and screws, we connect the transverse and longitudinal boards to the legs. On top of the latter we make two recesses to attach the tabletop. We wait twelve hours and install it. We cover the structure with varnish, stain or paint.
Table with fixed top, frame and legs
Important! When using stain, consider the following: choose the thinner wisely, the surface before coating must be carefully sanded, the main thing is to properly adjust the gun (the shape of the torch should be oval, and the layer you apply should cover the existing one by half).
Cover with varnish or wax to protect the top layer
Having familiarized yourself with the options for attaching legs to the tabletop, it will not be difficult for you to make a table with your own hands, thereby updating the interior with such an original thing.