Even the simplest repair of an angle grinder in a service workshop can cost from a third to half of its cost. Therefore, before turning to professionals, you should always try to fix it yourself. Moreover, the passports of Bulgarian women often contain tables of the most common faults and the reasons for their occurrence. For home repairs, in most cases, you can get by with a set of the most common tools: screwdrivers, pliers, wrenches and a multimeter. The only time mandrels, pullers, or similar devices may be required is when removing and installing bearings. And spare parts for repairing an angle grinder can be purchased without any problems in well-known online stores.
General rules for repairing power tools
The safety rules for repairing an angle grinder are the same as for repairing any other power tool. Cleaning from dust, disassembling and assembling is carried out only with the device completely de-energized. Repair work must be carried out on a dielectric surface, and the power source must be equipped with a short circuit protection circuit breaker. It is strictly forbidden to manually turn the angle grinder spindle if the power supply is turned on. It is also prohibited to carry out test runs during or after repair with a cutting disc installed on the spindle.
Bulgarian and its operation
An angle grinder is called an angle grinder. The name of the instrument is due to the fact that it was produced in Plovdiv. It is intended for performing work on grinding or trimming hard material:
- metal;
- concrete;
- stone
Does a good job of sharpening tools.
A grinder is a very necessary tool these days, so almost everyone has one.
There are grinding machines of different power: from 500 W to 2500, depending on the thickness of the wheel - from 115 mm to 230 mm. The most popular ones in use are angle grinders with a power of 1.2 W, and the most used disc is 125 mm thick.
Every year the choice for this construction power tool becomes wider, but the operating rules remain almost unchanged. And even if you always adhere to them, sooner or later malfunctions arise in the mechanism, which you can try to fix yourself by collecting everything you need to repair the angle grinder.
Common problems in the operation of angle grinders
The grinder is a fairly unpretentious tool, as it is designed to work with high loads and in dusty environments. The main problems in its operation in most cases are associated with improper operation, as well as non-compliance with maintenance and scheduled repairs. The most common malfunctions are:
- The angle grinder does not turn on. The most common reason for this phenomenon is a broken wire in the power cable or a faulty switch. And for grinders with electronic control, the speed control unit or soft start fails.
- The grinder operates at low speeds. As a rule, this is due to an interturn short circuit in the rotor windings or an electronic malfunction.
- The angle grinder gets very hot. This often occurs due to a violation of the ratio of recommended work cycles and breaks. In addition, heating may be a result of poor engine cooling due to dust accumulated inside the housing.
- The grinder sparkles. In this case, the main reasons are wear of the carbon brushes or wear of the electric motor commutator. Brushes also spark when there is increased contamination and oxidation of the commutator plates.
- The Bulgarian smokes. This is usually observed when the unit is used too intensively and the air cooling ducts are filled with dust. The reason that the tool smokes can also be short circuits in the rotor or stator windings.
- The angle grinder hums, but does not rotate. As a rule, this happens when the gears of the gearbox jam or the bearings fail.
- The spindle lock button is broken. The reason for this is that dust gets inside the clamp, causing wear on its rod.
- The bearings are broken. Bearing failure most often occurs after prolonged use and work with shock loads.
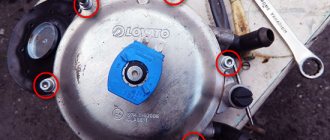
Another fairly common problem with angle grinders is the jamming of the clamping nut.
Do-it-yourself grinder repair at home - diagnostics and solutions
How to properly repair an angle grinder? This question interests many masters. The approach to performing repair work can be different - it all depends on the type of fault.
Electrical breakdowns
If no current is supplied to the brushes, it is necessary to clean the contact plates of the holders. If this manipulation has no effect, it is recommended to replace the brushes.
Do-it-yourself grinder button repair
To cope with this malfunction, you need to buy a new button of a suitable design and install it on the machine. You will not be able to repair this element yourself. This part contains small parts that may fall apart during disassembly.
Do-it-yourself network cable repair for an angle grinder
If a cable break is detected, it must be cut at this location. After which it must be properly connected and reliably insulated.
Repairing an electric motor for an angle grinder - types of breakdowns and how to fix them yourself
Most often, the armature of the machine breaks, but the stator can also fail.
- If the anchor breaks, it must be replaced with a new one.
- If the stator fails, it can be repaired. However, to do this, it is recommended to take the device to a repair shop, where the winding will be rewound.
How to check the serviceability of an anchor and repair it on an angle grinder with your own hands
To evaluate the performance of the armature, it is recommended to use a multimeter. This tool will help you measure the resistance of the armature winding. To repair this element, it is recommended to contact professional technicians.
Checking the serviceability of the angle grinder motor stator
To check the operation of the stator you need to do the following:
- Measure the resistance between the stator winding and the core. It indicates a violation of the copper wire insulation.
- Check the resistance in the winding. To do this, you need to touch the output contacts with the probes. It is important that the resistance in the two windings matches.
Malfunctions of the angle grinder regulator and do-it-yourself repairs
Some models have regulators that change the speed of rotation of the spindles. This is a very convenient feature. To identify a regulator failure, you should pay attention to the operation of the product.
Important! If, when moving the disk, the speed does not increase or decrease, this indicates a failure of the element. To eliminate the breakdown, you should solder the wire or clean the oxides on the microcircuit.
How to fix brush problems yourself
When the brushes wear by more than 30-40%, they need to be replaced. To do this, just disconnect the wires and pull them out of the special holders. Then you can replace the old brushes with new ones and connect the wires to the contacts.
Malfunctions of the mechanical part of the angle grinder
Mechanical failures are easier to identify and repair. They can often be diagnosed by hearing:
- a hum during operation indicates wear of the bearings;
- the appearance of a knock indicates a malfunction in the gearbox assembly;
- If there are problems with fixing the spindle attachment, you can suspect a broken button.
How to repair a gearbox on an angle grinder with your own hands
The gearbox consists of a pair of helical gears. Over time, their teeth can wear out. This creates the need to replace the element. To disassemble the gearbox pair, you need to do the following:
- unscrew the nut;
- get the rotor;
- knock out the gear from the shaft and install a new one;
- pull out and replace the second gear.
How to replace bearings on an angle grinder
To replace the bearing you will need a special puller. A piece of pipe of the required diameter will also work. After changing the element, it is necessary to remove the old lubricant and apply new one. For this purpose, it is permissible to use solid oil.
The spindle lock button is broken, repair it yourself
To remove the attachment, you will need a thin open-end wrench. They need to get to the inner spindle nut and unscrew it. After which you can install a new element.
To prevent breakdowns, you need to lubricate the elements of the device in a timely manner.
General instructions for disassembling an angle grinder
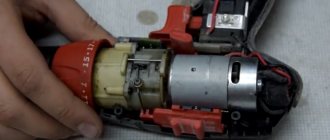
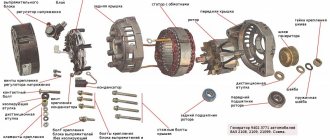
All angle grinders consist of two main parts: a plastic drive housing and a metal gearbox. In addition, for many angle grinders you can separately disassemble the rear handle, inside of which there is a power input, as well as control system units. To repair an angle grinder at home, you may need Phillips and flathead screwdrivers, wrenches and thin pliers. In addition, to check and repair electrical circuits, you will need a multimeter and tools for working with wires. Before disassembling the grinder, it is necessary to remove the cutting disc and protective casing.
Angler anchor device
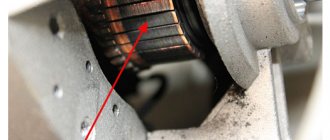
The armature of the angle grinder motor consists of a conductive winding and a magnetic circuit into which the rotation shaft is pressed. It has a drive gear at one end and a commutator with lamellas at the other. The magnetic core consists of grooves and soft plates coated with varnish to insulate them from each other.
Grinder anchor diagram
Two conductors of the armature winding are laid in the grooves according to a special pattern. Each conductor makes up half a turn, the ends of which are connected in pairs on lamellas. The beginning of the first turn and the end of the last are in the same groove, so they are closed to one lamella.
Step-by-step electrical diagnostics with a multimeter or light bulb
When diagnosing and repairing the electrical part of an angle grinder, it is most convenient to use a multifunction tester (abbreviated name - multimeter). If such a device is not at hand, then a screwdriver with an indicator or a light bulb with two wires will be suitable for some checks. During the repair process, the multimeter allows you to measure both voltage and current values, as well as the resistance of the motor windings. The indicator and light bulb can only show the presence or absence of voltage.
Diagnosis of power failure
Perhaps the most common malfunction of an angle grinder's electrical equipment is a break in the power wires inside the power cable sheath. To diagnose and repair such damage, it is enough to disassemble the rear handle of the angle grinder and check the voltage at the terminals in front of the switch. Another way is to disconnect the cable terminals and use a multimeter to check the resistance of each wire for an open.
Checking the stator and rewinding it
To check the stator of the electric motor of the angle grinder, you need to disconnect both of its windings from the power circuit, and then measure their resistance with a multimeter in the range of 200 Ohms. On a working winding, the device will show a resistance of about one ohm, and on a faulty winding (with a break) - tens or hundreds of ohms. If the winding fails as a result of a short circuit, carbon deposits can usually be seen on the inside of the stator housing. It is impossible to check the stator for interturn short circuit with a conventional tester - there are special induction devices for this. The only ways to repair the stator are to replace it or rewind it. The second is only possible if you have the appropriate qualifications, so most often the stator is simply replaced.
Armature diagnostics with a tester
It is necessary to check the armature of the angle grinder both for breakage of the windings and for their short circuit to the core. In the first case, the resistance is measured in a circle between two adjacent plates of the commutator located on the rotor shaft. All values should be the same (within one ohm), and a significant difference indicates an open circuit. In the second, measurements are taken between the rotor magnetic circuit and the collector plates. To search for an interturn short circuit, as in the case of the stator, you need to use a special device. If a malfunction is detected, it is necessary to decide how to repair it: by rewinding the armature or replacing it with a new one. It is unrealistic to rewind the armature windings yourself without the appropriate skills and equipment, and rewinding at a service center will cost almost the same as a new armature. Therefore, the best repair option is to purchase and replace the anchor yourself.
Checking the starting and control unit
Diagnostics of the electronic components of an angle grinder comes down to determining the serviceability of individual units, and repair (if there are no skills in radio engineering) means completely replacing them. The soft starter can be checked with a dial ammeter, comparing the current surge with and without it. To accurately diagnose the speed control unit under load, you will need an oscilloscope. Although, in order to understand whether it is in principle working or not, it is enough to simply observe the behavior of the angle grinder in different modes.
Checking carbon brushes
During operation, the carbon brushes are worn out and must be replaced when they reach the minimum size. The first sign of problems with the brushes is an uneven spark ring around the commutator with flashes. Some models have round holes with screw caps on the body for replacing and checking brushes. But in most angle grinders, in order to change them, you have to completely disassemble the body or rear handle, as during repairs.
Diagnostics of the start button and speed controller
The most common malfunction in the electrics of an angle grinder is the failure of the start button, which is most often a consequence of dust getting into it. You can check the functionality of the button using a multimeter or an indicator screwdriver by measuring the voltage at its output contact. It usually cannot be repaired and is simply replaced with a new one. It is even easier to determine the malfunction of the rotation speed controller: when the wheel rotates, it either changes the spindle speed or not. If you don’t have the skills to repair such devices, then it’s easier to buy a new one for a few hundred rubles.
The power button does not lock
Frequently pressing the button with force leads to wear on the contacting surfaces, and the button no longer locks. This defect is one of the most common that occurs during the operation of grinders.
In the following video, the Makita model grinder does not have the button locked in the required position . After disassembly, the worn surfaces on the button and the fixing groove on the body of the angle grinder are clearly visible. Repairs are made in two ways.
Replacing the worn button with a new one
Here you should remove the radius of curvature on the fixing groove and align the landing plane under the button. In this case, the processing is carried out very carefully with minimal removal of plastic material. The properties of plastic, as a fragile soft material, make it possible to select a machining mode with low tool speeds, which allows you to regulate its optimal feed when eliminating surface defects.
With worn button fix
The author is right that it is not always possible to find a new button to replace a worn one. The button restoration method is relevant, especially for craftsmen working outside the scope of specialized retail outlets. Important: clean the seating surface of the button with a file no more than a few tenths of a millimeter, and just level the contact surface of the “tendril” of the button without removing excess material.
These methods are one-time in nature; the next such breakdown may lead to the replacement of parts with new ones.
Diagnostics of the mechanical part of an angle grinder
Most often, bearings and gears are repaired or replaced in the mechanical part of the angle grinder (see figure below). Wear and failure of these parts is usually accompanied by increased vibration, unusual sounds or gearbox jamming. Diagnosis of their condition is carried out visually after complete disassembly of the case, and based on its results, a decision is made on the need and type of repair.
In addition, the gearboxes of angle grinders use protective couplings that prevent a sharp jerk of the housing when the disk jams. Such devices are initially designed to operate in extreme conditions and, as a rule, require repair very rarely.
Checking the gears of the gearbox
In order to inspect the gears of the angle grinder gearbox, it is necessary to separate it from the drive and then completely disassemble it. Diagnostics consists of visually determining the degree of tooth wear, and repair involves replacing the worn-out gear with a new one. The main types of gear malfunctions that require gearbox repair are grinding and chipping of teeth.
Checking the lock button
The angle grinder spindle lock (locking button) is necessary to hold it stationary when tightening the clamping nut. If it starts to sink, you need to remove the button, remove the rod and spring, and then clean the inside and visually check the condition of the rod, seal and spring. Repairing the retainer usually involves replacing one of these components (see video).
Checking the disk mounting flange
The usual support flange of an angle grinder is a simple device in the form of a disk, against which a cutting wheel is pressed. Its surface should be smooth, without potholes or burrs. It cannot be repaired, and when worn out it is simply replaced with a new one.
Checking the rotor bearings
The bearing of the drive shaft of the angle grinder, which is the rotor shaft of the electric motor, can be inspected and replaced without completely disassembling the gearbox. To do this, it is enough to disconnect the gearbox and drive housing (see figure above). If the decision is made to repair and replace the bearing, then you will have to completely remove the electric motor rotor, remove the drive gear (see photo below), and then remove the old one and install a new bearing.
Checking and repairing the collector
To inspect the collector, it is necessary to remove the rotor, disassembling the housing and gearbox. When grooves are identified on the commutator, it is turned on a lathe, and minor damage is removed by grinding. To grind the surface of the commutator, the rotor shaft is fixed in a drill chuck, and grinding is done with glass paper. When carrying out grinding and turning work, beating and displacement of the center of the workpiece are not allowed, and before work it is necessary to remove the bearings from the rotor shaft.
Read also: How to connect an argon torch to a welding inverter
After carrying out the work, you need to clean the surface with a soft cloth and remove burrs on the lamellas.
How to disassemble the gearbox
When repairing the mechanical part of an angle grinder, first of all, it is necessary to separate the gearbox from the drive by unscrewing the four bolts and disengaging the drive and driven gears. To inspect it internally and repair its components, you need to remove the lower part of the gearbox, which is also bolted to the main body. Next, the gearbox is disassembled into individual parts, sequentially separating the bearings, gear and flange from the shaft.
How to remove gears
The drive gear of the grinder gearbox is usually attached to the shaft by tension and pressed with a nut, and the driven gear is fixed with a key and a split washer. The video below shows the repair procedure with disassembling the gearbox, removing the upper bearing and replacing the driven gear. The video is in English, but everything is very clear, so you can watch without sound.
How to remove a spindle: tips
The spindle axis works together with the main gear, which includes:
To disassemble the spindle housing, you must first remove the main gear, for which special tools are used.
After removing the gear, the housing is placed in a vice. Applying a wooden block and hitting it with a hammer, carefully remove the spindle on which the bearing is mounted. Removing the bearing is done as described above.
Disassembly of the gearbox should be performed regularly, especially when the tool has been subjected to intensive use. After disassembling, replace the lubricant. The most commonly used is Litol-24. It must be said that the lubricant must be changed constantly after a certain period. This allows you to increase the life of the gearbox for many years, due to reduced wear of its component parts.
Repairing an angle grinder with your own hands is a completely solvable task. The main thing is not to rush, understand the design, remember all the circumstances under which it broke, determine what could have worn out during operation, make diagnostics and begin repairing it.
Prevention of angle grinders
Prevention of an angle grinder includes compliance with passport requirements during its operation, periodic maintenance and scheduled repairs.
First of all, it is necessary to strictly observe the ratio of work cycles and breaks recommended by the manufacturer. It is also necessary to periodically clean the internal space of the angle grinder body from dust, change the brushes in a timely manner and lubricate the gearbox. If persistent vibrations and uncharacteristic sounds occur during operation of the angle grinder, you should immediately carry out an internal inspection of the mechanical part and carry out the necessary repairs. Unlike a regular angle grinder, the quick-release nut is a rather expensive device. How long can it last and is it possible to repair it if it fails? If anyone knows the answer to this question, please share the information in the comments.