A grinder is a fairly popular tool that is often used in the household for sawing wood, metal or stone. When using these angle grinders for a long time, people often encounter the cutting disc jamming. This leads to the fact that the tool begins to work much worse. To cope with such a problem, you need to figure out in advance how to unscrew the nut on an angle grinder and what needs to be done for this.
A grinder is a power tool often used for sawing various materials.
The nut is stuck - how to unscrew it?
Removing a disc on an angle grinder if it is bitten is not so easy, especially without damaging the cutting element or tool. We will also consider several options for action.
Replacing a counter-rotating disc
This method has several advantages - it can be done without a key and with a broken spindle lock. Beginners in working with angle grinders mistakenly believe that if the stopper breaks, it is almost impossible to unscrew the nut. However, this is not the case. You don't even need keys.
Read also: How to make ginger juice
The point is that the abrasive wheel needs to be rotated in different directions. Wearing thick gloves, you need to hit the cutting edge of the circle several times. This is what will ensure variable movement in different directions. As a rule, a couple of sharp blows are enough so that the nut can be easily unscrewed.
Open-end wrench and socket head
In this case, you will have to slightly modify the existing standard tools - a 17 mm open-end wrench and a 24 mm socket. The thickness of the key is ground down to 4 mm. 4 protrusions are machined on the head and fit into the holes of the retaining nut.
After preparation, the key is placed in the space under the disk, and the head is put on the flange of the angle grinder and rotated in the direction opposite to the rotation of the wheel. After this, you can easily remove it and install a new one.
Replacing a disk in normal mode
When operating an angle grinder regularly, you need to constantly change the wheels, which are consumables. If the tool is no longer comfortable to work with, then the worn abrasive wheel should be replaced.
Important! Be sure to check the electrical disconnection to avoid personal injury.
Step-by-step algorithm of actions
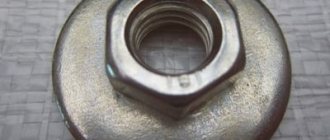
The circle is secured to the spindle head with a locking nut having an M14 thread. The standard configuration includes an open-end wrench with special protrusions for engaging with the holes of the fixing flange.
To unscrew the nut, you need to fix the spindle. For these purposes, there is a special lock located on the back of the angle grinder. By pressing the button, you will secure the gearbox with a cotter pin, eliminating the possibility of its rotation.
Insert the key into the holes. Hold the latch with one hand, and with the other turn the wrench counterclockwise, moving the nut.
The direction of movement of the disk is usually clockwise. However, there are models that may have something different. In any case, unscrewing occurs in the opposite direction to rotation.
Once the nut is in place, it can be unscrewed by hand without any effort.
Remove the retainer and the old circle.
Remove the bottom flange.
After intensive work with a tool with metal inside the casing, you can find a layer of burnt scale with abrasive. Use a steel brush to remove residue.
After cleaning, install the lower flange in place, aligning the grooves of the spindle with the grooves of the flange. A gasket is placed on top.
If your model does not have additional spacers, then such washers can be prepared from plastic or thick cardboard. Next, you need to correctly place the disc on the grinder and cover it with a similar gasket.
Important! Installed spacers allow you to easily unscrew the nut, even if the disc is pinched or broken. Use your hand to tighten the top clamp counterclockwise (counter-rotation), supporting the cutting wheel.
In this case, you also need to tighten the spindle lock and tighten the flange until there is noticeable resistance. Use the open-end wrench to tighten it with a little more effort. Do not over-tighten the fastener, otherwise you can overtighten the circle and it will warp
Use your hand to tighten the top clamp counterclockwise (counter-rotation), supporting the cutting wheel. In this case, you also need to tighten the spindle lock and tighten the flange until there is noticeable resistance. Use the open-end wrench to tighten it with a little more effort. Do not over-tighten the fastener, otherwise you can overtighten the circle and it will warp.
Now you can continue to work. However, problems arise from time to time and it is simply impossible to unscrew the disc on an angle grinder. Let's see below how to change the disc on an angle grinder in such cases.
Heating the retaining flange
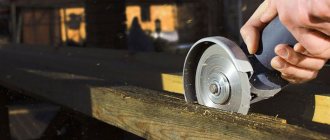
This is one of the simplest and most effective ways to replace a cutting disc on an angle grinder when there is no special key nearby. The locking nut must be heated using a hair dryer, a gas cutter, or by pressing it firmly against a wooden block. Once the flange is hot enough, it can be easily pressed out with a hand protected by a welding glove. However, there is one drawback to this method: there is a risk of damaging the plastic body of the angle grinder.
PHOTO: Heating the nut by pressing a working grinder against a wooden log
Reasons for snacking
As a rule, this problem occurs on angle grinders with a working surface diameter in the range of 150-180 mm. When a strong torque occurs, the disc bites. This leads to the fact that the nozzle cannot be removed using a regular wrench, even with serious physical effort.
The second common reason is the use of a grinder disc that does not correspond to the factory parameters of the tool. This leads to disruption of the entire mechanism and jamming. In rare cases, a nut cannot be unscrewed when rust appears on its thread. This most often occurs when the tool is used for a long time or stored without changing the attachment.
How to remove a bitten disc from an angle grinder + (Video)
The use of new nuts solves the problem of removing the disk, but what to do with an already bitten disk? Even if the disk was installed correctly, it is not always possible to remove it. Practice suggests different ways to solve a problem. You can clamp the clamp and hit the nut holes through the extension in the direction of unwinding. This option is only possible with a working latch. But the latch may not withstand such a solution to the problem and break.
The second method is more logical. Under the clamping nut and lower support washer there is a gearbox shaft with machined chamfers. The lower support washer is put on them. A standard wrench cannot be installed there - it is very narrow. But you can take a regular open-end wrench set to “17” and sharpen it on both sides.
Read also: The dog is aggressive towards other dogs
The turned key will fit into the gap, fit onto the chamfer of the shaft and secure it. Now, using any wrench, any nut will be unscrewed, and the disk or its remains will be removed from the angle grinder.
How to disassemble an angle grinder
How to disassemble an angle grinder? It's not such a complicated process. This does not require special knowledge, but everything must be done carefully and with caution. Every owner needs to know how to disassemble any working tool, because periodically it needs internal cleaning from dirt and dust, and its service life depends on this.
Nowadays on the market you can choose different types of grinders, which differ in operating parameters, size, and quality. Manufacturers are also different. Whatever model of grinding machine you buy, they all have the same model for assembling parts.
Disassembling the angle grinder will require few tools; you just need a regular screwdriver or a reversible one with a ratchet mechanism.
Having prepared the screwdriver, you can start disassembling:
- We unscrew the screws from the body and remove one side of the product.
- Remove the nut that holds the disk in place and unscrew the bolts securing the protective casing.
- Remove the brushes.
- Disconnect the wires from the engine.
- We unscrew the bolts that secure the gearbox inside and very carefully remove it; the rotor is also removed with it.
- We unscrew the bolts that hold the stator and remove it.
- We assemble the angle grinder back, put everything in place one by one in reverse order and screw it on.
When disassembling an angle grinder, it is important to remember the order in which parts are removed in order to assemble it correctly.
Why does the lock nut tighten?
The grinder, depending on the brand and diameter of the working disk, develops from 6,000 to 12,000 revolutions per minute. When the rotating disk sharply touches the surface being processed, the following rapid processes occur. The cutting disk, cutting into the material, experiences great resistance and slows down somewhat, but the electric motor rotor rotates by inertia for a few more moments at the same speed and literally screws the spindle thread into the locking nut, pressing it into the cutting wheel. Now it will not be easy to unscrew it, especially with the original key.
There are various ways to get rid of this defect. Not all of them pass without a trace for the instrument. Here we will look at one of them, which can be called auto thermal.
Angle grinder device
Any grinder consists of the following parts:
- rotor - part of the electric motor that rotates during operation and is controlled in speed, also called an armature;
- collector - the place on the rotor where the control winding wires are located;
- brushes - parts that serve as current conductors from the cable to the commutator winding;
- gearbox - a mechanism that acts as a drive from a rotating rotor to a spinning disk, consists of a spindle, a bearing, and two gears (a large gear and a shaft gear);
- stator – part of the electric motor in which the rotor operates;
- grinder cooling impeller;
- start button;
- electrically driven network cable;
- protection casing;
- grinder body;
- additional handle.
All these details can be divided into two parts:
- electrical;
- mechanical.
Dismantling with a nail
Removing a damaged disk will not be difficult using a key made from a nail. According to experts, its optimal size is at least 100 mm. First, the nail needs to be bent into a U-shape. It is important that the distance between its ends corresponds to the two holes in the flange. Then, using a hacksaw from a weave, you need to carefully cut off the cap and tip. Now the homemade key can be inserted into the flange, fix the spindle and unscrew the mount. If it turns out that the nut is tightened very tightly, you will need a larger lever. You need to insert another “hundred” between the two vertical ends.
How to prevent the nut and disc from biting on an angle grinder
And a few words about preventing such unpleasant precedents again. You can use small cardboard spacers, inserting them between the disc and the nut. As a last resort, we use a disk with a smaller diameter, unless, of course, the nut is tightened from above. As a result, you can unscrew such a nut without any problems. It won’t pinch, it won’t bite on the thread...
And another small video on a topic that I learned from my own experience.
An angle grinder is a multifunctional, but capricious tool that does not tolerate haste and carelessness. Breakdowns and failures are the result of careless handling or violation of safety precautions. And the most common problem when working with an angle grinder is the jamming of the abrasive tool between the support flange and the clamping nut. How to unscrew a disc on an angle grinder without damaging the parts and the tool itself?
Security measures
Angle grinders belong to the group of dangerous power tools, so it is important to adhere to safety rules and handle manual cutting and grinding equipment with care. Adhere to the following rules for working with a grinder wheel:
- Always use the disc for its intended purpose. Pay attention to the manufacturer's instructions to determine the technical features of the disc and use the discs for a specific material.
- Never use abrasive tools after the stated expiration date. Such discs are unusable and may cause accidents. Most often, the expiration date is indicated on a metal ring inside the disc.
- Always store grinding wheels in a dry place at room temperature.
- Before use, check the grinder wheel for possible damage.
- When replacing the disk, be sure to disconnect the angle grinder from the power source.
- Always wear protective clothing, a mask or goggles, as if a disc malfunctions, chips can harm you.
- Adhere to the maximum permissible tool speed. Their meaning is indicated on the disk.
- Make sure the sanding disc is installed correctly. Make sure the diameter of the disc hole matches the diameter of the mounting on your sander.
- Both clamping flanges must have the same diameter.
- Work only with angle grinders that have a protective casing. It is designed for protection at work.
- Never use cut-off wheels for grinding unless specifically permitted by the pictogram.
- Use only discs that are clearly suitable for the intended purpose. Follow any restrictions on use, safety instructions or other information made available to you.
- Working with high-speed abrasive discs requires special care.
- Avoid applying excessive pressure to the angle grinder.
- All manipulations with dry abrasive grinding methods must be carried out in places with an equipped dust removal system. These should be special filters that promote high-quality air purification.
How to remove the sanding disc: important points
Without a tool, removing the grinding disc on an angle grinder is almost impossible. To remove the circle, you need to loosen a large number of screws and nuts, which is very difficult to do manually. Nuts, washers, screws are very tight and cannot be unscrewed by hand.
To remove a circle from an angle grinder, you need:
- disconnect the grinder from the network;
- wait until the grinding disc stops completely;
- use a wrench to turn the nut on the angle grinder counterclockwise;
- remove the protective cover;
- Install the new wheel and tighten the nut.
When machining the wrong material on the wrong grinding wheel, you can face two potential risks - the disc can crack or break, creating a huge number of pieces of the grinding wheel. Please pay attention to the compliance of the materials from which the discs are made and their scope of application:
- Aluminum oxide disc is designed for steel, carbide steel, iron. Alloy steel, high-speed steel and similar metals in composition;
- The grinder disc made of silicon carbide works with brass, cast iron, bronze and other soft metals. It is also designed for processing stone and non-ferrous metals;
- Ceramic aluminum oxide is very abrasive and is used on steel, hard metals. The main task of the discs is precision grinding;
- Zirconia alumina is another type of grinding wheel designed for steel and most hard metals.
What causes the disc to jam and why is it impossible to unscrew the disc?
Most often, a malfunction occurs upon contact with the material. In idle mode, such problems are not observed, since the number of tool revolutions remains stable. But, when we start grinding or cutting metal, then the number of revolutions begins to increase, which is reflected in the operation of the disk and the angle grinder.
You can recognize a jammed disk by the following signs:
- the number of revolutions of the tool circle sharply decreases and braking and jamming can even be observed;
- the disc may be deformed due to even stronger clamping of the nut;
- increasing the diameter and depth of cutting.
In this case, you need to react to the current situation in time and take action. In this case, you definitely need to remove the jammed disk from the grinder and try to solve the problem with the least amount of time and effort.
One of the most common reasons for a jammed nut is that you have not used the angle grinder for a long time, and the nut, bolt or washer is rusty. Consequently, this causes the tool to malfunction. If you encounter this situation, you need to perform a number of actions:
- To begin, unplug your angle grinder.
- Spray the structural parts of the angle grinder with an anti-corrosion agent or a special solvent liquid. The product must get on the washer, nut, and bolts.
- After this, you can proceed to removing the protective casing and individual parts that can be unscrewed.
If special means do not help to cope with the problem, then you need to move on to the second method. Its essence is to preheat it with wax, after which you can use a wrench to unscrew the nut. Control the force so as not to break the sanding disc.
Sometimes the wheel cannot be unscrewed due to the wrong direction of unscrewing the nut. Make sure you are unscrewing in the correct direction. If the nut cannot be unscrewed with a simple wrench, then you can apply force with a hammer. But, in this case, it is important to carefully adjust the force so as not to damage the parts of the angle grinder.
The method by which you can unscrew the nut and fix the problem largely depends on the type of grinder. The method of fixing the disc on the grinder also plays a role. Most often, in order to remove a disc from an angle grinder, you will need a wrench or a screwdriver.
If you decide to remove the disc from the angle grinder yourself or replace it, be sure to think about the security system. Grinding machines and their cutting parts are very sharp, so you need to be extremely careful and do not forget about protective equipment. In addition to overalls, safety glasses will be required. If a wheel breaks, particles can fly off and hit your face. If the wheel is stuck and you cannot solve the problem, you will have to resort to more labor-intensive methods.
Disk corruption
The abrasive compressed by the nut can eventually be destroyed. To do this you will need:
- pliers or narrow-nose pliers;
- vice;
- piece of sheet metal 0.8 - 1 mm.
First of all, the disk clamped in the angle grinder is broken by hand. Then, using narrow-nose pliers or pliers, break off the remaining abrasive sticking out from under the retainer. Next, you should remove the jammed part of the disk. To do this, a piece of metal is compressed in a vice. The turned on tool is driven along the edge of the sheet between the nut. This removes the remains of the disk, and after that the clamp should be easily unscrewed by hand.
As you can see, in order to unscrew a stubborn locking nut from an angle grinder, there are a lot of effective ways. When dismantling, it is only important to be careful not to damage the power tool.
How does the cutting process take place?
For good cutting, it is necessary that the edges of the disk rotate at the required speed when moving. The wheel will not cut well if the speed is less than the set speed. All discs are designed for certain speeds; if they are exceeded, a danger arises, which consists of increased vibration. The circle can simply fly apart.
The rotation frequency of grinders with different diameters is also different. Grinders with a smaller diameter will rotate at a higher speed.
The dependence of rotation speed on the diameter of the circle is given in the table
| No. | Disc diameter | Frequency rpm |
| 1 | Small diameter - 115 or 125 mm. | 10000-11000 |
| 2 | The average diameter is 150 or 180 mm. | 8500 |
| 3 | Large diameter – 230 mm. | up to 6650 |
This frequency was not chosen by chance. Laboratory studies show that the linear speed of the circle edge should be less than 80 m/s. Otherwise, the disk may fall apart, which will lead to serious consequences. It is necessary to very carefully monitor the rotation speed of the grinder and the disc placed on it.
But since the rotation speed of wheels 115 and 125 is the same, a smaller disk with a diameter of 115 can be installed on an angle grinder with a seat diameter of 125. On a grinder with a 180 diameter, you can put a wheel of 150 diameter.
Based on the above, you cannot put grinded wheels from a large grinder on a small grinder, although the casing will not be removed, but since the rotation frequency of the large circle is lower, and the grinder itself is higher, the disk will be destroyed.
Preventative maintenance of an angle grinder
Unexpected breakdowns can be avoided if you regularly carry out not only visual inspection, but also maintenance of the tool. The manufacturer usually indicates the prevention regulations in the passport. In order for the grinder to serve for a long time and without “surprises”, you should:
- carry out tool maintenance in a timely manner;
- comply with operating and storage standards;
- avoid long-term operation of the tool under load at reduced speeds;
- do not allow the working part of the tool to become pinched;
- Monitor the mechanisms and promptly replace worn parts.
If the angle grinder was operating at low engine speeds, it must be kept at idle for about a minute before turning it off. This will allow the engine to recover and regulate the temperature of the windings.
Preventive disassembly, cleaning and lubrication of mechanical parts will increase the service life of the tool several times. This simple maintenance will help you avoid costly repairs.
The optimal conditions for storing an angle grinder are dry rooms, protected from sudden changes in air temperature. When storing an instrument for a long time, it is preferable to pack it in a plastic bag in a cardboard box.
All repair work carried out on power tools must strictly comply with safety standards. Under no circumstances should you disassemble the housing while the device is plugged in. Containers with flammable and flammable materials should not be located near the disassembly site.
Rotary hammer or impact drill
To be honest, it is not the best or easiest option to unscrew a jammed nut on an angle grinder, but it is used if other methods do not work. As an attachment for a drill or hammer drill, you need a drill of a suitable diameter, most often 6 mm. If you are using a drill, you need to set it to jackhammer mode in advance. It is better to fix the grinder in a vice, clamp the spindle stopper, insert the drill into one of the holes of the clamping nut with emphasis in the direction of unscrewing, and briefly press the “Start” button. This method allows you to move even a tightly clamped flange. The disadvantage is that this can break the mounting holes for a standard key.
PHOTO: i.ytimg.com Insert the drill into one of the holes in the nut and turn on the drill in impact mode
The nail will help you
Another effective way to unscrew a jammed nut on an angle grinder if you don’t have a key. To do this, you will need a nail 100 mm long, the head of which needs to be bitten off, and then given a U-shape. The distance between the ends of the nail must correspond to the holes in the clamping flange of the angle grinder. Insert the resulting structure into the holes of the nut and turn it. If the flange does not give in, you can use a screwdriver as a lever or pliers.
PHOTO: i.ytimg.comYou can use a nail if you don’t have a key at hand
How to unscrew the nut of an angle grinder (angle grinder) if it is stuck
So, if the key doesn’t work, even if you insert it and hit it lightly with a hammer, then we start using something more serious.
The first thing you can try, but again without fanaticism, is to take a rod, insert it into the holes on the nut and, using a hammer, move the nut in the direction of unscrewing it. The main thing here is not to break the button or tear off the holes, as here
The second thing many people advise is to warm the nut. Warm up the nut. As a result, it is slightly, but physically still obliged to expand. Resizing may or may not help...
There is no need to pull as hard as possible until the lock on the anti-rotation button or the button itself breaks. In this case, it is not the tool you use to unscrew that breaks, but often it is the body of the angle grinder.
The third method is the most effective, and, oddly enough, one of the safest for the grinder herself. Take and break off the edges of the disk along the nut.
Next, we use a thin metal plate or another disk (thinner), and perhaps a second grinder with a disk. In this case, the broken disk must be turned either with a plate or a disk. We try to sharpen the disk so as not to damage the nuts holding this disk, because they will be useful to us later. We sharpen the entire broken circle in this way until we grind it down and the nut comes off.
This is a matter of 4-5 minutes, no more.
If you use a second disk or metal plate, it is better to insert it into a vice to hold it. Since holding such objects with your hands is dangerous. This method is the most effective!
Useful attachments for angle grinders from Combo and more. Grinder extension
Sharpening discs turn the grinder into a sharpener
The discs are made of coarse abrasive, pressed into a thick plate (not just 5 mm) with a roughness in the center. If you install such a disk on the spindle, the flange is hidden in the recess and does not protrude above the plane of the disk. Coarse grinding wheels are also used for cleaning weld seams.
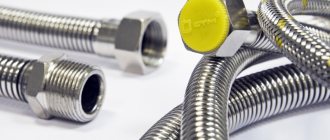
Craftsmen renovating mid-century houses are faced with removing alkyd paint from the walls. Wire brushes are suitable for this type of work.
Any paint will not resist such a metal cup.
The brush is a cup, around the circumference of which iron or brass strands are placed. They differ in the width and stiffness of the wire - for coarse and narrow stripping. The brush is screwed onto the spindle using an M14 thread.
A stone grinding disc cuts old cement evenly
After removing the alkyd paint, the curved concrete wall must be sanded. Only a grinder can cope with such a task. The working surface of the diamond grinding disc is perpendicular to the axis of rotation. Synthetic diamonds cut and smooth concrete like sandpapering wood.
Adviсe
If you had to use a gas wrench, you need to remember about the very powerful arm of such a wrench and the force that is applied to the parts of the grinder. If you act carelessly, you can break the spindle lock or damage the gearbox.
All manipulations with the angle grinder disk must be performed with the power supply completely turned off (the plug must be unplugged from the socket). Any accidental pressing of the start button will cause the electric motor to turn on, and the rotation speed of the rod is very high. In this case, injuries cannot be avoided.
Working with a grinder involves a large amount of waste in the form of metal or wood shavings and dust. Before starting work, you must wear special safety glasses: they will protect your eyes from fragments of the cutting wheel itself in the event of its jamming and destruction.
Glasses are necessary not only as a safety element. If your eyes are protected, you can pay more attention to the actual operation of the grinder, ensure the correct cut or select the correct operating mode. This will allow you to use consumables (cutting wheels) most efficiently and minimize the occurrence of emergency situations with the disc biting or destroying it.
An excellent replacement for glasses is a protective mask that completely covers the face - this is especially true for a technician with impaired vision who wears prescription glasses that cannot be worn with protective glasses.
The disk on the grinder can be installed either “pull forward” or “pull forward” depending on the direction of rotation and, accordingly, the flow of chips. This makes no fundamental difference in operation. However, the “grinder” with a circle “towards you”, when biting the disk, tends to jump out of the cut forward, and not towards the person who is using it. This is especially important when working with powerful tools, but even a small angle grinder can pose a serious danger.
A specially mounted extension cord with a plug socket, preferably without grounding, will help to quickly stop the operation of a machine that has escaped from your hands.
The “grinder” is a rough processing tool and you should not strive to obtain an ideal surface as a result of its work; the main thing is to make a rough cut, which later, if necessary, can be processed in other ways.
To work without clamps and jamming, it is better not to cut long metal workpieces to the end, leaving 1–2 mm of metal in the cut: it will be easy to break them off afterwards, this will have virtually no effect on the quality of the workpiece.
It is better to place small workpieces in a vice or press them with a clamp to a workbench or other reliable horizontal surface. The quality of the cut and safety depend on the pressure density.
To change the disc on an angle grinder, you need to unscrew the fastening washer.
The fastening washer, as a rule, comes with special grooves, and it can only be unscrewed with the appropriate key, which usually comes with each angle grinder.
On some angle grinders, ordinary nuts are installed as fasteners, which can be unscrewed with an open-end wrench.
To unscrew the fastening washer, you need to install an angle grinder wrench in its grooves.
On the other side of the angle grinder, press the locking button to lock the rotor in a stationary state.
Next you need to turn the key counterclockwise.
This is how the fasteners are unscrewed, then the old disk is replaced with a new one.
After installing the new disk in place, first tighten the fastening washer by hand, and finally tighten it with a wrench.
Now the grinder is “charged” with a new disk and you can get to work.
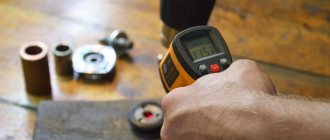
Diagnostics of the electrical part of an angle grinder
As mentioned above, most often an angle grinder refuses to work due to breakdowns of the electrical part of the unit. To correctly diagnose the electrical circuits of a tool, electrical equipment repair technicians use a special device - a tester.
If you press the start button of the unit and it does not work, then in 90% of cases the cause of the breakdown is not so serious that you cannot repair the angle grinder yourself.
Experts advise adhering to the basic rule of repairing power tools: moving from simple to complex.
The first step is to check the electrical cable and the plug at its end. If it is collapsible, then unscrew it and check the reliability of the contacts. Otherwise, you will have to disassemble the angle grinder (remove the casing of the device) and “ring” the cable with a tester, and also make sure that the current is suitable for the contacts of the “Start” button. If the device shows a break, the cable should be replaced with a new one.
The situation when current flows to the button, but does not pass further (when in the on position), indicates a malfunction of the switch. The button cannot be repaired. It needs to be replaced with a new one, but first mark the contacts you are removing so that you can connect them correctly in the future. If the contacts are connected incorrectly, the motor winding may burn out.
If during the check it turns out that both the cable and the start button are in good condition, but no current is supplied to the brushes, then it is necessary to clean the contact plates of the brush holders. If this procedure is ineffective, it is recommended to replace the brushes. Next, if everything is fine with the brushes and current is flowing to them, you should check the rotor and stator for shorts and breaks.
Checking the motor armature
The electric motor rotor may have the following malfunctions: interturn short circuit and broken conductors at the lamella contacts. You can check the armature of an angle grinder with a multimeter: the device is switched to the resistance change mode, the value is set to 200 Ohms, and the resistance between two adjacent lamellas is measured using probes. Thus, it is necessary to check all pairs of lamellas. If the resistance values are the same, then the rotor winding is not damaged. Detection of other resistance values during “ringing”, as well as detection of an open circuit, indicates a malfunction in this coil. In this case, the angle grinder's anchor will need to be repaired.
Typically, conductor rupture occurs at the junction with the winding. Inspect the places where the coils are connected to the lamellas, make sure that the contacts are soldered securely.
If you do not have a measuring device, you can check the rotor using a 12 V light bulb and a battery for this purpose. The power should be between 30-40 W. The test is done as follows: apply 12 V voltage from the battery to the plug of the angle grinder, connect a light bulb to the gap in one wire, and start rotating the angle grinder spindle. If the winding is in good condition, the light will burn evenly, without blinking. With an interturn short circuit, the degree of incandescence of the light bulb filament will change. In this case, repairing the angle grinder's anchor with your own hands will be difficult, since the armature winding scheme is quite complex, and the process itself requires special equipment and knowledge. Therefore, it is recommended to entrust this operation to specialists. But the best way out of the situation would be to replace the anchor on the angle grinder with a new one.
If the light does not light up when testing the rotor, this indicates a break in the stator or a short circuit in its windings, as well as problems with the electric brushes.
Checking the motor stator
To check the stator of the angle grinder, use a multimeter, as in the previous case. The values need to be set to 20-200 Ohms and do the following. Touch one probe to the contact of the stator winding, and the second to the body of the part. If the device shows resistance, this means that a breakdown has occurred to the housing. Touch the probes to the contacts of one winding, and then to the contacts of the other. If the resistance is the same, then the coils are working. If the device shows an open circuit on one winding, it means that the stator will need to be rewinded or the part replaced with a new one.
Rewinding the stator at home without special knowledge, skills and equipment will be problematic. It is better to contact specialists who professionally rewind motors.
How to prevent a disk from jamming?
Since the problem is quite relevant and many craftsmen have encountered it, it is important to understand how to prevent jamming and prevent such a turn of events. Precautions include:
- It is best to use cardboard or plastic washers to install between the disc itself and the spindle head. Due to this, the tool will not jam. If this happens, it will be easy to unscrew the stuck nut and replace the disk.
- Follow the instructions for installing the abrasive wheel. The bright side with the picture should be close to the gearbox. There should be no contact with the clamping nut. The center ring will prevent jamming.
- You can weld a nut onto the flange. Even if an emergency situation occurs, it can be solved with a regular wrench without much effort.
- Always adjust the tightening force. Do not use too much force when installing the grinder wheel. If you overtighten the nut, jamming will be observed under increased loads. When idling, it will not be possible to determine the malfunction.
How to prevent re-clamping?
To avoid getting into a similar situation in the future, carefully read the following recommendations from experienced professionals:
- when tightening the disk nut, do not apply excessive force by pressing the key, since at the moment of rotation the nut will tighten itself to the desired level;
- Before installing a new disk, place a cardboard or plastic washer under the nut; it can be cut from any available material;
- the side of the abrasive disc with the label pasted should touch the support flange, not the nut; if this condition is met, the metal ring of the circle will protect it from jamming;
- Weld a regular hex nut onto the flange, which can be unscrewed with a simple wrench.
Cutting stones or discs for grinders are not always of good quality and exact size. This can lead to a situation where the nut gets stuck. But if this happens to you, do not despair. Useful advice from experienced craftsmen and your own ingenuity will always help you out in difficult times and tell you what to do in a given situation.
To learn how to unscrew the nut on an angle grinder without much effort, watch the video below.