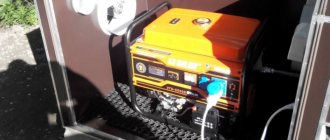
Gasoline generators, even if they are made in China, are very reliable with proper care . However, during their operation, small problems may arise that can usually be quickly fixed with your own hands. Serious breakdowns, provided the owner knows the device and the operating principle of the generator, will also not be able to disable it for a long time.
Design and principle of operation of the generator
Most gasoline generators consist of a tubular frame that houses an internal combustion engine and an electrical converter. They are connected to each other by a special coupling. The generator converts the mechanical energy of the engine into electrical current. This element can be single-phase or three-phase. Its operation is controlled by an electronic control unit, which protects against overloads and short circuits.
Depending on the model, engines have one or more cylinders. It can be two-stroke or four-stroke. Four-stroke engines are most commonly used due to their efficiency. A manual or electric starter is used for starting. More expensive models are equipped with an autostart system.
Main types of faults
Most of the problems encountered are due to improper operation: excessive load and use of low-quality fuel. Sometimes malfunctions arise due to the banal expiration of the operating limit of a particular node. Problems are conventionally divided into two categories:
- Electrical problems.
- Problems with the internal combustion engine.
It should be noted that the electrical part of gas generators is quite reliable. During the period of the resource laid down by the manufacturer, difficulties in its operation very rarely arise. Typically, faults manifest themselves in the form of a drop in voltage. Or there is no output voltage at all. The reasons for this are different: wear of the graphite brushes, short circuit in the electrical circuit, etc. If you have no experience in repairing generators, it is best to entrust this to specialists from the service center.
Repairing a gasoline generator, in particular its engine, is similar to repairing any other gasoline engine. The most common malfunctions:
- Malfunction of the spark plug, high-voltage wiring, ignition system.
- Clogged fuel filter, carburetor, etc.
- Violation of carburetor adjustments.
- Wear of the cylinder, crankshaft, pistons and other moving parts.
Signs of generator problems
It is necessary to diagnose and possibly repair inverter generators in the following situations:
Indication of the “battery” on the parting panel - if it flashes, it means that there are interruptions in the operation of the generator, if it is constantly on, no current is generated, and the power comes from the battery:
- Rapid boiling of the electrolyte in the battery.
- Less bright headlights.
- When you press the accelerator pedal, the brightness of the headlights increases.
- The presence of constant sounds in the generator.
- Generator overheating.
- Frequent spontaneous engine shutdowns.
Storage of petrol generators
Any equipment requires professional care. Therefore, it is recommended to adhere to the rules that the manufacturer provides to customers. These are very important aspects that will not only improve equipment startup, but also increase the turnaround time. Basic recommendations:
- During long-term storage, be sure to drain all fuel from the tank. Gasoline oxidizes carburetor parts, which can lead to clogged channels.
- It is recommended to use polyethylene to cover equipment during long-term storage to protect against corrosion and moisture.
- It is best to carry out maintenance before storage.
- Under no circumstances should the generator be left disassembled for a long period of time, as foreign elements may get inside.
- Should be stored in a dry and cool place.
- Do not operate equipment in severe frost unless it is designed for use in such conditions.
This way you can protect not only your money, but also your equipment. Currently, manufacturing companies provide customers with special technical instructions that cover all the details in detail.
Useful tips Connection diagrams Principles of operation of devices Main concepts Meters from Energomer Precautions Incandescent lamps Video instructions for the master Testing with a multimeter
Most common faults
If you arrange the possible malfunctions of a gas generator in a kind of rating, you will get the following list:
- Failure or contamination of the spark plug: difficult or impossible starting, unstable operation.
- Carburetor clogged: difficult starting, excessive fuel consumption, unstable operation under constant load.
- Ignition coil failure: no spark, unable to start.
- Starter breakdowns: breakage, cable snagging, ratchet destruction.
- Violation of valve clearances: difficult starting, increased noise during operation.
- Brush wear (on synchronous generators) – lack of output voltage.
- Faulty speed controller: floating engine speed, dips when the load changes.
- Wear of the crankshaft bearings and generator rotor - increased operating noise and oil leakage.
- Wear of the cylinder, piston rings - difficulty starting a cold engine, excessive oil consumption.
This does not take into account breakdowns that result from a gross violation of the operating rules of the generator: for example, scuffing on the crankshaft journal due to insufficient oil level, burnout of the windings of the generator or voltage converter (on inverter gas generators) due to frequent overloads.
In fact, gasoline generator faults can be divided into three groups: mechanical, electrical and fuel/ignition system faults .
Malfunctions in the operation of power and ignition systems and their maintenance
Difficulty starting the generator, which appears suddenly and is not accompanied by an increase in engine noise, is a clear sign of either abnormalities in the carburetor (too lean or rich mixture) or a faulty ignition system (weak or intermittent spark formation). Since the diagnostics of the state of these systems is interconnected, it is combined into one section.
Remove the spark plug and inspect the carbon deposits on its electrodes.
- Dense and dry black carbon deposits are a sign of a rich mixture (the carburetor is faulty, the air filter is clogged);
- Oily black soot is a sign of severe wear of the piston rings; oil enters the combustion chamber;
- White carbon deposits are a sign of running on a lean mixture; you need to check the carburetor.
- Brick-brown soot is normal for carburetor engines.
- Red, green-red soot is a consequence of working on low-quality fuel.
It is easy to check the functionality of the ignition system itself because of its extreme simplicity: turn on the ignition, insert a known good spark plug into the spark plug cap and, placing its skirt on the nearest metal part of the engine, sharply turn the recoil starter. If there is no spark, disconnect the ignition switch and oil level sensor in turn from the ignition coil: if, after disconnecting both elements, there is still no spark, replace the ignition coil.
If the spark is present and has sufficient strength (white or white-blue color), remove the spark plug after several starting attempts. A spark plug filled with gasoline is a sign of over-enrichment of the mixture; a dry spark plug is a sign of a lack of fuel.
Sometimes, after long-term storage, the carburetor needle and float stick and prevent gasoline from flowing inside. Hit the float chamber cover sharply, but not very hard, several times and repeat the start.
The most common malfunction of the carburetor is its contamination. Dirt getting into the air channels leads to over-enrichment of the mixture, and into the fuel jets - to depletion. Dirt on the float shut-off needle leads to loss of tightness and overfilling of the float chamber, which will be immediately noticeable by fuel leaking from the carburetor.
Let's look at servicing a carburetor using the example of one installed on Honda GX engines - its design is typical for a gasoline generator.
- Remove the float chamber cover (4). Wash it in gasoline or aerosol carburetor cleaner - dirt and deposits accumulate at the bottom.
- Do the same with the gas tap sump (22).
- Check whether the gas valve is ventilated in the “open” position.
- Remove the float shaft (3), remove the float and locking needle (2). Blow out the channel with air.
- Blow out the fuel nozzle (25), emulsion tube (11) and all carburetor channels with an aerosol cleaner or compressed air.
- Turn out the adjusting screw (5) and blow out its channel. Then screw it all the way and loosen it by 2 (foam rubber, paper filters) - 2.5 turns (cyclone filters), depending on the type of air filter.
- Assemble the carburetor.
Electrical faults
The electrical system of gas generators is quite reliable. Most often, you may encounter two problems: lack of battery charging on generators with electric start or lack of voltage at the generator output .
- Lack of battery charging is a consequence of a failure of the rectifier or low-voltage winding. It’s easy to check this system with your own hands: connect a 12-volt light bulb in parallel with the low-voltage winding of the generator and start it. A burning light means that the generator itself is working properly and the rectifier needs to be replaced.
- The lack of voltage at the generator output is most often a consequence of brush wear. Remove them and assess the degree of wear, replace if necessary. If your generator is of the inverter type, check whether voltage is coming to the input of the converter by connecting a low-power 220 V lamp in parallel with it.
Mechanical faults and adjustments
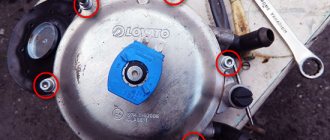
One of the routine works provided for in the operating instructions for gasoline generators is monitoring and adjusting, if necessary, the clearances of the valve mechanism. Increasing the gaps beyond the norm will lead to a decrease in engine power and increased noise during operation. Reducing the gap is the most dangerous, since it is not audible during operation, but pinched valves, especially exhaust valves, begin to quickly burn out. As a result, the engine begins to operate unstably and when the plate burns out, it stops starting.
The procedure for adjusting the valves is quite simple:
- Remove all components that interfere with removing the engine valve cover.
- Remove the spark plug.
- Remove the valve cover.
- Align the crankshaft to the top dead center of the compression stroke using the mark on the flywheel (if there is one) or by monitoring the movement of the piston through the spark plug hole. Do not confuse compression TDC ( both valves are closed ) with exhaust TDC ( exhaust valve closes, intake valve opens ).
- Loosen the locknuts of the adjusting screws and use a flat feeler gauge inserted between the rocker arm and the end of the valve to set the gaps by rotating the screw. Typically, a gap of 0.2 mm is accepted for the exhaust valve, and 0.15 for the intake valve (check the operating instructions).
- Tighten the locknuts and rotate the crankshaft twice, bringing it to TDC. If everything is done correctly, at the next dead center both gaps will go away, and after another turn they will take the set value. The gaps that have increased after the first revolution are a sign that they were adjusted at TDC of the exhaust stroke.
- Assemble the generator.
Overload
Sometimes it happens that a power plant can be overloaded with consumers and devices, the sum of their powers exceeds the rated power of the generator. Try running the generator completely without load or simply disconnecting several devices from it.
Carburetor clogged
Check the gas generator carburetor for blockages.
Gasoline injection needle clogged.
If the needle is clogged, it must be cleaned. Blow it out using a car compressor. Apply the nozzle.
Video instructions for cleaning the carburetor needle
https://youtube.com/watch?v=2UZLvmf_mWM
Clogged or stuck float mechanism for supplying fuel to the gasoline unit.
Purchase a carburetor cleaner and treat the entire structure. Wait a few minutes, and then move the float mechanism with your own hands and blow out the valve.
https://youtube.com/watch?v=oVhJbqFMKgA
Valve repair
The valves of a gasoline engine are controlled by a timing belt. To check its operation, remove the unit cover by unscrewing several bolts. You will see several valves and a pushrod. You need to push the shaft in the right direction. If you see that everything is moving, but the valves are not moving, then they are stuck. To repair them, take a carburetor cleaner and a hammer.
Rotate the rocker arm and carefully hammer in the valves. Next, turning the shaft, push the valves back, pouring plenty of liquid on them
Repeat this step until the valves come off.
The generator works, but does not provide energy.
If the gas generator starts but does not produce energy, then most likely the engine is damaged or the internal settings of the generator are lost. Take a voltmeter and an ammeter and compare the readings at the power plant with the readings given in the instructions. If the readings differ, then this is certainly an internal failure and your unit needs professional examination and repair. So call the experts.
Emergency start of a power plant using a drill and battery
If your portable generator starts but does not produce power, you can:
- Use the battery after connecting the wires to it correctly (plus to plus, minus to minus).
Remove the spark plug and start the engine by pulling the starter cord.
Starting with a drill.
Use a drill to restore the alternator's magnetic field. This video will clearly show how to do it yourself.
Advice: the best way to prevent breakdowns of expensive equipment is to maintain it correctly and in a timely manner, even if your autonomous power source only works from time to time. Also promptly change filters and other elements that require periodic replacement. Remember that it is better to play it safe and replace the filter than to rely on chance.
Finally, remember to use good quality oil and fuel. You will save a lot of money and time if you are familiar with the basic troubleshooting methods and can repair a gasoline generator yourself. Most of these techniques are described in the instructions for use for your model. Do your research first before calling the experts.
Diagnostics of breakdowns
Diagnostics is a mandatory process that should be carried out regularly, and especially if there are doubts about the serviceability of the unit. The diagnostic procedure allows you to identify mechanical and electrical faults. Of course, for a full diagnosis you need special equipment and a specialist, but some part of the procedure can be identified on your own.
- If the control lamp does not light up when the ignition is turned on, then you should pay attention to the following details:
- It is possible that the lamp simply burned out
- Short circuit of the generator windings to ground
- Broken wiring, problem with fuse or charge lamp relay
- In a situation where the lamp is constantly on, it is worth checking the following:
- First of all, you need to check the belt; it is possible that its tension is not sufficient for normal operation. This is especially true if a belt whistle is heard at high speeds.
- Pay attention to the deterioration or possible destruction of current collection points.
- Oxidation of contacts or broken wiring
- Damage to the voltage regulator or malfunction
- Extraneous noise during generator operation can be caused by premature wear of the bearings; other less significant problems can lead to this:
- Oxidation of the positive terminals of the battery, which increases the load on the unit
- Mechanical impacts and contamination, in particular the ingress of moisture, dirt, sand, etc.
- If the car owner has noticed that the battery is insufficiently charged by the generator, then you need to check the following:
- The simplest and most common reason is insufficient belt tension.
- The problem could also be in the battery itself.
- Oxidation of battery terminals and terminals
- Damage to the wiring, in particular the line going from the generator to the battery
- Break in one of the windings
- Diode bridge breakdown
- There are times when the battery does not charge at all, then the following must be checked:
- Current collecting brushes, due to increased load they can simply “stick”
- Broken wires
- The rotor may touch the stator during operation
Gasoline engine repair
Gasoline engines are most often installed on generators; of course, there are models running on diesel fuel and gas, but they are less popular. Various breakdowns occur during operation, and sometimes their elimination requires immediate intervention. Only in this way will it be possible to achieve the required indicator. Considering the main types of breakdowns and defects, it all comes down to the fact that they are always identical. The design of the motors is the same, and they differ only in technical characteristics, so it will be much easier to eliminate engine breakdowns than generators. Main faults:
- The engine does not start. There is no fuel or spark at the spark plugs, the integrity of the crank mechanism is damaged. There are defects or foreign elements that prevent this.
- Equipment operation is uneven and intermittent. The fuel contains foreign impurities and the spark plugs are not functioning correctly.
- Failures associated with the crank mechanism. Most often, this leads to the fact that there is a fuel supply, as well as a spark, but the engine does not start. There may be no compression due to worn rings.
- Sometimes pistons break on Chinese models because low-grade metal is used.
- Poor quality oil can also cause clogging of the channels, which will lead to overheating of the engine.
- Carburetor clogging occurs due to low-quality fuel, foreign impurities, or prolonged non-use of the equipment.
Technical issues are resolved only through specialized service stations. If there is a guarantee and service in the city, then the choice is completely obvious. In this situation, nothing can be disassembled, since specialists will refuse free repairs due to a violation of the integrity of the structure. Therefore, you need to check the warranty period first.
The equipment has many different additional parts and mechanisms that perform their technical tasks. The installed inverter muffler is part of the sound insulation. When using a gas generator, a large amount of noise is generated, so it needs to be minimized. Developers are trying their best to create more advanced systems for these devices.
Troubleshooting methods
Now let's talk about how to repair the device in question yourself if the most common problems occur.
Dirty air cooling fins
One of the fairly common problems that can arise when working with a gasoline generator is dirty air cooling fins. The reason for this could be two things. In the first case, we are talking about the fact that the device has not been used for a long time; dust has settled on it and got inside. Naturally, when the device is actively operating, the system will overheat, which will sooner or later simply burn out.
The solution to this problem can be found in any instruction manual for any model of gasoline generator.
It can also appear for another reason - the use of low-quality fuel can cause carbon deposits to appear on various types of filters and on the cooling mechanism of the device as well. It can be eliminated very simply - the air cooling fins should be very carefully wiped with a cloth to remove dust and dirt. If you wish, you can do this without disassembling the device, but it would still be better to disassemble it, remove the necessary part and thoroughly clean it, and then install it in its original place.
Details about the appointment
Equipment of this kind can perform different functions, each of which is extremely important:
- Providing autonomous backup power supply to the facility;
- Operating on a permanent basis if there are no power lines in the area.
Considering the magnitude of the load on such a compact device, it is quite logical that gas generators need to be repaired periodically. To ensure that this has to be done as rarely as possible, maintenance of the main components should be carried out on time. The increased load on such a device lies in the fact that several consumers can be powered from it simultaneously, and the duration of operation is often quite long.
Thus, even despite the need to repair gas generators from time to time, a device of this type is sometimes necessary to have in everyday life. Among other things, there is another factor that speaks in its favor - the organization of a stable output voltage for connecting equipment with sensitive automation.
DIY generator repair
Most of the malfunctions that occur in the generator are solved by simply replacing one or another component. Actually, let’s take a closer look at how you can repair a car generator with your own hands and start with disassembly:
- Before starting to disassemble the generator, you will need to mark the position of the housing covers in order to subsequently facilitate reassembly.
- Next, the pulley is removed
- The brush holder is carefully dismantled to avoid damaging the current collection brushes.
- All possible wires are disconnected, and the contact bolt located, as a rule, on the back cover is unscrewed
- After this, the case bolts are unscrewed, which prevent the rear cover from being removed. It is worth noting that the case elements fit quite tightly and it will be necessary to apply some effort.
- At the end of disassembling the case, the front cover and rotor are dismantled. Quite often the cover cannot be removed by hand, so it would be wise to use the following method. The cover is installed on two wooden blocks and the rotor is knocked out not with strong blows, you need to be extremely careful in order to avoid damage.
- Finally, the windings are disconnected from the diode block and the elements are dismantled.
Emergency generator start
Sometimes it happens that the generator urgently needs to be started, but the manual starter fails at that very moment. If necessary, there are several methods for emergency starting.
The methods listed below are not safe !
Remove the starter housing. Below it is a flywheel with a cooling impeller, pulled to the crankshaft by a nut. To set it in rotation, you can:
- Wrap a rope around the flywheel and use it in the same way as a recoil starter cable. Please note that if it gets caught on the fan blades, when the engine starts, this rope will turn into a whip whipping in all directions, so be careful. Stand so that the rope cannot hit your hands or head.
- Low-power engines can also be started manually: with the ignition off, turn the crankshaft several times, rotating the pulley by hand in the desired direction. In this case, the gas tap must be open and the starter flap must be closed. After this, turning on the ignition, bring the crankshaft to compression TDC (you will feel an increase in force on the flywheel), and then turn the pulley with a sharp jerk so that the spark energy is enough to ignite the mixture.
- A powerful cordless drill and a head with an extension from the tool kit are a good quick replacement for an electric starter. Clamp the extension in the chuck, put a socket of a suitable size on it and unscrew the crankshaft by the flywheel mounting nut. True, in this way it will only be possible to start a low-power generator - for a large-volume engine, the torque of the drill is not enough to turn it on the compression stroke.
When should you contact the workshop?
A number of malfunctions, alas, are quite difficult to fix with your own hands without sufficient qualifications: for example, a faulty inverter converter or voltage regulator can be repaired only with a good understanding of the operating principle and circuitry of such devices. Not every owner of a gas generator will undertake to overhaul the engine, although this is not as difficult as it might seem.
In this case, you should contact a specialized repair shop. You can find out the coordinates of workshops in your city on the Internet or in stores selling gas-powered tools.
How to remove the generator
Starter fuse for Lada Granta
First you need to de-energize the car by removing the negative terminal from the battery. After this, you need to remove the engine protection and the mudguard on the right.
Note how the wires are connected to the generator and disconnect them. Now the difficulties begin - you need to unscrew the nut securing the generator to the motor housing. Pull out the device, and if difficulties arise, use WD-40. Gently hit the bolt to knock it out from the back. If this does not lead to anything, the generator will have to be dismantled along with the bracket on which it is supported.
To remove the bracket, unscrew a couple of bolts. Some VAZ 2107 models have three-bolt generator mounts. Sometimes you need to remove the radiator, but do not rush to disconnect the supply pipes - just move the radiator a little to the side, providing access to the bracket. After unscrewing the generator from the car, you need to remove the belt and remove the generator.
Sometimes the problem of dismantling the generator can be solved in another way. For example, if the car is new or the generator was installed relatively recently. In these cases, craftsmen reach it through the wheel arch on the right. Technically, the procedure is not much different. You won't need to remove the radiator, and you will need to remove the belt before removing the alternator. To get to the device, turn the steering wheel all the way and remove the mudguard.
Repair parts
To repair the generator you will need the following spare parts:
- device capacitor;
- bearings;
- diode bridge;
- four nuts for 8;
- relay regulator
If the relay regulator is in normal condition, it does not need to be changed.
Tools
To work you may need the following devices and tools:
- universal puller for dismantling the bearing - a rod puller can be used, but it is not very convenient;
- hammer;
- a good metal brush and sandpaper;
- set of screwdrivers and keys;
- WD-40.
Preventive measures
The device should be cleaned from time to time. We are talking about cleaning the fuel tank, as well as the elements of the cooling system from carbon deposits and dust. This will keep the device clean, and blockages will not cause it to overheat and subsequently fail.
In addition, it would not be superfluous to disassemble it from time to time and check the functionality of various mechanisms.
You will need to check the ATS and the functionality of the control unit especially carefully. If possible, it would be a good idea to also clean the internal elements from dirt and dust. Considering the design features of this device, there are no large-scale preventive measures for it.
To this you can also add monitoring the fuel and oil levels, checking the strength of fastening of various elements with bolts, as well as periodically cleaning the air filter from dirt and dust.
Repair and restoration
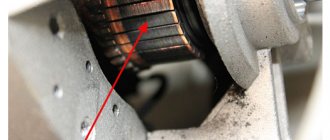
Most generators consist of a rotor and two aluminum shells with stator windings sandwiched between them. Both body parts are connected using bolts. The brushes and straightener assembly are located on the back. Restoration involves the following types of work:
- disassembly;
- testing of windings and rectifier;
- replacing the regulator;
- installation of new brushes;
- replacing the front and rear bearings;
- restoration of stator windings;
- rotor replacement and balancing.
- testing.
Do-it-yourself dismantling of the assembly is a fairly simple procedure for most cars. As a replacement, you can purchase a new unit or buy a refurbished one from companies specializing in the repair of auto generators. The worst option is to take the unit from disassembly, since in this case the chances of long-term operation after replacement are low. To remove the generator, the following steps are most often required:
- Turn off the car and disconnect the battery terminals.
- Provide access to the unit and connectors on it.
- Remove the terminal covers and loosen the bolts.
- Disconnect the terminals and remember their original location.
- Loosen the pulley.
- Remove the alternator belt.
- Remove the bolt on the armature shaft.
- Unscrew the mounting bolts and remove the generator.
To install a new or repaired unit, you must perform the steps in reverse order. These instructions are very general, since the design and location of the generator unit can vary greatly among different car models. Often the drive is equipped with automatic tensioners or V-belt drives, and attachments significantly complicate access to the unit and require a unique disassembly algorithm. In any case, during such work it is useful to replace the belt.
The simplicity of the procedure for installing and dismantling the generator, as well as the availability of belts for it, implies a low cost of such work at specialized stations. Therefore, if you have doubts about your own strengths and skills, it makes sense to turn to specialists.
Some recommendations for proper operation
It is necessary to regularly check the voltage in the car network. Performed with a multimeter with the car turned on. The terminals of the device are connected to the battery terminals. The voltage should be between 13.8 and 14.2 V.
Indicators outside the specified values will indicate the presence of problems:
- The problems will be related to either the battery or the regulator.
- Checking the brightness of the headlights. When the brightness decreases, it makes sense to check the regulator and/or diode bridge.
- Checking the drive belt tension. It should not be pulled too tight.
Listen to the generator regularly. If noises appear, the alternator belt must be diagnosed and repaired.
You can better understand the sequence of actions by watching a video of repairing generators with your own hands.
Welding unit design
The key components of a welding electric generator are a stator with magnetic poles placed on it, as well as an armature. This armature contains the turns of the transformer winding containing an electromotive force of alternating direction.
Any electric generator includes a magnetizing excitation winding. Its power comes from two sources:
- In this case, the generator is called a unit with independent excitation. The demagnetizing winding is connected in series. The current strength is regulated by a rheostat. As the current in the welding network increases, the magnetic flux generated by the demagnetization winding increases. In this case, the magnetic flux, which is generated by the independent excitation winding, remains unchanged. As a result, the voltage at the generator terminals decreases and a falling external characteristic appears.
Thus, we get a self-excited unit. The armature winding of the electric generator transmits direct current to the magnetizing winding. All generators can operate in both modes. To change the operating mode of the electric unit, it is enough to smoothly change the magnetizing current.
Welding generators differ from each other and in their external characteristics:
- Generators with a falling external characteristic.
- Generators with a rigid external characteristic or a flat-sloping one.
- Universal generators.
Why carry out maintenance on a generator?
Any device, even the simplest one, is subject to wear and tear. The degree of wear depends on both the period and operating conditions. The latter include the quality of the fuel used and the intensity of operation.
An external inspection of a gasoline power unit must be carried out before each start-up. Gasoline, oil and refrigerant levels are also checked each time. Scheduled maintenance of electric generators must be carried out after the first 50 hours of operation. The next maintenance is carried out at intervals of 50-100 hours.
During scheduled maintenance, a number of checks and preventative actions are carried out. The integrity and reliability of all main components and connections are checked, filters and generator are cleaned, and fluid levels are checked. During long-term downtime, it is recommended to start a gasoline electric generator at least once a month at 75% load for about an hour.