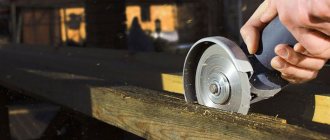
An angle grinder (angle grinder) or grinder has proven itself to be a very effective tool with which you can perform a wide range of work. However, during its operation, you should adhere to safety precautions, since the disk speeds are very high and you can get injured. Judging by numerous reviews, many home craftsmen have problems with the discs; they often split, and the nuts with which they are clamped become jammed. The reason for this may be the human factor or simply marriage. As a result, such a nozzle cannot be used for its intended purpose.
It would seem that there is nothing difficult about replacing the disk with a new one. However, at this stage the master is faced with a problem - the nozzle is tightly clamped by a fixing nut that does not want to unscrew. How to remove a jammed disc from an angle grinder? What methods are used for this? What means can be used if the standard key is lost? You will learn how to remove a jammed disc from an angle grinder from this article.
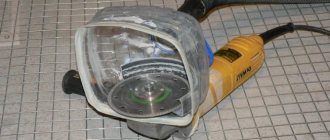
How to remove protection from an angle grinder?
The casing can be removed easily, on a Boche, for example, you press the lever and turn the casing until that moment. until the cutouts line up and it is removed. On other angle grinders, the casing is secured with screws, usually three screws, they need to be unscrewed. This is done so that you can adjust the casing to suit your needs.
Interesting materials:
How to determine, being in the northern hemisphere, which month is aging? How to determine the mood of verbs in Russian? How to determine the presence of methyl alcohol in alcohol? How to determine the presence of palm oil in butter? How to determine the presence of mercury in a room? How to determine the presence of a hydrogen bond? How to determine the direction north by the North Star? How to determine the direction of a river's flow? How to determine the direction of the current? How to determine the direction of rotation of an electric motor?
What solution to the problem is offered by specialists and amateurs + (Video)
- Install a newspaper gasket under the nut;
- Place a gasket from a plastic bottle under the nut;
- Replace the nut with a nut of a different design.
What is a newspaper gasket? This is a paper washer the size of a nut. It is put on the installed disk, and a nut is screwed on top. This piece of paper was a stumbling point, because the safety inspection always spoke about the harmfulness of such a decision.
Representatives of safety authorities treat the installation of gaskets made of any other materials in the same way:
- Cardboard;
- Paronitis;
- Gaskets made of various plastics;
- Rubber gaskets of various thicknesses.
But there is a solution that does not contradict safety requirements and allows you to install and remove the disk normally. This is a special nut that consists of two elements - a nut and a pressure washer. The use of such a nut does not require any shims, because with it the disk does not jam.
If you don’t have a special key at hand, then craftsmen suggest doing without a key. This does not mean that you can do without a key at all, but use a “gas key” or other device. To do this, you need to hold the latch, tighten the nut with a gas wrench and unscrew it. This way you can replace a jammed disk, but this is a very inconvenient operation for one person.
There are also suggestions to hold the disk with your hand and unscrew it. Maybe, but it’s unlikely that you’ll be able to change broken disks this way. It is better to use wrenches that are designed for removing and installing disks.
Some foreign power tool manufacturers, such as Bosh, produce grinders with easily removable nuts. They securely fix the disk on the tool shaft and are easily and quickly removed to replace the disk.
Removing a split disk
There are times when the cutting wheel jams during operation. Not only have you lost the nozzle, in such a situation the flange (its threaded part) is clamped with repeated force. How to remove a disc from an angle grinder in such a situation?
First of all, the tool should be securely fastened. Use clamps and a sturdy workbench. Then you need to lock the shaft lock key. If the force of your hands is not enough, lengthen the handle of the open-end wrench: for example, with a piece of steel pipe.
There are cases when the flange is jammed tightly. Then there is a possibility of damage to the locking key. To save the tool, disassemble the gearbox and clamp the output shaft in a vice.
Then we continue disassembling using the above methods: a reinforced open-end wrench or a gas wrench. The disadvantage of this method is that the shaft can be damaged and nicks will remain on it.
If the shaft is completely removed from the gearbox, the bottom of the flange can be chamfered using a traditional wrench.
Then the risk of damage is minimal. For any method, it is recommended to use a penetrating lubricant: WD-40 or regular kerosene. Waiting a few minutes after application will significantly reduce the force.
Bottom line: It is easier to prevent any problem than to deal with the consequences. By following the operating rules and tools, you will minimize the possibility of emergency situations.
Why is it better to point the label and ferrule outward?
Let's consider the advantages of placing the ring and pattern on the outside, when there are no other instructions on which side to install the disk on the grinder. The first point significantly simplifies the process of replacing the nozzle. The metal part offers less resistance than the abrasive surface. It also ensures that the circle is secured evenly.
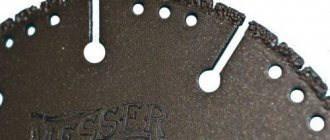
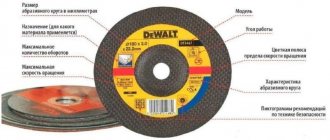
If you place the picture outside, then the main advantage of this solution is the availability of information about the physical parameters of the disk, its purpose and operating conditions (for example, permissible metal thickness or rotation speed). Often the name of the specific sample and the manufacturer are also important.
An example of decrypting information from the labeled side of a disk Source yandex.net
Safety regulations
Basic safety rules when working with the tool:
- When starting to work with the tool, you should only wear thick, long-sleeved clothing and a mask;
- It is strongly not recommended to remove and change the protective casing;
- mandatory checking of the tool for malfunctions;
- It is prohibited to stand in the cutting area; you must take a side position;
- movements of the switched-on grinder should be from yourself;
- no need to put in extra effort to make the cut.
All actions to replace component materials should be carried out only by disconnecting the device from the power supply.
There are many ways to unscrew an angle grinder. But the main thing when using these methods: do not neglect basic safety precautions and carry out all actions only when the device is disconnected from the power supply. Simple techniques should be used first. And only if they do not lead to results, proceed to drastic measures.
Measures to prevent jamming
By taking care of the safe operation of the angle grinder in advance, you will save yourself from the need to take measures to eliminate an emergency situation. Such events include:
- Place cardboard or plastic washers between the disk, flange and spindle head. They do not allow the tool to jam, but even in the event of a corkscrew, they can be removed/melted and the element can be easily unscrewed.
- The abrasive wheel must be installed correctly. To do this, place the front side of the circle on the support flange (with the picture facing the gearbox). It should not come into contact with the clamping nut. In this case, the standard metal ring in the center will act as a washer preventing jamming.
- Weld a regular nut onto the clamping flange, which allows you to press the installed disk using a regular wrench.
- Check the tightening force. No excessive effort is required to install the cutting element. Otherwise, it will jam under intense loads.
What else can you do?
If the above methods do not work, then the nut will have to be heated with a gas burner. Under the influence of high temperature, the nut will expand and begin to rotate. You can also use a rather barbaric method, namely sawing the nut with a hacksaw. Then you will have to buy a new one. Some technicians use WD-40 penetrating lubricant. It is used for processing threaded connections. Judging by the reviews, after just a few minutes the nut can be turned.
Why does the lock nut tighten?
The grinder, depending on the brand and diameter of the working disk, develops from 6,000 to 12,000 revolutions per minute. When the rotating disk sharply touches the surface being processed, the following rapid processes occur. The cutting disk, cutting into the material, experiences great resistance and slows down somewhat, but the electric motor rotor rotates by inertia for a few more moments at the same speed and literally screws the spindle thread into the locking nut, pressing it into the cutting wheel. Now it will not be easy to unscrew it, especially with the original key.
There are various ways to get rid of this defect. Not all of them pass without a trace for the instrument. Here we will look at one of them, which can be called auto thermal.
Using a Gas Key
To dismantle the clamping nut on an angle grinder, you can use an ordinary gas wrench. To do this, they need to carefully grasp the surface of the flange and begin to carefully unscrew it. It should be noted that when using this hand tool, one should not apply great force when dismantling and unscrewing the flange. Otherwise, if excessive force is used, there is a high risk of damage to the rotation lock of the angle grinder, as well as damage to the integrity of the nut itself.
Heating the retaining flange
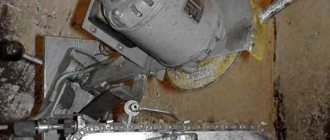
This is one of the simplest and most effective ways to replace a cutting disc on an angle grinder when there is no special key nearby. The locking nut must be heated using a hair dryer, a gas cutter, or by pressing it firmly against a wooden block. Once the flange is hot enough, it can be easily pressed out with a hand protected by a welding glove. However, there is one drawback to this method: there is a risk of damaging the plastic body of the angle grinder.
PHOTO: Heating the nut by pressing a working grinder against a wooden log
Video description
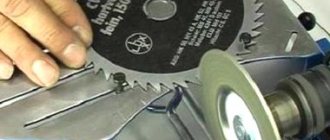
In this video, a specialist talks about common opinions and rules for installing metal discs on different angle grinders:
It is better to cut stone or concrete with angle grinders whose discs rotate towards the user. In this case, the equipment is always installed with the pattern facing outward. But in most cases, power tools are designed differently, so the marked surface is partially hidden behind the device and casing.
Electrical faults of the Hitachi angle grinder
Hitachi grinders suffer from failure of switches, carbon brushes, and broken wires of the stator windings. As with all electric tools, the appearance of faults in the electrical part largely depends on the condition of the carbon brushes. Hitachi angle grinders are equipped with carbon brushes with a built-in device, popularly called a “shot”. The purpose of such a device is to prevent Hitachi angle grinders from turning on when there is a high degree of wear on the carbon brushes. The weak point in the design of the electrical part of Hitachi angle grinders is the place where the power cable is inserted. This is where the cable most often breaks, breaks, or becomes exposed.
Checking the electric motor
Several points indicate that the grinder is not working properly:
- Rotation of the working body in jerks;
- Drop in speed and power of Hitachi angle grinders;
- Spontaneous set of revolutions;
- Strong heating of the stator housing;
- The appearance of significant sparking in the collector area;
- The appearance of a burning smell, smoke.
A drop in power from a power tool is associated with a break or short circuit in the rotor windings.
Rotor repair
Repairing the rotor of a Hitachi angle grinder is no different from repairing the rotor of any angle grinder. Not every consumer will be able to fix this kind of malfunction. To do this, you need to have not only special equipment, but also the skills of a winder. It is preferable to send the failed rotor to specialized service centers.
But for those who like to get to the bottom of the truth, we recommend that you familiarize yourself with the rotor rewinding algorithm.
The failure of the rotor is indicated by the appearance of burning in the collector area. As a rule, the lamellas burn out and a dark coating appears on the winding wires.
The rotor must be removed from the housing:
- Remove the carbon brushes;
- Remove the gearbox cover;
- Unscrew the nut securing the drive gear;
- Pull the rotor out of the gearbox housing;
- Pull the rotor out of the stator housing.
If you have an IK-2 device, then you can measure the presence of a short circuit in the turns or a break in the windings without disassembling the rotor.
Dismantling a failed rotor begins with removing the rotor bearings and impeller from the armature shaft. It is recommended to remove the bearings and impeller using special pullers to avoid damaging the parts. If the collector is damaged and cannot be restored, it must also be dismantled using a puller. Pre-solder the ends of the windings soldered to the collector lamellas. All that remains is to remove the burnt winding. Having cut off the end of the winding with a hacksaw, count the number of turns in several grooves, sketch the winding direction, and determine the percentage of filling of the armature core grooves. Using a micrometer, measure the diameter of the wire being used. You will need this data if you decide to wind the anchor of a Hitachi angle grinder with your own hands.
For other consumers, we recommend purchasing a new rotor from service centers or online stores.
Stator repair
Failure of the stator is most often indicated by significant overheating of the angle grinder body and a spontaneous increase in speed that cannot be controlled. The malfunction can be determined by removing the stator from the housing:
- Disconnect the gear housing and stator housing by unscrewing the four screws;
- Pull the gearbox with rotor out of the stator housing;
- Pull out the plastic stator protection;
- Unscrew the two screws securing the stator and pull it out.
A stator break is easily determined by a tester. But the interturn short circuit is best measured with an IK-2 device or an oscilloscope. You can repair the stator of a Hitachi angle grinder yourself at home. But you need to have some skills.
A failed stator is first disassembled:
- The output contacts are released;
- The winding is cut off from one end of the core with a hacksaw;
- The number of laid turns of wire, the direction of winding, and the percentage of filling of the grooves are calculated;
- The diameter of the wire used is measured using a micrometer;
- The core is cleaned of traces of soot and drops of molten copper wire.
The manufacture of the stator is described in detail on the pages of our website. For those who wish, it will not be difficult to complete this work.
Some useful tips when winding:
- Use a wire of the same diameter as was used in the stator;
- If the volume of the stator slots allows, it is preferable to use a larger cross-section wire, but do not overdo it;
- Try to lay the turns tightly when winding, controlling the shape of the winding;
- Carefully tie the winding with a mounting thread or cord;
- Be sure to impregnate the winding of the wound stator with paint or varnish, using alternating voltage through the LATR during impregnation;
- Upon completion of winding, clean the middle of the stator core from traces of paint and varnish.
Video:
Repair of electrical control circuits for Hitachi angle grinders
Electrical control circuits for power tools are a simple design. They perform the task of smoothly starting the tool, possibly adjusting the speed, turning the tool on and off. The control circuits include a switch, speed controller, electric motor, carbon brushes, power cable and switching elements. Let's look at the operation of the electrical part of a Hitachi angle grinder using the example of two models: Hitachi G13SB3 and Hitachi G23SCY.
Electrical diagram of the angle grinder Hitachi G13SB3 angle grinder 125
Assembly diagram of the Hitachi angle grinder.
Power is supplied via cable pos. 52 to the terminals pos. 53, connected to the switch pos. 42. At the entrance to the angle grinder body, the cable is fixed with a clamp pos. 55. The noise suppressor pos. 46 and the wires to the carbon brushes pos. 39 are connected to the switch. Hitachi angle grinders use self-stop carbon brushes. The size of the carbon brushes in the Hitachi G13SR3 angle grinder is 6.5×7.5 mm. Carbon brushes are installed in the brush holder pos. 38. The Hitachi angle grinder is turned on by moving the switch button pos. 36.
The most common malfunctions in Hitachi angle grinders occur when the power cable fails at the entry point, wear of the carbon brushes pos. 39, or failure of the switch pos. 42.
This kind of malfunction is eliminated by replacing the failed part or piece of wire.
Scheme of the angle grinder Hitachi G23SCY angle grinder 230
Main uses of angle grinders
- Cleaning surfaces, stripping off old paint. It is performed with brushes with steel rods or sandpaper petals. There are no difficulties in operation, except that brushes with sandpaper require compliance with the direction of rotation.
- Sanding with sandpaper. A concentric attachment with Velcro is screwed onto the grinder, onto which the abrasive in turn is attached. Before use, check that the direction of the threaded fastening and the rotation of the tool shaft are consistent.
- Grinding with abrasive wheels. These attachments require careful handling, as under high load, the abrasive may break. You cannot cut material with such discs; shock loads are unacceptable.
- Cutting metals, stone, gating concrete. Performed using cutting discs.
It is with such attachments that emergency situations most often occur.