Any tool, regardless of model and brand, will sooner or later break down. A screwdriver is no exception: individual parts and assemblies wear out over time, and without proper care or under force majeure circumstances they may fail.
The main functional load when operating the tool is distributed through the gearbox between the engine and the chuck, so if something happens to the gearbox, the work will stop. In order not to spend money on repair services, it is enough to use the advice of specialists to restore the operation of the unit yourself.
Design and principle of operation
device
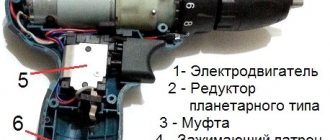
is a complex mechanical transmission unit through which the axis of the motor-power unit transmits torque to the cartridge.
Two or three transmission stages are installed in the gearbox.
The design of the “household” dual-mode screwdriver assembly includes:
- The plastic case is a small drum that is mounted on a cartridge. The body itself is fixed motionless, and the chuck shaft is inserted into a clamp on one of the transfer plates;
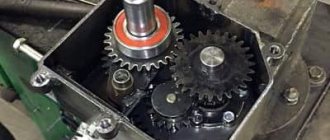
- 2 or 3 transfer plates (carrier) - a round metal plate, on one side of each there are 3 protrusions for small gears. On the other side of one of them there is a clamp for the chuck shaft, and the other (or 2 others) has another so-called. a “planetary” gear that rotates three small gears;
- 6 or 9 small gears (three each: they can be of the same or different thicknesses) are the so-called “satellite” gears, which are installed and rotate freely on the projections of the transfer plates. With their teeth they interact with the sun gear located between them and with the ring gear, which is located on the inner surface of the housing;
- ring gear - a metal ring with teeth on the inside and small protrusions on one of the rings on the outside. It is placed on these protrusions and ball bearings on the inner surface of the housing.
The parts are lubricated, assembled in series and installed inside the ring gear, which lies inside the housing drum (it has a seal with recesses for ball bearings and gear lugs). After this, the surface of the open satellites is covered with a metal washer, in the center of which there is a hole into which the engine shaft enters with another gear attached to it.
During operation of the screwdriver, the gear wheel on the motor shaft rotates the upper satellites, and they, spinning around their axis and, along the ring gear, respectively, transmit movement to the next carrier. Depending on the number of plates and small gears, the rotation speed will decrease proportionally.
Troubleshooting the third gear stage
As for the pins of the satellites that have fallen out of the holes intended for them, returning them to their place is not a difficult task, but it is not enough to simply insert them into the holes, but you will need to drive them there. But, given the fact that there is a lot of grease in the gearbox, which easily penetrates into all its corners, you should wipe it well with a rag and degrease both the axles themselves and the walls of the holes intended for them, so that there is good adhesion between them.
When driving the axles into the holes, you should not try to hit them directly with a hammer, as there is a danger of damaging nearby parts, but it is better to use a metal guide and hit it.
In addition, you also need to strike with prudence, without fanaticism, not forgetting that the screwdriver is half made of plastic. When all three pins and the satellites intended for them are in the proper position and thus the troubleshooting of the screwdriver is completed, you can begin assembly, returning its components to their original place.
Kinds
As can be seen from the design of the gear unit, they are divided depending on the number of transfer plates into:
- two-stage.
- three-stage. In this case, another plate with a “planetary” gear and 3 satellites is added to the design.
Reference. The number of speed modes of the device depends on the presence of stages, and this, in turn, will affect its cost.
Another indicator by which gearboxes are divided is the material from which their parts are made.
In the production of satellite gears the following is used:
- plastic. Such structures are relatively lighter, but their reliability is lower than that of their metal counterpart;
- metal. They are durable and with proper care and lubrication they will work like a clock.
Important. The disadvantages of metal parts are a continuation of their advantages - they are heavier than plastic ones and are more expensive. Moreover, if a screwdriver is used without violating the operating rules 2-3 times a year, the master most likely will not feel the difference in what material the gearbox parts are made of.
The best brushless drills/drivers
Some models combine 2 functions - a screwdriver and a drill, which makes the tool more versatile.
Bison DB-20 A5
Brushless drill-driver for working with various materials and threaded connections. The service life is increased due to the metal case and reinforced gearbox. Provides high efficiency.
Advantages:
- fast charger,
- additional handle,
- storage case.
Flaws:
- weight,
- price.
Brushless screwdriver Zubr
Makita DDF481RTE
Drill/driver with rubberized handle and powerful brushless motor. Equipped with a quick-release chuck and rechargeable battery.
Advantages:
- power,
- good battery
- versatility.
Flaws:
- weight,
- The lighting is not of high quality.
DeWALT DCD701D2
Dewalt hammerless compact drill/driver for working with wood and metal. Equipped with a rubberized handle, backlight, belt clip, and reverse.
Advantages:
- compactness,
- brushless motor,
- belt clip.
Flaws:
high noise level.
Metabo BS 18 L BL
A quality tool for the most intensive work. The quick-release chuck makes it easy to change attachments. The adjustable chuck diameter from 1.5 to 13 mm allows the use of equipment of different sizes. Metabo is battery operated. A case for storing the tool and accessories included.
Advantages:
- compact size,
- ergonomics,
- quality,
- power.
Flaws:
- flimsy case,
- price.
Interskol 573.1.2.70
Impact drill/driver, effective when working with hard metals. Equipped with backlight for working in dimly lit rooms. Characterized by a long service life thanks to the gearbox with metal gears and brushless motor.
Advantages:
- battery,
- power,
- all-metal cartridge,
- reverse,
- backlight,
- case.
Flaws:
- noise during operation,
- price.
DeWALT DCD701D2
Dewalt hammerless drill/driver of compact size for working with wood and metal. Equipped with a rubberized handle, backlight, belt clip, and reverse.
Advantages:
- compactness,
- brushless motor,
- belt clip.
Flaws:
high noise level.
Dewalt Cordless Screwdriver
DIY repair
In a home workshop, repairing a gearbox is not so difficult. Repair comes down to disassembling the unit into individual parts, checking the integrity of their structure, purging and lubrication, followed by reassembly. The process is divided into the following stages:
- Separating the gearbox from the engine and removing it (usually together with the chuck) from the screwdriver housing.
- Unscrewing the housing and removing the locking washer.
- Sequential removal of satellite gears and transfer plates (2 or 3, depending on the design).
- Removing the ring gear and checking the ball bearings (they can roll around the entire seal, but should not roll out beyond it).
After removing all the parts, they must be cleaned of “old grease,” wiped dry and made sure that they are not damaged.
Then the craftsmen recommend folding them in the reverse order “dry” and making sure that when the satellites rotate, the chuck spindle also rotates. If the rotation is carried out without twisting, then it can be assembled back.
First, bearings are placed in the recesses in the housing, onto which the ring gear is installed. Then, one at a time, the transfer plates are placed, with the satellites installed on them, and the locking washer is placed on top.
If the battery and charging unit are working, but the screwdriver does not work
If it turns out that the charging unit and battery of the tool are working, then you should look a little deeper for the cause of the electrical malfunction. To do this, you need to disassemble the screwdriver. Further steps to identify breakdowns and eliminate them are as follows:
- Measure the presence of voltage coming from the battery to the terminals of the “Start” button. If there is voltage, then power is supplied to the button. If there is no voltage, it means the wire is damaged or the contact is broken. We follow the chain further to find the fault
- Check the start button. First, you need to remove the battery from the tool - this is necessary to check the serviceability of the button. After removing the battery, you should short-circuit the contacts (connect the wires that go from the battery to the input terminals of the button). You need to connect the multimeter probes to the output contacts of the button and set the device to resistance measurement mode. To measure the resistance value, you need to press the tool button. If the button is working properly, then the device readings will tend to zero. If it malfunctions, the device readings will tend to infinity (break)
The button can be replaced or repaired. If the part is collapsible, then you can disassemble it and clean the contacts. Very often, the cause of button malfunction is burnt contacts. If you clean them with sandpaper, the device will operate as before. If the button is not removable or its contacts are badly burned out, then you will need to buy a new part. Its price is not high, so everyone can afford to buy it to avoid repairs.
This is interesting! The button consists not only of contacts, but also of small springs, which can fly out at the slightest wrong movement. To prevent this from happening, you need to disassemble the button carefully and slowly.
What and how to lubricate?
During assembly, each part is lubricated with synthetic (semi-synthetic) or mineral lubricating paste (grease). These substances differ in viscosity and durability. The smaller it is, the more often the parts have to be coated again. After the gear unit has been disassembled, it is recommended to coat each element with lubricant separately, gradually assembling the unit together. The lubricant is applied with a brush and distributed over the entire surface of each part.
Another way is to use specialized gear oil. Oils have a liquid consistency. They are used in the same way as lubricant, or sometimes they are poured into the gearbox without disassembling it, if a special hole is provided for this in the design of the screwdriver.
Thus, having understood the structure of the gear unit of an electric screwdriver, removing it from the tool, checking all the parts and, if necessary, changing the lubricant on them will not be difficult even for a novice craftsman. If you carry out this operation regularly 1-2 times a year, the risk of screwdriver failure will be minimal.
Features of proper storage to increase service life
Knowing how corded and cordless screwdrivers work, it remains to figure out how to care for them in order to extend their service life. Everything is as simple as the principle of operation of a screwdriver. When storing, the following recommendations are taken into account:
- Prevent water from entering the instrument
- Do not miss or drop the device, as in addition to damaging the housing, internal devices may fail.
- Ensure that the chuck is regularly lubricated to increase its service life
- If various contaminants get inside, then before using the device again, you should disassemble and clean it.
- Do not store the tool with completely discharged batteries.
- The device should be stored and operated in a temperature range not lower than -5 and not higher than +30 degrees
- Cool the bit when drilling
Only by following all of the above recommendations can you ensure long-term use of the tool without breakdowns. The service life of the device also depends on the quality, since a cheap Chinese screwdriver cannot serve for a long time a priori, because only low-quality components are used in its production.
To summarize, it is worth noting that not only the master whose work is related to the operation of the device, but also beginners who use the tool for the first time should know how a screwdriver works. This will extend the life of the screwdriver, and will also eliminate the need to take the device to a service center if malfunctions occur.
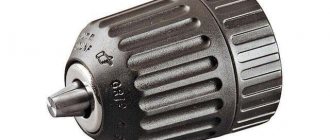
Cartridge
When using the tool, various attachments for screws and drills are used. Their tip in the standard version is made in the form of a hexagon. To secure such attachments and to transmit rotation to them, there is a cartridge. This element is installed on the spindle. The chuck is secured with a special screw, which prevents it from loosening during rotation.
Screwdriver chuck diagram
The most common version of this unit is called three-jaw, self-centering and self-clamping. Inside the cartridge there is a recess with a hexagonal profile. The attachments are fastened by rotating the coupling, which allows them to be fixed between the cams. The coupling also contains a retainer. It can be used to clamp attachments, which prevents spindle rotation.
Checking the electric motor
Electrical connection diagram for a screwdriver.
The last element to check the electrical circuit is the electric motor. It is tested if all previous tests have shown the full functionality of other electrical parts.
Repairing screwdrivers in the electric motor part is considered the most difficult.
First, the motor armature is removed from its stator, and then a visual inspection of the commutator contacts and the condition of the winding is carried out.
Mechanical defects, electrical short circuits and insulation breakdown are detected by a characteristic change in color and the appearance of traces of soot.
If the inspection reveals nothing, the integrity of each winding is checked individually with an ohmmeter. The condition of the stator is assessed in the same way. It is also repaired only by a professional rewinder.
Electrical breakdowns
In the electrical circuit of a screwdriver, batteries often fail; the second place is shared by the buttons and the motor, in which the brushes most often deteriorate.
How to repair a battery yourself
To repair the battery, a preliminary check is required. To do this, the battery is charged and tested for power output for a certain time. If the released charge is small, then you can try to restore the nickel-cadmium batteries.
If the voltage is low and the current is too low, the battery must be repaired. Repair consists of finding faulty elements and replacing them. Lithium-ion battery packs require the use of charge balance controllers due to the series connection of the batteries, which can make repairs much more difficult and require the assistance of a qualified electronics technician. This is especially important because lithium-ion batteries can become a fire hazard if not properly repaired.
Replacing brushes
Replacing brushes is done quite often, especially for screwdrivers used by builders and installers who work with stone or near a source of stone dust. For example, it is enough to assemble a wooden rack with a screwdriver in a warehouse with cement so that the brushes are almost half worn out.
To replace the brushes, you need to disassemble the screwdriver, remove the motor and then remove the brushes. How exactly this is done depends on the engine design. Sometimes the brushes are fixed with plugs (this is the easiest case for replacing them), and sometimes they are pushed in the direction of the commutator axis. In some cases, it is necessary to resort to devices to temporarily hold the brushes during assembly.
Problems with the button
Buttons may break due to rough force. Splinters, small fragments of metal from self-tapping screws, or sheet metal that stick to the worker’s hands often get inside. This debris leads to jamming of the button, and if it is not removed in time, it easily bores the plastic case in which the button with the regulator is mounted.
As a result, the regulator begins to become unstable, the speed of the screwdriver jerks, and in the end it completely fails. The same applies to the reverse switch if it has an unfortunate design that does not protect it well from dust.
Repairing these parts is not always possible; this again depends on the specific design of the push-button assembly. Most often you have to replace the entire assembly with a new one. Electrical faults can be corrected by replacing parts.
Disassembling a screwdriver
Most often, in order to find a fault and repair the device, you will need to disassemble it. Since all devices are similar in appearance, resembling the shape of a pistol, their disassembly can be presented in the form of recommendations given for repairing an Interskol screwdriver:
- First of all, the battery pack is disconnected. To do this, you need to press the latch and unfasten the module.
- Unscrew all the screws around the perimeter of the device using a Phillips screwdriver.
- After unscrewing the screws, the two halves of the housing are separated, while holding the structural parts installed in the grooves.
- The speed switch, start button and reverse mechanism are carefully disconnected.
- The gearbox is removed from the removed half. To remove it, you will need to rotate the gearbox in its seat.
Assembly occurs in reverse order. In this case, it is necessary to ensure that all removed elements and wires are located in specially made recesses for them.
To lubricate the mechanical parts or restore the gearbox, the latter often has to be disassembled. To do this, first remove the protective plate, then unscrew the screws in a circle and remove the top cover. Viscous materials are used as lubricants, for example, Litol
It is important to note that it is almost impossible to carry out serious repairs to a screwdriver gearbox with your own hands, since gears are not produced separately by manufacturers. Therefore, if it is damaged, you will have to replace the entire unit.
The next element that has to be disassembled is the cartridge. It is a quick-clamping design that is secured with a threaded connection, a screw, or a Morse taper. With the first method, you will need to unscrew the fastener using a hex key, and then, placing the key in the chuck, tighten it tightly. The cartridge is unscrewed by turning the key.
With the second type of connection, use a screwdriver to unscrew the screw located in the middle of the chuck jaws counterclockwise. Next, having installed and clamped the L-shaped key in the jaws, with a sharp movement the key must be turned counterclockwise. Removing the fastener using a Morse taper occurs by carefully striking the end of the cartridge.
Read also: Doorbell evology instructions
Model Makita 6281 DWPE
This is a typical representative of the model range with inexpensive Ni-Cd batteries. In order for the batteries to remain in working condition for a long time, you must strictly follow the discharge-charge regime.
The rubber-lined handle fits comfortably in the palm of your hand and does not slip. Thanks to the ergonomic shape and proper balancing, it does not tire your hand and allows you to work for a long time in a vertical position.
The Makita 6281 DWPE screwdriver has the minimum required qualities, without being overloaded with professional options. Due to this, the tool turned out to be light (only 1.5 kg) and compact. It does not have a built-in impact mechanism or LED backlight.
Head rotation speed – 0-1300 rpm. The planetary two-speed gearbox is equipped with metal gears, which increases its wear resistance. When operating in a reduced speed mode of 0-350 rpm, it twists with pinpoint precision. The torque control mechanism has 16 stages, which ensures precise adjustment of the torque force. The maximum value of 36 Nm allows you to easily cope with self-tapping screws up to 100 mm long.
Quick change of working attachments is carried out thanks to the self-clamping chuck. The spindle locking mechanism allows you to tighten the chuck with one hand.
The set comes with 2 batteries. While the master is working on one battery, the other is being charged. Thus, the work cycle will be continuous.
Requirements for lubricating fluids for angle grinder gearboxes
The master decides for himself how to lubricate the grinder gearbox. There is no universal remedy - you need to select your own liquid for a specific tool. A properly selected lubricant must meet a number of requirements, including:
- be resistant to corrosion;
- consist of natural components - including ensuring that it does not harm the artist when inhaling vapors;
- reduce the friction force of gears, and, accordingly, the heating temperature of the tool;
- the consistency should be thick enough to stick to the parts, but with a viscosity not higher than 800 Pa s;
- the consistency must remain stable and not change, “melt” or flow out of the mechanism when the temperature rises - the minimum dropping temperature is +120ºС;
- ensure the operation of the tool in the range of up to +150 ºС;
- The presence of metal impurities in the composition is not allowed;
- tensile strength of at least 120 Pa;
- be hydrophobic, have water-repellent properties;
- protect the “insides” from dirt and dust.
Review of lubricants for grinders
If you lubricate a working tool with lithol or grease, saving on materials, there is a high probability that, ultimately, the equipment will refuse to work properly, no matter how high quality it is.
Some resources claim that preparing a liquid that satisfies all of the above points will not be difficult even at home. In one case, it is recommended to use lubricant for SDC in combination with MS-20 oil, in another case it is proposed to use a mixture of substances Tsiatim-221 and TAD-17. Despite numerous positive reviews, in both cases the consequences can be unpredictable - the manufacturer hardly took into account the possibility of filling the gearbox of a technical device with compounds that were not reassigned for it.
Foreign companies recommend to craftsmen how to lubricate the grinder, offering specially developed ointments. The manufacturer strongly recommends the use of exactly the products specified in the operating instructions. They are indeed present on the Russian market, but at a fairly high price. In this regard, the question of high-quality lubricants from domestic manufacturers arises:
- if the original imported lubricant contained molybdenum, you should look for an analogue labeled “MoS2”;
- “NLGI2” - for industrial tools and others operating on liquids of the second viscosity class (penetration - 265-295);
- "ISOL-XBCHB 2" for ISO standard;
- "DIN 51825-KPF 2 K-20" for DIN standards.
Among Russian lubricants, materials from the company Interskol stand out, which has been producing and servicing power tools for a long time. Such lubricants, “tailored” to the specific features of the equipment, not only ensure first-class operation of the gearbox and meet many of the stated requirements, but are also pleasantly priced. Thus, a tube of lubricant will cost the buyer no more than 100 rubles, while the same lithiol costs only half as much. Whether it makes sense to save money in this case, or is it easier to pay a little more but get a quality product? It’s up to each master to decide.
How good is the ice drill knife sharpening machine?
Whether the fisherman wants it or not, the blades begin to dull over time. There are several factors for this: ice density, sand, small pebbles and other abrasive particles. During fishing, you can correct the edges with a regular whetstone or even a file, but it is necessary to sharpen more carefully under other conditions.
Read also: At what temperature does soldering solder melt?
For this purpose, you can design a machine for sharpening ice drill knives with your own hands, or you can make a regular corner stand that will allow you to place knives at a certain angle. Its advantage is the avoidance of bevel of the edge.
Knife sharpening algorithm:
- Use a needle file or an abrasive stone to remove small chips that form while drilling a hole.
- The knife is attached with the long end to the stand at an angle of 30 degrees. Corrected to the required state.
- The knife turns the other way around. The angle between both edges should be almost straight, which will reduce the risk of jamming during drilling.
- When sharpening, the blade must be constantly cooled by dipping it in a container of water.
- After sharpening, you need to carefully polish the surfaces, not forgetting the cutting edge.
When transporting knives, they must be hidden in a special case to avoid defects and not injure others. A DIY ice auger case wouldn’t hurt either. Experienced fishermen use old jeans as a material because this fabric is durable.
Attention Bearing Buyers
Attention Bearing Buyers
Dear customers, send your questions and requests for the purchase of bearings and components by mail or call now: +7 Delivery of bearings in the Russian Federation and abroad. Bearing catalog on the website
Attention Bearing Buyers
Dear customers, send your questions and requests for the purchase of bearings and components by mail or call now: +7 Delivery of bearings in the Russian Federation and abroad. Bearing catalog on the website