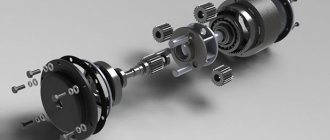
DC motor
made in the form of a cylinder, in which permanent magnets are located in a circle inside the body. The motor armature is located on support bushings made of brass. The armature itself is made of electrical steel with high magnetic permeability. Windings of insulated copper wire are placed in the grooves of the armature. After an equal number of turns, the winding has access to the collector plates. The drive gear (sun gear) is pressed onto the armature shaft. The motor brushes touch the commutator plates on the “tail” of the armature. For reliable contact, the brushes are spring-loaded, while being isolated from the motor housing. According to the screwdriver circuit, voltage is supplied only to the brushes. If you change the polarity of the voltage supplied to the motor brushes, the direction of rotation will also change.
Planetary reductor
The screwdriver is made in a separate housing. The gearbox includes the following elements: ring gear, sun gear (pressed onto the armature shaft), satellites and carrier. Gearbox parts can be made of both plastic and metal. For a more complete picture of the operation of the gearbox, it is necessary to clarify the location of the individual parts.
A ring gear is a cylinder, inside of which there are teeth along the entire circumference along which the satellites move during operation. The satellites are installed on the carrier pins. Between the satellites of the first carrier, the engine drive gear (the first sun gear) comes in. The first carrier, on the opposite side of the satellites, has a drive gear (the second sun gear), which, when assembled, fits between the satellites of the second carrier.
If the gearbox is two-stage, the second carrier is rigidly connected to the shaft on which the cartridge is mounted. Thus, you get a kind of “sandwich” of two carriers with satellites. This "sandwich" is located inside the ring gear.
The ring gear is rigidly attached to the housing using protrusions on its end or sides. The protrusions rest against protruding balls, spring-loaded by an elastic ring around the entire circumference. The ring, in turn, is spring-loaded by the load limiting mechanism spring. The spring force may vary depending on the position of the load regulator.
The operation of the gearbox is as follows: the engine sun gear rotates the satellites in a circle around the ring gear, and accordingly the carrier rotates at a lower speed than the engine speed. The first carrier transmits torque through its sun gear to the second trio of satellites, which also rotate around the ring gear, which means the speed of the second carrier decreases even more. The second carrier, as mentioned above, is connected to the cartridge shaft. This happens in a two-stage gearbox. There are models of screwdrivers with three-stage gearboxes; they have another planetary mechanism inserted into the gearbox. At the end of the article there is a video showing the operation of a planetary gearbox.
There are models of screwdrivers with a conventional gearbox.
For convenience during work, some screwdrivers have two-speed gearboxes. The first speed is intended for tightening screws (0-450 rpm and increased torque), and the second for drilling holes (0-1400 rpm).
When rotating the chuck under load, there comes a time when more force is required to complete the job, for example, the last stage of tightening a screw, or when it is necessary to limit the force. The load regulator comes into operation. The force of the regulator spring is not enough to hold the ring gear and it “breaks off” from the balls. It turns out that the engine begins to rotate the ring gear, while characteristic clicks are heard, and the cartridge stops at this time. To use a screwdriver in drilling mode, the ring gear is locked and its rotation is prevented.
Speed controller
assembled on the basis of a PWM controller and a key N-channel field-effect transistor.
The operation of the regulator is controlled by a variable resistor, the position of which depends on the force of pressing the power button (trigger). Read also: Wiring out the micro usb socket
Reverse is reduced only to changing the polarity of the voltage supplied to the motor brushes. For this purpose, changeover contacts are provided, which are activated by the reverse lever.
Battery
. To power the screwdriver, a small-sized battery is installed in the housing. The battery for a screwdriver is a set of small elements contained in one housing.
The supply voltage range for different brands of screwdrivers is from 9 to 18 volts. The higher the supply voltage, the more powerful the screwdriver itself.
Video demonstrating the operating principle of a planetary gearbox:
A cordless screwdriver is not just a tool necessary for construction and repair, but also an indispensable assistant in everyday life. The device allows you to unscrew and tighten screws, drill holes and perform other installation work in various hard-to-reach places. Its operation does not require a cable or electrical network nearby, because it runs on a battery. With a cordless screwdriver, you can perform small household and other jobs efficiently and quickly.
Types of cordless screwdrivers
According to the type of battery, screwdrivers are divided into three types:
- Lithium-ion - Li-Ion - can withstand 3 thousand charge and discharge cycles.
- Nickel-cadmium - Ni-Cd - designed for 1000 cycles.
- Nickel-metal hybrid - Ni-MH - can withstand up to 500 charges.
Ni-MH and Ni-Cd batteries have a memory effect and as a result, capacity may decrease due to incomplete charging. Li-Ion devices do not suffer from this. At the same time, Ni-Cd can also function at low temperatures, while Li-Ion and Ni-MH are not recommended for use outdoors in winter. The safest and most environmentally friendly are Li-Ion batteries.
Screwdrivers are classified according to their purpose:
- Specialized , used for unscrewing/twisting fasteners with cross-shaped heads, including for drilling small holes in plastic, wood and other soft materials.
- Cordless screwdriver . Used to work with fasteners such as self-tapping screws, screws and screws. Widely used on assembly lines.
- Impact wrench . Used to work with nuts and bolts, used in car repair shops, assembly lines and other enterprises.
- Drill-driver . Used for drilling, it has a low speed mode for unscrewing and tightening fasteners with a slot for a screwdriver.
Screwdrivers are divided according to other characteristics:
- Torque is the force that ensures the screws are unscrewed.
- According to the speed of rotation of the shaft, that is, the speed of screwing in self-tapping screws. Professional models provide 1200-1300 rpm, amateur models - 400-500 rpm.
- Number of torque control stages.
- Time to charge the battery: professional - 30-100 minutes, household - 2-5 hours.
- The presence of an impact mechanism (drilling holes in concrete and working with socket heads).
- Ergonomics and weight.
Device
The cordless screwdriver consists of the following elements:
- Electric motor , which provides torque and rotation of the shaft at the required speed. New generation tools have a brushless motor, that is, they do not have commutator brushes, which wear out quite quickly.
- Planetary type gearbox . This element transfers the force to the spindle, equipped with a clamping chuck. A planetary gearbox is an arrangement of shafts and gears inside a cylindrical housing.
- Clutch , which is attached to the gearbox. It provides torque control.
- Clamping cartridge . Used to attach the attachment to the motor shaft.
- Electronic control system . Ensures the screwdriver starts and works. To do this, it is equipped with a button to start the device, including a reverse switch. The system includes a speed controller, which matches the speed of the engine shaft with the force exerted on the power button. With less pressure, the bat chuck rotates more slowly. Reverse is controlled by a separate lever.
- Plastic case , all other previous elements are built into it. The body has an ergonomic pistol grip. Certain areas of the surface are rubberized for ease of grip.
- The battery is the power source for the screwdriver.
Read also: 6B75 universal milling machine
A modern cordless screwdriver can be equipped with additional elements: a torque limiter, LED backlight, a load limiting mechanism, a deep discharge protection system, a charging indicator, and so on.
Operating principle
The principle of operation of cordless screwdrivers begins with the operation of the engine.
- To start the screwdriver, you must press the trigger switch. The electromagnetic relay closes, current flows into the engine, starting it. The speed of the tool increases as the pressure on the trigger switch increases. To stop the screwdriver, you must release the trigger switch.
- The engine transmits movement to the shaft through a gearbox. There is a reversing switch on the housing, which changes the direction of rotation by changing the rotation of the shaft in the opposite direction. The gearbox can be plastic or metal. It is recommended to choose a metal gearbox in case of heavy work of a screwdriver with maximum load. This is due to the fact that the metal is stronger and removes heat better. The plastic gearbox is not designed for heavy loads, so it is often found in cheap household models.
- The gearbox, which is located after the engine, provides an increase in torque or a decrease in shaft rotation speed.
- By means of the shaft, the cartridge with the attachment attached to it begins to rotate. To fix the equipment, you need to install a drill or other chuck tool. The coupling in the chuck is usually tightened by hand without much effort.
- To operate the engine, electricity is required, which comes from the battery. Therefore, before starting work, you need to check whether the battery is charged. The larger the battery capacity, the longer it will work before the next recharge. The battery charging time for a household screwdriver model is on average 3-7 hours. Professional tools use more powerful and expensive devices, so they charge in literally 1 hour.
Application
A cordless screwdriver is a very functional tool. It is used in everyday life and professional activities. These are construction, automotive, mechanical engineering, assembly production and other industries. It is used by residents of city apartments and owners of country houses when performing various construction and repair work. For example, finishing specialists use it to attach drywall and other finishing materials, furniture assemblers assemble cabinets, sofas and much more.
- Screwing screws, bolts, self-tapping screws, screws and other fasteners.
- Tightening dowels and anchors during installation work.
- Removing screws, bolts, self-tapping screws, screws, dowels, anchors and other fasteners.
- Drilling metal.
- Drilling wood.
- Threading in structures.
The cordless screwdriver is perfect for working in hard-to-reach places, as well as where there is no electrical network. A screwdriver can significantly reduce labor costs and time. Depending on the needs and goals, a screwdriver is selected. For example, most household models tighten screws up to 5 mm. With a good screwdriver you can work with screws up to 10-12 mm. This also applies to drilling operations: you need to take into account the maximum diameter of the drills used.
Non-standard application
Screwdrivers often find quite unexpected uses. For example, some resourceful people use a screwdriver to clean sewer pipes and clogged drains. To do this, they fix a small cable or a wire bent in half into the clamping chuck. Such a device is inserted into the drain hole, after which the clogged pipe is cleared at low speeds.
A screwdriver is used to mix solutions or even peel potatoes. In addition, it is used to compactly wind up wires, wires and large pieces of rope for storage. So, using a screwed-in self-tapping screw, a wooden block is attached to the cartridge, after which a wire or rope begins to wind at low speeds. The same principle applies when making springs at home.
Read also: Sharpening wheels for sharpening knives
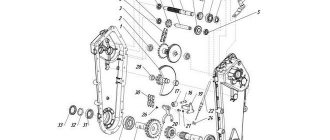
Most often, the gearbox fails during prolonged operation under heavy load. The most common failure is the bending of the main shaft with the chuck. With such a malfunction, the device begins to vibrate strongly in your hands.
Another breakdown is wear of the shaft bearing with the cartridge or support sleeve. If only the bearing or bushing is deformed, but the shaft remains in the same condition, then repairing the screwdriver gearbox with your own hands consists only of replacing the worn element.
If, when you turn on the screwdriver, the motor starts for a second and then stops abruptly, then the problem lies in the gearbox. In such a situation, most often the pin fails, due to which the satellite cannot transmit speed to the main shaft. In this case, installing a new carrier will help. If the carrier is also damaged, then the entire gearbox needs to be replaced. Gear teeth also affect the operation of the gearbox. If the device works for a long time with worn gears, this can render most of the parts that relate to the screwdriver gearbox unusable.
Screwdriver gear diagram
Checking the electric motor
Electrical connection diagram for a screwdriver.
The last element to check the electrical circuit is the electric motor. It is tested if all previous tests have shown the full functionality of other electrical parts.
Repairing screwdrivers in the electric motor part is considered the most difficult.
First, the motor armature is removed from its stator, and then a visual inspection of the commutator contacts and the condition of the winding is carried out.
Mechanical defects, electrical short circuits and insulation breakdown are detected by a characteristic change in color and the appearance of traces of soot.
If the inspection reveals nothing, the integrity of each winding is checked individually with an ohmmeter. The condition of the stator is assessed in the same way. It is also repaired only by a professional rewinder.
How to disassemble the screwdriver button?
- There is no need to get rid of the connecting wire. The lower part of the button is dismantled.
- Remove the protective flap. To do this you will need a screwdriver. They pry it up and remove it, remove the compartment cover. If there is carbon deposits on the contacts, it is removed. Often it burns out altogether, then it is completely replaced.
- Secure the spring to pull out the engaging mechanism. There may be dust inside. It interferes with proper operation. Everything cleans well.
- Another breakdown is the transistor. The contacts are cleaned, then the device is assembled. The transistor is replaced, and after collection it is tested for functionality.
Depending on the cause of the breakdown, the screwdriver is disassembled. There is no need to do unnecessary processes, otherwise you won’t be able to get everything back.
Design and principle of operation
The gearbox is a complex mechanical transmission unit through which the axis of the motor-power unit transmits torque to the cartridge.
Two or three transmission stages are installed in the gearbox.
The design of the “household” dual-mode screwdriver assembly includes:
- The plastic case is a small drum that is mounted on a cartridge. The body itself is fixed motionless, and the chuck shaft is inserted into a clamp on one of the transfer plates;
- 2 or 3 transfer plates (carrier) - a round metal plate, on one side of each there are 3 protrusions for small gears. On the other side of one of them there is a clamp for the chuck shaft, and the other (or 2 others) has another so-called. a “planetary” gear that rotates three small gears;
- 6 or 9 small gears (three each: they can be of the same or different thicknesses) are the so-called “satellite” gears, which are installed and rotate freely on the projections of the transfer plates. With their teeth they interact with the sun gear located between them and with the ring gear, which is located on the inner surface of the housing;
- ring gear - a metal ring with teeth on the inside and small protrusions on one of the rings on the outside. It is placed on these protrusions and ball bearings on the inner surface of the housing.
The parts are lubricated, assembled in series and installed inside the ring gear, which lies inside the housing drum (it has a seal with recesses for ball bearings and gear lugs). After this, the surface of the open satellites is covered with a metal washer, in the center of which there is a hole into which the engine shaft enters with another gear attached to it.
During operation of the screwdriver, the gear wheel on the motor shaft rotates the upper satellites, and they, spinning around their axis and, along the ring gear, respectively, transmit movement to the next carrier. Depending on the number of plates and small gears, the rotation speed will decrease proportionally.
As can be seen from the design of the gear unit, they are divided depending on the number of transfer plates into:
Reference. The number of speed modes of the device depends on the presence of stages, and this, in turn, will affect its cost.
Another indicator by which gearboxes are divided is the material from which their parts are made.
In the production of satellite gears the following is used:
- plastic. Such structures are relatively lighter, but their reliability is lower than that of their metal counterpart;
- metal. They are durable and with proper care and lubrication they will work like a clock.
Important. The disadvantages of metal parts are a continuation of their advantages - they are heavier than plastic ones and are more expensive
Moreover, if a screwdriver is used without violating the operating rules 2-3 times a year, the master most likely will not feel the difference in what material the gearbox parts are made of.
What and how to lubricate?
During assembly, each part is lubricated with synthetic (semi-synthetic) or mineral lubricating paste (grease). These substances differ in viscosity and durability. The smaller it is, the more often the parts have to be coated again. After the gear unit has been disassembled, it is recommended to coat each element with lubricant separately, gradually assembling the unit together. The lubricant is applied with a brush and distributed over the entire surface of each part.
Another way is to use specialized gear oil. Oils have a liquid consistency. They are used in the same way as lubricant, or sometimes they are poured into the gearbox without disassembling it, if a special hole is provided for this in the design of the screwdriver.
Thus, having understood the structure of the gear unit of an electric screwdriver, removing it from the tool, checking all the parts and, if necessary, changing the lubricant on them will not be difficult even for a novice craftsman. If you carry out this operation regularly 1-2 times a year, the risk of screwdriver failure will be minimal.
Source: 2lzz.ru
How good is the ice drill knife sharpening machine?
Whether the fisherman wants it or not, the blades begin to dull over time. There are several factors for this: ice density, sand, small pebbles and other abrasive particles. During fishing, you can correct the edges with a regular whetstone or even a file, but it is necessary to sharpen more carefully under other conditions.
Read also: At what temperature does soldering solder melt?
For this purpose, you can design a machine for sharpening ice drill knives with your own hands, or you can make a regular corner stand that will allow you to place knives at a certain angle. Its advantage is the avoidance of bevel of the edge.
Knife sharpening algorithm:
- Use a needle file or an abrasive stone to remove small chips that form while drilling a hole.
- The knife is attached with the long end to the stand at an angle of 30 degrees. Corrected to the required state.
- The knife turns the other way around. The angle between both edges should be almost straight, which will reduce the risk of jamming during drilling.
- When sharpening, the blade must be constantly cooled by dipping it in a container of water.
- After sharpening, you need to carefully polish the surfaces, not forgetting the cutting edge.
When transporting knives, they must be hidden in a special case to avoid defects and not injure others. A DIY ice auger case wouldn’t hurt either. Experienced fishermen use old jeans as a material because this fabric is durable.
Attention Bearing Buyers
Attention Bearing Buyers
Dear customers, send your questions and requests for the purchase of bearings and components by mail or call now: +7 Delivery of bearings in the Russian Federation and abroad. Bearing catalog on the website
Attention Bearing Buyers
Dear customers, send your questions and requests for the purchase of bearings and components by mail or call now: +7 Delivery of bearings in the Russian Federation and abroad. Bearing catalog on the website
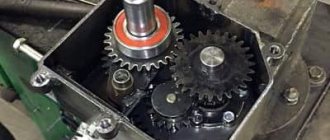
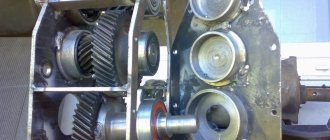
Operating principle of the gearbox
Figure 1. Typical screwdriver gearbox design.
The hammer drill is a convenient and easy-to-use device; its use began with flights into outer space, where it was used by astronauts. New models of screwdrivers are being produced, so the demand for them does not fall. This device is suitable for various household small items, as well as repairs.
The operation of a screwdriver gearbox is reminiscent of the operation of a drill gearbox; the distinctive characteristic is the component configuration and the gear ratio. The gearbox of any of these tools requires regular inspection. The uninterrupted operation of these devices is associated with periodic checking of the working condition of the gears and gearbox lubrication, which sometimes requires replacement.
The gearbox mechanism includes cylindrical, bevel and worm gears. The gear ratio is constant. The number of revolutions of the cartridge and the frequency of blows are adjusted using an electronic regulator. There are models of devices that have two-speed gearboxes. During operation, the device must not be overloaded, that is, it must not be operated for more than 15 minutes. Every quarter of an hour the hammer drill must cool down, since the device cannot operate continuously.
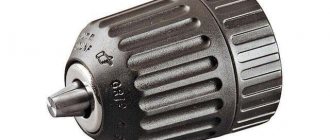
Cartridge
When using the tool, various attachments for screws and drills are used. Their tip in the standard version is made in the form of a hexagon. To secure such attachments and to transmit rotation to them, there is a cartridge. This element is installed on the spindle. The chuck is secured with a special screw, which prevents it from loosening during rotation.
Screwdriver chuck diagram
The most common version of this unit is called three-jaw, self-centering and self-clamping. Inside the cartridge there is a recess with a hexagonal profile. The attachments are fastened by rotating the coupling, which allows them to be fixed between the cams. The coupling also contains a retainer. It can be used to clamp attachments, which prevents spindle rotation.
Related video: Screwdriver - a look from the inside
Publications on the topic
Self-conversion of a cordless screwdriver into a corded one
Screwdriver battery recovery algorithm
Principles of installation and arrangement of a valley roof
DIY repair
In a home workshop, repairing a gearbox is not so difficult. Repair comes down to disassembling the unit into individual parts, checking the integrity of their structure, purging and lubrication, followed by reassembly. The process is divided into the following stages:
- Separating the gearbox from the engine and removing it (usually together with the chuck) from the screwdriver housing.
- Unscrewing the housing and removing the locking washer.
- Sequential removal of satellite gears and transfer plates (2 or 3, depending on the design).
- Removing the ring gear and checking the ball bearings (they can roll around the entire seal, but should not roll out beyond it).
After removing all the parts, they must be cleaned of “old grease,” wiped dry and made sure that they are not damaged.
Then the craftsmen recommend folding them in the reverse order “dry” and making sure that when the satellites rotate, the chuck spindle also rotates. If the rotation is carried out without twisting, then it can be assembled back.
First, bearings are placed in the recesses in the housing, onto which the ring gear is installed. Then, one at a time, the transfer plates are placed, with the satellites installed on them, and the locking washer is placed on top.
What is the operating principle of a planetary screwdriver gear?
Why is it needed in a screwdriver?
The planetary gearbox of a drill, like other mechanical devices, is designed to reduce or increase after transmission of torque, reduce the load on the motor input shaft and increase the load at the output.
It works this way:
- The sun gear, which is located in the center of the planetary gearbox, is driven by the rotating motor shaft.
- Several (at least three) toothed gears are driven from the sun gear, the rotation ratio is already changing.
- From the gears around the sun gear, rotation is transmitted to the crown gear, which closes the mechanism and transmits rotation to the output shaft.
- Next, the operation can be repeated if it is a three-stage process.
- So at the output we get a different speed and power.
The advantages of using such gearboxes are the durability of the tool while increasing its power due to transmission gears.
The principle of operation of a planetary gearbox is to reduce the speed entering the gearbox and convert their reduction into power thrust - in general, like a conventional gearbox.
The small gear rotates the large one; because of this, the speed decreases, but the traction force on the shaft of the large gear increases in direct proportion to the decrease in speed.
Only in a conventional gearbox does the small gear rotate the large one itself without intermediaries, but in a planetary gearbox through planetary gears their number can be different: 2-3-4-5-6 or more.
That is, the small drive gear does not touch the large driven gear.
Now what is this for, but in order to unload the teeth of both the small and large gears, since in a planetary gearbox the teeth that transmit the load are many times greater than in a normal gear, and accordingly they will withstand the load together more!
Therefore, it is possible to use cheaper and easier-to-process materials, such as plastic, for the manufacture of such gearboxes, and when working in a planetary gearbox, they will withstand a sufficient load, serving for a sufficient time without wearing out.
A planetary gearbox, among other things, is more stable and gentle on bushings and bearings, since in it the load is distributed over the entire gearbox, and not like in a conventional gearbox on one contact side.
That is why such gearboxes are used in screwdrivers, to provide good traction and force with non-bulky parts.
Source: www.remotvet.ru
DIY repair
In a home workshop, repairing a gearbox is not so difficult. Repair comes down to disassembling the unit into individual parts, checking the integrity of their structure, purging and lubrication, followed by reassembly. The process is divided into the following stages:
- Separating the gearbox from the engine and removing it (usually together with the chuck) from the screwdriver housing.
- Unscrewing the housing and removing the locking washer.
- Sequential removal of satellite gears and transfer plates (2 or 3, depending on the design).
- Removing the ring gear and checking the ball bearings (they can roll around the entire seal, but should not roll out beyond it).
After removing all the parts, they must be cleaned of “old grease,” wiped dry and made sure that they are not damaged.
Then the craftsmen recommend folding them in the reverse order “dry” and making sure that when the satellites rotate, the chuck spindle also rotates. If the rotation is carried out without twisting, then it can be assembled back.
First, bearings are placed in the recesses in the housing, onto which the ring gear is installed. Then, one at a time, the transfer plates are placed, with the satellites installed on them, and the locking washer is placed on top.
Help me to understand. screwdriver
Dear homemade friends. question ! The gearbox on the screwdriver produces 1 in 55 and 1 in 17 revolutions, two-speed. on the screwdriver it is stated from 0-550 rpm and, accordingly, 0-1250 rpm, therefore, having these data you can calculate the number of revolutions on the engine! it corresponds to 30250 rpm. brains are boiling (if they exist) how can this be? You wouldn’t even dream of such engines even in a nightmare!! or am I wrong? If there are such engines, tell me where to get them with the highest current readings.
Reasons for breakdowns of different brands of screwdrivers - how to extend the life of the tool
It's not just the low-priced tools that break. All tools tend to break, so there is no escape from this. To extend the service life of a screwdriver, you need to understand what causes the device to quickly fail.
- Incorrect operation. The tool should only be used for its intended purpose. If a portable device is used daily for drilling concrete, it will not last even a few days
- Purpose - like other types of tools, screwdrivers are divided into household or amateur and professional. If professional ones are designed for a long time of operation, then household appliances can be used no more than 2 hours a day
- Compliance with storage conditions - instruments should not be stored in a room with high humidity. If the internal parts (mechanical and electrical) become damp, the device will quickly fail. Portable screwdrivers need to be stored not only in appropriate humidity conditions, but also at the correct temperature. This is necessary not for the tool itself, but for batteries, which are destroyed at low temperatures. It is recommended to store the device in heated garages and workshops for the winter.
- Eliminate the negative influence of weather conditions - this is not only rain or snow, but also sunlight. If the device overheats in the sun, then the next time it is turned on, it may burn out, so do not allow the instrument to remain in the scorching sun for a long time
To extend the life of batteries, which break down faster than screwdrivers, you need to not only store them correctly, but also charge them. The battery should not be stored for a long time in a discharged state, or left to charge for a long time. You regularly need to turn on the tool and let it work (1-2 times a week). If you don’t do this, you will soon need to buy a new battery or the tool itself. How long an instrument of Chinese, European or German quality will last depends on the quality of care and operation.
https://youtube.com/watch?v=MC7aTW4CUmw%3F
To repair the device in question, you will need a minimum set of tools. Repair work should be carried out on a table in good lighting, since the screwdriver has many small parts that can get lost. Take enough time to repair the device rather than disassemble it and throw it away. If you are repairing an electrical part, it is recommended to treat the rubbing parts with lubricants before assembly. After repair, the screwdriver will be able to serve for as long or even longer. Detailed video instructions - how to repair a screwdriver from “A to Z”.
https://youtube.com/watch?v=qxrfGBJmZIo%3F
To summarize, it should be noted that a screwdriver is the most reliable and necessary tool that should always be in good working order. Repairing it does not require much effort, and if the device is broken, then repairing it will only require time and spare parts, which are not difficult to buy.
Publications on the topic
Choosing a water-cooled electric tile cutter for work
How to repair a hair dryer - all types of breakdowns and their elimination
What is the difference between an impact drill and a hammer drill - how the tools differ
We repair an angle grinder with our own hands quickly and easily
DIY repair
In a home workshop, repairing a gearbox is not so difficult. Repair comes down to disassembling the unit into individual parts, checking the integrity of their structure, purging and lubrication, followed by reassembly. The process is divided into the following stages:
- Separating the gearbox from the engine and removing it (usually together with the chuck) from the screwdriver housing.
- Unscrewing the housing and removing the locking washer.
- Sequential removal of satellite gears and transfer plates (2 or 3, depending on the design).
- Removing the ring gear and checking the ball bearings (they can roll around the entire seal, but should not roll out beyond it).
After removing all the parts, they must be cleaned of “old grease,” wiped dry and made sure that they are not damaged.
Then the craftsmen recommend folding them in the reverse order “dry” and making sure that when the satellites rotate, the chuck spindle also rotates. If the rotation is carried out without twisting, then it can be assembled back.
First, bearings are placed in the recesses in the housing, onto which the ring gear is installed. Then, one at a time, the transfer plates are placed, with the satellites installed on them, and the locking washer is placed on top.
Electrical circuit
The tool is turned on by pressing the screwdriver button located on its handle. This push-button switch is combined with a voltage regulator - with different pressing forces, a different voltage value is supplied to the electric motor, which is provided by a wide-pulse regulator. The rotation direction lever is also located in the button installation area. This switch allows you to change the polarity of the supplied signal, which provides reverse rotation. The electric motor is started through a fairly powerful transistor, the opening process of which is controlled by a PWM generator.
The electrical signal is supplied directly to the engine rotor through the commutator. To ensure electrical contact, graphite brushes of a certain size are used.
DIY repair
In a home workshop, repairing a gearbox is not so difficult. Repair comes down to disassembling the unit into individual parts, checking the integrity of their structure, purging and lubrication, followed by reassembly. The process is divided into the following stages:
- Separating the gearbox from the engine and removing it (usually together with the chuck) from the screwdriver housing.
- Unscrewing the housing and removing the locking washer.
- Sequential removal of satellite gears and transfer plates (2 or 3, depending on the design).
- Removing the ring gear and checking the ball bearings (they can roll around the entire seal, but should not roll out beyond it).
After removing all the parts, they must be cleaned of “old grease,” wiped dry and made sure that they are not damaged.
Then the craftsmen recommend folding them in the reverse order “dry” and making sure that when the satellites rotate, the chuck spindle also rotates. If the rotation is carried out without twisting, then it can be assembled back.
First, bearings are placed in the recesses in the housing, onto which the ring gear is installed. Then, one at a time, the transfer plates are placed, with the satellites installed on them, and the locking washer is placed on top.
Screwdriver and its design features
You should start repairing a screwdriver yourself by becoming familiar with its design. The main element of a screwdriver is an electric motor. Screwdrivers come in both corded and cordless types. The use of a corded screwdriver is used less frequently, due to such a disadvantage as the need to connect the tool to a 220V network. Battery-type tools are more popular, as they allow you to carry out not only repair work at home, but also outside it.
The main components of a cordless screwdriver are:
- Frame. Typically, all screwdrivers are made of durable plastic.
- Start button. It is designed in such a way that the number of revolutions of the cartridge depends on the force of pressing it.
- Electric motor. Battery-powered tools use single-phase commutator-type and DC motors. The motor consists of a rotor, a stator in the form of magnets, and a brush assembly.
- Gearbox.
- Force regulator.
- Reverse switch.
- Battery. As a rule, it is removable and is often supplied with the product in duplicate.
- Cartridge. As a rule, quick-release chucks are used.
Frequent screwdriver malfunctions
In order not to forget how to reassemble a disassembled screwdriver, all parts must be placed in the order in which they were removed. Almost all screwdrivers have the same design, which means the faults are identical. This could be wear on bushings, brushes, or a collapsed bearing.
The tool does not turn on
It doesn’t matter what brand of screwdriver is Bort, Hilti, Pit, Sparky, Sturm, Soyuz, Whirlwind, Diold, Ermak, Zubr, Elti, Koln, Vortex or Patriot. First you need to make sure that the battery is working properly and make sure that there is a charge in the element
If the tool does not turn on, it may be:
- Lack of current in the network (for electric screwdrivers).
- There is no charge in the battery (for wireless models).
- The power button is faulty.
- Poor condition of the contacts in the battery connector or in the places where the brushes are attached.
Engine repair
The screwdriver is equipped with a motor placed in a special housing. The anchor and brushes are also located there. To check the condition of the engine, you need to disconnect the wires going to the start button. The resistance of the armature winding is measured with a multimeter. If the value is low, the device will indicate a short circuit. If the value is missing, it means it happened somewhere in the live wire. If the armature fails, the power of the screwdriver is lost and sparks appear during operation. This may be accompanied by smoke and complete shutdown of the unit.
Screwdriver motor
Replacing brushes
To replace the brushes, you need to disassemble the electric motor. Here you need to bend the clamps on the end of the motor and, lightly tapping the shaft with a hammer, knock the rotor off it. Then you should remove the cover and remove the faulty brushes. These items are considered consumables, so they are replaced with new ones.
Screwdriver gear repair
Sometimes during operation the screwdriver makes strange sounds. This is worn out teeth on the gear in the gearbox. In this case, you can grind a small bolt down to the desired size and insert it into the worn area. Before installation, the bolt must be capped.
Electrical faults - how to identify and fix them
A screwdriver is a universal tool and is suitable not only for working with fasteners. If the speed is adjustable, it can be used for drilling. It no longer surprises anyone that you can use a screwdriver to mix mortar or drill a hole during winter fishing.
Problems often occur in the electrical part of the unit:
- The screwdriver does not work when the power button is pressed.
- The reverse function does not work.
- The speed does not increase.
It makes no difference which screwdriver has the problem. If the tool does not start, you need to check the battery for charging. To do this, charge the battery for 1-2 hours and put it back on the screwdriver. If the unit does not turn on again, then diagnostics must be performed using a multimeter.
Screwdriver battery
Battery
Many users are interested in how to disassemble a screwdriver battery. Here you need to disassemble the battery case to remove the cassettes from several elements. These so-called “banks” supply the required voltage to the instrument. Without some dexterity and ability, it will not be possible to disassemble the battery. It is better to entrust this matter to people who are well versed in this matter.
Problems with the button
Most often, the contacts at the power button burn out. To clean them, you will need fine-grained sandpaper. This applies to the collapsible button. If the button is not removable, it is replaced with a new one. You can check the operation of the button with a multimeter. To do this, you need to disconnect the battery and connect a measuring device to the output terminals. If the start is correct, the multimeter will show a zero value.
Quick release mount
During operation, the quick-release fastener becomes clogged with dust, metal chips and sand. The cartridge begins to jam, extraneous noise and crackling appear. To troubleshoot problems, remove the lower coupling. Use a thin screwdriver to pry it clockwise. Then you need to remove the metal ring using a hammer and a long bolt. After disassembly, all elements of the cartridge must be cleaned and lubricated. The entire assembly is carried out in reverse order.
Before repairing, you need to study the design of the screwdriver
Post navigation
Screwdriver force regulator The force regulator is a clutch that limits the force when rotating the chuck. The torque control clutch ensures that rotation stops when the screw is screwed in, as it is accompanied by an increase in rotational resistance.
It is made in the form of a rotating plastic drum. If the speed controller does not work, it means the transistor has burned out and needs to be replaced.
For this purpose, you can gently lift the lid, noting the clear placement of the spare parts on the paper. When replacing, you need to ensure that the capacity and type of power element match. DC power is supplied from a battery, which is a set of elements housed in one housing. The diagram shows that when the contacts of the electromagnetic relay are closed, the positive voltage through the diode VD7 1N is supplied to the zener diode VD6 through the quenching resistor R6. The gearbox is driven by the rotor sun gear. Using a specialized chip Manufacturers of screwdrivers are trying to reduce prices for their products, often this is achieved by simplifying the charger circuit.
This means you should make sure to clean the device after each use - this is the only way to reduce the risk of failures during operation due to contamination of the tool. If the battery is good, then the next step is to check the power button.
If the elements of the printed circuit board are in good working order and do not raise suspicions, and the charging mode does not turn on, then you should check the SA1 JDD 2A thermal switch in the battery pack. Gearbox parts can be made of both plastic and metal.
By the way, the speed control button and the reverse control button are located in different places, so they will have to be inspected separately. The higher this indicator, the longer the screwdriver works.
In the first case, they are capable of exploding, and in the second, they will no longer be able to restore their capacity. If such elements are found, they should be dismantled and replaced with new ones. Screwdriver battery repair
Review of network model DSh-10/320E2 220.1.1.00
If you are thinking about the best Interskol screwdriver to choose, you should also consider network models that are not tied to operating time. You don't have to keep an eye on the battery charge indicator without fear that the charge will run out before you finish working.
The Interskol corded screwdriver mentioned in the subtitle will cost the consumer 2,900 rubles. It is used for drilling holes and driving as well as loosening screws and screws. Using a torque control clutch, you can set the tightening torque for a specific material.
Tool design features
A screwdriver is a hand-held electric tool for tightening or unscrewing screw-type fasteners. Its direct purpose is to work with screws. Quite often, a screwdriver is used as a drill (for drilling), which leads to its failure. The fact is that this device has a mechanism for braking torque under excessive load, and the rotation speed of its chuck is significantly inferior to the rotation speed of the drill chuck. This creates overloads that can lead to breakage and wear of parts.
Almost all such devices have the same operating principle and differ only in the design of the case and the placement of the elements. Any screwdrivers include a body, a working tool (chuck), electrical and mechanical systems. The cartridge belongs to the cam type and is installed on the main shaft, to which torque is supplied from the electric motor using a gearbox.
Screwdriver device: 1 – switch; 2 – reverse device; 3 – transistor; 4 – engine; 5 – gearbox.
Electrical power to the device is provided from the mains or built-in batteries. The electrical system consists of an electric motor, a push-button starting element with a power regulator and a device that provides reverse. The heart of the tool is a single-phase commutator-type motor with a voltage of 220 V. It is started using a capacitor, and the voltage is removed from the contact brushes.
The power button is combined with a speed controller, the basis of which is a transistor (generator) installed on the control board. When the start button is pressed differently, the signal that opens the transistor changes, which accordingly changes the voltage at the input of the electric motor.
The mechanical component consists of a gearbox and a force adjustment mechanism. A planetary gearbox transmits torque from the electric motor shaft to the main shaft with a decrease in rotation speed. The gearbox contains ring and sun gears, satellites and carrier. The ability to control the shaft speed depends on the number of stages (satellites). Typically gearboxes with 2-3 stages are used.
The force regulator provides the required load on the screw under different operating conditions of the tool. Up to 16 positions are available, which optimizes screw driving into materials of varying densities. The mechanism relieves the load when the screw is fully tightened. In the mechanical subsection of a screwdriver, special mention should be made of the important role of bearings, which ensure smooth running of rotating parts.
Screwdriver body
The classic design of screwdrivers implies the presence of a plastic body. This design allows you to reduce the weight of the tool and reduce its cost. Only a few instruments have a stainless steel body. It is characterized by increased impact resistance.
For ease of use, the screwdriver body consists of two parts. It usually takes the form of a pistol, equipped with a comfortable handle where the trigger button is located.
How to extend the life of an instrument?
If you are purchasing a screwdriver seriously and for a long time, it is better to pay attention to popular brands. There are a large number of service centers and spare parts available.
But, like any mechanism, a screwdriver needs care and timely maintenance.
First of all, the tool should be protected from dust, dirt, falls and adverse weather conditions. Always use your original charger. A constantly disconnected ratchet will cause rapid wear of the limiting clutch. At the same time, long-term operation of the ratchet will not lead to anything good.
The screwdriver should be stored according to the instructions. It is advisable to place the instrument vertically to prevent it from falling. Before starting work, both batteries are charged, provided that the second one is included.
History of the device
A screwdriver is a power tool. Its main purpose, as the name suggests, is to tighten or unscrew fasteners. After the invention of the electric drill in 1868, the development of power tools became widespread. Founding companies DeWALT, Bosch, BlackDecker, Makita and Hitachi developed the industry by creating new devices.
Why does a screwdriver crack? Repairing a screwdriver gearbox, how to repair a gearbox on a screwdriver?
The introduction of the Phillips head screw in 1934 created a demand for electric tools to tighten them. It was especially in demand in mechanical engineering. The first device of this kind was called a wrench. With the advent of batteries, the device gained mobility, and the name Screwdriver came into use. Its mass production began in the early 80s.
Modern devices are constantly improving, but to a greater extent this relates to the method of autonomy and control. The design of the device remains unchanged.
Disassembling a screwdriver
Most often, in order to find a fault and repair the device, you will need to disassemble it. Since all devices are similar in appearance, resembling the shape of a pistol, their disassembly can be presented in the form of recommendations given for repairing an Interskol screwdriver:
- First of all, the battery pack is disconnected. To do this, you need to press the latch and unfasten the module.
- Unscrew all the screws around the perimeter of the device using a Phillips screwdriver.
- After unscrewing the screws, the two halves of the housing are separated, while holding the structural parts installed in the grooves.
- The speed switch, start button and reverse mechanism are carefully disconnected.
- The gearbox is removed from the removed half. To remove it, you will need to rotate the gearbox in its seat.
Assembly occurs in reverse order. In this case, it is necessary to ensure that all removed elements and wires are located in specially made recesses for them.
To lubricate the mechanical parts or restore the gearbox, the latter often has to be disassembled. To do this, first remove the protective plate, then unscrew the screws in a circle and remove the top cover. Viscous materials are used as lubricants, for example, Litol
It is important to note that it is almost impossible to carry out serious repairs to a screwdriver gearbox with your own hands, since gears are not produced separately by manufacturers. Therefore, if it is damaged, you will have to replace the entire unit.
The next element that has to be disassembled is the cartridge. It is a quick-clamping design that is secured with a threaded connection, a screw, or a Morse taper. With the first method, you will need to unscrew the fastener using a hex key, and then, placing the key in the chuck, tighten it tightly. The cartridge is unscrewed by turning the key.
With the second type of connection, use a screwdriver to unscrew the screw located in the middle of the chuck jaws counterclockwise. Next, having installed and clamped the L-shaped key in the jaws, with a sharp movement the key must be turned counterclockwise. Removing the fastener using a Morse taper occurs by carefully striking the end of the cartridge.
Read also: Doorbell evology instructions
Rechargeable battery with locking button
Since the screwdriver can be cordless and wired, the power supply system in them is different. The cordless screwdriver has a built-in rechargeable battery, which is a device with built-in external contacts for transmitting electricity. The main element of the battery is its power supplies connected in series. Otherwise they are called banks, sample in the photo.
It also has a thermostat that protects the battery from overheating when charging. The rechargeable battery is a removable device, since it must be replaced as the resource is exhausted. The battery is attached to the screwdriver with a locking button, which is located on the side in some models, and in the front in others. From the handle extend contact plates that connect to the battery and provide power.
Finding the cause of the breakdown and eliminating it
The final breakdown of a tool is often accompanied by preliminary events, by paying attention to which you can prevent a serious malfunction: the appearance of extraneous sounds, sparking, burning odors, increased vibration, rapid battery discharge. By disassembling the device, you can understand which unit is faulty
All device problems are divided into two types:
By disassembling the device, you can understand which unit is faulty. All device problems are divided into two types:
- electrical;
- mechanical.
Each type has its own primary characteristics, by which the damaged part can be easily determined. A special type of problem is related to the battery. The nature of the failure is due to the fact that the battery is quickly discharged, or the device does not want to start at all.
The battery is disassembled by removing its latches from the grooves. Under the casing there are elements with a container. Their connection to each other is made by contact welding. You can use a multimeter to measure the voltage on each bank. The normal value of a charged cell is 1.2 volts. Faulty elements are removed - to do this, they are carefully bitten off with pliers at the point of contact, and similar ones are installed in their place. If there is no welding, you can use a soldering iron. Then the battery must be assembled and installed in a screwdriver for testing.
But the problem is not always related to the battery. For example, when repairing a Bosch screwdriver with your own hands, you often find damage to the charger circuit, not the battery. Repair of the charger consists of testing the radio elements. First of all, the mains fuse and rectifier bridge are checked.
Usually, when opening the charger case, external signs in the form of blackening of radio elements or a PCB board immediately show which element requires replacement. Most often, transistors located on radiators and the operational amplifier fail.
Source
Trigger switch and LED lighting
The trigger switch is located between the top of the housing and the handle. It is located under the master’s index finger, and it is convenient to use it to put the tool into operation. The trigger button closes the electrical network of the screwdriver and starts the electrical mechanisms.
The photo shows the device of the trigger button.
Some models of screwdrivers have built-in LED lighting that illuminates the work area. This is prudent and convenient, since in dimly lit areas it can be difficult to see the screw slot. In the model shown in the picture, the backlight is located in the lower part of the body above the trigger; in some Western European models it is located on the leg above the battery.
Requirements for lubricating fluids for angle grinder gearboxes
The master decides for himself how to lubricate the grinder gearbox. There is no universal remedy - you need to select your own liquid for a specific tool. A properly selected lubricant must meet a number of requirements, including:
- be resistant to corrosion;
- consist of natural components - including ensuring that it does not harm the artist when inhaling vapors;
- reduce the friction force of gears, and, accordingly, the heating temperature of the tool;
- the consistency should be thick enough to stick to the parts, but with a viscosity not higher than 800 Pa s;
- the consistency must remain stable and not change, “melt” or flow out of the mechanism when the temperature rises - the minimum dropping temperature is +120ºС;
- ensure the operation of the tool in the range of up to +150 ºС;
- The presence of metal impurities in the composition is not allowed;
- tensile strength of at least 120 Pa;
- be hydrophobic, have water-repellent properties;
- protect the “insides” from dirt and dust.
Review of lubricants for grinders
If you lubricate a working tool with lithol or grease, saving on materials, there is a high probability that, ultimately, the equipment will refuse to work properly, no matter how high quality it is.
Some resources claim that preparing a liquid that satisfies all of the above points will not be difficult even at home. In one case, it is recommended to use lubricant for SDC in combination with MS-20 oil, in another case it is proposed to use a mixture of substances Tsiatim-221 and TAD-17. Despite numerous positive reviews, in both cases the consequences can be unpredictable - the manufacturer hardly took into account the possibility of filling the gearbox of a technical device with compounds that were not reassigned for it.
Foreign companies recommend to craftsmen how to lubricate the grinder, offering specially developed ointments. The manufacturer strongly recommends the use of exactly the products specified in the operating instructions. They are indeed present on the Russian market, but at a fairly high price. In this regard, the question of high-quality lubricants from domestic manufacturers arises:
- if the original imported lubricant contained molybdenum, you should look for an analogue labeled “MoS2”;
- “NLGI2” - for industrial tools and others operating on liquids of the second viscosity class (penetration - 265-295);
- "ISOL-XBCHB 2" for ISO standard;
- "DIN 51825-KPF 2 K-20" for DIN standards.
Among Russian lubricants, materials from the company Interskol stand out, which has been producing and servicing power tools for a long time. Such lubricants, “tailored” to the specific features of the equipment, not only ensure first-class operation of the gearbox and meet many of the stated requirements, but are also pleasantly priced. Thus, a tube of lubricant will cost the buyer no more than 100 rubles, while the same lithiol costs only half as much. Whether it makes sense to save money in this case, or is it easier to pay a little more but get a quality product? It’s up to each master to decide.