A homemade winch is designed to facilitate heavy manual labor when cultivating the soil and can replace any walk-behind tractor or cultivator. With its help, you can plow the soil under the beds, plant, harrow, hill, dig up potatoes.
The agricultural winch allows you to carry out a full cycle of soil cultivation when growing potatoes. The unit helps preserve and maintain soil fertility, which leads to maximum yield.
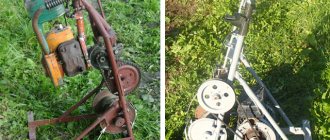
In the distant 90s, a plowing winch was created based on the engine from the Ural, Druzhba chainsaw, and it still serves faithfully to this day. Changes and improvements concerned mainly the plow. The video below clearly shows these changes. See winch drawings here. Gradually the idea came to create an electric analogue. And this is what happened, see the video and photos below.
A winch was made - a walk-behind tractor from scrap materials using standard publicly available parts and ordinary materials (electric motor 2.2 kW 1500 rpm, pipes, angles, sprockets and chains from motor vehicles).
Electric plowing winch
The motor is three-phase and connected to a single-phase 220 V network. This power is enough for plowing, hilling, and digging up potatoes. If you buy a motor for a single-phase network, you can plow virgin soil. And in my modification for plowing virgin soil, I used a block that reduces the plowing speed by half, but also increases the effort.
A single-phase motor costs more than 10,000 rubles. We are talking about the city of Smolensk, so a 3-phase one was installed. In addition, people who were faced with rewinding a single-phase motor faced big problems. A 3-phase motor is in practice more reliable - it can operate continuously for years.
The principle of working with an agricultural winch is to sequentially plow the land with the plow returning to the beginning of the furrow. It is advisable to carry out the work together, but if necessary, it is possible to do it alone. In this case, it is possible to apply fertilizer (humus) directly into the furrow.
Even the turf (virgin soil) can be plowed. At first, a classic homemade plow with handles was used, which required basic plowman skills and weighed a couple of kilograms more than the modernized one.
Electric and petrol winch
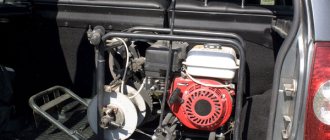
(the wheels on the winch are used only for transportation around the site)
Parts that need to be turned on a lathe or purchased at a motorcycle parts store.
The host of the “Smart City” channel spoke about the construction of a homemade electric winch, which he uses to plow the land. Engine 1.1 kilowatt. 220 volt. Gearbox for 40. Fastened with a belt drive. Electromagnetic starter. Remote Control. Capacitor. The entire structure is mounted on one frame. The diagram can be found on the Internet. This device for plowing a vegetable garden is made with your own hands.
The gearbox is attached with an angle to the frame with the possibility of adjustment. Grooves have been made. And after that the drum. Made from pipe 150. Flanges are welded to the pipe. The video shows how the shaft passes through the drum and how it is attached. Reverse done. To unwind the cable, you had to put it in reverse and it would unwind. This happens for a very long time, so we decided to make the drum spin back to idle. They pulled out a shaft with a diameter of 35. The bearings can be different, here they are 36. This shaft will be tightly welded to the drum.
We took them from the front, outer grenades, because they have a long slotted part. The hub itself can be selected. But the internal ones are thick, you can’t pick anything up. The grenades have an internal clip, everything fits. Two clips are welded and you can make one common one. We sharpen the adapter sleeve onto the gearbox. We insert one part of the grenade under welding. Then the front hub.
The electric winch gearbox rotates, the hub connects two front shafts. Fully drum. When we move the hub, everything rotates separately. We don’t touch the gearbox, but unwind the cable and the drum moves at idle. You need to connect the shaft again. We translate, and all the mechanics spin together. Details about the plowing device are in the video posted at the beginning of the publication.
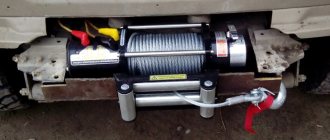
The proposed homemade plow-electric winch (see illustration) has a number of additional advantages associated with the relative cheapness of electricity, ease of acquisition and long life (over 30 years) of trouble-free operation of the electric motor, ease of start-up and operation of the entire structure. The gearbox speed control lever is located in close proximity to the unit with electrical equipment (capacitors, magnetic starter, “Start” and “Stop” buttons). Next to it is a coil of cable on a reel.
So the electric winch can be anchored anywhere on the land plot at a distance of up to 100 m from its connection to the power grid (with a longer cable length, line losses increase). And the built-in remote control with a “Stop” button allows you to control and plow, even working together with a disabled person. When a boulder or tree roots get under the plow , the force on the rope increases sharply.
And when it becomes the maximum permissible (330 kgf), the winch electric motor stops, preventing the rope from breaking (as well as breaking the chain transmission mechanism). And one more feature. Thanks to the modular design, if necessary, you can easily remove the engine and the unit with electrical equipment from the electric winch (it is enough to unscrew 4 M10 bolts) and, installing them on an electric sawing machine, start preparing firewood, slats, timber, etc. By rearranging these same block units onto the grass cutter, we obtain valuable, vitamin-rich feed for livestock and poultry.
Well, having replaced the plow with a towed cultivator-hiller, the same electric winch can be used not only for weeding and hilling, processing row spacing, but also, say, for digging potatoes. Kinematics? The proposed home-made design is so elementary (and therefore reliable) that it is unlikely to cause anyone any difficulties when “incarnating it in metal.” From the electric motor shaft, the torque is transmitted (a sleeve coupling is used for this) to the gearbox (taken from the Riga moped with subsequent minor modifications).
And from there (thanks to a chain drive with a pitch of 12.7 mm) - onto a drum with a 10-mm nylon rope wound onto the last one, to the end of which a towed plow or cultivator-hiller (aka potato digger) is connected. The frame is based on a welded structure made from sections of 34x50 mm steel angle with a tubular spar and brackets for mounting the electric motor, gearbox and drum.
Moreover, the rope guide, made from a suitably bent section of a 22×3 steel water-gas pipe, is welded after installing the drum. And in the brackets of the latter, boring holes are provided for the shaft with the possibility of some movement of the shaft to ensure proper tension of the PR-12.7 drive roller chain. The anchor structure is also welded (see figure).
Description
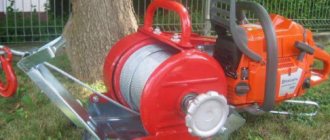
The winch turned out to be compact and easy to use. Fuel consumption of a small 2-3 liters is enough for a fairly large plot of land. The fuel tank was borrowed from a chainsaw. The chassis is made of a drive sprocket (mounted on the engine), a chain and a driven sprocket (mounted on the drum) all from a motorcycle.
The engine is mounted on the frame in one position and does not move along the frame. The drum is installed on the frame using four bolts and nuts. Special longitudinal holes are cut for it so that the drum moves along the frame and with this the chain tension is adjusted. To create a homemade winch for plowing, not only parts from various motorcycles were used, but also parts made by hand.
Operating the plowing winch is very simple; anyone driving a motorcycle will figure it out very quickly. Controls like those on a motorcycle. On the left side is the clutch control lever, on the right is the throttle control handle and the ignition switch. The speed can be switched on either with your foot or with your hand. It's even more convenient to use your hand. It is advisable to plow at first speed. The homemade plowing machine starts up like a motorcycle.
Drawings of a homemade winch for plowing land. DIY electric plowing winch
For personal plots, it has become popular to use a homemade winch when plowing. Do-it-yourself homemade products are preferable. Let's consider a winch for plowing as a donor, which was the Minsk motorcycle.
The engine with a displacement of 125 cm3 is not too heavy and the power is quite enough. Anyone who has used a Minsk motorcycle knows that the engine starts very easily and without fail. Reliable in operation, repairs are not expensive.
Spare parts are available and there are no problems with them.
Description
The winch turned out to be compact and easy to use. Fuel consumption of a small 2-3 liters is enough for a fairly large plot of land. The fuel tank was borrowed from a chainsaw. The chassis is made of a drive sprocket (mounted on the engine), a chain and a driven sprocket (mounted on the drum) all from a motorcycle.
The engine is mounted on the frame in one position and does not move along the frame. The drum is installed on the frame using four bolts and nuts.
Special longitudinal holes are cut for it so that the drum moves along the frame and with this the chain tension is adjusted.
To create a homemade winch for plowing, not only parts from various motorcycles were used, but also parts made by hand.
Operating the plowing winch is very simple; anyone driving a motorcycle will figure it out very quickly. Controls like those on a motorcycle.
On the left side is the clutch control lever, on the right is the throttle control handle and the ignition switch. The speed can be switched on either with your foot or with your hand. It's even more convenient to use your hand.
It is advisable to plow at first speed. The homemade plowing machine starts up like a motorcycle.
Motorized winch: we make a drum for the cable with our own hands
It is most often made from the rear wheel hub of a motorcycle. Again, the same “Belarusian” can be used as a “donor”. More complex, but less expensive in terms of financial costs, would be the option of making a drum from a pipe.
Since the speed of a moving plow when loosening and plowing the soil on a future tool will be about 5-8 km/h, the gear and diameter of this device must be selected in such a way that the device has enough speed during nominal operation in 1st gear.
When you make a motorized winch with your own hands, its design also includes a gas tank. No, we won’t install it from a motorcycle; you can simply mount the container from a chainsaw.
The amount of fuel consumed by the winch engine is not so large that a 10-liter gas tank can be used.
Plowing winch parts
Main details of the homemade product:
1 — Fuel tank from a Ural chainsaw; before installation, we saw off the handles and fastened them to the frame. 2 - Ignition coil. 3 - Electronic switch 4 - Homemade rectifier unit for connecting an electric motor. For cooling. 5 - The frame of a homemade winch for plowing consists of angles, profile pipes and just pipes.
6 — To purify the air, we used an air filter from the IZH Planet-Sport motorcycle. 7 - Homemade winch drum. 8 - Homemade muffler, made of a 1mm thick iron sheet, bent into a pipe and welded.
9 - Hooks on the ground to hold in one place.
10 — Electric motor for forced cooling of the engine.
How to make a walk-behind winch frame
Open photo How to make a walk-behind winch frame in an enlarged view. If this is a drawing or diagram of a device, you can download it to your computer by opening it in large size and using the “Save picture as” function. "(right mouse button). Please rate this material by highlighting the appropriate number of stars.
Most often, together with this material on the topic
“Design and fastening of the main components of the winch walk-behind tractor”
You can view all photographs, drawings, pictures and diagrams from the category “Homemade walk-behind tractors from chainsaws” by clicking on the link.
You will find even more materials with descriptions of how to make your own motor-cultivator and accessories for it in the section “ Photos of home-made walk-behind tractors ” or by selecting from all materials on the motoblok website.
populjarno.com by the following TAGS: walk-behind winch, units, Frame, from a chainsaw.
Perhaps what you are looking for is in one of the most viewed sections of our website:
DRAWINGS AND PHOTOS OF HOMEMADE MOTOR-BLOCKS and ATTACHMENTS (CLICK ON THE PICTURE or name):
Motorized winch: we make a drum for the cable with our own hands
It is most often made from the rear wheel hub of a motorcycle. Again, the same “Belarusian” can be used as a “donor”. More complex, but less expensive in terms of financial costs, would be the option of making a drum from a pipe. Since the speed of a moving plow when loosening and plowing the soil on a future tool will be about 5-8 km/h, the gear and diameter of this device must be selected in such a way that the device has enough speed during nominal operation in 1st gear. When you make a motorized winch with your own hands, its design also includes a gas tank. No, we won’t install it from a motorcycle; you can simply mount the container from a chainsaw. The amount of fuel consumed by the winch engine is not so large that a 10-liter gas tank can be used.
Plowing winch parts
Main details of the homemade product:
1 — Fuel tank from a Ural chainsaw; before installation, we saw off the handles and fastened them to the frame. 2 - Ignition coil. 3 - Electronic switch 4 - Homemade rectifier unit for connecting an electric motor. For cooling. 5 - The frame of a homemade winch for plowing consists of angles, profile pipes and just pipes.
6 — To purify the air, we used an air filter from the IZH Planet-Sport motorcycle. 7 - Homemade winch drum. 8 - Homemade muffler, made of a 1mm thick iron sheet, bent into a pipe and welded.
9 - Hooks on the ground to hold in one place.
10 — Electric motor for forced cooling of the engine.
How to make a walk-behind winch frame
Open photo How to make a walk-behind winch frame in an enlarged view. If this is a drawing or diagram of a device, you can download it to your computer by opening it in large size and using the “Save picture as” function. "(right mouse button). Please rate this material by highlighting the appropriate number of stars.
Most often, together with this material on the topic
“Design and fastening of the main components of the winch walk-behind tractor”
Perhaps what you are looking for is in one of the most viewed sections of our website:
DRAWINGS AND PHOTOS OF HOMEMADE MOTOR-BLOCKS and ATTACHMENTS (CLICK ON THE PICTURE or name):
Comments on the material “ Homemade winch for plowing a garden using a Druzhba chainsaw ” are located at the bottom of the page - here you can express your opinion, ask for advice from visitors to our site, share interesting materials, talk about your positive or negative experience in assembling walk-behind tractors and trailed equipment with your own hands . If you have questions or suggestions about this material, please leave your comment below. Those who want to share their photos using the keywords “frame design, walk-behind winch, chainsaw, device” or any other questions about diesel, gasoline, light, medium or heavy home-made walk-behind tractors, motor cultivators and attachments for them need to register and use the link “Add photo. "(visible after registration on the page of all Photo Albums of walk-behind tractors and attachments ).
| Photo dimensions: 1709px by 897px; 306.3 Kb
Plowing winch drum
The drum is the main part. A cable is wound around it and how this happens depends on the work of the homemade product. The first time we made guides for winding. After a short time of operation, they refused because, when the cable came into contact with the guides, it quickly wore out and broke. You just need to install the winch during operation directly in the direction of the unwound cable. The cable began to be wound exactly ring to ring and lasted many times longer. The dimensions of the pipe on which the cable is wound are 108 mm in diameter. Pipe width 100 mm. The pipe is driven by a bolted sprocket.
The parts from which the plowing winch drum is assembled: 1. The base is welded from pipes and two flanges; 2. flange for sprocket installation; 3. driven sprocket from the Voskhod motorcycle; 4. bolts with nuts and engravers for fastening the sprocket; 5. washer for securing the cable; 6. bolt for securing the cable; 7. bearings 204;
8. spacer between bearings; 9. an axis that holds all the parts together; 10. axis engraver; 11. axle nut; 12. fasteners for fastening to the frame; 13. spacers between the bearing and the strut, welded to the strut; 14. stands on which the winding pipe is held and secured.
15. bearing seats.
A real winch - a “horse” for a plow
I have a small plot of land for vegetables.
I process it with a milling cutter every spring. We even plant potatoes using our own method. But the soil needs to be dug up before winter. Of course the work is not easy. For this purpose (ploughing) a plow was made, which requires a “horse”. The manufactured winch became such a horse. The pulling force of which is more than enough for such work. Having thought through the design, calculating the parameters, I assembled (from what I had) the necessary hardware. Having estimated the bases for the required “set”.
I placed the main components on the base. Everything seems to be normal, I like it.
Then he began to implement the project, collecting everything into a “pile.”
This is what came out of this “venture”. First of all, it was necessary to make a reliable “stop-anchor” connection with the ground. It had to be retractable (when necessary) and securely secure the winch when loaded.
The gearbox is “connected” to the winch drum by a chain.
The cable is wound onto the winch drum and is guided (laid) manually using an appropriate mechanism. Without it, installation proceeds “spontaneously,” which leads to distortions and damage to the cable. And with the help of a lever, the winch operator easily controls this process. And here is the finished field. Ready for winter.
For “servicing” two people are required, a winch operator and a plowman. You can do it alone, but it will take longer and be more difficult. Good luck to all. Delivery of new homemade products to the post office
Receive a selection of new homemade products by email. No spam, only useful ideas!
*By filling out the form you agree to the processing of personal data
Become the author of the site, publish your own articles, descriptions of homemade products and pay for the text. Read more here.
Drive sprocket installation
There are several options for fixing the star on the flange. The first and fastest is, of course, done by welding. But not the most practical. After welding, the metal may become softer. Yes, and you have to work with the earth, which ends up on the chain and sprockets. As a result, wear and tear occurs intensively. Replacing a welded star is quite difficult.
You need to choose a method in which the replacement should be convenient. For this purpose, a third flange is installed (welded) on the drum base. Holes with a diameter of 8 mm are drilled on the flange, onto which the sprocket is fixed. The drive is carried out by a motorcycle chain.
The host of the “Smart City” channel spoke about the construction of a homemade electric winch, which he uses to plow the land. Engine 1.1 kilowatt. 220 volt. Gearbox for 40. Fastened with a belt drive. Electromagnetic starter. Remote Control. Capacitor. The entire structure is mounted on one frame. The diagram can be found on the Internet. This device for plowing a vegetable garden is made with your own hands.
The gearbox is attached with an angle to the frame with the possibility of adjustment. Grooves have been made. And after that the drum. Made from pipe 150. Flanges are welded to the pipe. The video shows how the shaft passes through the drum and how it is attached. Reverse done. To unwind the cable, you had to put it in reverse and it would unwind. This happens for a very long time, so we decided to make the drum spin back to idle. They pulled out a shaft with a diameter of 35. The bearings can be different, here they are 36. This shaft will be tightly welded to the drum.
We took them from the front, outer grenades, because they have a long slotted part. The hub itself can be selected. But the internal ones are thick, you can’t pick anything up. The grenades have an internal clip, everything fits. Two clips are welded and you can make one common one. We sharpen the adapter sleeve onto the gearbox. We insert one part of the grenade under welding. Then the front hub.
A homemade winch is designed to facilitate heavy manual labor when cultivating the soil and can replace any walk-behind tractor or cultivator. With its help, you can plow the soil under the beds, plant, harrow, hill, dig up potatoes.
The agricultural winch allows you to carry out a full cycle of soil cultivation when growing potatoes. The unit helps preserve and maintain soil fertility, which leads to maximum yield.
In the distant 90s, a plowing winch was created based on the engine from the Ural, Druzhba chainsaw, and it still serves faithfully to this day. Changes and improvements concerned mainly the plow. The video below clearly shows these changes. Gradually the idea came to create an electric analogue. And this is what happened, see the video and photos below.
A winch was made - a walk-behind tractor from scrap materials using standard publicly available parts and ordinary materials (electric motor 2.2 kW 1500 rpm, pipes, angles, sprockets and chains from motor vehicles).
Electric plowing winch
The motor is three-phase and connected to a single-phase 220 V network. This power is enough for plowing, hilling, and digging up potatoes. If you buy a motor for a single-phase network, you can plow virgin soil. And in my modification for plowing virgin soil, I used a block that reduces the plowing speed by half, but also increases the effort.
A single-phase motor costs more than 10,000 rubles. We are talking about the city of Smolensk, so a 3-phase one was installed. In addition, people who were faced with rewinding a single-phase motor faced big problems. A 3-phase motor is in practice more reliable - it can operate continuously for years.
The principle of operation of an agricultural winch is to sequentially plow the land with the plow returning to the beginning of the furrow. It is advisable to carry out the work together, but if necessary, it is possible to do it alone. In this case, it is possible to apply fertilizer (humus) directly into the furrow.
Even the turf (virgin soil) can be plowed. At first, a classic homemade plow with handles was used, which required basic plowman skills and weighed a couple of kilograms more than the modernized one.
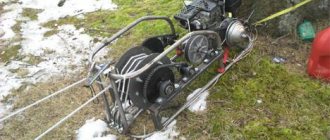
Electric and petrol winch
(the wheels on the winch are used only for transportation around the site)
Parts that need to be turned on a lathe or purchased at a motorcycle parts store.
At home I had an old, dusty and oily 4-40 worm gearbox with a reduction ratio of 1:40, which served as the basis for the winch. This, by the way, can be found at a flea market for a low price and in good condition.
Having completely disassembled it and washed it in gasoline to remove oil deposits, which looked more like black plasticine, I decided to immediately change the seals. As a replacement, I used oil seals from a VAZ family car. I changed all the gaskets (replacement ones were cut out of paronite 0.6 mm thick), and adjusted the gap between the worm and the gear. I filled in the transmission oil and the gearbox was like new.
To determine what size drum would be needed, I first welded a frame from a 40x40x4 mm angle piece measuring 75x30 cm.
At first I thought that the cable from the drum would be unwound using the engine reverse, but this turned out to be very time-consuming and inconvenient; manually it is much easier. But for this it was necessary to come up with a coupling with which it would be possible to separate the gearbox shaft from the drum shaft and thereby unwind the cable effortlessly to the required length of the garden. And while the winch is operating, I connect the gearbox to the drum, and both shafts work together.
The coupling was made from the front CV joints (constant velocity joints) and the front hub of the VAZ 2108. The CV joint shafts have external splines identical to the internal splines of the hub. They will engage with each other. I purchased used CV joints and a hub at a scrap metal collection point (the nearest auto repair shop did not have them at that moment). I immediately cut off two parts of the shaft from the CV joint - these are what are needed to make the winch shaft (Fig. 3).
Then I started making a drum on which the cable would be wound. From a piece of pipe with an outer diameter of 114 mm I made two flanges 5 mm thick. At a metal depot I bought round steel (round timber) with a diameter of 35 mm - it served as a blank for the shaft. A round piece with a diameter of 90 mm became a blank for the drum bearing housings. By the way, keep in mind: when buying metal at a metal depot (if they cut it for you with a propane cutter), do not immediately throw it into a container of water. This metal is difficult to turn. I also had to buy a pair of 306 series bearings - these will withstand the load created by the plow.
Arriving home and drawing a drawing of the future shaft on a piece of paper (Fig. 1), I went to the turner. The time has come to collect all this into a single mechanism. I’ll say right away that winch housings can be found both ready-made and used. But there are no such stores in my city, so I asked the turner to also turn out the housing for the unit (Fig. 2).
Taking flanges with holes cut in the center for the outer diameter of the shaft, I welded them to a piece of pipe with a diameter of 114 mm. Then, passing the machined shaft through the flanges of the drum, centered it so that there was a small gap between the flange and the bearing housing, and welded the drum to the shaft. The splined shaft of the CV joint was inserted into a machined hole in the end of the drum shaft and carefully welded. I made the same slots on the gearbox. This required a second splined CV joint shaft - it was fixed to the gearbox through a machined bushing.
I made the fastenings of the gearbox and drum to the frame from a 50x50x5 mm corner. I fixed everything with tacks, because it all needs to be aligned. I welded a 50x50 mm angle to the turned bearing housings (Fig. 5): now they can be secured to the frame with bolts and easily removed if repairs or replacement of bearings is needed.
It is very important to position the housings so that when the winch is operating, the entire traction force from the housings falls not on the welding seam, but on the corner (photo 4). Then the case will not come off, the corner will provide a large margin of safety.
I aligned all the machined parts so that the hub moved freely and did not jam (photo 5), then I lightly secured it with welding, and when I was sure that everything was installed correctly, I welded it properly.
You can fix the winch on the ground using two short pieces of pipe welded. You just need to pass reinforcement or metal rods through them and drive them into the ground.
Probably every owner has one, and its power and 6500 rpm allow it to cope with any load during plowing and hilling without the slightest sign of overheating. I secured it simply - with two bolts in the holes intended for installing the handle. Instead of a cutting disc, I installed a threaded pulley - and everything works great. The pulley, by the way, can be turned by a turner, or it can be made much cheaper: find a suitable pulley in scrap metal and, having precisely centered it, weld a nut for clamping the disk from the same grinder. The belt was used from the generator of a VAZ-2101 car. The grinder is tightened using the force applied by hand (photo 6).
Everything is prepared, all that remains is to attach the cable to the drum with a bolt and wind it evenly. I took the cable with a thickness of 4 mm: this one confidently copes with its task, although if your soil is heavy, it is worth taking a 5 mm one, with a margin. I made the plow and hiller (photos 7-9) myself, since those offered on the market were not satisfactory in quality. Drawings of the plow and hiller are in Fig. 4-7. Having a welding machine, a grinder, a hammer and suitable material on the farm, it is not difficult to make a plow and hiller.
DIY plow drawings
After I got a self-made agricultural winch, which is used for plowing the garden, the question became: should I buy a plow or make it myself? Walking through the shops and bazaar of Smolensk, you get a strange feeling that the plows produced by the industry for walk-behind tractors are a sad sight.
And these industrial creations are suitable only for “picking” and not for plowing the land, and even with the rotation of the layer, and regarding the depth and width of plowing, we can conclude that for planting potatoes with a distance between rows of 60 cm, not one of the proposed ones is suitable in the plow trade. Either our manufacturers are saving money, or the power of the most popular walk-behind tractors is not enough to work with a normal plow with a working width of 30 cm. When planting potatoes, you shouldn’t plow one furrow three times. And the price wants to leave the best - under 2 thousand. rubles (for a couple of pieces of iron from a scrap metal collection point).
The next step to find something useful is to search the Internet. To my surprise, there are 3-4 original descriptions with drawings floating in the vastness of the Russian-language network (this fact surprises me very much). The next step is to look at what those around you are using. It was not possible to buy a suitable plow; the decision was made to make a plow with our own hands. Based on the fact that the plow was supposed to be used for planting potatoes with a winch for plowing, the following requirements are imposed on it:
1. Plowing width – up to 30 cm.
2. Plowing depth -10-20cm.
3. The plow must hold the furrow itself, without digging in or jumping out of the furrow. The geometry of the plow must ensure movement with the specified parameters without the help of a plowman.
4. Possibility of adjusting the depth and width of plowing.
5. Minimum weight and sufficient strength.
My uncle has been using his homemade motorized winch for plowing for more than 10 years and has tried several options. For the last few years, he has settled on an option optimized for a homemade motorized winch for the garden, namely for planting potatoes with a distance between rows of 60 cm. There is also a homemade hiller for a motorized winch and a homemade potato digger, all this can be viewed on the corresponding pages of the site.
Plow drawing
Field board drawing.
The blade is bent according to this template until the two profiles coincide and then welded at an angle.
Using a drawing of a homemade plow, you need to draw a template for the plow pattern on thick paper, and then transfer the picture to metal and cut out the blank with a grinder. Personally, I used stainless steel material with a thickness of 1.8 mm. Many often use a sheet of 2-3 mm. The cutting part of the plow is reinforced with a strip of thicker metal. Someone suggests using a disk from a circular machine for these purposes, or a spring from a “Muscovite”. From personal experience, if you plow a summer cottage plot for a family of 4 people in the spring and fall, cultivating six acres, you shouldn’t strive for super-strength. It is more profitable to make a plow that is light but strong enough for its tasks. It’s better to repair or replace something after 10 years, and only if necessary, than to carry around the heavy structure of a homemade plow for 10 years. There is no need for excess weight.
This is what the plowing width adjustment system looks like. By rearranging the large wheel, you can change the plowing width within significant limits. When I plant potatoes, I set the grip to 30 cm, in two passes the distance between the rows is 60 cm. For autumn plowing of the garden or when plowing virgin soil, I use a smaller grip. The small wheel is made so wide that the plow does not press into the ground.
Having looked at the pictures below, you can imagine the basic principles of operation of a homemade plow, or rather a guide system that allows the plow, without the participation of a plowman, to move strictly in a straight line at the established plowing depth and width. The plowing width is regulated by moving the large wheel, which, when the point of application of the traction force is shifted as shown in the figure, is pressed against the furrow, which allows the plow to repeat the direction of the previous furrow. The plow turns slightly, which increases the plowing width. In fact, the width of the nose in the direction perpendicular to the axis of movement of the plow is less than 300 mm, however, the specified width is available for plowing.
The plow wheel runs along the bottom of the plowed furrow and this situation is observed from the previous furrow to the next. As a result of the application of traction force, a force is exerted to deepen the plow until the plow is aligned with the axis of the wheel, as shown in the figure, as a result, all forces are balanced, and the system operates very stably. Rough adjustment of the plowing depth is carried out by selecting the appropriate difference in wheel diameters, and smooth adjustment is carried out by adjusting the tilt of the plow. At this stage, there was no longer any need to use handles to control the plow, except for some special plowing conditions.
Plows not only loose soil as in the video, but also virgin soil
Do-it-yourself universal all-terrain vehicle made from a walk-behind tractor
To use it as a tractor, the machine plows, cultivates, and mows grass. By the way, for mowing grass, the author made an interesting mower from a friendship chainsaw tire, such a mower takes grass and weeds of various thicknesses. A winch is installed at the rear for lifting the hitch. A drive pulley is installed to increase the speed range and 2 belts, one 1180, and the second 1320, so there is a pressure roller and two clutch pedals.
Materials
Tools
Step-by-step instructions for assembling a universal all-terrain vehicle with your own hands.
The first step was to weld a frame from a square professional pipe. Three types of wheels: from a walk-behind tractor, Ural motorcycle wheels and all-terrain YAK-40 aviation wheels on R-20 Porsche wheels. The hitch is lifted using a winch.
Converted into an all-terrain vehicle.
Mower for tractor from chainsaw "Friendship"
To mow the grass, wheels from a Ural motorcycle are installed on the tractor. The mower is driven by a belt drive, and the shaft transmits torque to the tire with a chain and the grass is evenly mowed. All-terrain vehicle testing.
Preparing for work
At the beginning of the row, in the middle, we install a winch, driving in two metal rods for fixation. An assistant manually unwinds the cable to the required length. Using the hub, two shafts are connected, then we turn on the grinder - and the unit begins to work.
When hilling, you only need to slightly direct the plow to the left or right, adjusting the position of the hiller in the row. The plow also needs to be adjusted when plowing, although most of the work is done for you by the wheel in the furrow in front of the plow.
Now hilling and plowing takes much less time and effort, although, making the same winch again, I would correct a few things, making the design smaller. And so the plans include painting and modification of this winch, but even now it copes with its task perfectly.
Advantages of a homemade winch
According to the survey, few people find a suitable traction mechanism in stores or other trading platforms. Most people do it themselves, using scrap materials and standard publicly available parts.
As a rule, the design of a homemade winch is very simple and consists of a rigid frame, a motor (usually a three-phase one is used), an upper shaft (transmits engine power to the drum that winds the rope) and a lower shaft (affects the gear ratio of the device). It is distinguished by increased traction force with a fairly low weight; it can be part of a cargo scooter that reaches speeds of up to 40 km/h.
Features of the plowing winch:
Structure and types of plows
To make a plow with your own hands, you need to have information about its structure and the purpose of its parts. General purpose arable implements are most often used. It consists of several parts, which can be divided into working and auxiliary:
- workers:
- body - consists of a stand to which a ploughshare with a blade and a field board are attached;
- knife - the main cutting part;
- skimmer - an additional cutting part that cuts the turf layer of soil;
General purpose plow design
How does this plow work? The skimmer removes the top layer of soil with plants growing on it, turns it over and places it at the bottom of the furrow, which is the result of the work of the body. The body with the equipment cuts off part of the soil from the side of the furrow, loosens it, turns it around a certain angle (depending on the design), and lays it on top of an inverted layer of turf (laid with a skimmer). To level the furrow wall, a knife is placed in front of the last plow body.
General purpose plows can provide a plowing depth of 20 cm to 30 cm, plowshares - from 16 cm (they also do not have a knife and skimmer).
MOTOR BLOCK: STAND OR MOVE?
Many who, believing the advertisement, bought a walk-behind tractor, are now converting it to a walk-behind winch using their motors. My neighbor, who has a homemade mini-tractor, has already made seven winches for all his relatives, two of which he sent to neighboring regions. He gave his first winch to his brother living in Perm about eight years ago. This was the only winch that had lugs on the front and rear of the frame. Perhaps it served as a model for the winch of the Perm students, who, by the way, made two big mistakes. The first is that they made the lugs in the front part of the frame, forgetting that when the cable is tensioned, a tipping moment appears. This does not make it possible to use the full power of the motor, and working on such a winch is unsafe. It happened that when plowing virgin soil, such a winch lifted a person standing on the back of the frame and threw it over the winch. Therefore, the lugs need to be installed only on the back of the frame, preferably hinged: it is more convenient to deepen them, and working with a winch will be completely safe. The person operating the winch will stand on the lugs, deepening them with their weight, which makes it possible to triple the traction force.
The second mistake is that they made the plow single-wheeled with control handles. It is inconvenient to roll it to the beginning of the furrow, and it is impossible to start the furrow from the obstacle itself (fence, building, greenhouse, etc.): the control handles get in the way. Moreover, two people must plow such a plow.
The plow must be made with two wheels: such a furrow “holds” itself, exactly copying the one previously traversed. There is practically no need to operate it, it is more convenient and easier to roll it to the beginning of the furrow, it allows you to start the furrow from the obstacle itself, and then one person can plow the winch.
Now I have three motor winches. The latter design is extremely successful: it plows, harrows, hills up potatoes, loosens rows even with closed tops, allows you to plant potatoes “under the plow”, cultivate slopes of any steepness, serves as a load-lifting device, works with any cultivator, and clears forests.
In addition to all this, it (which is especially valuable) can transport a load of up to 500 kg at a speed of up to 40 km/h. The traffic police allows you to drive it on all roads without restrictions.
My motorized winch is designed extremely simply. It has two frames - main and additional. The main one is the front fork of the motorcycle, on which the engine, gas tank, drum with cable and engine controls are installed. An additional frame serves to stabilize the winch. An anchor with two legs is hinged on it —
lugs similar to bayonet shovels. The additional frame is attached to the main frame with four bolts. In its front part there are two limiting rollers for the cable in case the winch is installed at an angle to the furrow line.
To turn the winch into a vehicle, the drum is removed, the additional frame is disconnected along with the anchor, the rear wheel from a scooter (“Tula”, “Tourist” or “Tulitsa”) is installed in the main fork frame, and then the main frame is attached to the two-wheeled one with a pivot bolt trolley: it turns out to be a three-wheeled front-wheel drive motorized trolley, similar to a cargo scooter.
Since the wheel sprocket of Tula scooters is twice as large as that of the Electron scooter, the speed of the trolley decreased by 2 times.
Interestingly, the bogie's steering column is moved back from the main frame; The fork frame together with the motor rotates 100° in both directions, which allows the trolley to turn 360° on the spot without going beyond its dimensions (so it does not need reverse gear).
Note that the engine, tank, driver and passenger are located above the drive wheel, and the rear wheels of the cart are offset back from the center of the body. This increases the load on the drive wheel, while its grip on the road is simply excellent. The body of the cart is wooden, with dimensions of 1.5X1.3X0.3 m. The frame of the cart is tubular, the wheels are from an Electron scooter.
Converting a motorized cart into a motorized winch is done in the reverse order.
Many have already become convinced of the undeniable advantages of a motorized winch-trolley over walk-behind tractors and mini-tractors. A trolley winch is ideally suited for a rural farmstead - a universal, productive and inexpensive technique. I made my unit from a used Electron scooter, bought for only 50 rubles; Thus, it cost me half as much as a bicycle, 22 times as much as a walk-behind tractor, and 120 times as much as a mini-tractor!
G. ODEGOV, Nizhny Tagil, Sverdlovsk region.
Electric plow - purpose and principle of operation
Often, a plow is used in tandem with an electric winch, which significantly increases its performance. Its principle of operation is quite simple: a traction structure is installed on one edge of the site, and a cultivator or plow attached to it on the other. Switching on: the trailing mechanism begins to pull towards it, switching off – it moves to a new row and the process repeats.
You can buy a plow for a winch in almost any specialized store, but you can also make it yourself. To do this, it will be enough to correctly measure the angles of the share (the optimal indicator relative to the field board is 20°-25° and 45° relative to the center line) and take a solid base (channel, for example). Often, for the stability of the structure, a 4 mm metal strip is welded into the middle, which will protect the plow from damage when it hits boulders.
Buy only high-quality traction mechanisms from trusted manufacturers. Basically, for self-assembly, electric plows are used from the Polish companies Dragon Winch and Husar. They are quite resistant to loads and do not require significant maintenance. However, during operation it should be remembered that the traction force directly depends on the length of the cable: the more turns there are on the drum, the less weight the winch can pull and vice versa.
Winch for plowing or how to plant potatoes correctly
With the onset of spring, almost every landowner breaks out in a cold sweat. Again, regular cultivation of the vegetable garden, garden, planting potatoes and various crops, which requires a lot of time and effort. Based on this, some people think about how to significantly simplify their lot in this whole process, others purposefully choose a faithful and irreplaceable assistant - a winch.
Advantages of a homemade winch
According to the survey, few people find a suitable traction mechanism in stores or other trading platforms. Most people do it themselves, using scrap materials and standard publicly available parts.
As a rule, the design of a homemade winch is very simple and consists of a rigid frame, a motor (usually a three-phase one is used), an upper shaft (transmits engine power to the drum that winds the rope) and a lower shaft (affects the gear ratio of the device). It is distinguished by increased traction force with a fairly low weight; it can be part of a cargo scooter that reaches speeds of up to 40 km/h.
Features of the plowing winch:
- High traction power;
- Wide scope of application;
- Powered by both internal combustion engines and electric ones;
- Long period of operation;
- Ease of dismantling;
- Maintains soil fertility;
- Effective hilling of cultivated plants;
- Safe and environmentally friendly use;
- Cost-effective mechanism;
- Almost silent in operation.
Electric plow - purpose and principle of operation
Often, a plow is used in tandem with an electric winch, which significantly increases its performance.
Its principle of operation is quite simple: a traction structure is installed on one edge of the site, and a cultivator or plow attached to it with a cable is installed on the other.
Switching on: the trailing mechanism begins to pull towards it, switching off – it moves to a new row and the process repeats.
You can buy a plow for a winch in almost any specialized store, but you can also make it yourself.
To do this, it will be enough to correctly measure the angles of the share (the optimal indicator relative to the field board is 20°-25° and 45° relative to the center line) and take a solid base (channel, for example).
Often, for the stability of the structure, a 4 mm metal strip is welded into the middle, which will protect the plow from damage when it hits boulders.
WE RECOMMEND!
Buy only high-quality traction mechanisms from trusted manufacturers. Basically, for manual assembly of an electric plow, ATV winches from the Polish companies Dragon Winch and Husar are used.
They are quite resistant to loads and do not require significant maintenance.
However, during operation it should be remembered that the traction force directly depends on the length of the cable: the more turns there are on the drum, the less weight the winch can pull and vice versa.
| Winch ATV Dragon Winch DWH 3000 HD | Winch ATV Husar BST 3000 LBS |
No less popular mechanisms for quickly plowing land are walk-behind tractors. These devices come in three types: light, medium and heavy. Basically, the last two are used in gardening activities, the main feature of which is the presence of rear-wheel drive.
Walk-behind tractors are suitable for use on large areas (up to 0.5 hectares), have a load-resistant engine with a power of up to 30 hp, and are easily attached to additional equipment. However, like most electrically powered devices, they have their own pros and cons.
Advantages of a mini tractor:
- possibility of attaching a plow or trailer;
- wide range of uses;
- multifunctionality at work;
- lightweight and easy to use;
- does not require a large supply of fuel.
Disadvantages of the walk-behind tractor:
- low productivity;
- large dimensions;
- inconvenience in transportation.
Agricultural winch or walk-behind tractor – which is better?
| Process | Winch | Walk-behind tractor |
| Planting potatoes | Occurs using the classic method without damaging the product. | It can significantly “harm” the vegetable (cut it, mash it). |
| Loosening (harrowing) | Effectively pulls the plow at almost any speed from the other side of the site. | Quite inconvenient: the soil is heavily compacted by repeatedly moving over the planted potatoes. |
| Hilling up potatoes | It is not difficult to adjust the row spacing. | Complex types of tillage are used, which significantly damage the organic crop. |
| Digging up potatoes | An ordinary hiller is used. | A weapon with greater power is used. |
| Plowing the land | Multifunctional: it will loosen the soil both in a greenhouse and in the open air. Leaves no weeds. | Used exclusively in the garden. The wrong choice of cutters can lead to the disappearance of earthworms. |
| Earth compaction | Absent: all forces are devoted to plowing with a plow. | Compacts well. |
Back
Walk-behind tractor - pros and cons
No less popular mechanisms for quickly plowing land are walk-behind tractors. These devices come in three types: light, medium and heavy. Basically, the last two are used in gardening activities, the main feature of which is the presence of rear-wheel drive.
Walk-behind tractors are suitable for use on large areas (up to 0.5 hectares), have a load-resistant engine with a power of up to 30 hp, and are easily attached to additional equipment. However, like most electrically powered devices, they have their own pros and cons.
Source
| In our city and surrounding area, the motorized winch has long replaced walk-behind tractors and mini-tractors. |
Do-it-yourself motorized winch for plowing. Homemade winch for plowing land
At home I had an old, dusty and oily 4-40 worm gearbox with a reduction ratio of 1:40, which served as the basis for the winch. This, by the way, can be found at a flea market for a low price and in good condition.
Having completely disassembled it and washed it in gasoline to remove oil deposits, which looked more like black plasticine, I decided to immediately change the seals. As a replacement, I used oil seals from a VAZ family car. I changed all the gaskets (replacement ones were cut out of paronite 0.6 mm thick), and adjusted the gap between the worm and the gear. I filled in the transmission oil and the gearbox was like new.
To determine what size drum would be needed, I first welded a frame from a 40x40x4 mm angle piece measuring 75x30 cm.
Everything you need for this article is here >>>
At first I thought that the cable from the drum would be unwound using the engine reverse, but this turned out to be very time-consuming and inconvenient; manually it is much easier.
But for this it was necessary to come up with a coupling with which it would be possible to separate the gearbox shaft from the drum shaft and thereby unwind the cable effortlessly to the required length of the garden.
And while the winch is operating, I connect the gearbox to the drum, and both shafts work together.
Engine
This unit is the “heart” of the motorized winch, because it is on its shoulders that all the work and movement of the accompanying mechanisms falls. Of course, we won’t make it with our own hands (although if you really want to, it’s quite possible to make something similar), so we’ll take some kind of unit from a motorcycle.
The most suitable engines for such a device as a motorized winch are the engines from Minsk motorcycles. You can take the internal combustion engine from the Ural or Druzhba chainsaw - this is not fundamental. The only thing is that the engines from Minsk are more powerful, high-torque and start well at any time.
Also, when deciding how to make a motorized winch with your own hands, it should be noted that the minimum power of the power plant must be at least 3 horsepower. “Minsk” will serve as a visual aid. A do-it-yourself electric winch is made in the same way.
However, the performance of its engine will be much less high than that of gasoline units.
Walk-behind tractor - pros and cons
No less popular mechanisms for quickly plowing land are walk-behind tractors. These devices come in three types: light, medium and heavy. Basically, the last two are used in gardening activities, the main feature of which is the presence of rear-wheel drive.
Walk-behind tractors are suitable for use on large areas (up to 0.5 hectares), have a load-resistant engine with a power of up to 30 hp, and are easily attached to additional equipment. However, like most electrically powered devices, they have their own pros and cons.
Advantages of a mini tractor:
- possibility of attaching a plow or trailer;
- wide range of uses;
- multifunctionality at work;
- lightweight and easy to use;
- does not require a large supply of fuel.
Disadvantages of the walk-behind tractor:
- low productivity;
- large dimensions;
- inconvenience in transportation.